<?xml version="1.0" encoding="UTF-8"?><rss version="2.0"
	xmlns:content="http://purl.org/rss/1.0/modules/content/"
	xmlns:wfw="http://wellformedweb.org/CommentAPI/"
	xmlns:dc="http://purl.org/dc/elements/1.1/"
	xmlns:atom="http://www.w3.org/2005/Atom"
	xmlns:sy="http://purl.org/rss/1.0/modules/syndication/"
	xmlns:slash="http://purl.org/rss/1.0/modules/slash/"
	>

<channel>
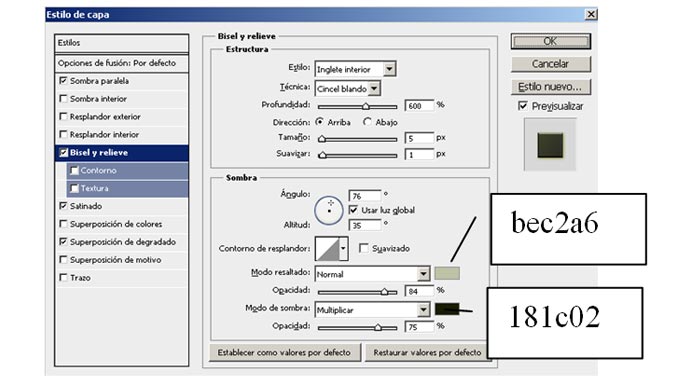
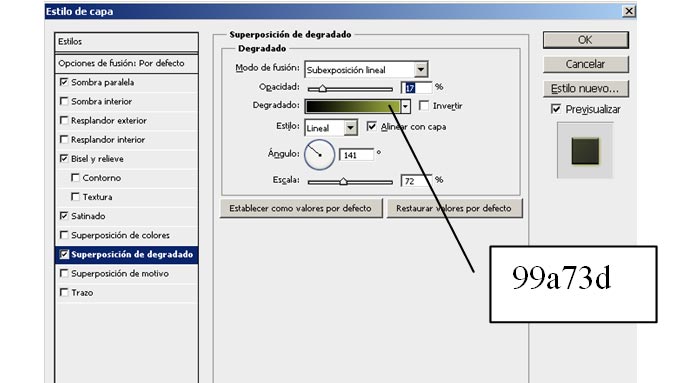
	<title>estilos | Ildefonso Segura</title>
	<atom:link href="https://ildefonsosegura.es/tag/estilos-2/feed/" rel="self" type="application/rss+xml" />
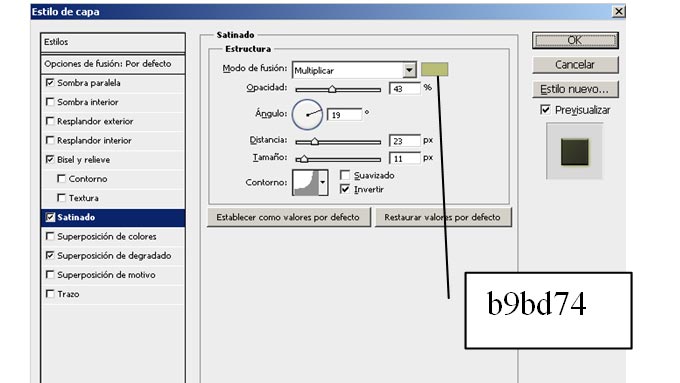
	<link>https://ildefonsosegura.es</link>
	<description>Tutoriales de diseño y animación</description>
	<lastBuildDate>Sun, 11 Jun 2023 17:44:05 +0000</lastBuildDate>
	<language>es</language>
	<sy:updatePeriod>
	hourly	</sy:updatePeriod>
	<sy:updateFrequency>
	1	</sy:updateFrequency>
	<generator>https://wordpress.org/?v=7.1.2</generator>

<image>
	<url>https://ildefonsosegura.es/wp-content/uploads/cropped-Favicon-new-logo-website-32x32.png</url>
	<title>estilos | Ildefonso Segura</title>
	<link>https://ildefonsosegura.es</link>
	<width>32</width>
	<height>32</height>
</image> 
	<item>
		<title>#Tutorial #Photoshop texto estilo globo, plástico, látex by @ildefonsosegura (incluye editable psd con estilo)</title>
		<link>https://ildefonsosegura.es/tutorial-photoshop-texto-estilo-globo-by-ildefonsosegura-incluye-editable/</link>
					<comments>https://ildefonsosegura.es/tutorial-photoshop-texto-estilo-globo-by-ildefonsosegura-incluye-editable/#respond</comments>
		
		<dc:creator><![CDATA[Ildefonso Segura]]></dc:creator>
		<pubDate>Tue, 30 Jul 2019 10:00:06 +0000</pubDate>
				<category><![CDATA[Editable]]></category>
		<category><![CDATA[Estilos]]></category>
		<category><![CDATA[Photoshop]]></category>
		<category><![CDATA[Tecnicas]]></category>
		<category><![CDATA[Textos]]></category>
		<category><![CDATA[Tutorial Escrito]]></category>
		<category><![CDATA[Tutoriales]]></category>
		<category><![CDATA[capas]]></category>
		<category><![CDATA[descarga]]></category>
		<category><![CDATA[editable]]></category>
		<category><![CDATA[efecto]]></category>
		<category><![CDATA[efectos]]></category>
		<category><![CDATA[estilo]]></category>
		<category><![CDATA[estilos]]></category>
		<category><![CDATA[fondo]]></category>
		<category><![CDATA[fusion]]></category>
		<category><![CDATA[globo]]></category>
		<category><![CDATA[gloriasanis]]></category>
		<category><![CDATA[ildefonso]]></category>
		<category><![CDATA[ildefonsosegura]]></category>
		<category><![CDATA[latex]]></category>
		<category><![CDATA[material]]></category>
		<category><![CDATA[materiales]]></category>
		<category><![CDATA[photoshop]]></category>
		<category><![CDATA[plastico]]></category>
		<category><![CDATA[style]]></category>
		<category><![CDATA[text]]></category>
		<category><![CDATA[texto]]></category>
		<category><![CDATA[textura]]></category>
		<category><![CDATA[tuto]]></category>
		<category><![CDATA[tutorial]]></category>
		<category><![CDATA[youtube]]></category>
		<guid isPermaLink="false">http://ildefonsosegura.es/?p=2945</guid>

					<description><![CDATA[<p>Con este tutorial aprenderemos a usar los estilos de capa para emular un efecto de material de globo, plástico o latex. Si usas variaciones sencillas del ejemplo, puedes conseguir otros efectos que harán que el texto parezca otro material. En cualquier caso, abajo te dejo el editable, estilo y la fuente para que puedas tener [&#8230;]</p>
La entrada <a href="https://ildefonsosegura.es/tutorial-photoshop-texto-estilo-globo-by-ildefonsosegura-incluye-editable/">#Tutorial #Photoshop texto estilo globo, plástico, látex by @ildefonsosegura (incluye editable psd con estilo)</a> apareció primero en <a href="https://ildefonsosegura.es">Ildefonso Segura</a>.]]></description>
										<content:encoded><![CDATA[<div data-elementor-type="wp-post" data-elementor-id="2945" class="elementor elementor-2945">
						<section class="elementor-section elementor-top-section elementor-element elementor-element-70f89c23 elementor-section-boxed elementor-section-height-default elementor-section-height-default" data-id="70f89c23" data-element_type="section" data-e-type="section">
						<div class="elementor-container elementor-column-gap-default">
					<div class="elementor-column elementor-col-100 elementor-top-column elementor-element elementor-element-2387411d" data-id="2387411d" data-element_type="column" data-e-type="column">
			<div class="elementor-widget-wrap elementor-element-populated">
						<div class="elementor-element elementor-element-1905c002 elementor-widget elementor-widget-text-editor" data-id="1905c002" data-element_type="widget" data-e-type="widget" data-widget_type="text-editor.default">
				<div class="elementor-widget-container">
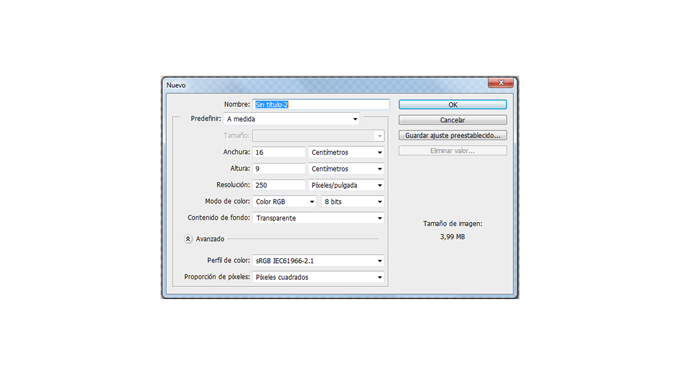
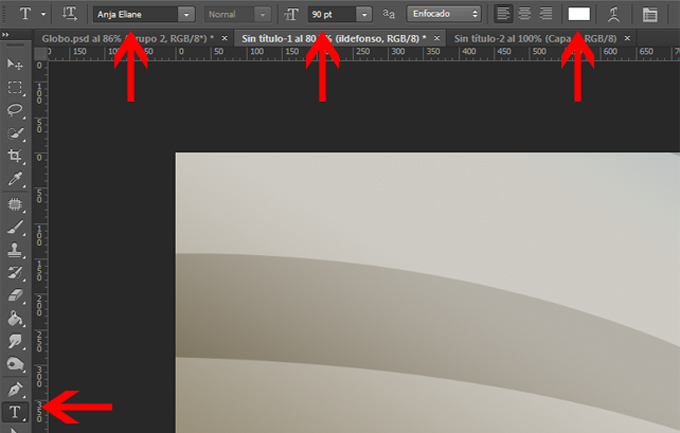
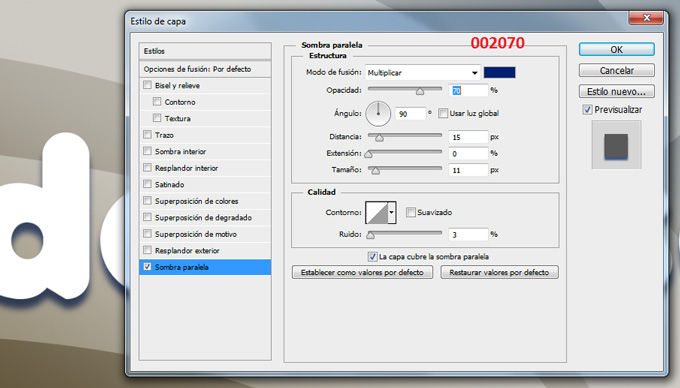
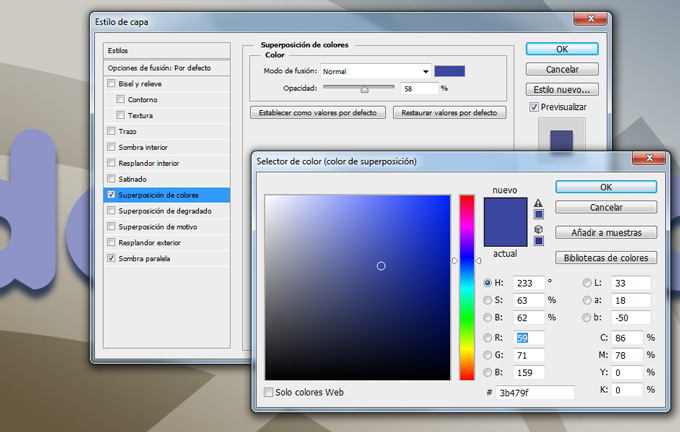
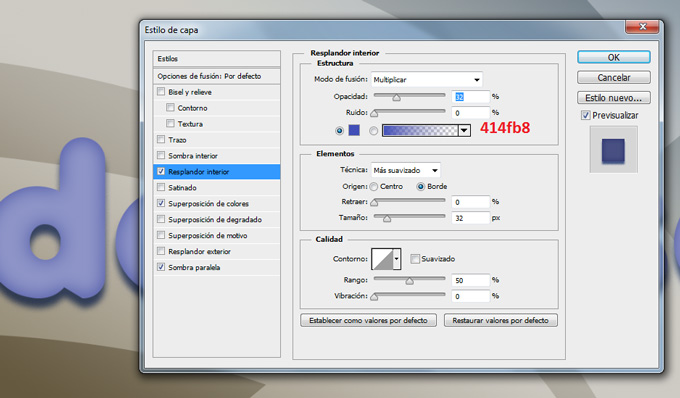
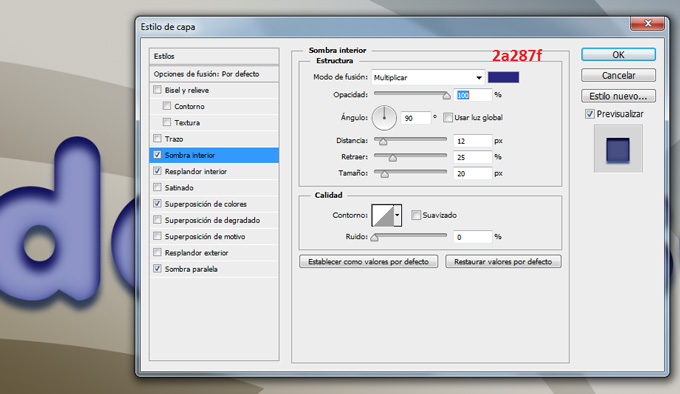
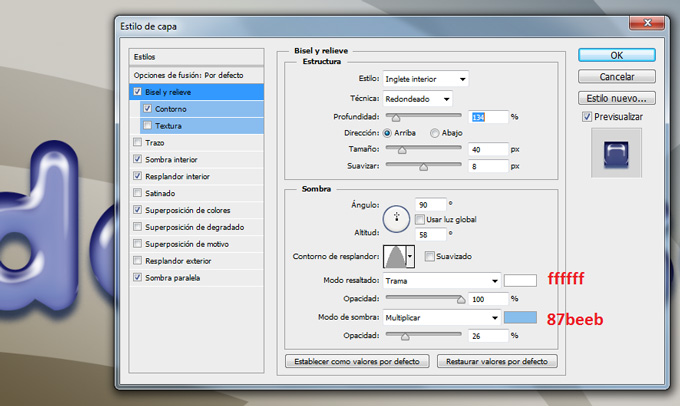
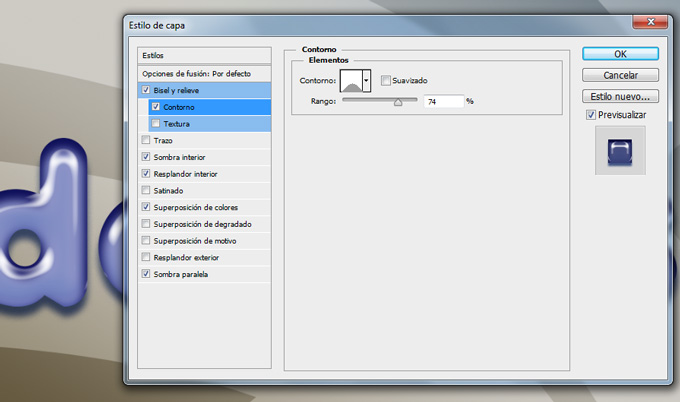
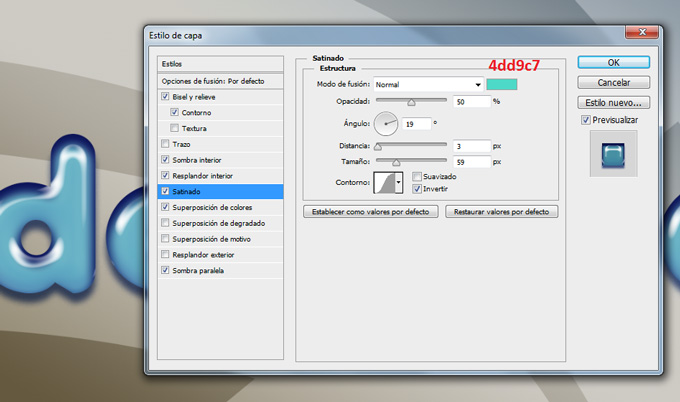
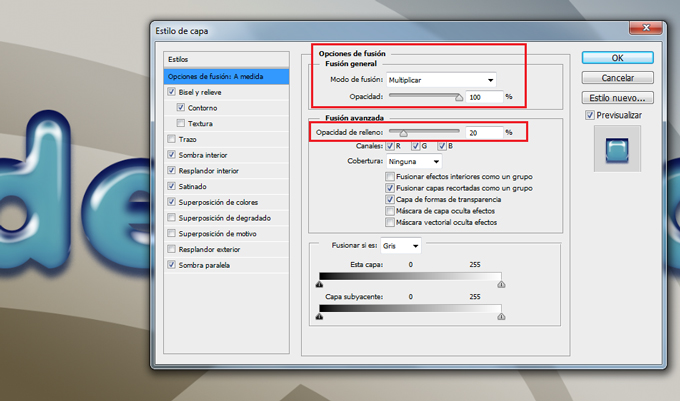
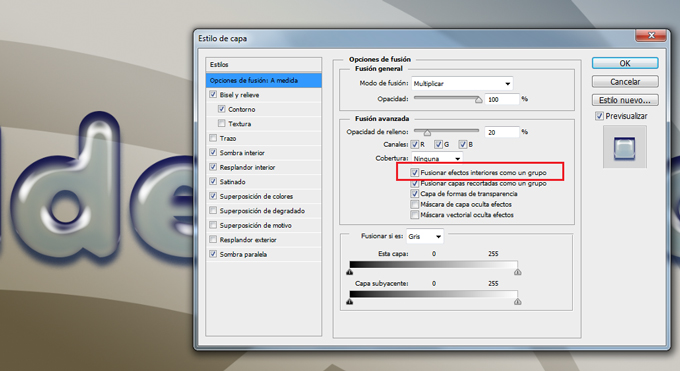
									<p><a href="https://ildefonsosegura.es/tutorial-photoshop-texto-estilo-globo-by-ildefonsosegura-incluye-editable/globo-15/" rel="attachment wp-att-2960"><img fetchpriority="high" decoding="async" class="aligncenter" src="https://ildefonsosegura.es/wp-content/uploads/globo-15.jpg" alt="globo-15" width="680" height="383" /></a></p><p>Con este tutorial aprenderemos a usar los estilos de capa para emular un efecto de material de globo, plástico o latex. Si usas variaciones sencillas del ejemplo, puedes conseguir otros efectos que harán que el texto parezca otro material. En cualquier caso, abajo te dejo el <strong>editable</strong>, estilo y la fuente para que puedas tener el efecto sin necesidad de crearlo.</p><p> </p><p>1.- Abre un nuevo canvas de trabajo con una resolución de 250 ppp. Yo usé un tamaño en cm de 16:9 (wide screen)</p><p><a href="https://ildefonsosegura.es/tutorial-photoshop-texto-estilo-globo-by-ildefonsosegura-incluye-editable/globo-1/" rel="attachment wp-att-2946"><img decoding="async" class="size-full wp-image-2946 aligncenter" src="https://ildefonsosegura.es/wp-content/uploads/globo-1.jpg" alt="globo-1" width="680" height="383" srcset="https://ildefonsosegura.es/wp-content/uploads/globo-1.jpg 680w, https://ildefonsosegura.es/wp-content/uploads/globo-1-300x168.jpg 300w" sizes="(max-width: 680px) 100vw, 680px" /></a></p><p> </p><p>2.- Pon un fondo que tu elijas. Yo usé uno creado por mi sencillo</p><p><a href="https://ildefonsosegura.es/tutorial-photoshop-texto-estilo-globo-by-ildefonsosegura-incluye-editable/globo-2/" rel="attachment wp-att-2947"><img decoding="async" class="size-full wp-image-2947 aligncenter" src="https://ildefonsosegura.es/wp-content/uploads/globo-2.jpg" alt="globo-2" width="680" height="383" srcset="https://ildefonsosegura.es/wp-content/uploads/globo-2.jpg 680w, https://ildefonsosegura.es/wp-content/uploads/globo-2-300x168.jpg 300w" sizes="(max-width: 680px) 100vw, 680px" /></a></p><p>3.- Selecciona la herramienta texto de la barra de herramientas. Usa la fuente Anja con color blanco ffffff y tamaño aproximadamente 90 px</p><p><a href="https://ildefonsosegura.es/tutorial-photoshop-texto-estilo-globo-by-ildefonsosegura-incluye-editable/globo-3/" rel="attachment wp-att-2948"><img loading="lazy" decoding="async" class="size-full wp-image-2948 aligncenter" src="https://ildefonsosegura.es/wp-content/uploads/globo-3.jpg" alt="globo-3" width="680" height="433" srcset="https://ildefonsosegura.es/wp-content/uploads/globo-3.jpg 680w, https://ildefonsosegura.es/wp-content/uploads/globo-3-300x191.jpg 300w" sizes="(max-width: 680px) 100vw, 680px" /></a></p><p>4.- Escribe tu texto</p><p><a href="https://ildefonsosegura.es/tutorial-photoshop-texto-estilo-globo-by-ildefonsosegura-incluye-editable/globo-4/" rel="attachment wp-att-2949"><img loading="lazy" decoding="async" class="size-full wp-image-2949 aligncenter" src="https://ildefonsosegura.es/wp-content/uploads/globo-4.jpg" alt="globo-4" width="680" height="383" srcset="https://ildefonsosegura.es/wp-content/uploads/globo-4.jpg 680w, https://ildefonsosegura.es/wp-content/uploads/globo-4-300x168.jpg 300w" sizes="(max-width: 680px) 100vw, 680px" /></a></p><p>5.- Haz clic derecho en la capa de texto y selecciona OPCIONES DE FUSION. Comienza seleccionando SOMBRA PARALELA</p><p><a href="https://ildefonsosegura.es/tutorial-photoshop-texto-estilo-globo-by-ildefonsosegura-incluye-editable/globo-5/" rel="attachment wp-att-2950"><img loading="lazy" decoding="async" class="size-full wp-image-2950 aligncenter" src="https://ildefonsosegura.es/wp-content/uploads/globo-5.jpg" alt="globo-5" width="680" height="388" srcset="https://ildefonsosegura.es/wp-content/uploads/globo-5.jpg 680w, https://ildefonsosegura.es/wp-content/uploads/globo-5-300x171.jpg 300w" sizes="(max-width: 680px) 100vw, 680px" /></a></p><p>6.- Continuamos con SUPERPOSICION DE COLORES buscando un tono azul</p><p><a href="https://ildefonsosegura.es/tutorial-photoshop-texto-estilo-globo-by-ildefonsosegura-incluye-editable/globo-6/" rel="attachment wp-att-2951"><img loading="lazy" decoding="async" class="size-full wp-image-2951 aligncenter" src="https://ildefonsosegura.es/wp-content/uploads/globo-6.jpg" alt="globo-6" width="680" height="432" srcset="https://ildefonsosegura.es/wp-content/uploads/globo-6.jpg 680w, https://ildefonsosegura.es/wp-content/uploads/globo-6-300x190.jpg 300w" sizes="(max-width: 680px) 100vw, 680px" /></a></p><p>7.- Aplicamos ahora la variable RESPLANDOR INTERIOR</p><p><a href="https://ildefonsosegura.es/tutorial-photoshop-texto-estilo-globo-by-ildefonsosegura-incluye-editable/globo-7/" rel="attachment wp-att-2952"><img loading="lazy" decoding="async" class="size-full wp-image-2952 aligncenter" src="https://ildefonsosegura.es/wp-content/uploads/globo-7.jpg" alt="globo-7" width="680" height="398" srcset="https://ildefonsosegura.es/wp-content/uploads/globo-7.jpg 680w, https://ildefonsosegura.es/wp-content/uploads/globo-7-300x175.jpg 300w" sizes="(max-width: 680px) 100vw, 680px" /></a></p><p>8.- A continuación le damos SOMBRA INTERIOR</p><p><a href="https://ildefonsosegura.es/tutorial-photoshop-texto-estilo-globo-by-ildefonsosegura-incluye-editable/globo-8/" rel="attachment wp-att-2953"><img loading="lazy" decoding="async" class="size-full wp-image-2953 aligncenter" src="https://ildefonsosegura.es/wp-content/uploads/globo-8.jpg" alt="globo-8" width="680" height="394" srcset="https://ildefonsosegura.es/wp-content/uploads/globo-8.jpg 680w, https://ildefonsosegura.es/wp-content/uploads/globo-8-300x173.jpg 300w" sizes="(max-width: 680px) 100vw, 680px" /></a></p><p>9.- Nos situamos en BISEL Y RELIEVE dándole unos valores como sigue:</p><p><a href="https://ildefonsosegura.es/tutorial-photoshop-texto-estilo-globo-by-ildefonsosegura-incluye-editable/globo-9/" rel="attachment wp-att-2954"><img loading="lazy" decoding="async" class="size-full wp-image-2954 aligncenter" src="https://ildefonsosegura.es/wp-content/uploads/globo-9.jpg" alt="globo-9" width="680" height="406" srcset="https://ildefonsosegura.es/wp-content/uploads/globo-9.jpg 680w, https://ildefonsosegura.es/wp-content/uploads/globo-9-300x179.jpg 300w" sizes="(max-width: 680px) 100vw, 680px" /></a></p><p>10.- Dentro de bisel y relieve seleccionamos CONTORNO</p><p><a href="https://ildefonsosegura.es/tutorial-photoshop-texto-estilo-globo-by-ildefonsosegura-incluye-editable/globo-10/" rel="attachment wp-att-2955"><img loading="lazy" decoding="async" class="size-full wp-image-2955 aligncenter" src="https://ildefonsosegura.es/wp-content/uploads/globo-10.jpg" alt="globo-10" width="680" height="402" srcset="https://ildefonsosegura.es/wp-content/uploads/globo-10.jpg 680w, https://ildefonsosegura.es/wp-content/uploads/globo-10-300x177.jpg 300w" sizes="(max-width: 680px) 100vw, 680px" /></a></p><p> </p><p>11.- Casi finalizando aplicamos SATINADO</p><p><a href="https://ildefonsosegura.es/tutorial-photoshop-texto-estilo-globo-by-ildefonsosegura-incluye-editable/globo-11/" rel="attachment wp-att-2956"><img loading="lazy" decoding="async" class="size-full wp-image-2956 aligncenter" src="https://ildefonsosegura.es/wp-content/uploads/globo-11.jpg" alt="globo-11" width="680" height="402" srcset="https://ildefonsosegura.es/wp-content/uploads/globo-11.jpg 680w, https://ildefonsosegura.es/wp-content/uploads/globo-11-300x177.jpg 300w" sizes="(max-width: 680px) 100vw, 680px" /></a></p><p>12.- Hasta aquí ya tendríamos un efecto de texto de globo bastante aceptable.</p><p><a href="https://ildefonsosegura.es/tutorial-photoshop-texto-estilo-globo-by-ildefonsosegura-incluye-editable/globo-12/" rel="attachment wp-att-2957"><img loading="lazy" decoding="async" class="size-full wp-image-2957 aligncenter" src="https://ildefonsosegura.es/wp-content/uploads/globo-12.jpg" alt="globo-12" width="680" height="383" srcset="https://ildefonsosegura.es/wp-content/uploads/globo-12.jpg 680w, https://ildefonsosegura.es/wp-content/uploads/globo-12-300x168.jpg 300w" sizes="(max-width: 680px) 100vw, 680px" /></a></p><p>13.- En las opciones de fusión vamos a cambiar variables tanto de la sección de FUSION GENERAL como de FUSION AVANZADA</p><p>En la fusión general cambiaremos el tipo de fusión de capa a MULIPLICAR. En la fusión avanzada cambiaremos el porcentaje de relleno al 20%</p><p><a href="https://ildefonsosegura.es/tutorial-photoshop-texto-estilo-globo-by-ildefonsosegura-incluye-editable/globo-13/" rel="attachment wp-att-2958"><img loading="lazy" decoding="async" class="size-full wp-image-2958 aligncenter" src="https://ildefonsosegura.es/wp-content/uploads/globo-13.jpg" alt="globo-13" width="680" height="401" srcset="https://ildefonsosegura.es/wp-content/uploads/globo-13.jpg 680w, https://ildefonsosegura.es/wp-content/uploads/globo-13-300x176.jpg 300w" sizes="(max-width: 680px) 100vw, 680px" /></a></p><p> </p><p>14.- Para conseguir mayor transparencia en el texto seleccionaremos una variable dentro de la FUSIÓN AVANZADA que no he visto en ningún tutorial. Esa opción es FUSIONAR EFECTOS INTERIORES COMO UN GRUPO. Con esta opción seleccionada lo que se hace es fusionar los efectos de «resplandor interior», «satinado» y «superposición» con la capa antes de fusionarlos con el documento. Todas las opciones de fusión se fusionan con el documento y en función del contenido de las otras capas el resultado de las variables es diferente. Si tienes esta opción de FUSIONAR EFECTOS INTERIORES COMO UN GRUPO, los efectos interactuan con el contenido de la capa y no con el resto de capas.</p><p><a href="https://ildefonsosegura.es/tutorial-photoshop-texto-estilo-globo-by-ildefonsosegura-incluye-editable/globo-14/" rel="attachment wp-att-2959"><img loading="lazy" decoding="async" class="size-full wp-image-2959 aligncenter" src="https://ildefonsosegura.es/wp-content/uploads/globo-14.jpg" alt="globo-14" width="680" height="371" srcset="https://ildefonsosegura.es/wp-content/uploads/globo-14.jpg 680w, https://ildefonsosegura.es/wp-content/uploads/globo-14-300x163.jpg 300w" sizes="(max-width: 680px) 100vw, 680px" /></a></p><p>15.- Así el resultado es el siguiente que íbamos buscando:</p><p><a href="https://ildefonsosegura.es/tutorial-photoshop-texto-estilo-globo-by-ildefonsosegura-incluye-editable/globo-15/" rel="attachment wp-att-2960"><img loading="lazy" decoding="async" class="size-full wp-image-2960 aligncenter" src="https://ildefonsosegura.es/wp-content/uploads/globo-15.jpg" alt="globo-15" width="680" height="383" srcset="https://ildefonsosegura.es/wp-content/uploads/globo-15.jpg 680w, https://ildefonsosegura.es/wp-content/uploads/globo-15-300x168.jpg 300w" sizes="(max-width: 680px) 100vw, 680px" /></a></p><p> </p><p> </p>								</div>
				</div>
					</div>
		</div>
					</div>
		</section>
				<section class="elementor-section elementor-top-section elementor-element elementor-element-1272db76 elementor-section-full_width elementor-section-height-default elementor-section-height-default" data-id="1272db76" data-element_type="section" data-e-type="section">
						<div class="elementor-container elementor-column-gap-default">
					<div class="elementor-column elementor-col-50 elementor-top-column elementor-element elementor-element-1834e7b8" data-id="1834e7b8" data-element_type="column" data-e-type="column">
			<div class="elementor-widget-wrap elementor-element-populated">
						<div class="elementor-element elementor-element-5393f42d elementor-align-right elementor-invisible elementor-widget elementor-widget-button" data-id="5393f42d" data-element_type="widget" data-e-type="widget" data-settings="{&quot;_animation&quot;:&quot;shake&quot;}" data-widget_type="button.default">
				<div class="elementor-widget-container">
									<div class="elementor-button-wrapper">
					<a class="elementor-button elementor-button-link elementor-size-sm elementor-animation-grow" href="https://drive.google.com/open?id=0B_nJkCGJubucWFU4eTFhMzF1YVU">
						<span class="elementor-button-content-wrapper">
									<span class="elementor-button-text">BAJATE EL EDITABLE</span>
					</span>
					</a>
				</div>
								</div>
				</div>
					</div>
		</div>
				<div class="elementor-column elementor-col-50 elementor-top-column elementor-element elementor-element-726d94ee" data-id="726d94ee" data-element_type="column" data-e-type="column">
			<div class="elementor-widget-wrap elementor-element-populated">
						<div class="elementor-element elementor-element-38a200b6 elementor-widget elementor-widget-html" data-id="38a200b6" data-element_type="widget" data-e-type="widget" data-settings="{&quot;_animation&quot;:&quot;none&quot;}" data-widget_type="html.default">
				<div class="elementor-widget-container">
					<form action="https://www.paypal.com/cgi-bin/webscr" method="post" target="_blank">
<input type="hidden" name="cmd" value="_donations">
<input type="hidden" name="business" value="ildefonsosegura@gmail.com">
<input type="hidden" name="lc" value="ES">
<input type="hidden" name="item_name" value="MANTENIMIENTO DE LA PAGINA DE ILDEFONSOSEGURA">
<input type="hidden" name="no_note" value="0">
<input type="hidden" name="currency_code" value="EUR">
<input type="hidden" name="bn" value="PP-DonationsBF:paypal1.jpg:NonHostedGuest">
<input type="image" src="http://ildefonsosegura.es/wp-content/uploads/paypal-updated-1.png" border="0" name="submit" alt="PayPal. La forma rápida y segura de pagar en Internet.">
<img loading="lazy" decoding="async" alt="" border="0" src="https://www.paypalobjects.com/es_ES/i/scr/pixel.gif" width="1" height="1">
</form>				</div>
				</div>
					</div>
		</div>
					</div>
		</section>
				<section class="elementor-section elementor-top-section elementor-element elementor-element-29087141 elementor-section-boxed elementor-section-height-default elementor-section-height-default" data-id="29087141" data-element_type="section" data-e-type="section">
						<div class="elementor-container elementor-column-gap-default">
					<div class="elementor-column elementor-col-100 elementor-top-column elementor-element elementor-element-994285d" data-id="994285d" data-element_type="column" data-e-type="column">
			<div class="elementor-widget-wrap elementor-element-populated">
						<div class="elementor-element elementor-element-2089d69f elementor-widget elementor-widget-html" data-id="2089d69f" data-element_type="widget" data-e-type="widget" data-widget_type="html.default">
				<div class="elementor-widget-container">
					&nbsp;
<center><span style="color: #333333;"><strong>SUSCRÍBETE A MI CANAL DE YouTube</strong></span></center>&nbsp;
<div>
<div>
<div align="center">


<script src="https://apis.google.com/js/platform.js"></script>

<div class="g-ytsubscribe" data-channel="ildefonsosegura" data-layout="full" data-count="default"></div>
</div>
</div>
&nbsp;<p style="text-align: left;">No te lo pierdas y comparte tus trabajos en mi página de facebook (<span style="color: #ff0000;"><strong><a style="color: #ff0000;" href="http://www.facebook.com/IldefonsoSeguraPage" target="_blank" rel="noopener noreferrer">IldefonsoSeguraPage</a></strong></span>)</p>
Espero que te guste y compartas el vídeo. No dejes de compartir este post.
<p style="text-align: left;">Así es como me puedes ayudar 🙂 Gracias</p>

</div>				</div>
				</div>
					</div>
		</div>
					</div>
		</section>
				</div>La entrada <a href="https://ildefonsosegura.es/tutorial-photoshop-texto-estilo-globo-by-ildefonsosegura-incluye-editable/">#Tutorial #Photoshop texto estilo globo, plástico, látex by @ildefonsosegura (incluye editable psd con estilo)</a> apareció primero en <a href="https://ildefonsosegura.es">Ildefonso Segura</a>.]]></content:encoded>
					
					<wfw:commentRss>https://ildefonsosegura.es/tutorial-photoshop-texto-estilo-globo-by-ildefonsosegura-incluye-editable/feed/</wfw:commentRss>
			<slash:comments>0</slash:comments>
		
		
			</item>
		<item>
		<title>#Tutorial #Photoshop efecto cuasi sevesiano by @photoshopeando</title>
		<link>https://ildefonsosegura.es/tutorial-photoshop-efecto-cuasi-sevesiano-by-photoshopeando/</link>
					<comments>https://ildefonsosegura.es/tutorial-photoshop-efecto-cuasi-sevesiano-by-photoshopeando/#respond</comments>
		
		<dc:creator><![CDATA[Ildefonso Segura]]></dc:creator>
		<pubDate>Wed, 20 Nov 2013 12:57:20 +0000</pubDate>
				<category><![CDATA[Colaboradores]]></category>
		<category><![CDATA[Fotocomposición]]></category>
		<category><![CDATA[Photoshop]]></category>
		<category><![CDATA[Tecnicas]]></category>
		<category><![CDATA[Tutoriales]]></category>
		<category><![CDATA[Wallpaper]]></category>
		<category><![CDATA[alberto seveso]]></category>
		<category><![CDATA[carlos oliveras]]></category>
		<category><![CDATA[design]]></category>
		<category><![CDATA[efecto]]></category>
		<category><![CDATA[effect]]></category>
		<category><![CDATA[estilo]]></category>
		<category><![CDATA[estilos]]></category>
		<category><![CDATA[fondo]]></category>
		<category><![CDATA[fotos]]></category>
		<category><![CDATA[gloriasanis]]></category>
		<category><![CDATA[ildefonsosegura]]></category>
		<category><![CDATA[imagen]]></category>
		<category><![CDATA[motivos]]></category>
		<category><![CDATA[murall]]></category>
		<category><![CDATA[pattern]]></category>
		<category><![CDATA[photomanipulation]]></category>
		<category><![CDATA[photos]]></category>
		<category><![CDATA[photoshop]]></category>
		<category><![CDATA[photoshopeando]]></category>
		<category><![CDATA[poster]]></category>
		<category><![CDATA[seveso]]></category>
		<category><![CDATA[style]]></category>
		<category><![CDATA[tecnicas]]></category>
		<category><![CDATA[tutorial]]></category>
		<category><![CDATA[wallpaper]]></category>
		<guid isPermaLink="false">http://ildefonsosegura.es/?p=3253</guid>

					<description><![CDATA[<p>En mi intento de ayudar a que todos seamos conocedores de aquellos tutores que pueden añadir valor al conocimiento en la red y de forma gratuita, estoy dando la oportunidad a amigos que no son tan conocidos como se merecen dada su calidad técnica y docente para transmitirnos conocimientos. Mi canal otro pequeño canal de [&#8230;]</p>
La entrada <a href="https://ildefonsosegura.es/tutorial-photoshop-efecto-cuasi-sevesiano-by-photoshopeando/">#Tutorial #Photoshop efecto cuasi sevesiano by @photoshopeando</a> apareció primero en <a href="https://ildefonsosegura.es">Ildefonso Segura</a>.]]></description>
										<content:encoded><![CDATA[<div data-elementor-type="wp-post" data-elementor-id="3253" class="elementor elementor-3253">
						<section class="elementor-section elementor-top-section elementor-element elementor-element-6777161c elementor-section-boxed elementor-section-height-default elementor-section-height-default" data-id="6777161c" data-element_type="section" data-e-type="section">
						<div class="elementor-container elementor-column-gap-default">
					<div class="elementor-column elementor-col-100 elementor-top-column elementor-element elementor-element-205ebc45" data-id="205ebc45" data-element_type="column" data-e-type="column">
			<div class="elementor-widget-wrap elementor-element-populated">
						<div class="elementor-element elementor-element-4ef2406a elementor-widget elementor-widget-text-editor" data-id="4ef2406a" data-element_type="widget" data-e-type="widget" data-widget_type="text-editor.default">
				<div class="elementor-widget-container">
									<p>En mi intento de ayudar a que todos seamos conocedores de aquellos tutores que pueden añadir valor al conocimiento en la red y de forma gratuita, estoy dando la oportunidad a amigos que no son tan conocidos como se merecen dada su calidad técnica y docente para transmitirnos conocimientos. Mi canal otro pequeño canal de los miles que hay para transmitir algo de mi mismo. Quiero que la audiencia que pueda tener sea partícipe de lo que considero es formación de calidad de otros canales.</p><p><span style="color: #ff0000;"><strong>Carlos Oliveras</strong></span> (<a href="https://twitter.com/Photoshopeando" target="_blank" rel="noopener">Photoshopeando</a>) es responsable de este fantástico tutorial que he subido a mi canal en noviembre de 2013 y que intenta mostrar un resultado inspirado en el estilo del famoso <a href="http://burdu976.com/" target="_blank" rel="noopener">Alberto Seveso</a> (chequea <a href="http://burdu976.com/" target="_blank" rel="noopener">burdu976.com</a>).</p><p> </p><p>Muchos diréis que no es lo mismo y con razón pero nos ilustra como poder manipular una fotografía de una forma fácil intentando llegar a un resultado determinado. Despierta nuestra curiosidad por aprender técnicas y aplicar una dosis de creatividad a una imagen. Su resultado fue éste y es fantástico:</p><p><a href="https://ildefonsosegura.es/tutorial-photoshop-efecto-cuasi-sevesiano-by-photoshopeando/imagen-para-web/" rel="attachment wp-att-3254"><img loading="lazy" decoding="async" class="size-full wp-image-3254 aligncenter" src="https://ildefonsosegura.es/wp-content/uploads/imagen-para-web.jpg" alt="imagen para web" width="680" height="453" srcset="https://ildefonsosegura.es/wp-content/uploads/imagen-para-web.jpg 680w, https://ildefonsosegura.es/wp-content/uploads/imagen-para-web-300x199.jpg 300w" sizes="(max-width: 680px) 100vw, 680px" /></a></p><p>Gracias Carlos por tu tutorial y en especial el trabajo que realizas en tus redes. Si quereis encontrar a Carlos en Photoshopeando solo tienes que hacer clic en cualquiera de estos links:</p><ol><li><a href="http://www.photoshopeando.com/" target="_blank" rel="noopener">http://www.photoshopeando.com/</a></li><li><a href="http://www.youtube.com/user/photoshopeandotv" target="_blank" rel="noopener">http://www.youtube.com/user/photoshopeandotv</a></li><li><a href="https://twitter.com/#!/Photoshopeando" target="_blank" rel="noopener">https://twitter.com/#!/Photoshopeando</a></li><li><a href="http://www.facebook.com/Photoshopeando" target="_blank" rel="noopener">http://www.facebook.com/Photoshopeando</a></li></ol><p>Espero que te guste el tutorial</p><p> </p><p><span style="color: #800000;"><strong>TUTORIAL  </strong></span></p><center><iframe src="https://www.youtube.com/embed/6OZ8juzYuMM" width="640" height="420" frameborder="0" allowfullscreen="allowfullscreen"></iframe></center><p> </p><p> </p><p> </p>								</div>
				</div>
					</div>
		</div>
					</div>
		</section>
				<section class="elementor-section elementor-top-section elementor-element elementor-element-6b9d3be7 elementor-section-full_width elementor-section-height-default elementor-section-height-default" data-id="6b9d3be7" data-element_type="section" data-e-type="section">
						<div class="elementor-container elementor-column-gap-default">
					<div class="elementor-column elementor-col-100 elementor-top-column elementor-element elementor-element-57a9b1ca" data-id="57a9b1ca" data-element_type="column" data-e-type="column">
			<div class="elementor-widget-wrap elementor-element-populated">
						<div class="elementor-element elementor-element-401c0029 elementor-widget elementor-widget-text-editor" data-id="401c0029" data-element_type="widget" data-e-type="widget" data-widget_type="text-editor.default">
				<div class="elementor-widget-container">
									<div><div align="center"><center><strong style="color: #ff0000;">Suscríbete a mi canal de Youtube:</strong></center><div><div><div align="center"><p><script src="https://apis.google.com/js/platform.js"></script></p><div class="g-ytsubscribe" data-channel="ildefonsosegura" data-layout="full" data-count="default"> </div></div></div><p> </p><p style="text-align: center;">No te lo pierdas y comparte tus trabajos en mi página de facebook (<span style="color: #0000ff;"><strong><a style="color: #0000ff;" href="http://www.facebook.com/IldefonsoSeguraPage" target="_blank" rel="noopener noreferrer">IldefonsoSeguraPage</a></strong></span>)<br />Espero que te guste y compartas el vídeo. No dejes de compartir este post.</p><p style="text-align: center;">Así es como me puedes ayudar 🙂 Gracias</p></div></div></div>								</div>
				</div>
					</div>
		</div>
					</div>
		</section>
				</div>La entrada <a href="https://ildefonsosegura.es/tutorial-photoshop-efecto-cuasi-sevesiano-by-photoshopeando/">#Tutorial #Photoshop efecto cuasi sevesiano by @photoshopeando</a> apareció primero en <a href="https://ildefonsosegura.es">Ildefonso Segura</a>.]]></content:encoded>
					
					<wfw:commentRss>https://ildefonsosegura.es/tutorial-photoshop-efecto-cuasi-sevesiano-by-photoshopeando/feed/</wfw:commentRss>
			<slash:comments>0</slash:comments>
		
		
			</item>
		<item>
		<title>Tutorial Photoshop // Convierte tu logo en piedra, envejecelo y agrietalo</title>
		<link>https://ildefonsosegura.es/convierte-tu-logo-en-piedra-envejecelo-y-agrietalo-con-photoshop/</link>
					<comments>https://ildefonsosegura.es/convierte-tu-logo-en-piedra-envejecelo-y-agrietalo-con-photoshop/#respond</comments>
		
		<dc:creator><![CDATA[Ildefonso Segura]]></dc:creator>
		<pubDate>Thu, 03 Jan 2013 14:00:44 +0000</pubDate>
				<category><![CDATA[Efectos]]></category>
		<category><![CDATA[Estilos]]></category>
		<category><![CDATA[Photoshop]]></category>
		<category><![CDATA[PREMIUM]]></category>
		<category><![CDATA[Tecnicas]]></category>
		<category><![CDATA[Textos]]></category>
		<category><![CDATA[Tutorial Escrito]]></category>
		<category><![CDATA[Tutoriales]]></category>
		<category><![CDATA[Wallpaper]]></category>
		<category><![CDATA[capas]]></category>
		<category><![CDATA[envejecer]]></category>
		<category><![CDATA[estilos]]></category>
		<category><![CDATA[fondo]]></category>
		<category><![CDATA[gloriasanis]]></category>
		<category><![CDATA[ildefonsosegura]]></category>
		<category><![CDATA[máscara]]></category>
		<category><![CDATA[piedra]]></category>
		<category><![CDATA[roca]]></category>
		<category><![CDATA[text]]></category>
		<category><![CDATA[texto]]></category>
		<category><![CDATA[textura]]></category>
		<category><![CDATA[viejo]]></category>
		<category><![CDATA[wall]]></category>
		<category><![CDATA[wallpaper]]></category>
		<guid isPermaLink="false">http://ildefonsosegura.es/?p=2121</guid>

					<description><![CDATA[<p>En este tutorial trabajaremos un logotipo cualquiera para darle un efecto de piedra, lo envejeceremos y después lo agrietaremos para darle un aspecto mucho más longevo. Conseguiremos primero un wallpaper como este: Y posteriormente lo envejeceremos para conseguir este: Igualmente le podemos dar un color para hacerlo mucho más real comparándolo con el logo original [&#8230;]</p>



La entrada <a href="https://ildefonsosegura.es/convierte-tu-logo-en-piedra-envejecelo-y-agrietalo-con-photoshop/">Tutorial Photoshop // Convierte tu logo en piedra, envejecelo y agrietalo</a> apareció primero en <a href="https://ildefonsosegura.es">Ildefonso Segura</a>.]]></description>
										<content:encoded><![CDATA[<p>En este tutorial trabajaremos un logotipo cualquiera para darle un efecto de piedra, lo envejeceremos y después lo agrietaremos para darle un aspecto mucho más longevo.</p>
<p>Conseguiremos primero un wallpaper como este:</p>
<p><a href="https://ildefonsosegura.es/convierte-tu-logo-en-piedra-envejecelo-y-agrietalo-con-photoshop/imagen1/" rel="attachment wp-att-2123"><img loading="lazy" decoding="async" class="alignnone size-full wp-image-2123" src="https://ildefonsosegura.es/wp-content/uploads/imagen1.png" alt="imagen1" width="680" height="455" srcset="https://ildefonsosegura.es/wp-content/uploads/imagen1.png 680w, https://ildefonsosegura.es/wp-content/uploads/imagen1-300x200.png 300w" sizes="(max-width: 680px) 100vw, 680px" /></a></p>
<p>Y posteriormente lo envejeceremos para conseguir este:</p>
<p><a href="https://ildefonsosegura.es/convierte-tu-logo-en-piedra-envejecelo-y-agrietalo-con-photoshop/imagen2/" rel="attachment wp-att-2124"><img loading="lazy" decoding="async" class="alignnone size-full wp-image-2124" src="https://ildefonsosegura.es/wp-content/uploads/imagen2.jpg" alt="imagen2" width="680" height="453" srcset="https://ildefonsosegura.es/wp-content/uploads/imagen2.jpg 680w, https://ildefonsosegura.es/wp-content/uploads/imagen2-300x199.jpg 300w" sizes="(max-width: 680px) 100vw, 680px" /></a></p>
<p>Igualmente le podemos dar un color para hacerlo mucho más real comparándolo con el logo original</p>
<p><a href="https://ildefonsosegura.es/convierte-tu-logo-en-piedra-envejecelo-y-agrietalo-con-photoshop/imagen44/" rel="attachment wp-att-2167"><img loading="lazy" decoding="async" class="alignnone size-full wp-image-2167" src="https://ildefonsosegura.es/wp-content/uploads/imagen44.jpg" alt="imagen44" width="680" height="453" srcset="https://ildefonsosegura.es/wp-content/uploads/imagen44.jpg 680w, https://ildefonsosegura.es/wp-content/uploads/imagen44-300x199.jpg 300w" sizes="(max-width: 680px) 100vw, 680px" /></a></p>
<p>&nbsp;</p>
<h2>1.- STOCKTS UTILIZADOS</h2>
<p>Partimos de dos stocks</p>
<ol>
<li>Logotipo seleccionado</li>
<li>Textura de piedra</li>
</ol>
<p><a href="https://ildefonsosegura.es/convierte-tu-logo-en-piedra-envejecelo-y-agrietalo-con-photoshop/imagen3/" rel="attachment wp-att-2125"><img loading="lazy" decoding="async" class="alignnone size-full wp-image-2125" src="https://ildefonsosegura.es/wp-content/uploads/imagen3.jpg" alt="imagen3" width="680" height="251" srcset="https://ildefonsosegura.es/wp-content/uploads/imagen3.jpg 680w, https://ildefonsosegura.es/wp-content/uploads/imagen3-300x110.jpg 300w" sizes="(max-width: 680px) 100vw, 680px" /></a></p>
<h2>2.-PLANTEAMIENTO DEL TRABAJO</h2>
<p>En cualquier proyecto os recomiendo que planteeis en primer lugar un borrador de lo que quereis hacer para seguir una guía que, incluso durante el desarrollo del trabajo, podréis modificar. En cualquier caso es un punto de partida.</p>
<p><a href="https://ildefonsosegura.es/convierte-tu-logo-en-piedra-envejecelo-y-agrietalo-con-photoshop/imagen4/" rel="attachment wp-att-2126"><img loading="lazy" decoding="async" class="alignnone size-full wp-image-2126" src="https://ildefonsosegura.es/wp-content/uploads/imagen4.jpg" alt="imagen4" width="680" height="244" srcset="https://ildefonsosegura.es/wp-content/uploads/imagen4.jpg 680w, https://ildefonsosegura.es/wp-content/uploads/imagen4-300x107.jpg 300w" sizes="(max-width: 680px) 100vw, 680px" /></a></p>
<h2>3.-DESARROLLO DEL TRABAJO</h2>
<p>&nbsp;</p>
<h3>3.1.-FONDO</h3>
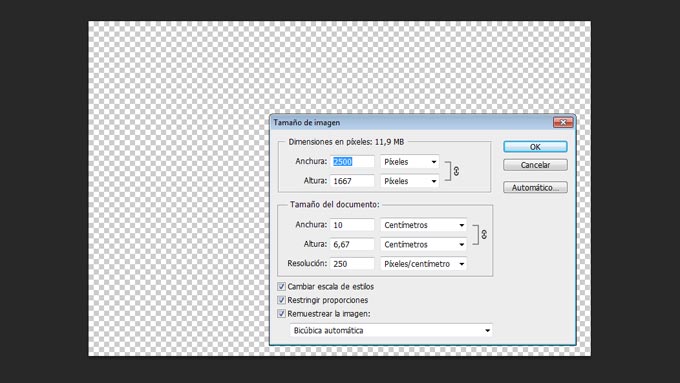
<p>1) Abriremos un documento (CTRL+N) de dimensiones 2500&#215;1667 con una resolución de 250ppp y fondo transparente. Cualquier otra resolución implicará ajustes en los estilos que posteriormente mostraré. El resultado que yo obtengo es en función de estos parámetros. Con otros distintos, el resultado no será igual sin perjuicio de que vosotros lo ajusteis para conseguirlo.</p>
<p><a href="https://ildefonsosegura.es/convierte-tu-logo-en-piedra-envejecelo-y-agrietalo-con-photoshop/imagen5/" rel="attachment wp-att-2127"><img loading="lazy" decoding="async" class="alignnone size-full wp-image-2127" src="https://ildefonsosegura.es/wp-content/uploads/imagen5.jpg" alt="imagen5" width="680" height="383" srcset="https://ildefonsosegura.es/wp-content/uploads/imagen5.jpg 680w, https://ildefonsosegura.es/wp-content/uploads/imagen5-300x168.jpg 300w" sizes="(max-width: 680px) 100vw, 680px" /></a></p>
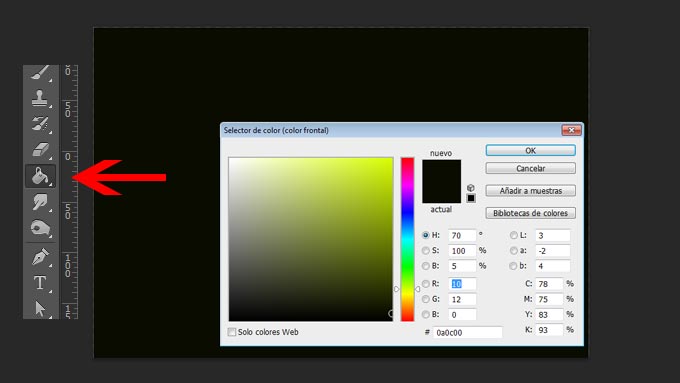
<p>2) Seleccionamos la herramienta de bote de pintura (tecla «G») y rellenamos de un color 0a0c00</p>
<p><a href="https://ildefonsosegura.es/convierte-tu-logo-en-piedra-envejecelo-y-agrietalo-con-photoshop/imagen6/" rel="attachment wp-att-2128"><img loading="lazy" decoding="async" class="alignnone size-full wp-image-2128" src="https://ildefonsosegura.es/wp-content/uploads/imagen6.jpg" alt="imagen6" width="680" height="383" srcset="https://ildefonsosegura.es/wp-content/uploads/imagen6.jpg 680w, https://ildefonsosegura.es/wp-content/uploads/imagen6-300x168.jpg 300w" sizes="(max-width: 680px) 100vw, 680px" /></a></p>
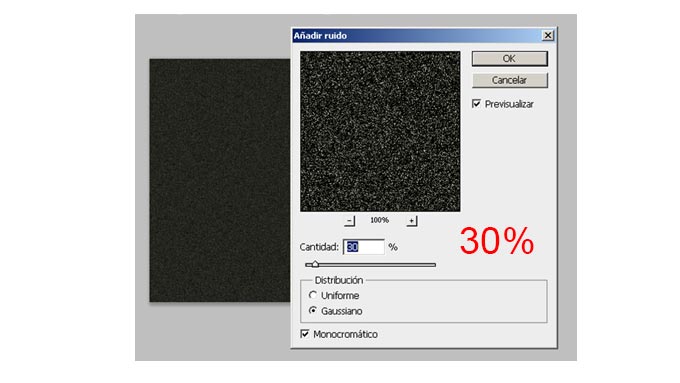
<p>3) Vamos a FILTRO, AÑADIR RUIDO y añadimos un 30%, gausiano y monocromático</p>
<p><a href="https://ildefonsosegura.es/convierte-tu-logo-en-piedra-envejecelo-y-agrietalo-con-photoshop/imagen7/" rel="attachment wp-att-2129"><img loading="lazy" decoding="async" class="alignnone size-full wp-image-2129" src="https://ildefonsosegura.es/wp-content/uploads/imagen7.jpg" alt="imagen7" width="680" height="383" srcset="https://ildefonsosegura.es/wp-content/uploads/imagen7.jpg 680w, https://ildefonsosegura.es/wp-content/uploads/imagen7-300x168.jpg 300w" sizes="(max-width: 680px) 100vw, 680px" /></a></p>
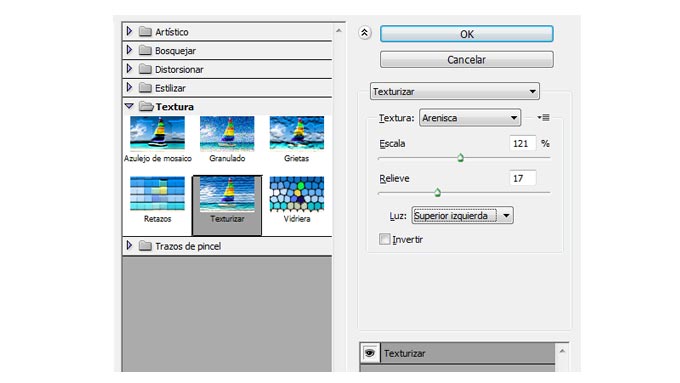
<p>4) Vamos de nuevo a FILTRO, GALERIA DE FILTROS y seleccionamos TEXTURA dándole los valores de Arenisca, Escala al 121%, Relieve 17 y luz superior izquierda</p>
<p><a href="https://ildefonsosegura.es/convierte-tu-logo-en-piedra-envejecelo-y-agrietalo-con-photoshop/imagen8/" rel="attachment wp-att-2130"><img loading="lazy" decoding="async" class="alignnone size-full wp-image-2130" src="https://ildefonsosegura.es/wp-content/uploads/imagen8.jpg" alt="imagen8" width="680" height="383" srcset="https://ildefonsosegura.es/wp-content/uploads/imagen8.jpg 680w, https://ildefonsosegura.es/wp-content/uploads/imagen8-300x168.jpg 300w" sizes="(max-width: 680px) 100vw, 680px" /></a></p>
<p>Así conseguimos tener esto</p>
<p><a href="https://ildefonsosegura.es/convierte-tu-logo-en-piedra-envejecelo-y-agrietalo-con-photoshop/imagen9/" rel="attachment wp-att-2131"><img loading="lazy" decoding="async" class="alignnone size-full wp-image-2131" src="https://ildefonsosegura.es/wp-content/uploads/imagen9.jpg" alt="imagen9" width="680" height="383" srcset="https://ildefonsosegura.es/wp-content/uploads/imagen9.jpg 680w, https://ildefonsosegura.es/wp-content/uploads/imagen9-300x168.jpg 300w" sizes="(max-width: 680px) 100vw, 680px" /></a></p>
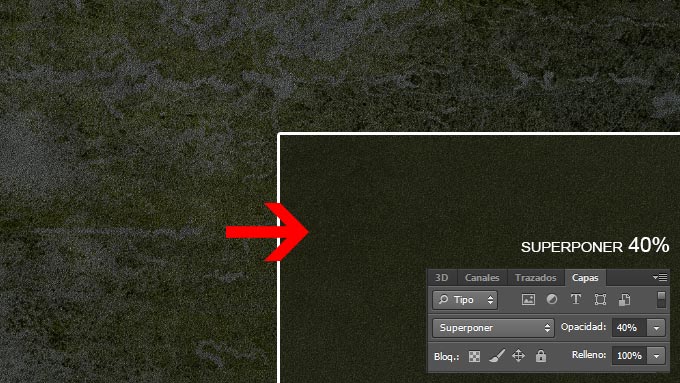
<p>5) Colocamos la textura de piedra (ve al menú ARCHIVO, COLOCAR y busca el archivo de la textura) )y cambiamos el modo de fusión a SUPERPONER . Bajamos opacidad al 40%.</p>
<p><a href="https://ildefonsosegura.es/convierte-tu-logo-en-piedra-envejecelo-y-agrietalo-con-photoshop/imagen10/" rel="attachment wp-att-2132"><img loading="lazy" decoding="async" class="alignnone size-full wp-image-2132" src="https://ildefonsosegura.es/wp-content/uploads/imagen10.jpg" alt="imagen10" width="680" height="383" srcset="https://ildefonsosegura.es/wp-content/uploads/imagen10.jpg 680w, https://ildefonsosegura.es/wp-content/uploads/imagen10-300x168.jpg 300w" sizes="(max-width: 680px) 100vw, 680px" /></a></p>
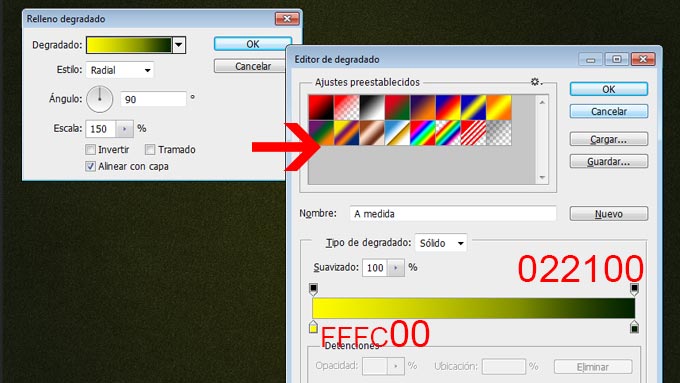
<p>6) Vamos al menú CAPA, AÑADIR NUEVA CAPA DE RELLENO de DEGRADADO  quedando como sigue</p>
<p><a href="https://ildefonsosegura.es/convierte-tu-logo-en-piedra-envejecelo-y-agrietalo-con-photoshop/imagen11/" rel="attachment wp-att-2133"><img loading="lazy" decoding="async" class="alignnone size-full wp-image-2133" src="https://ildefonsosegura.es/wp-content/uploads/imagen11.jpg" alt="imagen11" width="680" height="383" srcset="https://ildefonsosegura.es/wp-content/uploads/imagen11.jpg 680w, https://ildefonsosegura.es/wp-content/uploads/imagen11-300x168.jpg 300w" sizes="(max-width: 680px) 100vw, 680px" /></a></p>
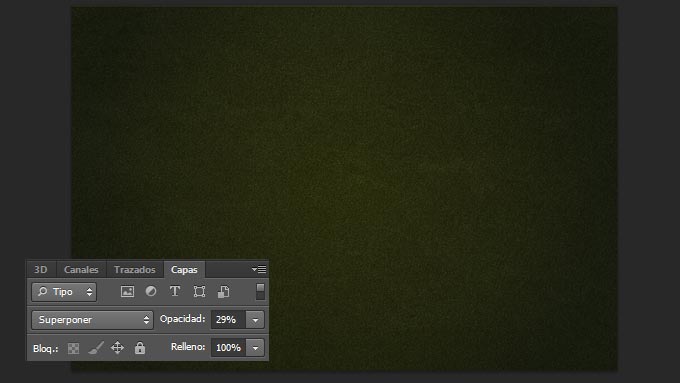
<p>Cambiamos el modo de fusión a SUPERPONER y bajamos opacidad al 29%</p>
<p><a href="https://ildefonsosegura.es/convierte-tu-logo-en-piedra-envejecelo-y-agrietalo-con-photoshop/imagen12/" rel="attachment wp-att-2134"><img loading="lazy" decoding="async" class="alignnone size-full wp-image-2134" src="https://ildefonsosegura.es/wp-content/uploads/imagen12.jpg" alt="imagen12" width="680" height="383" srcset="https://ildefonsosegura.es/wp-content/uploads/imagen12.jpg 680w, https://ildefonsosegura.es/wp-content/uploads/imagen12-300x168.jpg 300w" sizes="(max-width: 680px) 100vw, 680px" /></a></p>
<p>Así ya tenemos nuestro fondo hecho</p>
<h3>3.2.-LOGOTIPO DE PIEDRA</h3>
<p>1) Introducimos el logotipo (a través del ARCHIVO, COLOCAR el logotipo)</p>
<p><a href="https://ildefonsosegura.es/convierte-tu-logo-en-piedra-envejecelo-y-agrietalo-con-photoshop/imagen13/" rel="attachment wp-att-2135"><img loading="lazy" decoding="async" class="alignnone size-full wp-image-2135" src="https://ildefonsosegura.es/wp-content/uploads/imagen13.jpg" alt="imagen13" width="680" height="383" srcset="https://ildefonsosegura.es/wp-content/uploads/imagen13.jpg 680w, https://ildefonsosegura.es/wp-content/uploads/imagen13-300x168.jpg 300w" sizes="(max-width: 680px) 100vw, 680px" /></a></p>
<p>2) Con la combinación de teclas CTRL+SHIFT+U desaturamos la capa del logotipo (con el menú IMAGEN, AJUSTES, DESATURAR consigues lo mismo)</p>
<p><a href="https://ildefonsosegura.es/convierte-tu-logo-en-piedra-envejecelo-y-agrietalo-con-photoshop/imagen14/" rel="attachment wp-att-2136"><img loading="lazy" decoding="async" class="alignnone size-full wp-image-2136" src="https://ildefonsosegura.es/wp-content/uploads/imagen14.jpg" alt="imagen14" width="680" height="383" srcset="https://ildefonsosegura.es/wp-content/uploads/imagen14.jpg 680w, https://ildefonsosegura.es/wp-content/uploads/imagen14-300x168.jpg 300w" sizes="(max-width: 680px) 100vw, 680px" /></a></p>
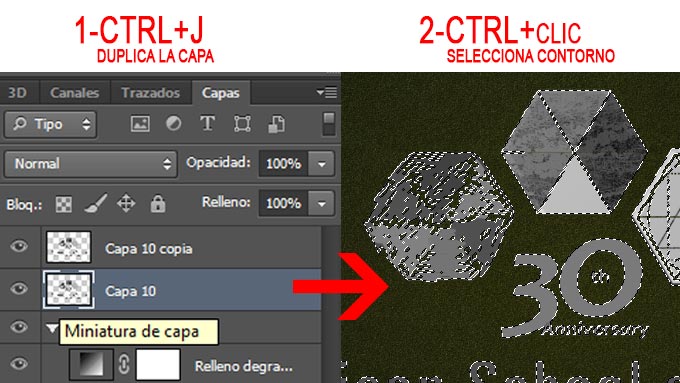
<p>3) Duplicamos esta capa con la combinación de teclas CTRL+J. A continuación nos situamos en la capa inferior de logo desaturado y con la tecla CTRL presionada hacemos clic con el mouse para seleccionar el contorno del logo.</p>
<p><a href="https://ildefonsosegura.es/convierte-tu-logo-en-piedra-envejecelo-y-agrietalo-con-photoshop/imagen15/" rel="attachment wp-att-2137"><img loading="lazy" decoding="async" class="alignnone size-full wp-image-2137" src="https://ildefonsosegura.es/wp-content/uploads/imagen15.jpg" alt="imagen15" width="680" height="383" srcset="https://ildefonsosegura.es/wp-content/uploads/imagen15.jpg 680w, https://ildefonsosegura.es/wp-content/uploads/imagen15-300x168.jpg 300w" sizes="(max-width: 680px) 100vw, 680px" /></a></p>
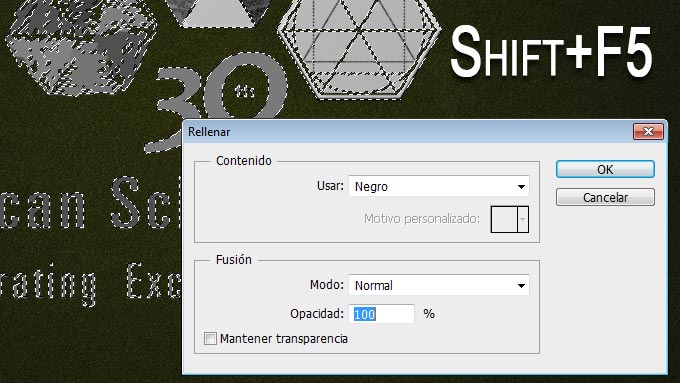
<p>4) Con la combinación SHIFT+F5 (o desde el menú EDICION, RELLENAR) rellenamos de color negro</p>
<p><a href="https://ildefonsosegura.es/convierte-tu-logo-en-piedra-envejecelo-y-agrietalo-con-photoshop/imagen16/" rel="attachment wp-att-2138"><img loading="lazy" decoding="async" class="alignnone size-full wp-image-2138" src="https://ildefonsosegura.es/wp-content/uploads/imagen16.jpg" alt="imagen16" width="680" height="383" srcset="https://ildefonsosegura.es/wp-content/uploads/imagen16.jpg 680w, https://ildefonsosegura.es/wp-content/uploads/imagen16-300x168.jpg 300w" sizes="(max-width: 680px) 100vw, 680px" /></a></p>
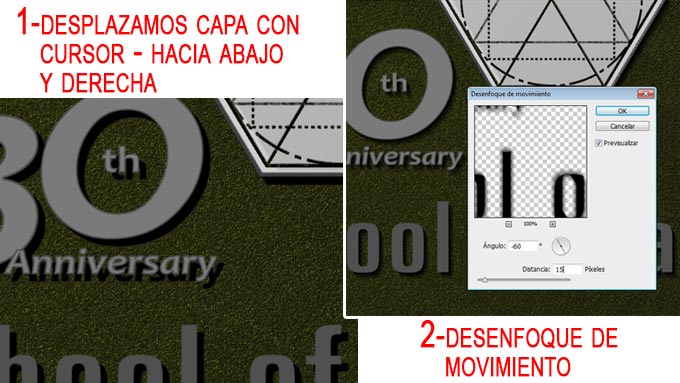
<p>5) Con el cursor desplazamos la capa rellena de negro hacia abajo y hacia la izquierda para darle una extrusión en la sombra del logo. Después iremos a FILTRO, DESENFOQUE DE MOVIMIENTO de -60º y 15 px</p>
<p><a href="https://ildefonsosegura.es/convierte-tu-logo-en-piedra-envejecelo-y-agrietalo-con-photoshop/imagen17/" rel="attachment wp-att-2139"><img loading="lazy" decoding="async" class="alignnone size-full wp-image-2139" src="https://ildefonsosegura.es/wp-content/uploads/imagen17.jpg" alt="imagen17" width="680" height="383" srcset="https://ildefonsosegura.es/wp-content/uploads/imagen17.jpg 680w, https://ildefonsosegura.es/wp-content/uploads/imagen17-300x168.jpg 300w" sizes="(max-width: 680px) 100vw, 680px" /></a></p>
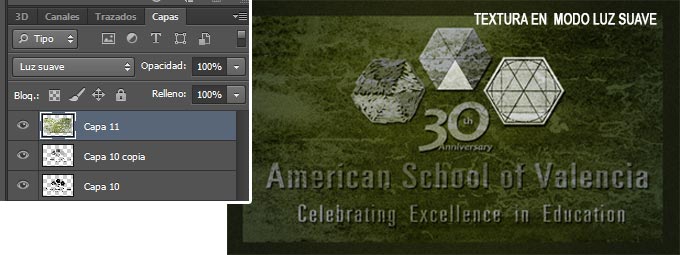
<p>6) Colocamos de nuevo la textura de piedra arriba del todo y ponemos en modo de fusión de la capa en LUZ SUAVE</p>
<p><a href="https://ildefonsosegura.es/convierte-tu-logo-en-piedra-envejecelo-y-agrietalo-con-photoshop/imagen18/" rel="attachment wp-att-2140"><img loading="lazy" decoding="async" class="alignnone size-full wp-image-2140" src="https://ildefonsosegura.es/wp-content/uploads/imagen18.jpg" alt="imagen18" width="680" height="255" srcset="https://ildefonsosegura.es/wp-content/uploads/imagen18.jpg 680w, https://ildefonsosegura.es/wp-content/uploads/imagen18-300x112.jpg 300w" sizes="(max-width: 680px) 100vw, 680px" /></a></p>
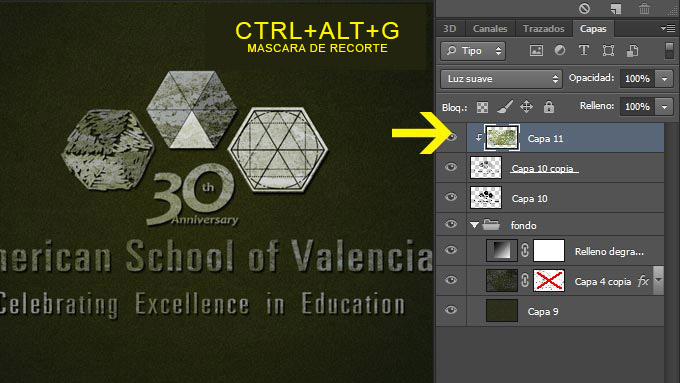
<p>7) Hacemos que la textura sea una máscara de recorte de la capa que tiene debajo (la del logo). Combinación para hacer la máscara de recorte = CTRL+ALT+G</p>
<p><a href="https://ildefonsosegura.es/convierte-tu-logo-en-piedra-envejecelo-y-agrietalo-con-photoshop/imagen19/" rel="attachment wp-att-2141"><img loading="lazy" decoding="async" class="alignnone size-full wp-image-2141" src="https://ildefonsosegura.es/wp-content/uploads/imagen19.jpg" alt="imagen19" width="680" height="383" srcset="https://ildefonsosegura.es/wp-content/uploads/imagen19.jpg 680w, https://ildefonsosegura.es/wp-content/uploads/imagen19-300x168.jpg 300w" sizes="(max-width: 680px) 100vw, 680px" /></a></p>
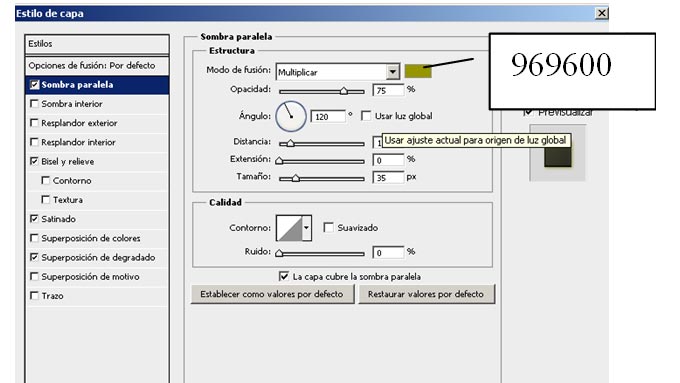
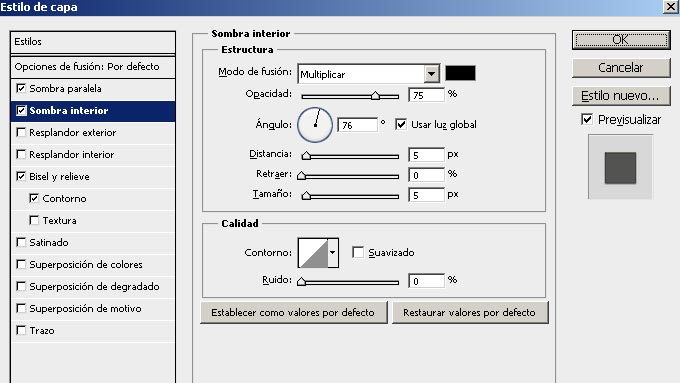
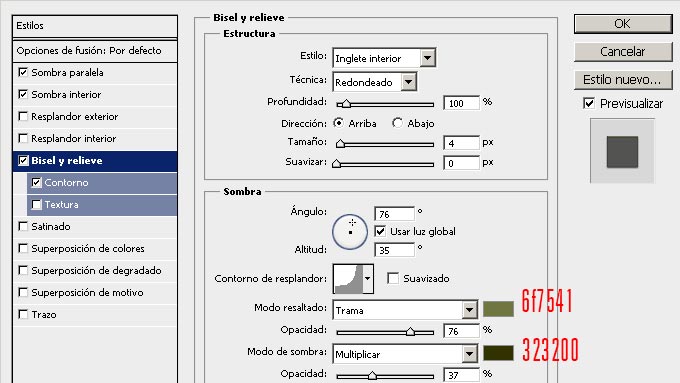
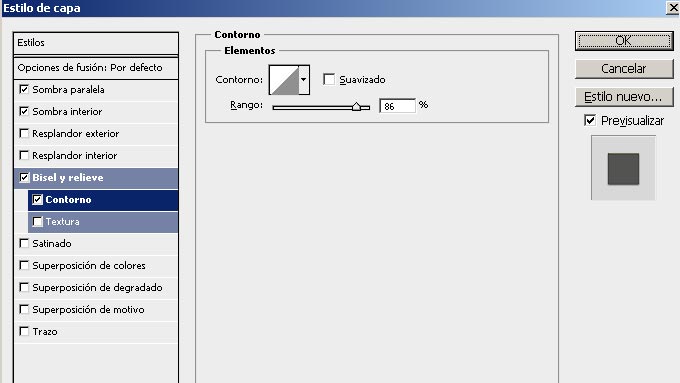
<p>8) A continuación nos situamos en la capa del logo desaturado y con el botón derecho hacemos clic en la capa para elegir OPCIONES DE FUSIÓN de la lista desplegable obtenida. Aplicamos unos estilos como aparece a continuación</p>
<p><a href="https://ildefonsosegura.es/convierte-tu-logo-en-piedra-envejecelo-y-agrietalo-con-photoshop/imagen20/" rel="attachment wp-att-2142"><img loading="lazy" decoding="async" class="alignnone size-full wp-image-2142" src="https://ildefonsosegura.es/wp-content/uploads/imagen20.jpg" alt="imagen20" width="680" height="383" srcset="https://ildefonsosegura.es/wp-content/uploads/imagen20.jpg 680w, https://ildefonsosegura.es/wp-content/uploads/imagen20-300x168.jpg 300w" sizes="(max-width: 680px) 100vw, 680px" /></a></p>
<p>&nbsp;</p>
<p><a href="https://ildefonsosegura.es/convierte-tu-logo-en-piedra-envejecelo-y-agrietalo-con-photoshop/imagen21/" rel="attachment wp-att-2143"><img loading="lazy" decoding="async" class="alignnone size-full wp-image-2143" src="https://ildefonsosegura.es/wp-content/uploads/imagen21.jpg" alt="imagen21" width="680" height="383" srcset="https://ildefonsosegura.es/wp-content/uploads/imagen21.jpg 680w, https://ildefonsosegura.es/wp-content/uploads/imagen21-300x168.jpg 300w" sizes="(max-width: 680px) 100vw, 680px" /></a></p>
<p>&nbsp;</p>
<p><a href="https://ildefonsosegura.es/convierte-tu-logo-en-piedra-envejecelo-y-agrietalo-con-photoshop/imagen22/" rel="attachment wp-att-2144"><img loading="lazy" decoding="async" class="alignnone size-full wp-image-2144" src="https://ildefonsosegura.es/wp-content/uploads/imagen22.jpg" alt="imagen22" width="680" height="383" srcset="https://ildefonsosegura.es/wp-content/uploads/imagen22.jpg 680w, https://ildefonsosegura.es/wp-content/uploads/imagen22-300x168.jpg 300w" sizes="(max-width: 680px) 100vw, 680px" /></a></p>
<p>&nbsp;</p>
<p><a href="https://ildefonsosegura.es/convierte-tu-logo-en-piedra-envejecelo-y-agrietalo-con-photoshop/imagen23/" rel="attachment wp-att-2145"><img loading="lazy" decoding="async" class="alignnone size-full wp-image-2145" src="https://ildefonsosegura.es/wp-content/uploads/imagen23.jpg" alt="imagen23" width="680" height="383" srcset="https://ildefonsosegura.es/wp-content/uploads/imagen23.jpg 680w, https://ildefonsosegura.es/wp-content/uploads/imagen23-300x168.jpg 300w" sizes="(max-width: 680px) 100vw, 680px" /></a></p>
<p>&nbsp;</p>
<p>El resultado que tenemos es este</p>
<p><a href="https://ildefonsosegura.es/convierte-tu-logo-en-piedra-envejecelo-y-agrietalo-con-photoshop/imagen24/" rel="attachment wp-att-2146"><img loading="lazy" decoding="async" class="alignnone size-full wp-image-2146" src="https://ildefonsosegura.es/wp-content/uploads/imagen24.jpg" alt="imagen24" width="680" height="383" srcset="https://ildefonsosegura.es/wp-content/uploads/imagen24.jpg 680w, https://ildefonsosegura.es/wp-content/uploads/imagen24-300x168.jpg 300w" sizes="(max-width: 680px) 100vw, 680px" /></a></p>
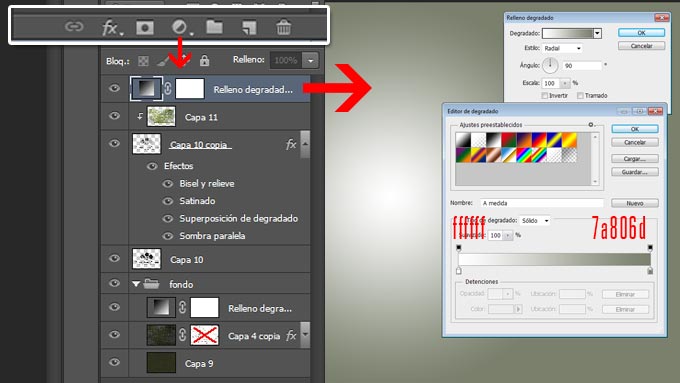
<p>9) Desde los iconos de la parte de abajo de la paleta de capas añadimos una capa de ajuste de DEGRADADO según las siguientes variables</p>
<p><a href="https://ildefonsosegura.es/convierte-tu-logo-en-piedra-envejecelo-y-agrietalo-con-photoshop/imagen25/" rel="attachment wp-att-2147"><img loading="lazy" decoding="async" class="alignnone size-full wp-image-2147" src="https://ildefonsosegura.es/wp-content/uploads/imagen25.jpg" alt="imagen25" width="680" height="383" srcset="https://ildefonsosegura.es/wp-content/uploads/imagen25.jpg 680w, https://ildefonsosegura.es/wp-content/uploads/imagen25-300x168.jpg 300w" sizes="(max-width: 680px) 100vw, 680px" /></a></p>
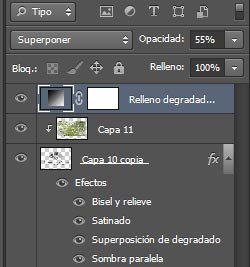
<p>10) Ponemos el modo de fusión de la capa en SUPERPONER y le bajamos la opacidad al 55%</p>
<p>&nbsp;</p>
<p><a href="https://ildefonsosegura.es/convierte-tu-logo-en-piedra-envejecelo-y-agrietalo-con-photoshop/imagen26/" rel="attachment wp-att-2148"><img loading="lazy" decoding="async" class="alignnone size-full wp-image-2148" src="https://ildefonsosegura.es/wp-content/uploads/imagen26.jpg" alt="imagen26" width="250" height="267" /></a></p>
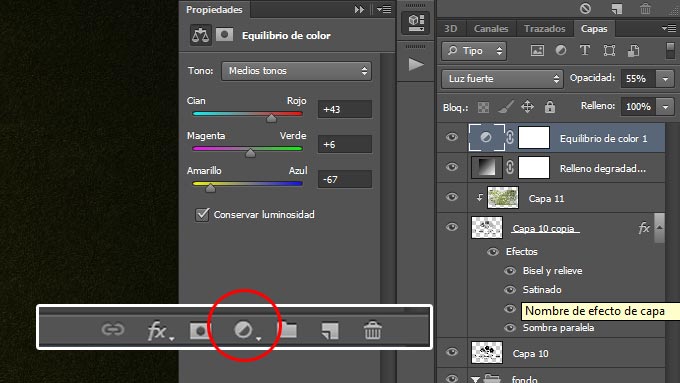
<p>11) Desde los iconos de abajo de la paleta de capas añadimos otra capa de ajuste de EQUILIBRIO DE COLOR con los valores que ves en la imágen y cambiamos el modo de fusión a LUZ FUERTE bajando la opacidad al 55%</p>
<p><a href="https://ildefonsosegura.es/convierte-tu-logo-en-piedra-envejecelo-y-agrietalo-con-photoshop/imagen27/" rel="attachment wp-att-2149"><img loading="lazy" decoding="async" class="alignnone size-full wp-image-2149" src="https://ildefonsosegura.es/wp-content/uploads/imagen27.jpg" alt="imagen27" width="680" height="383" srcset="https://ildefonsosegura.es/wp-content/uploads/imagen27.jpg 680w, https://ildefonsosegura.es/wp-content/uploads/imagen27-300x168.jpg 300w" sizes="(max-width: 680px) 100vw, 680px" /></a></p>
<p>12) Así es como tenemos el logotipo en apariencia de piedra iluminada</p>
<h1 style="text-align: center;"><span style="color: #800000;">CONCLUSION 1</span></h1>
<p><a href="https://ildefonsosegura.es/convierte-tu-logo-en-piedra-envejecelo-y-agrietalo-con-photoshop/imagen28/" rel="attachment wp-att-2150"><img loading="lazy" decoding="async" class="alignnone size-full wp-image-2150" src="https://ildefonsosegura.es/wp-content/uploads/imagen28.png" alt="imagen28" width="680" height="455" srcset="https://ildefonsosegura.es/wp-content/uploads/imagen28.png 680w, https://ildefonsosegura.es/wp-content/uploads/imagen28-300x200.png 300w" sizes="(max-width: 680px) 100vw, 680px" /></a></p>
<h3>3.3.-LOGOTIPO DE PIEDRA ENVEJECIDO Y AGRIETADO</h3>
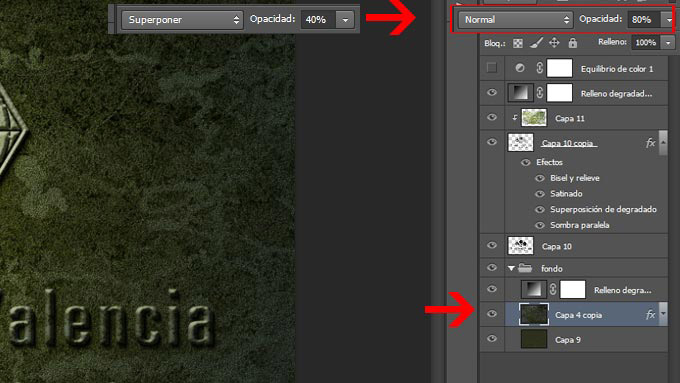
<p>1) Vamos a cambiar algunas variables de una capa que ya editamos al principio. Nos vamos a la capa inferior de la textura de pierdra y le cambiamos la opacidad a 80% (antes estaba al 40%) y el modo de fusión a NORMAL (estaba en superponer)</p>
<p><a href="https://ildefonsosegura.es/convierte-tu-logo-en-piedra-envejecelo-y-agrietalo-con-photoshop/imagen29a/" rel="attachment wp-att-2151"><img loading="lazy" decoding="async" class="alignnone size-full wp-image-2151" src="https://ildefonsosegura.es/wp-content/uploads/imagen29a.jpg" alt="imagen29a" width="680" height="383" srcset="https://ildefonsosegura.es/wp-content/uploads/imagen29a.jpg 680w, https://ildefonsosegura.es/wp-content/uploads/imagen29a-300x168.jpg 300w" sizes="(max-width: 680px) 100vw, 680px" /></a></p>
<p>2) Tendríamos ahora algo asi</p>
<p><a href="https://ildefonsosegura.es/convierte-tu-logo-en-piedra-envejecelo-y-agrietalo-con-photoshop/imagen29b/" rel="attachment wp-att-2152"><img loading="lazy" decoding="async" class="alignnone size-full wp-image-2152" src="https://ildefonsosegura.es/wp-content/uploads/imagen29b.jpg" alt="imagen29b" width="680" height="383" srcset="https://ildefonsosegura.es/wp-content/uploads/imagen29b.jpg 680w, https://ildefonsosegura.es/wp-content/uploads/imagen29b-300x168.jpg 300w" sizes="(max-width: 680px) 100vw, 680px" /></a></p>
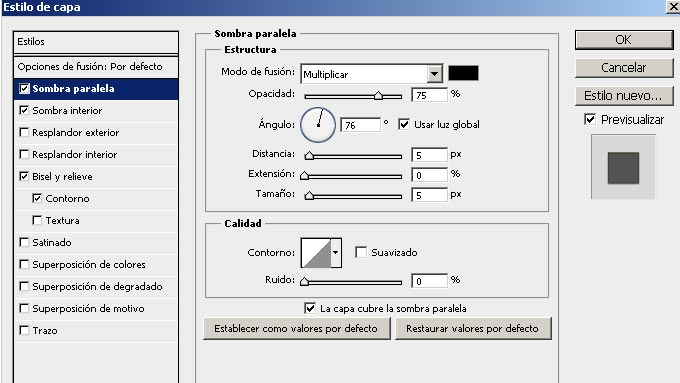
<p>3) A esa capa de la textura de piedra aplicaremos unos estilos (botón derecho sobre la capa y seleccionamos «opciones de fusión»). Aunque no veas que pasa nada, le estás dando estilo y será útil en los siguientes pasos.</p>
<p><a href="https://ildefonsosegura.es/convierte-tu-logo-en-piedra-envejecelo-y-agrietalo-con-photoshop/imagen30/" rel="attachment wp-att-2153"><img loading="lazy" decoding="async" class="alignnone size-full wp-image-2153" src="https://ildefonsosegura.es/wp-content/uploads/imagen30.jpg" alt="imagen30" width="680" height="383" srcset="https://ildefonsosegura.es/wp-content/uploads/imagen30.jpg 680w, https://ildefonsosegura.es/wp-content/uploads/imagen30-300x168.jpg 300w" sizes="(max-width: 680px) 100vw, 680px" /></a></p>
<p><a href="https://ildefonsosegura.es/convierte-tu-logo-en-piedra-envejecelo-y-agrietalo-con-photoshop/imagen31/" rel="attachment wp-att-2154"><img loading="lazy" decoding="async" class="alignnone size-full wp-image-2154" src="https://ildefonsosegura.es/wp-content/uploads/imagen31.jpg" alt="imagen31" width="680" height="383" srcset="https://ildefonsosegura.es/wp-content/uploads/imagen31.jpg 680w, https://ildefonsosegura.es/wp-content/uploads/imagen31-300x168.jpg 300w" sizes="(max-width: 680px) 100vw, 680px" /></a></p>
<p><a href="https://ildefonsosegura.es/convierte-tu-logo-en-piedra-envejecelo-y-agrietalo-con-photoshop/imagen32/" rel="attachment wp-att-2155"><img loading="lazy" decoding="async" class="alignnone size-full wp-image-2155" src="https://ildefonsosegura.es/wp-content/uploads/imagen32.jpg" alt="imagen32" width="680" height="383" srcset="https://ildefonsosegura.es/wp-content/uploads/imagen32.jpg 680w, https://ildefonsosegura.es/wp-content/uploads/imagen32-300x168.jpg 300w" sizes="(max-width: 680px) 100vw, 680px" /></a></p>
<p><a href="https://ildefonsosegura.es/convierte-tu-logo-en-piedra-envejecelo-y-agrietalo-con-photoshop/imagen33/" rel="attachment wp-att-2156"><img loading="lazy" decoding="async" class="alignnone size-full wp-image-2156" src="https://ildefonsosegura.es/wp-content/uploads/imagen33.jpg" alt="imagen33" width="680" height="383" srcset="https://ildefonsosegura.es/wp-content/uploads/imagen33.jpg 680w, https://ildefonsosegura.es/wp-content/uploads/imagen33-300x168.jpg 300w" sizes="(max-width: 680px) 100vw, 680px" /></a></p>
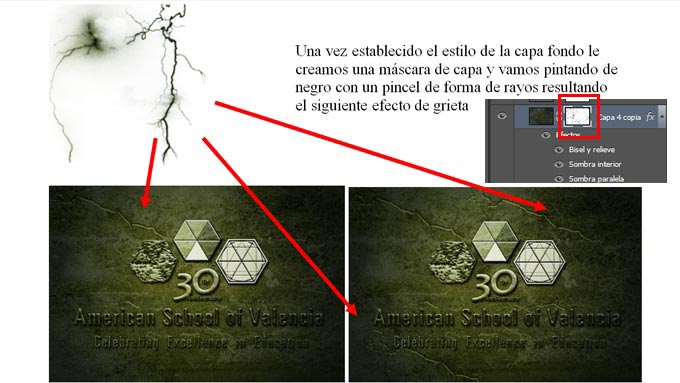
<p>4) Creamos una máscara de capa en la capa de la textura (en el menú CAPA, MASCARA DE CAPA, DESCUBRIT TODAS). Seleccionamos un pincel de rayos (si no sabes como instalarlos te aconsejo mi manual <a title="Manual de Photoshop" href="https://ildefonsosegura.es/manual-de-photoshop/" target="_blank"><strong>HAZ CLIC</strong></a> y te muestro cómo)</p>
<p><a href="https://ildefonsosegura.es/convierte-tu-logo-en-piedra-envejecelo-y-agrietalo-con-photoshop/imagen34/" rel="attachment wp-att-2157"><img loading="lazy" decoding="async" class="alignnone size-full wp-image-2157" src="https://ildefonsosegura.es/wp-content/uploads/imagen34.jpg" alt="imagen34" width="680" height="383" srcset="https://ildefonsosegura.es/wp-content/uploads/imagen34.jpg 680w, https://ildefonsosegura.es/wp-content/uploads/imagen34-300x168.jpg 300w" sizes="(max-width: 680px) 100vw, 680px" /></a></p>
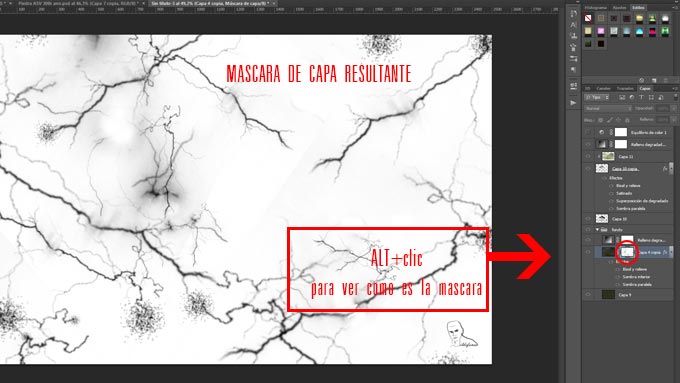
<p>5) Pintamos y tendríamos un resultado en la máscara como el que sigue (lo que ves es lo que hemos pintado en la máscara de capa de color negro &#8211; haz ALT+clic en la máscara para verlo y lo mismo para volver a la vista inicial)</p>
<p><a href="https://ildefonsosegura.es/convierte-tu-logo-en-piedra-envejecelo-y-agrietalo-con-photoshop/imagen35/" rel="attachment wp-att-2158"><img loading="lazy" decoding="async" class="alignnone size-full wp-image-2158" src="https://ildefonsosegura.es/wp-content/uploads/imagen35.jpg" alt="imagen35" width="680" height="383" srcset="https://ildefonsosegura.es/wp-content/uploads/imagen35.jpg 680w, https://ildefonsosegura.es/wp-content/uploads/imagen35-300x168.jpg 300w" sizes="(max-width: 680px) 100vw, 680px" /></a></p>
<p>6) Hemos conseguido hasta el momento esto:</p>
<p><a href="https://ildefonsosegura.es/convierte-tu-logo-en-piedra-envejecelo-y-agrietalo-con-photoshop/imagen36/" rel="attachment wp-att-2159"><img loading="lazy" decoding="async" class="alignnone size-full wp-image-2159" src="https://ildefonsosegura.es/wp-content/uploads/imagen36.jpg" alt="imagen36" width="680" height="383" srcset="https://ildefonsosegura.es/wp-content/uploads/imagen36.jpg 680w, https://ildefonsosegura.es/wp-content/uploads/imagen36-300x168.jpg 300w" sizes="(max-width: 680px) 100vw, 680px" /></a></p>
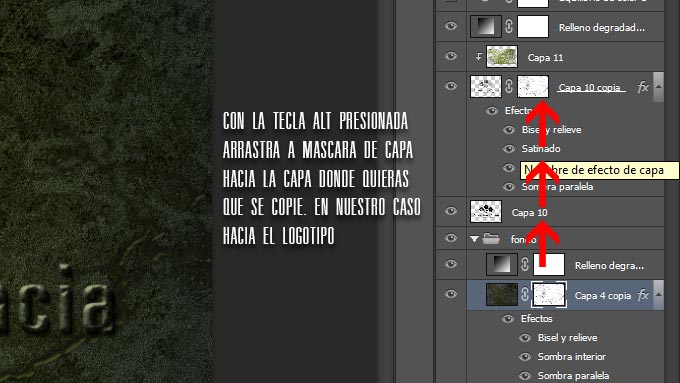
<p>7) Para conservar las mismas grietas que hemos dibujado en el fondo (a través de la máscara de capa) sobre el logo, debemos copiar la máscara de la textura a la capa del logo. Para ello, mantenemos la tecla ALT presionada mientras arrastramos la máscara que queremos copiar hacia la capa donde queremos copiarla.</p>
<p><a href="https://ildefonsosegura.es/convierte-tu-logo-en-piedra-envejecelo-y-agrietalo-con-photoshop/imagen37/" rel="attachment wp-att-2160"><img loading="lazy" decoding="async" class="alignnone size-full wp-image-2160" src="https://ildefonsosegura.es/wp-content/uploads/imagen37.jpg" alt="imagen37" width="680" height="383" srcset="https://ildefonsosegura.es/wp-content/uploads/imagen37.jpg 680w, https://ildefonsosegura.es/wp-content/uploads/imagen37-300x168.jpg 300w" sizes="(max-width: 680px) 100vw, 680px" /></a></p>
<p>y conseguimos que las mismas grietas de la parte de atrás estén sobre el logotipo</p>
<p><a href="https://ildefonsosegura.es/convierte-tu-logo-en-piedra-envejecelo-y-agrietalo-con-photoshop/imagen38/" rel="attachment wp-att-2161"><img loading="lazy" decoding="async" class="alignnone size-full wp-image-2161" src="https://ildefonsosegura.es/wp-content/uploads/imagen38.jpg" alt="imagen38" width="680" height="383" srcset="https://ildefonsosegura.es/wp-content/uploads/imagen38.jpg 680w, https://ildefonsosegura.es/wp-content/uploads/imagen38-300x168.jpg 300w" sizes="(max-width: 680px) 100vw, 680px" /></a></p>
<p>Vemos que nos queda lo que buscábamos</p>
<h1 style="text-align: center;"><span style="color: #800000;">CONCLUSION 2</span></h1>
<p><a href="https://ildefonsosegura.es/convierte-tu-logo-en-piedra-envejecelo-y-agrietalo-con-photoshop/imagen39/" rel="attachment wp-att-2162"><img loading="lazy" decoding="async" class="alignnone size-full wp-image-2162" src="https://ildefonsosegura.es/wp-content/uploads/imagen39.jpg" alt="imagen39" width="680" height="453" srcset="https://ildefonsosegura.es/wp-content/uploads/imagen39.jpg 680w, https://ildefonsosegura.es/wp-content/uploads/imagen39-300x199.jpg 300w" sizes="(max-width: 680px) 100vw, 680px" /></a></p>
<p>&nbsp;</p>
<h3>3.4.-COLOR EN EL LOGOTIPO DE PIEDRA ENVEJECIDO Y AGRIETADO</h3>
<p>1) Colocamos arriba del todo de nuevo el logo original a color y cambiamos el modo de fusión a LUZ SUAVE</p>
<p><a href="https://ildefonsosegura.es/convierte-tu-logo-en-piedra-envejecelo-y-agrietalo-con-photoshop/imagen40/" rel="attachment wp-att-2163"><img loading="lazy" decoding="async" class="alignnone size-full wp-image-2163" src="https://ildefonsosegura.es/wp-content/uploads/imagen40.jpg" alt="imagen40" width="680" height="383" srcset="https://ildefonsosegura.es/wp-content/uploads/imagen40.jpg 680w, https://ildefonsosegura.es/wp-content/uploads/imagen40-300x168.jpg 300w" sizes="(max-width: 680px) 100vw, 680px" /></a></p>
<p>2) Añadimos una máscara de capa (menú CAPA, MASCARA DE CAPA, MOSTRAR TODAS o desde los iconos de abajo de la paleta de capas). Nos situamos en la máscara de capa y aplicamos desde el menú FILTRO, INTERPRETAR, NUBES.  Lo hacemos por segunda vez presionando CTRL+F. Vamos de nuevo a FILTRO, INTERPRETAR pero en esta ocasión NUBES DE DIFERENCIA y posteriormente repetimos el filtro con CTRL+F. En definitiva hemos aplicado dos veces NUBES y dos veces NUBES DE DIFERENCIA. Quedaría así:</p>
<p><a href="https://ildefonsosegura.es/convierte-tu-logo-en-piedra-envejecelo-y-agrietalo-con-photoshop/imagen41/" rel="attachment wp-att-2164"><img loading="lazy" decoding="async" class="alignnone size-full wp-image-2164" src="https://ildefonsosegura.es/wp-content/uploads/imagen41.jpg" alt="imagen41" width="680" height="383" srcset="https://ildefonsosegura.es/wp-content/uploads/imagen41.jpg 680w, https://ildefonsosegura.es/wp-content/uploads/imagen41-300x168.jpg 300w" sizes="(max-width: 680px) 100vw, 680px" /></a></p>
<p>3) Aplicamos la máscara de capa ¿cómo? te situas en la máscara de capa, botón derecho del mouse y selecciona APLICAR MASCARA DE CAPA. Ahora solo tendrás una capa sin máscara pero como esta:</p>
<p><a href="https://ildefonsosegura.es/convierte-tu-logo-en-piedra-envejecelo-y-agrietalo-con-photoshop/imagen42/" rel="attachment wp-att-2165"><img loading="lazy" decoding="async" class="alignnone size-full wp-image-2165" src="https://ildefonsosegura.es/wp-content/uploads/imagen42.jpg" alt="imagen42" width="680" height="383" srcset="https://ildefonsosegura.es/wp-content/uploads/imagen42.jpg 680w, https://ildefonsosegura.es/wp-content/uploads/imagen42-300x168.jpg 300w" sizes="(max-width: 680px) 100vw, 680px" /></a></p>
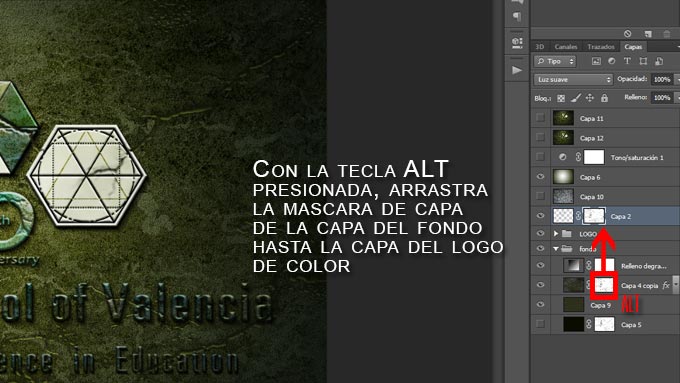
<p>4) Igual que hicimos en el punto 7 del apartado anterior, copiaremos la máscara de capa donde dibujamos las grietas en la capa que acabamos de obtener en el punto 3 anterior</p>
<p><a href="https://ildefonsosegura.es/convierte-tu-logo-en-piedra-envejecelo-y-agrietalo-con-photoshop/imagen43/" rel="attachment wp-att-2166"><img loading="lazy" decoding="async" class="alignnone size-full wp-image-2166" src="https://ildefonsosegura.es/wp-content/uploads/imagen43.jpg" alt="imagen43" width="680" height="383" srcset="https://ildefonsosegura.es/wp-content/uploads/imagen43.jpg 680w, https://ildefonsosegura.es/wp-content/uploads/imagen43-300x168.jpg 300w" sizes="(max-width: 680px) 100vw, 680px" /></a></p>
<p>Y nuestro trabajo está finalizado</p>
<h1 style="text-align: center;"><span style="color: #800000;">CONCLUSION 3</span></h1>
<p><a href="https://ildefonsosegura.es/convierte-tu-logo-en-piedra-envejecelo-y-agrietalo-con-photoshop/imagen44/" rel="attachment wp-att-2167"><img loading="lazy" decoding="async" class="alignnone size-full wp-image-2167" src="https://ildefonsosegura.es/wp-content/uploads/imagen44.jpg" alt="imagen44" width="680" height="453" srcset="https://ildefonsosegura.es/wp-content/uploads/imagen44.jpg 680w, https://ildefonsosegura.es/wp-content/uploads/imagen44-300x199.jpg 300w" sizes="(max-width: 680px) 100vw, 680px" /></a></p>
<p>&nbsp;</p>
<p>Espero que te haya gustado el tutorial, lo compartas y me dejes tu comentario</p>
<p>&nbsp;</p>
<p>&nbsp;</p>
<p>&nbsp;</p>
<p>&nbsp;</p>La entrada <a href="https://ildefonsosegura.es/convierte-tu-logo-en-piedra-envejecelo-y-agrietalo-con-photoshop/">Tutorial Photoshop // Convierte tu logo en piedra, envejecelo y agrietalo</a> apareció primero en <a href="https://ildefonsosegura.es">Ildefonso Segura</a>.]]></content:encoded>
					
					<wfw:commentRss>https://ildefonsosegura.es/convierte-tu-logo-en-piedra-envejecelo-y-agrietalo-con-photoshop/feed/</wfw:commentRss>
			<slash:comments>0</slash:comments>
		
		
			</item>
		<item>
		<title>Tutorial Photoshop // Crea personajes 3D</title>
		<link>https://ildefonsosegura.es/crea-personajes-3d-con-photoshop/</link>
					<comments>https://ildefonsosegura.es/crea-personajes-3d-con-photoshop/#respond</comments>
		
		<dc:creator><![CDATA[Ildefonso Segura]]></dc:creator>
		<pubDate>Sat, 22 Dec 2012 11:31:51 +0000</pubDate>
				<category><![CDATA[3D]]></category>
		<category><![CDATA[Efectos]]></category>
		<category><![CDATA[Estilos]]></category>
		<category><![CDATA[Photoshop]]></category>
		<category><![CDATA[Tecnicas]]></category>
		<category><![CDATA[Tutoriales]]></category>
		<category><![CDATA[degradados]]></category>
		<category><![CDATA[estilos]]></category>
		<category><![CDATA[eugenio]]></category>
		<category><![CDATA[formas]]></category>
		<category><![CDATA[fusion]]></category>
		<category><![CDATA[gloriasanis]]></category>
		<category><![CDATA[gusanito]]></category>
		<category><![CDATA[ildefonsosgeura]]></category>
		<category><![CDATA[mascota]]></category>
		<guid isPermaLink="false">http://ildefonsosegura.es/?p=817</guid>

					<description><![CDATA[<p>  Muchos me preguntaban con qué programa hacía yo mi mascota gusanito Eugenio. Pues bien,&#8230;Photoshop me ayudó mucho con degradados y estilos de fusión. Eso sí, debes poner algo de tu creatividad en juego para conseguir resultados similares. No copies a Eugenio porque es mi compañero fiel y mi yo presente en todas las escenas. [&#8230;]</p>
La entrada <a href="https://ildefonsosegura.es/crea-personajes-3d-con-photoshop/">Tutorial Photoshop // Crea personajes 3D</a> apareció primero en <a href="https://ildefonsosegura.es">Ildefonso Segura</a>.]]></description>
										<content:encoded><![CDATA[<div data-elementor-type="wp-post" data-elementor-id="817" class="elementor elementor-817">
						<section class="elementor-section elementor-top-section elementor-element elementor-element-54e94fcc elementor-section-boxed elementor-section-height-default elementor-section-height-default" data-id="54e94fcc" data-element_type="section" data-e-type="section">
						<div class="elementor-container elementor-column-gap-default">
					<div class="elementor-column elementor-col-100 elementor-top-column elementor-element elementor-element-7254d6ca" data-id="7254d6ca" data-element_type="column" data-e-type="column">
			<div class="elementor-widget-wrap elementor-element-populated">
						<div class="elementor-element elementor-element-631fc7d4 elementor-widget elementor-widget-text-editor" data-id="631fc7d4" data-element_type="widget" data-e-type="widget" data-widget_type="text-editor.default">
				<div class="elementor-widget-container">
									<p style="text-align: center;"><img loading="lazy" decoding="async" class="size-full wp-image-818 aligncenter" src="https://ildefonsosegura.es/wp-content/uploads/miniatura-eugenio-3D.jpg" alt="miniatura-eugenio-3D" width="500" height="281" srcset="https://ildefonsosegura.es/wp-content/uploads/miniatura-eugenio-3D.jpg 500w, https://ildefonsosegura.es/wp-content/uploads/miniatura-eugenio-3D-300x168.jpg 300w" sizes="(max-width: 500px) 100vw, 500px" /></p><p> </p><p>Muchos me preguntaban con qué programa hacía yo mi mascota gusanito Eugenio. Pues bien,&#8230;Photoshop me ayudó mucho con degradados y estilos de fusión. Eso sí, debes poner algo de tu creatividad en juego para conseguir resultados similares. No copies a Eugenio porque es mi compañero fiel y mi yo presente en todas las escenas. Disfrútalo</p><p style="text-align: left;"><span style="color: #800000;"><strong>VIDEOTUTORIAL </strong></span></p><p> </p><center><iframe src="https://www.youtube.com/embed/tFnOyKxm0EU" width="640" height="360" frameborder="0" allowfullscreen="allowfullscreen"></iframe></center><p> </p>								</div>
				</div>
					</div>
		</div>
					</div>
		</section>
				<section class="elementor-section elementor-top-section elementor-element elementor-element-554da3a2 elementor-section-boxed elementor-section-height-default elementor-section-height-default" data-id="554da3a2" data-element_type="section" data-e-type="section">
						<div class="elementor-container elementor-column-gap-default">
					<div class="elementor-column elementor-col-100 elementor-top-column elementor-element elementor-element-350f3ea2" data-id="350f3ea2" data-element_type="column" data-e-type="column">
			<div class="elementor-widget-wrap elementor-element-populated">
						<div class="elementor-element elementor-element-48c888f0 elementor-widget-divider--view-line elementor-widget elementor-widget-divider" data-id="48c888f0" data-element_type="widget" data-e-type="widget" data-widget_type="divider.default">
				<div class="elementor-widget-container">
							<div class="elementor-divider">
			<span class="elementor-divider-separator">
						</span>
		</div>
						</div>
				</div>
					</div>
		</div>
					</div>
		</section>
				<section class="elementor-section elementor-top-section elementor-element elementor-element-7f0d2d02 elementor-section-full_width elementor-section-height-default elementor-section-height-default" data-id="7f0d2d02" data-element_type="section" data-e-type="section">
						<div class="elementor-container elementor-column-gap-default">
					<div class="elementor-column elementor-col-50 elementor-top-column elementor-element elementor-element-123b6e15" data-id="123b6e15" data-element_type="column" data-e-type="column">
			<div class="elementor-widget-wrap elementor-element-populated">
						<div class="elementor-element elementor-element-a09269e elementor-align-right elementor-invisible elementor-widget elementor-widget-button" data-id="a09269e" data-element_type="widget" data-e-type="widget" data-settings="{&quot;_animation&quot;:&quot;shake&quot;}" data-widget_type="button.default">
				<div class="elementor-widget-container">
									<div class="elementor-button-wrapper">
					<a class="elementor-button elementor-button-link elementor-size-sm elementor-animation-grow" href="https://drive.google.com/open?id=0B_nJkCGJubucdFZEUGI2MFR0V1E" target="_blank">
						<span class="elementor-button-content-wrapper">
									<span class="elementor-button-text">DESCARGA EL MATERIAL</span>
					</span>
					</a>
				</div>
								</div>
				</div>
					</div>
		</div>
				<div class="elementor-column elementor-col-50 elementor-top-column elementor-element elementor-element-6e4e050" data-id="6e4e050" data-element_type="column" data-e-type="column">
			<div class="elementor-widget-wrap elementor-element-populated">
						<div class="elementor-element elementor-element-3df851f2 elementor-widget elementor-widget-html" data-id="3df851f2" data-element_type="widget" data-e-type="widget" data-settings="{&quot;_animation&quot;:&quot;none&quot;}" data-widget_type="html.default">
				<div class="elementor-widget-container">
					<form action="https://www.paypal.com/cgi-bin/webscr" method="post" target="_blank">
<input type="hidden" name="cmd" value="_donations">
<input type="hidden" name="business" value="ildefonsosegura@gmail.com">
<input type="hidden" name="lc" value="ES">
<input type="hidden" name="item_name" value="MANTENIMIENTO DE LA PAGINA DE ILDEFONSOSEGURA">
<input type="hidden" name="no_note" value="0">
<input type="hidden" name="currency_code" value="EUR">
<input type="hidden" name="bn" value="PP-DonationsBF:paypal1.jpg:NonHostedGuest">
<input type="image" src="http://ildefonsosegura.es/wp-content/uploads/paypal-updated-1.png" border="0" name="submit" alt="PayPal. La forma rápida y segura de pagar en Internet.">
<img loading="lazy" decoding="async" alt="" border="0" src="https://www.paypalobjects.com/es_ES/i/scr/pixel.gif" width="1" height="1">
</form>				</div>
				</div>
					</div>
		</div>
					</div>
		</section>
				<section class="elementor-section elementor-top-section elementor-element elementor-element-53a5a6e6 elementor-section-boxed elementor-section-height-default elementor-section-height-default" data-id="53a5a6e6" data-element_type="section" data-e-type="section">
						<div class="elementor-container elementor-column-gap-default">
					<div class="elementor-column elementor-col-100 elementor-top-column elementor-element elementor-element-3e1ae482" data-id="3e1ae482" data-element_type="column" data-e-type="column">
			<div class="elementor-widget-wrap elementor-element-populated">
						<div class="elementor-element elementor-element-51876740 elementor-widget-divider--view-line elementor-widget elementor-widget-divider" data-id="51876740" data-element_type="widget" data-e-type="widget" data-widget_type="divider.default">
				<div class="elementor-widget-container">
							<div class="elementor-divider">
			<span class="elementor-divider-separator">
						</span>
		</div>
						</div>
				</div>
					</div>
		</div>
					</div>
		</section>
				<section class="elementor-section elementor-top-section elementor-element elementor-element-7702fc4 elementor-section-full_width elementor-section-height-default elementor-section-height-default" data-id="7702fc4" data-element_type="section" data-e-type="section">
						<div class="elementor-container elementor-column-gap-default">
					<div class="elementor-column elementor-col-100 elementor-top-column elementor-element elementor-element-5004cb0f" data-id="5004cb0f" data-element_type="column" data-e-type="column">
			<div class="elementor-widget-wrap elementor-element-populated">
						<div class="elementor-element elementor-element-3ab3b020 elementor-widget elementor-widget-text-editor" data-id="3ab3b020" data-element_type="widget" data-e-type="widget" data-widget_type="text-editor.default">
				<div class="elementor-widget-container">
									<div><div align="center"><center><strong style="color: #ff0000;">Suscríbete a mi canal de Youtube:</strong></center><div><div><div align="center"><p><script src="https://apis.google.com/js/platform.js"></script></p><div class="g-ytsubscribe" data-channel="ildefonsosegura" data-layout="full" data-count="default"> </div></div></div><p> </p><p style="text-align: center;">No te lo pierdas y comparte tus trabajos en mi página de facebook (<span style="color: #0000ff;"><strong><a style="color: #0000ff;" href="http://www.facebook.com/IldefonsoSeguraPage" target="_blank" rel="noopener noreferrer">IldefonsoSeguraPage</a></strong></span>)<br />Espero que te guste y compartas el vídeo. No dejes de compartir este post.</p><p style="text-align: center;">Así es como me puedes ayudar 🙂 Gracias</p></div></div></div>								</div>
				</div>
					</div>
		</div>
					</div>
		</section>
				</div>La entrada <a href="https://ildefonsosegura.es/crea-personajes-3d-con-photoshop/">Tutorial Photoshop // Crea personajes 3D</a> apareció primero en <a href="https://ildefonsosegura.es">Ildefonso Segura</a>.]]></content:encoded>
					
					<wfw:commentRss>https://ildefonsosegura.es/crea-personajes-3d-con-photoshop/feed/</wfw:commentRss>
			<slash:comments>0</slash:comments>
		
		
			</item>
		<item>
		<title>Speed art Photoshop  // Tubbito (Tubeespaña)</title>
		<link>https://ildefonsosegura.es/speed-art-tubbito-tubeespana/</link>
					<comments>https://ildefonsosegura.es/speed-art-tubbito-tubeespana/#respond</comments>
		
		<dc:creator><![CDATA[Ildefonso Segura]]></dc:creator>
		<pubDate>Sat, 22 Dec 2012 10:52:39 +0000</pubDate>
				<category><![CDATA[Efectos]]></category>
		<category><![CDATA[Photoshop]]></category>
		<category><![CDATA[Speed Art]]></category>
		<category><![CDATA[Tecnicas]]></category>
		<category><![CDATA[Video]]></category>
		<category><![CDATA[Wallpaper]]></category>
		<category><![CDATA[art]]></category>
		<category><![CDATA[degradados]]></category>
		<category><![CDATA[estilos]]></category>
		<category><![CDATA[formas]]></category>
		<category><![CDATA[mascota]]></category>
		<category><![CDATA[speed]]></category>
		<category><![CDATA[trazados]]></category>
		<category><![CDATA[tubbito]]></category>
		<category><![CDATA[tubeespaña]]></category>
		<guid isPermaLink="false">http://ildefonsosegura.es/?p=790</guid>

					<description><![CDATA[<p>&#160; A través de infinidad de degradados y formas podemos construir una mascota. En este caso la de Tubeespaña (asociación española de videobloggers; infórmate para ser miembro). La música da gusto también (Musica de XERA, Título LLIENDES, http://xera.eu, Música libre de copyright) SPEED ART &#160; VIDEOTUTORIAL PARA HACER EL FONDO &#160; &#160; No dejes de [&#8230;]</p>
La entrada <a href="https://ildefonsosegura.es/speed-art-tubbito-tubeespana/">Speed art Photoshop  // Tubbito (Tubeespaña)</a> apareció primero en <a href="https://ildefonsosegura.es">Ildefonso Segura</a>.]]></description>
										<content:encoded><![CDATA[<p style="text-align: center;"><a href="https://ildefonsosegura.es/speed-art-tubbito-tubeespana/tubbito-by-ilde2/" rel="attachment wp-att-791"><img loading="lazy" decoding="async" class="alignnone size-full wp-image-791" src="https://ildefonsosegura.es/wp-content/uploads/Tubbito-by-ilde2.jpg" alt="Tubbito-by-ilde2" width="350" height="525" srcset="https://ildefonsosegura.es/wp-content/uploads/Tubbito-by-ilde2.jpg 350w, https://ildefonsosegura.es/wp-content/uploads/Tubbito-by-ilde2-200x300.jpg 200w" sizes="(max-width: 350px) 100vw, 350px" /></a></p>
<p>&nbsp;</p>
<p>A través de infinidad de degradados y formas podemos construir una mascota. En este caso la de <a title="Tubeespaña" href="http://www.conectapublicidad.com/tubeespana/" target="_blank">Tubeespaña </a>(asociación española de videobloggers; infórmate para ser miembro). La música da gusto también (Musica de XERA, Título LLIENDES, <a dir="ltr" title="http://xera.eu" href="http://xera.eu" target="_blank" rel="nofollow">http://xera.eu, </a>Música libre de copyright)</p>
<p style="text-align: left;"><span style="color: #800000;"><strong>SPEED ART </strong></span></p>
<p><center><iframe src="https://www.youtube.com/embed/q1aHksIAMis" width="640" height="420" frameborder="0" allowfullscreen="allowfullscreen"></iframe></center>&nbsp;</p>
<p style="text-align: left;"><span style="color: #800000;"><strong>VIDEOTUTORIAL PARA HACER EL FONDO </strong></span></p>
<p><center><iframe src="https://www.youtube.com/embed/sIDTPLzAoe0" width="640" height="420" frameborder="0" allowfullscreen="allowfullscreen"></iframe></center>&nbsp;</p>
<p>&nbsp;</p>
<div align="right">
<p><script src="https://apis.google.com/js/platform.js"></script><script>// <![CDATA[
function onYtEvent(payload) { if (payload.eventType == 'subscribe') { // Add code to handle subscribe event. } else if (payload.eventType == 'unsubscribe') { // Add code to handle unsubscribe event. } if (window.console) { // for debugging only window.console.log('YT event: ', payload); } }
// ]]&gt;</script></p>
<div class="g-ytsubscribe" data-channel="ildefonsosegura" data-layout="default" data-count="default" data-onytevent="onYtEvent"></div>
</div>
</div>
<p style="text-align: left;">No dejes de compartir este post.</p>
<p style="text-align: left;">Así es como me puedes ayudar 🙂 Gracias</p>
<p>&nbsp;</p>La entrada <a href="https://ildefonsosegura.es/speed-art-tubbito-tubeespana/">Speed art Photoshop  // Tubbito (Tubeespaña)</a> apareció primero en <a href="https://ildefonsosegura.es">Ildefonso Segura</a>.]]></content:encoded>
					
					<wfw:commentRss>https://ildefonsosegura.es/speed-art-tubbito-tubeespana/feed/</wfw:commentRss>
			<slash:comments>0</slash:comments>
		
		
			</item>
	</channel>
</rss>
<br />
<b>Fatal error</b>:  Uncaught TypeError: mysqli_num_fields(): Argument #1 ($result) must be of type mysqli_result, bool given in /var/www/vhosts/ildefonsosegura.es/httpdocs/wp-includes/class-wpdb.php:3941
Stack trace:
#0 /var/www/vhosts/ildefonsosegura.es/httpdocs/wp-includes/class-wpdb.php(3941): mysqli_num_fields()
#1 /var/www/vhosts/ildefonsosegura.es/httpdocs/wp-includes/class-wpdb.php(785): wpdb-&gt;load_col_info()
#2 /var/www/vhosts/ildefonsosegura.es/httpdocs/wp-content/plugins/w3-total-cache/DbCache_WpdbInjection_QueryCaching.php(230): wpdb-&gt;__get()
#3 /var/www/vhosts/ildefonsosegura.es/httpdocs/wp-content/plugins/w3-total-cache/DbCache_WpdbNew.php(220): W3TC\DbCache_WpdbInjection_QueryCaching-&gt;query()
#4 /var/www/vhosts/ildefonsosegura.es/httpdocs/wp-content/plugins/aaa-option-optimizer/src/class-database.php(199): W3TC\DbCache_WpdbNew-&gt;query()
#5 /var/www/vhosts/ildefonsosegura.es/httpdocs/wp-content/plugins/aaa-option-optimizer/src/class-plugin.php(182): Progress_Planner\OptionOptimizer\Database::batch_insert()
#6 /var/www/vhosts/ildefonsosegura.es/httpdocs/wp-includes/class-wp-hook.php(353): Progress_Planner\OptionOptimizer\Plugin-&gt;update_tracked_options()
#7 /var/www/vhosts/ildefonsosegura.es/httpdocs/wp-includes/class-wp-hook.php(377): WP_Hook-&gt;apply_filters()
#8 /var/www/vhosts/ildefonsosegura.es/httpdocs/wp-includes/plugin.php(523): WP_Hook-&gt;do_action()
#9 /var/www/vhosts/ildefonsosegura.es/httpdocs/wp-includes/load.php(1308): do_action()
#10 [internal function]: shutdown_action_hook()
#11 {main}
  thrown in <b>/var/www/vhosts/ildefonsosegura.es/httpdocs/wp-includes/class-wpdb.php</b> on line <b>3941</b><br />