<?xml version="1.0" encoding="UTF-8"?><rss version="2.0"
	xmlns:content="http://purl.org/rss/1.0/modules/content/"
	xmlns:wfw="http://wellformedweb.org/CommentAPI/"
	xmlns:dc="http://purl.org/dc/elements/1.1/"
	xmlns:atom="http://www.w3.org/2005/Atom"
	xmlns:sy="http://purl.org/rss/1.0/modules/syndication/"
	xmlns:slash="http://purl.org/rss/1.0/modules/slash/"
	>

<channel>
	<title>grabado | Ildefonso Segura</title>
	<atom:link href="https://ildefonsosegura.es/tag/grabado/feed/" rel="self" type="application/rss+xml" />
	<link>https://ildefonsosegura.es</link>
	<description>Tutoriales de diseño y animación</description>
	<lastBuildDate>Sun, 11 Jun 2023 17:35:06 +0000</lastBuildDate>
	<language>es</language>
	<sy:updatePeriod>
	hourly	</sy:updatePeriod>
	<sy:updateFrequency>
	1	</sy:updateFrequency>
	<generator>https://wordpress.org/?v=7.1</generator>

<image>
	<url>https://ildefonsosegura.es/wp-content/uploads/cropped-Favicon-new-logo-website-32x32.png</url>
	<title>grabado | Ildefonso Segura</title>
	<link>https://ildefonsosegura.es</link>
	<width>32</width>
	<height>32</height>
</image> 
	<item>
		<title>#Tutorial #Photoshop escrito: Texto tallado en madera by @ildefonsosegura</title>
		<link>https://ildefonsosegura.es/tutorial-photoshosop-escrito-texto-escrito-en-madera-by-ildefonsosegura/</link>
					<comments>https://ildefonsosegura.es/tutorial-photoshosop-escrito-texto-escrito-en-madera-by-ildefonsosegura/#comments</comments>
		
		<dc:creator><![CDATA[Ildefonso Segura]]></dc:creator>
		<pubDate>Mon, 29 Jul 2019 15:00:14 +0000</pubDate>
				<category><![CDATA[Efectos]]></category>
		<category><![CDATA[Estilos]]></category>
		<category><![CDATA[Photoshop]]></category>
		<category><![CDATA[PREMIUM]]></category>
		<category><![CDATA[Tecnicas]]></category>
		<category><![CDATA[Textos]]></category>
		<category><![CDATA[Tutorial Escrito]]></category>
		<category><![CDATA[Tutoriales]]></category>
		<category><![CDATA[CC]]></category>
		<category><![CDATA[cs4]]></category>
		<category><![CDATA[cs5]]></category>
		<category><![CDATA[cs6]]></category>
		<category><![CDATA[escrito]]></category>
		<category><![CDATA[estilo]]></category>
		<category><![CDATA[gloriasanis]]></category>
		<category><![CDATA[grabado]]></category>
		<category><![CDATA[halloween]]></category>
		<category><![CDATA[ildefonsosegura]]></category>
		<category><![CDATA[madera]]></category>
		<category><![CDATA[photoshop]]></category>
		<category><![CDATA[style]]></category>
		<category><![CDATA[text]]></category>
		<category><![CDATA[texto]]></category>
		<category><![CDATA[textura]]></category>
		<category><![CDATA[tuto]]></category>
		<category><![CDATA[tutorial]]></category>
		<category><![CDATA[wallpaper]]></category>
		<category><![CDATA[written]]></category>
		<guid isPermaLink="false">http://ildefonsosegura.es/?p=3143</guid>

					<description><![CDATA[<p>Con fecha 21 de octubre de 2013 se publica un videotutorial donde explico como conseguir un efecto de tallado de una calavera en una textura de madera. Con la misma técnica podrías conseguir la integración de un volumen sencillo en una textura determinada. Aprovechando estas fechas cercanas a Halloween, tienes a tu disposición un videotutorial [&#8230;]</p>
La entrada <a href="https://ildefonsosegura.es/tutorial-photoshosop-escrito-texto-escrito-en-madera-by-ildefonsosegura/">#Tutorial #Photoshop escrito: Texto tallado en madera by @ildefonsosegura</a> apareció primero en <a href="https://ildefonsosegura.es">Ildefonso Segura</a>.]]></description>
										<content:encoded><![CDATA[<div data-elementor-type="wp-post" data-elementor-id="3143" class="elementor elementor-3143">
						<section class="elementor-section elementor-top-section elementor-element elementor-element-28fd328 elementor-section-boxed elementor-section-height-default elementor-section-height-default" data-id="28fd328" data-element_type="section" data-e-type="section">
						<div class="elementor-container elementor-column-gap-default">
					<div class="elementor-column elementor-col-100 elementor-top-column elementor-element elementor-element-60bcc37" data-id="60bcc37" data-element_type="column" data-e-type="column">
			<div class="elementor-widget-wrap elementor-element-populated">
						<div class="elementor-element elementor-element-0f19028 elementor-widget elementor-widget-text-editor" data-id="0f19028" data-element_type="widget" data-e-type="widget" data-widget_type="text-editor.default">
				<div class="elementor-widget-container">
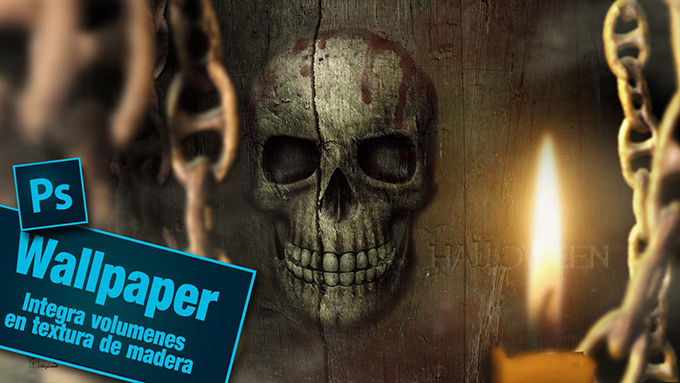
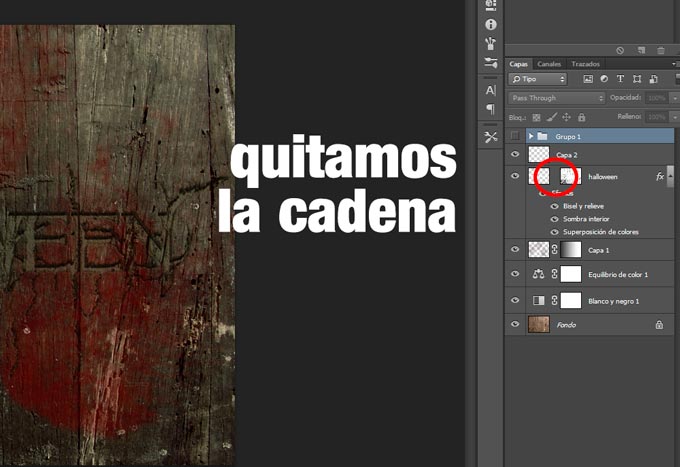
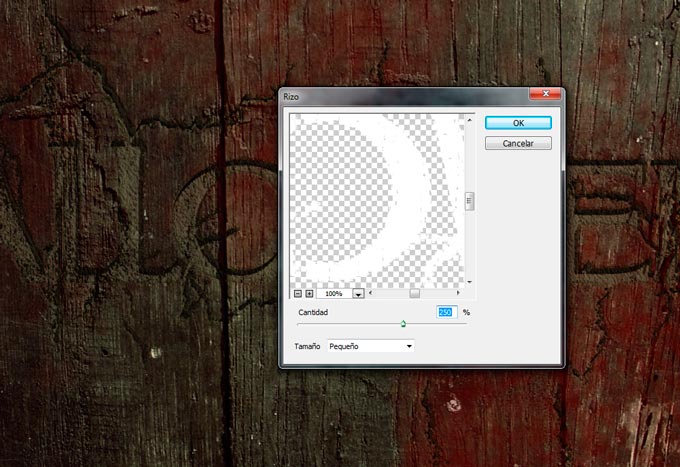
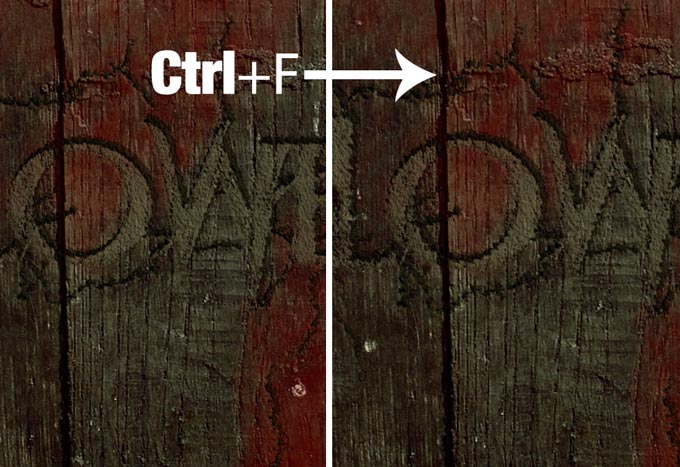
									<p>Con fecha <span style="color: #800000;"><strong>21 de octubre de 2013</strong></span> se publica un videotutorial donde explico como conseguir un efecto de tallado de una calavera en una textura de madera. Con la misma técnica podrías conseguir la integración de un volumen sencillo en una textura determinada.</p><p>Aprovechando estas fechas cercanas a Halloween, tienes a tu disposición un videotutorial junto con otros que ya publiqué y que te pueden servir también, donde te muestro unas técnicas sencillas con máscaras, filtros y capas de ajuste. El resultado es fantástico y te invito a ver el videotutorial haciendo clic en la imagen siguiente.</p><p style="text-align: center;"><a href="http://ildefonsosegura.es/tutorial-photoshop-fusionar-volumenes-con-texturas-by-ildefonsosegura-wallpaper-halloween" target="_blank" rel="attachment wp-att-3142 noopener noreferrer"><img fetchpriority="high" decoding="async" class="size-full wp-image-3142 aligncenter" src="http://ildefonsosegura.es/wp-content/uploads/Calavera-de-madera-wallpaper.jpg" alt="Calavera-de-madera-wallpaper" width="680" height="383" srcset="https://ildefonsosegura.es/wp-content/uploads/Calavera-de-madera-wallpaper.jpg 680w, https://ildefonsosegura.es/wp-content/uploads/Calavera-de-madera-wallpaper-300x168.jpg 300w" sizes="(max-width: 680px) 100vw, 680px" /></a></p><p style="text-align: center;"><strong style="color: #800000;">HAZ CLIC EN LA IMAGEN PARA VER EL VIDEOTUTORIAL</strong></p>								</div>
				</div>
					</div>
		</div>
					</div>
		</section>
				<section class="elementor-section elementor-top-section elementor-element elementor-element-52db58ed elementor-section-full_width elementor-section-height-default elementor-section-height-default" data-id="52db58ed" data-element_type="section" data-e-type="section">
						<div class="elementor-container elementor-column-gap-default">
					<div class="elementor-column elementor-col-50 elementor-top-column elementor-element elementor-element-1406c6bf" data-id="1406c6bf" data-element_type="column" data-e-type="column">
			<div class="elementor-widget-wrap elementor-element-populated">
						<div class="elementor-element elementor-element-5eda612a elementor-align-right elementor-widget elementor-widget-button" data-id="5eda612a" data-element_type="widget" data-e-type="widget" data-widget_type="button.default">
				<div class="elementor-widget-container">
									<div class="elementor-button-wrapper">
					<a class="elementor-button elementor-button-link elementor-size-sm elementor-animation-grow" href="https://drive.google.com/open?id=0B_nJkCGJubuca2tUelpSTUlDSmc">
						<span class="elementor-button-content-wrapper">
						<span class="elementor-button-icon">
				<i aria-hidden="true" class="far fa-arrow-alt-circle-down"></i>			</span>
									<span class="elementor-button-text">DESCARGA EL MATERIAL</span>
					</span>
					</a>
				</div>
								</div>
				</div>
					</div>
		</div>
				<div class="elementor-column elementor-col-50 elementor-top-column elementor-element elementor-element-460e16d1" data-id="460e16d1" data-element_type="column" data-e-type="column">
			<div class="elementor-widget-wrap elementor-element-populated">
						<div class="elementor-element elementor-element-471c22fd elementor-widget elementor-widget-html" data-id="471c22fd" data-element_type="widget" data-e-type="widget" data-settings="{&quot;_animation&quot;:&quot;none&quot;}" data-widget_type="html.default">
				<div class="elementor-widget-container">
					<center><form action="https://www.paypal.com/cgi-bin/webscr" method="post" target="_blank">
<input type="hidden" name="cmd" value="_donations">
<input type="hidden" name="business" value="ildefonsosegura@gmail.com">
<input type="hidden" name="lc" value="ES">
<input type="hidden" name="item_name" value="MANTENIMIENTO DE LA PAGINA DE ILDEFONSOSEGURA">
<input type="hidden" name="no_note" value="0">
<input type="hidden" name="currency_code" value="EUR">
<input type="hidden" name="bn" value="PP-DonationsBF:paypal1.jpg:NonHostedGuest">
<input type="image" src="http://ildefonsosegura.es/wp-content/uploads/paypal-updated-1.png" border="0" name="submit" alt="PayPal. La forma rápida y segura de pagar en Internet.">
<img decoding="async" alt="" border="0" src="https://www.paypalobjects.com/es_ES/i/scr/pixel.gif" width="1" height="1">
</form></center>				</div>
				</div>
					</div>
		</div>
					</div>
		</section>
				<section class="elementor-section elementor-top-section elementor-element elementor-element-792abb9a elementor-section-boxed elementor-section-height-default elementor-section-height-default" data-id="792abb9a" data-element_type="section" data-e-type="section">
						<div class="elementor-container elementor-column-gap-default">
					<div class="elementor-column elementor-col-100 elementor-top-column elementor-element elementor-element-448b7dc7" data-id="448b7dc7" data-element_type="column" data-e-type="column">
			<div class="elementor-widget-wrap elementor-element-populated">
						<div class="elementor-element elementor-element-122cd2cf elementor-widget elementor-widget-text-editor" data-id="122cd2cf" data-element_type="widget" data-e-type="widget" data-widget_type="text-editor.default">
				<div class="elementor-widget-container">
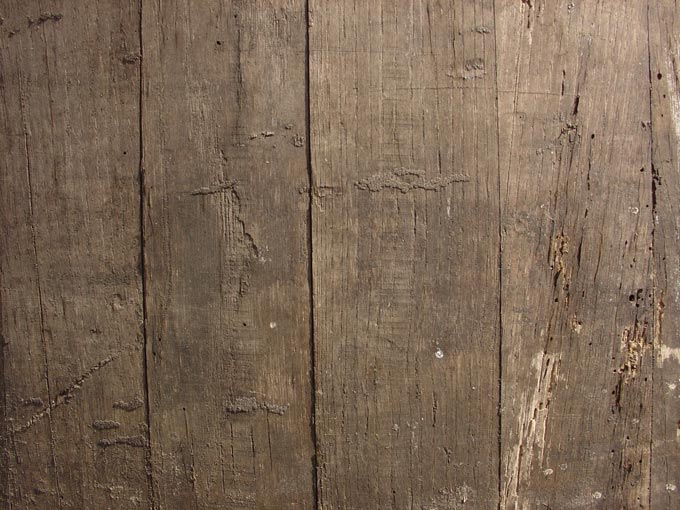
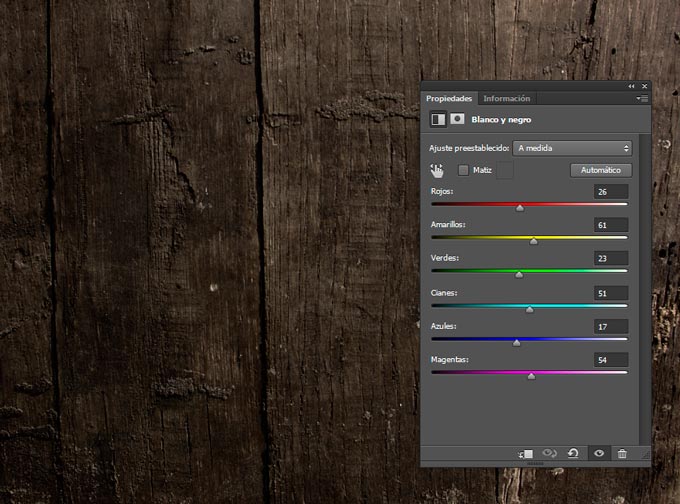
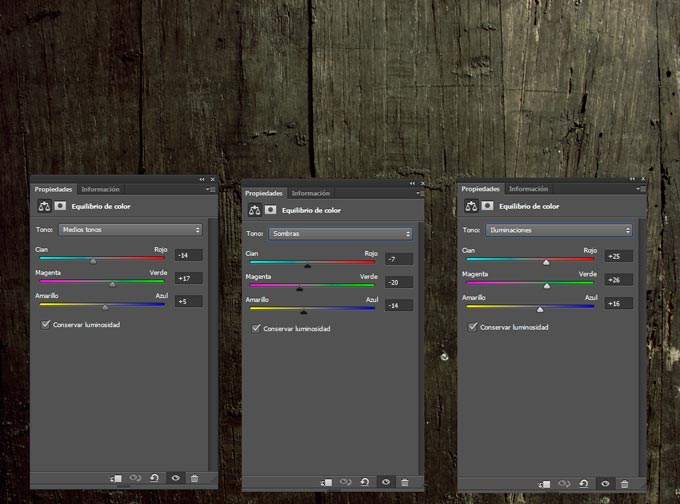
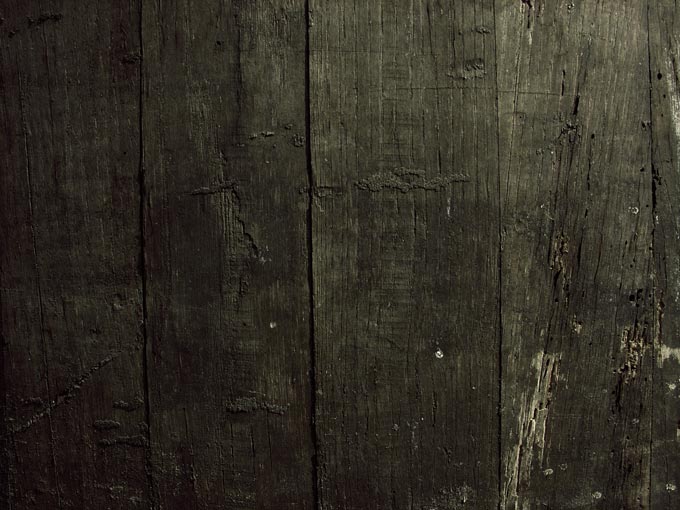
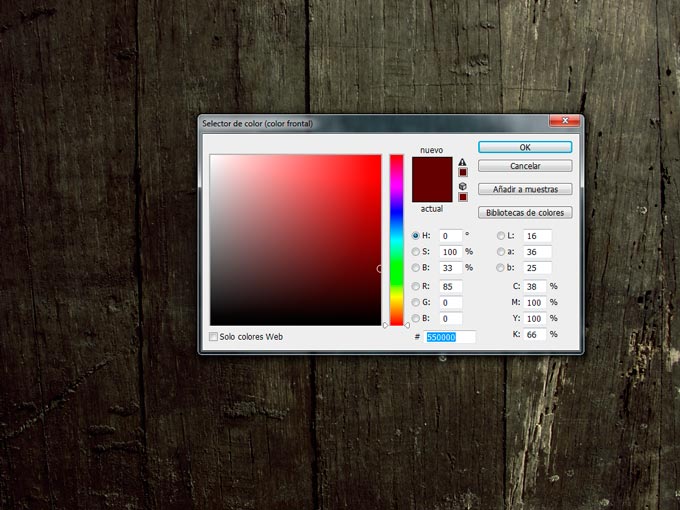
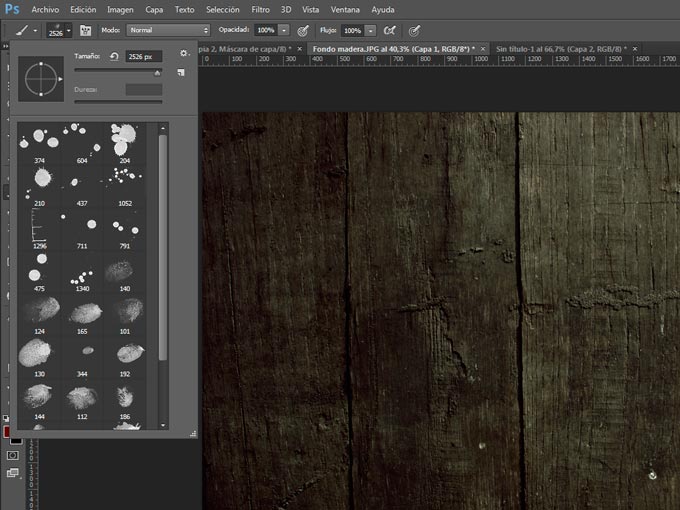
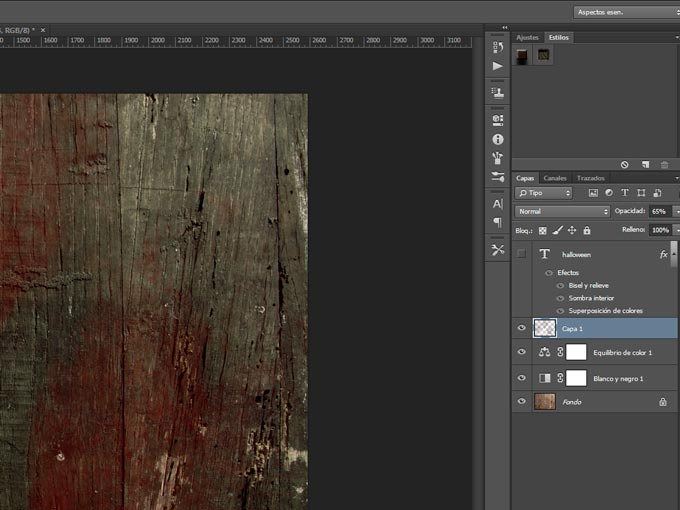
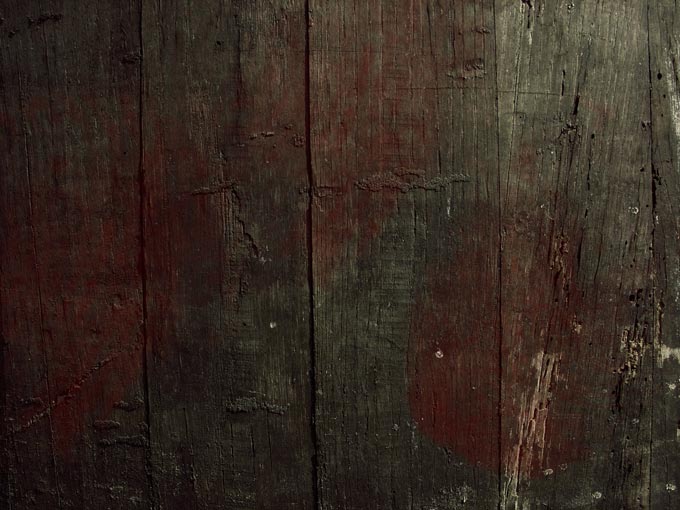
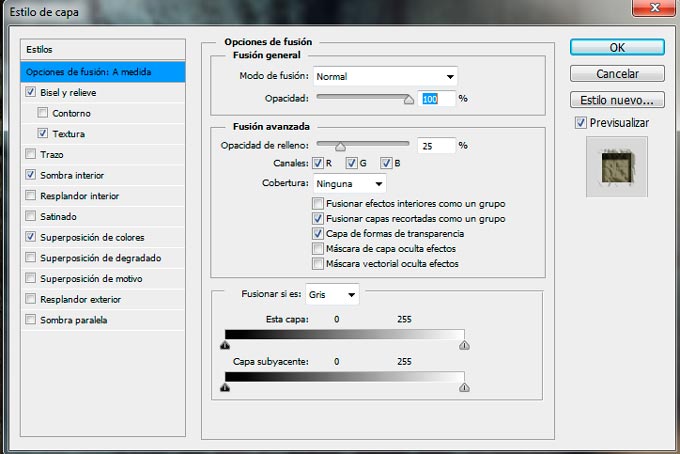
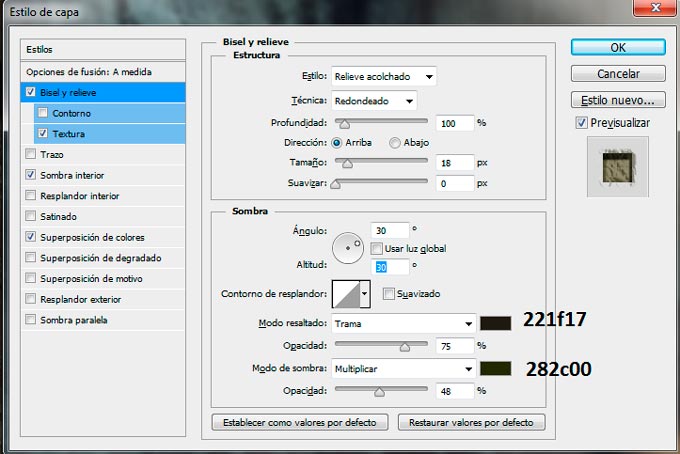
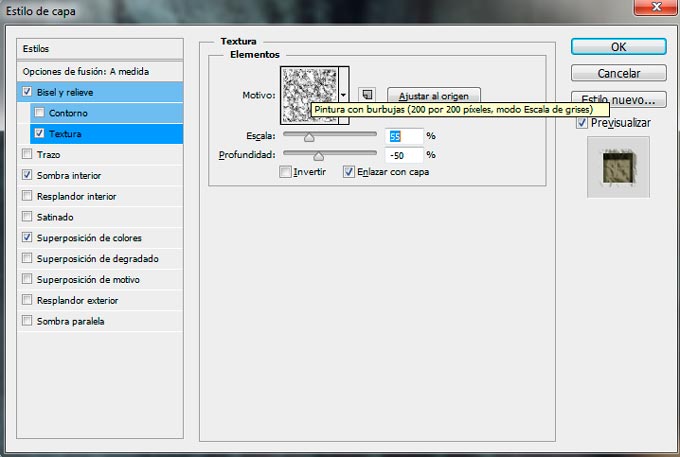
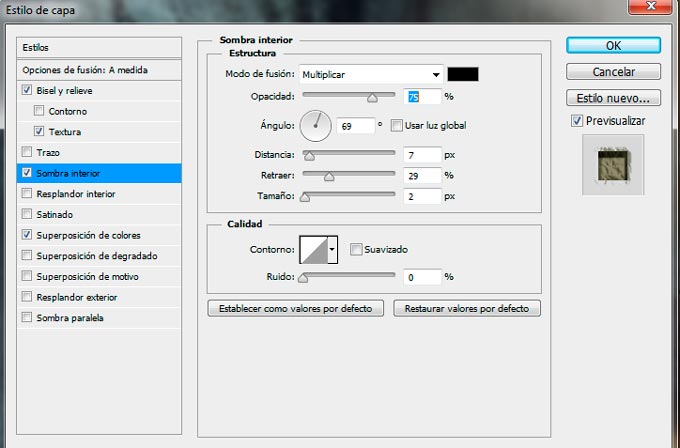
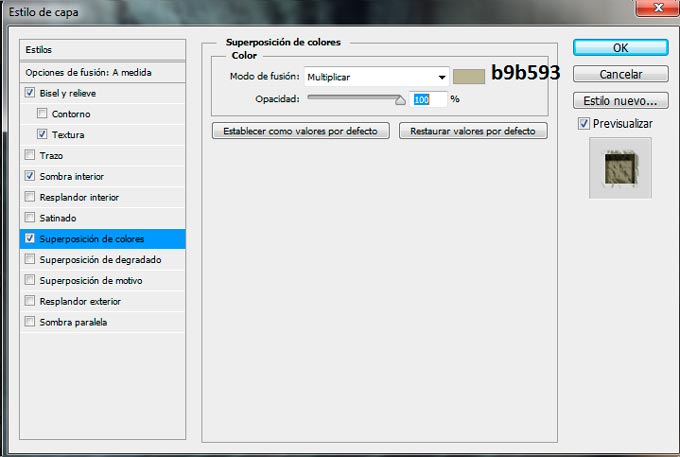
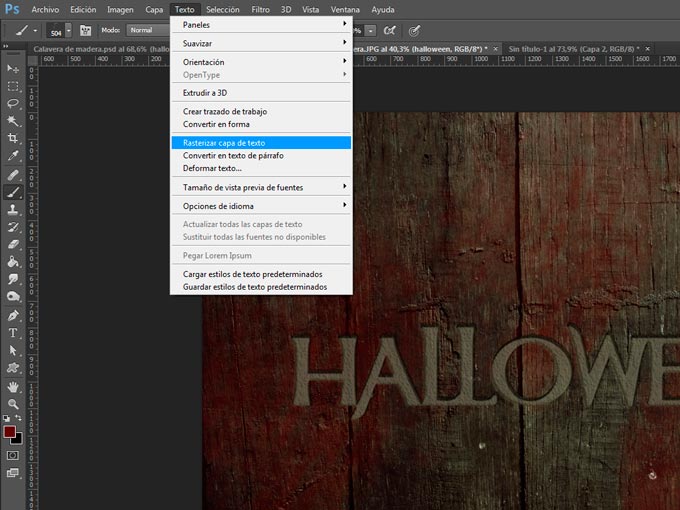
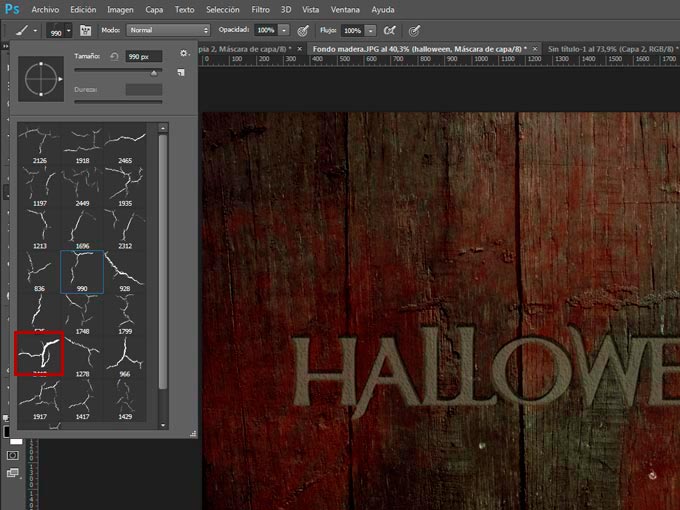
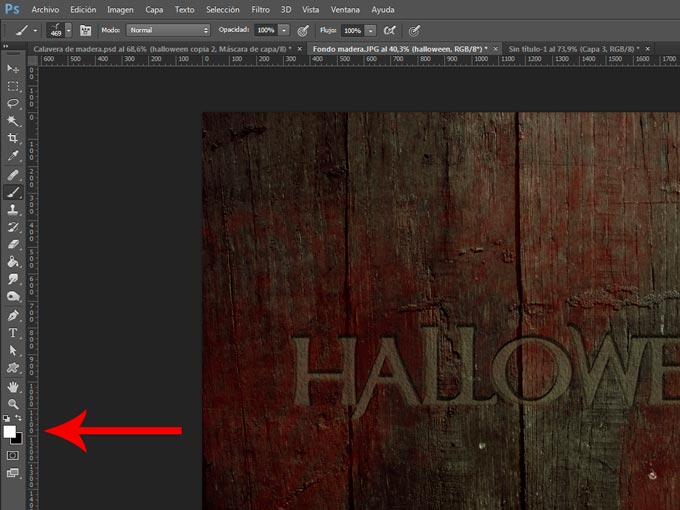
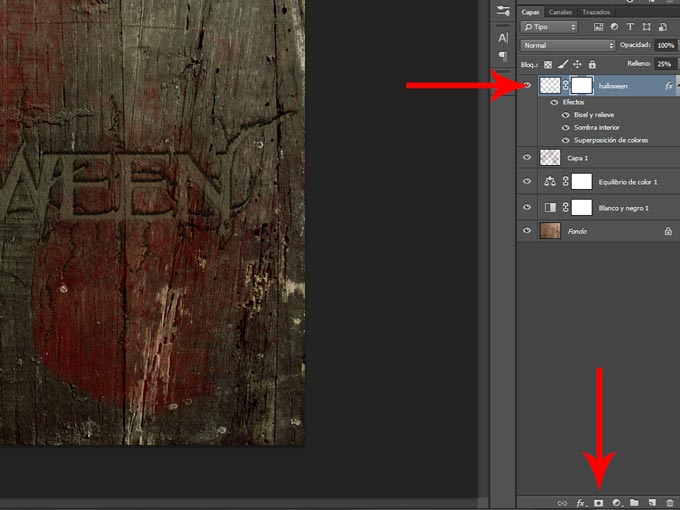
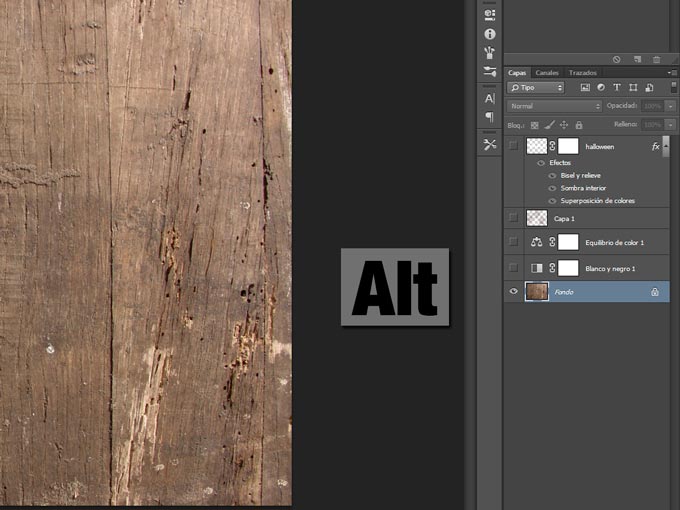
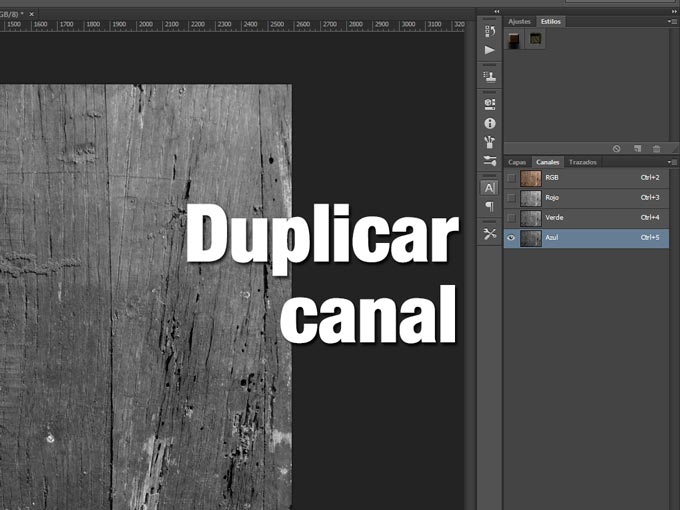
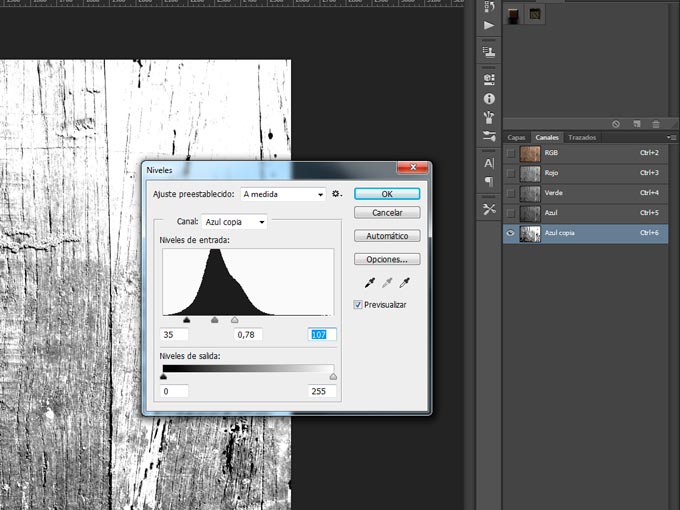
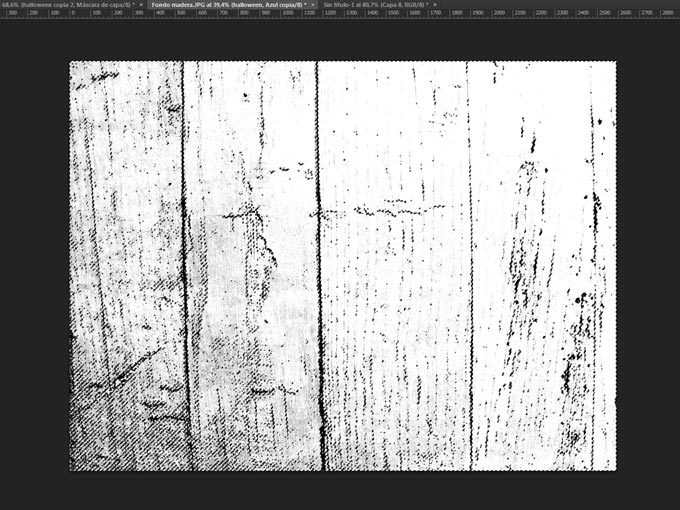
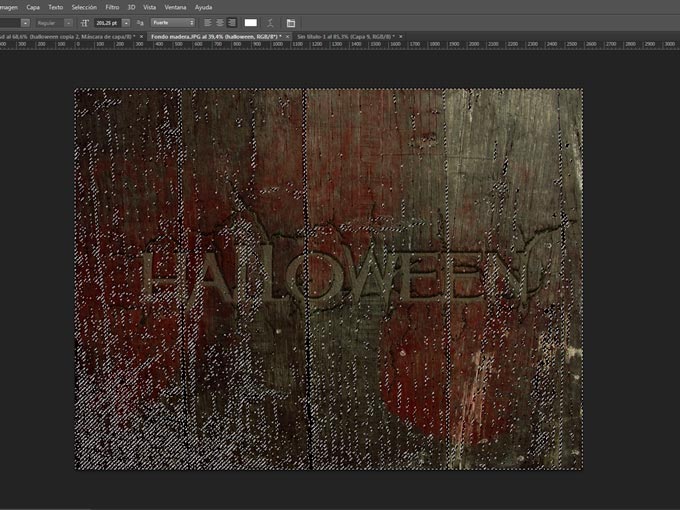
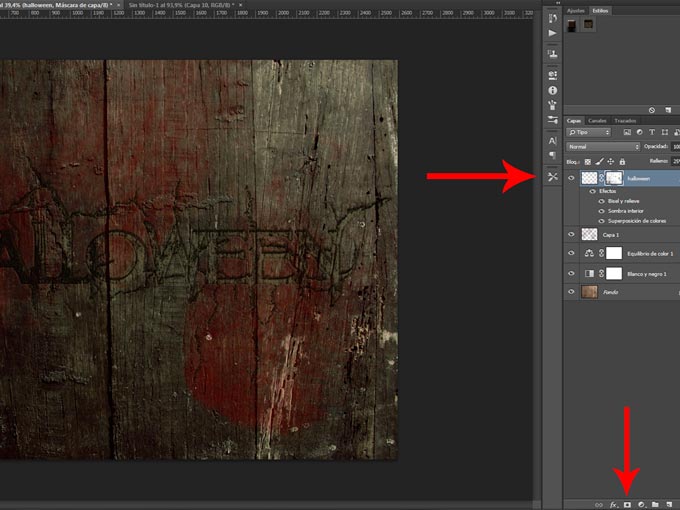
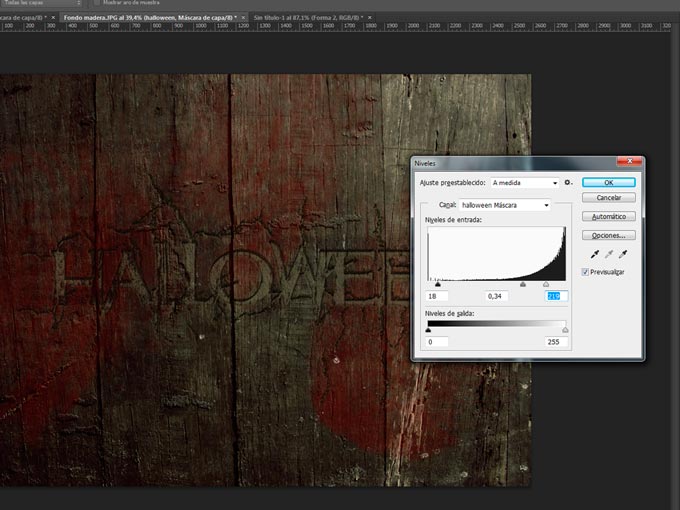
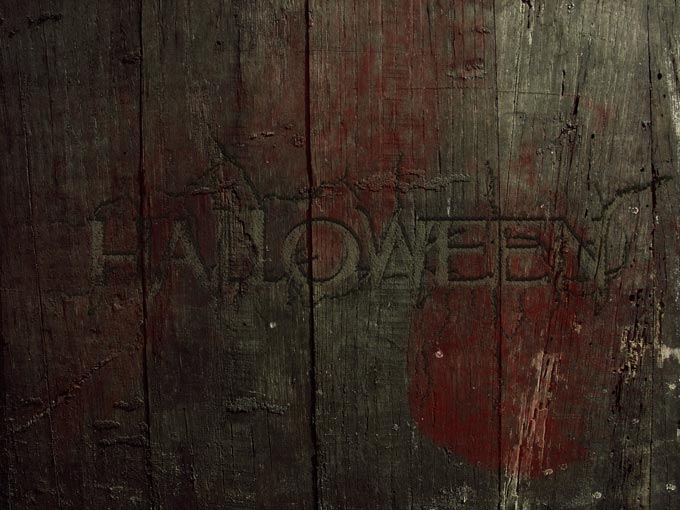
									<pre> [widget id="custom_html-8"]</pre><p>Tutoriales relacionados con la temática Halloween</p><p><a href="http://ildefonsosegura.es/texto-con-textura-de-calabaza-con-cinema4d-y-photoshop-wallpaper-halloween/" target="_blank" rel="noopener noreferrer"><img decoding="async" class="wp-image-1298 aligncenter" src="http://ildefonsosegura.es/wp-content/uploads/texto-calabaza4.jpg" alt="texto-calabaza4" width="194" height="110" srcset="https://ildefonsosegura.es/wp-content/uploads/texto-calabaza4.jpg 600w, https://ildefonsosegura.es/wp-content/uploads/texto-calabaza4-300x169.jpg 300w" sizes="(max-width: 194px) 100vw, 194px" /></a>  <a href="http://ildefonsosegura.es/vaciado-de-volumenes-con-boleanos-en-cinema4d/" target="_blank" rel="attachment wp-att-1304 noopener noreferrer"><img loading="lazy" decoding="async" class="wp-image-1304 aligncenter" src="http://ildefonsosegura.es/wp-content/uploads/Cara-de-calabaza.jpg" alt="Cara-de-calabaza" width="194" height="110" /></a>  <a href="http://ildefonsosegura.es/convertir-personas-en-zombis/" target="_blank" rel="attachment wp-att-3163 noopener noreferrer"><img loading="lazy" decoding="async" class="wp-image-3163 aligncenter" src="http://ildefonsosegura.es/wp-content/uploads/ZOMBIS-by-Ildefonsosegura1.jpg" alt="ZOMBIS-by-Ildefonsosegura" width="194" height="110" srcset="https://ildefonsosegura.es/wp-content/uploads/ZOMBIS-by-Ildefonsosegura1.jpg 600w, https://ildefonsosegura.es/wp-content/uploads/ZOMBIS-by-Ildefonsosegura1-300x169.jpg 300w" sizes="(max-width: 194px) 100vw, 194px" /></a></p><p>En este post te muestro un tutorial que completa al videotutorial citado dado que nos enseña a realizar el texto que aparece en el wallpaper de Halloween. El resultado es este y lo vemos paso a paso:</p><p><a href="http://ildefonsosegura.es/tutorial-photoshosop-escrito-texto-escrito-en-madera-by-ildefonsosegura/attachment/995/" rel="attachment wp-att-3148"><img loading="lazy" decoding="async" class="size-full wp-image-3148 aligncenter" src="http://ildefonsosegura.es/wp-content/uploads/995.jpg" alt="995" width="680" height="510" srcset="https://ildefonsosegura.es/wp-content/uploads/995.jpg 680w, https://ildefonsosegura.es/wp-content/uploads/995-300x225.jpg 300w" sizes="(max-width: 680px) 100vw, 680px" /></a></p><h1><span style="color: #800000;"><strong> TUTORIAL PHOTOSHOP</strong></span></h1><p><strong> PASO 1.-</strong>  Abrimos textura de madera donde pondremos el texto</p><p><a href="http://ildefonsosegura.es/tutorial-photoshosop-escrito-texto-escrito-en-madera-by-ildefonsosegura/attachment/1/" rel="attachment wp-att-3110"><img loading="lazy" decoding="async" class="alignnone size-full wp-image-3110 aligncenter" src="http://ildefonsosegura.es/wp-content/uploads/1.jpg" alt="1" width="680" height="510" srcset="https://ildefonsosegura.es/wp-content/uploads/1.jpg 680w, https://ildefonsosegura.es/wp-content/uploads/1-300x225.jpg 300w" sizes="(max-width: 680px) 100vw, 680px" /></a></p><p><strong>PASO 2.-</strong>  Añadimos capa de ajuste de Blanco y negro con los valores por defecto que son los que se ven en la imagen. Ponemos el modo de fusión de la capa en MULTIPLICAR</p><p style="text-align: center;"> <a href="http://ildefonsosegura.es/tutorial-photoshosop-escrito-texto-escrito-en-madera-by-ildefonsosegura/1a/" rel="attachment wp-att-3111"><img loading="lazy" decoding="async" class="alignnone size-full wp-image-3111" src="http://ildefonsosegura.es/wp-content/uploads/1a.jpg" alt="1a" width="680" height="504" srcset="https://ildefonsosegura.es/wp-content/uploads/1a.jpg 680w, https://ildefonsosegura.es/wp-content/uploads/1a-300x222.jpg 300w" sizes="(max-width: 680px) 100vw, 680px" /></a></p><p style="text-align: left;"><strong>PASO 3.-</strong>  Añadimos caja de ajuste de equilibrio de color con los valores de la imagen tanto en medios tonos como en sombras como en iluminaciones. Ponemos el modo de fusión de la capa en COLOR</p><p style="text-align: left;"><a href="http://ildefonsosegura.es/tutorial-photoshosop-escrito-texto-escrito-en-madera-by-ildefonsosegura/1b/" rel="attachment wp-att-3112"><img loading="lazy" decoding="async" class="alignnone size-full wp-image-3112 aligncenter" src="http://ildefonsosegura.es/wp-content/uploads/1b.jpg" alt="1b" width="680" height="504" srcset="https://ildefonsosegura.es/wp-content/uploads/1b.jpg 680w, https://ildefonsosegura.es/wp-content/uploads/1b-300x222.jpg 300w" sizes="(max-width: 680px) 100vw, 680px" /></a></p><p style="text-align: left;"><strong>PASO 4.-</strong>  tendríamos este resultado en la textura a partir del cual podemos trabajar el texto</p><p style="text-align: left;"><a href="http://ildefonsosegura.es/tutorial-photoshosop-escrito-texto-escrito-en-madera-by-ildefonsosegura/1c/" rel="attachment wp-att-3113"><img loading="lazy" decoding="async" class="size-full wp-image-3113 aligncenter" src="http://ildefonsosegura.es/wp-content/uploads/1c.jpg" alt="1c" width="680" height="510" srcset="https://ildefonsosegura.es/wp-content/uploads/1c.jpg 680w, https://ildefonsosegura.es/wp-content/uploads/1c-300x225.jpg 300w" sizes="(max-width: 680px) 100vw, 680px" /></a></p><p style="text-align: left;"><strong>PASO 5.-</strong>  Seleccionamos un color rojo oscuro para emular el color de la sangre. Código 550000</p><p style="text-align: left;"><a href="http://ildefonsosegura.es/tutorial-photoshosop-escrito-texto-escrito-en-madera-by-ildefonsosegura/1d/" rel="attachment wp-att-3114"><img loading="lazy" decoding="async" class="alignnone size-full wp-image-3114 aligncenter" src="http://ildefonsosegura.es/wp-content/uploads/1d.jpg" alt="1d" width="680" height="510" srcset="https://ildefonsosegura.es/wp-content/uploads/1d.jpg 680w, https://ildefonsosegura.es/wp-content/uploads/1d-300x225.jpg 300w" sizes="(max-width: 680px) 100vw, 680px" /></a></p><p style="text-align: left;"><strong>PASO 6.-</strong>  Seleccionamos un pincel de sangre que puedes encontrar en la red. Acuérdate de chequear que no tiene derecho de copyright</p><p style="text-align: left;"><a href="http://ildefonsosegura.es/tutorial-photoshosop-escrito-texto-escrito-en-madera-by-ildefonsosegura/1e/" rel="attachment wp-att-3115"><img loading="lazy" decoding="async" class="alignnone size-full wp-image-3115 aligncenter" src="http://ildefonsosegura.es/wp-content/uploads/1e.jpg" alt="1e" width="680" height="510" srcset="https://ildefonsosegura.es/wp-content/uploads/1e.jpg 680w, https://ildefonsosegura.es/wp-content/uploads/1e-300x225.jpg 300w" sizes="(max-width: 680px) 100vw, 680px" /></a></p><p style="text-align: left;"><strong>PASO 7.-</strong>  Vamos pintando con diferentes tamaños, pinceles, rotacion,&#8230; y bajamos la opacidad de la capa en torno al 65%</p><p style="text-align: left;"><a href="http://ildefonsosegura.es/tutorial-photoshosop-escrito-texto-escrito-en-madera-by-ildefonsosegura/1f/" rel="attachment wp-att-3116"><img loading="lazy" decoding="async" class="alignnone size-full wp-image-3116 aligncenter" src="http://ildefonsosegura.es/wp-content/uploads/1f.jpg" alt="1f" width="680" height="510" srcset="https://ildefonsosegura.es/wp-content/uploads/1f.jpg 680w, https://ildefonsosegura.es/wp-content/uploads/1f-300x225.jpg 300w" sizes="(max-width: 680px) 100vw, 680px" /></a></p><p style="text-align: left;"><strong>PASO 8.-</strong>  Tendríamo un resultado como este</p><p style="text-align: left;"><a href="http://ildefonsosegura.es/tutorial-photoshosop-escrito-texto-escrito-en-madera-by-ildefonsosegura/1g/" rel="attachment wp-att-3117"><img loading="lazy" decoding="async" class="alignnone size-full wp-image-3117 aligncenter" src="http://ildefonsosegura.es/wp-content/uploads/1g.jpg" alt="1g" width="680" height="510" srcset="https://ildefonsosegura.es/wp-content/uploads/1g.jpg 680w, https://ildefonsosegura.es/wp-content/uploads/1g-300x225.jpg 300w" sizes="(max-width: 680px) 100vw, 680px" /></a></p><p style="text-align: left;"><strong>PASO 9.-</strong>  Ponemos nuestro texto. El tipo de fuente que usé fue MULAN</p><p style="text-align: left;"><a href="http://ildefonsosegura.es/tutorial-photoshosop-escrito-texto-escrito-en-madera-by-ildefonsosegura/attachment/2/" rel="attachment wp-att-3118"><img loading="lazy" decoding="async" class="alignnone size-full wp-image-3118 aligncenter" src="http://ildefonsosegura.es/wp-content/uploads/2.jpg" alt="2" width="680" height="510" srcset="https://ildefonsosegura.es/wp-content/uploads/2.jpg 680w, https://ildefonsosegura.es/wp-content/uploads/2-300x225.jpg 300w" sizes="(max-width: 680px) 100vw, 680px" /></a></p><p style="text-align: left;"><strong>PASO 10.-</strong>  Aplicamos un estilo de capa. Clic derecho del ratón sobre la capa de texto y selecciona OPCIONES DE FUSION. Sigue los cuadros siguientes para copiar los valores de los atributos del estilo. Ojo&#8230; el relleno de la capa se reduce al 25%</p><p style="text-align: left;"><img loading="lazy" decoding="async" class="alignnone size-full wp-image-3119 aligncenter" src="http://ildefonsosegura.es/wp-content/uploads/3.jpg" alt="3" width="680" height="454" srcset="https://ildefonsosegura.es/wp-content/uploads/3.jpg 680w, https://ildefonsosegura.es/wp-content/uploads/3-300x200.jpg 300w" sizes="(max-width: 680px) 100vw, 680px" /></p><p style="text-align: left;"><a href="http://ildefonsosegura.es/tutorial-photoshosop-escrito-texto-escrito-en-madera-by-ildefonsosegura/attachment/4/" rel="attachment wp-att-3120"><img loading="lazy" decoding="async" class="alignnone size-full wp-image-3120 aligncenter" src="http://ildefonsosegura.es/wp-content/uploads/4.jpg" alt="4" width="680" height="454" srcset="https://ildefonsosegura.es/wp-content/uploads/4.jpg 680w, https://ildefonsosegura.es/wp-content/uploads/4-300x200.jpg 300w" sizes="(max-width: 680px) 100vw, 680px" /></a></p><p style="text-align: left;"><a href="http://ildefonsosegura.es/tutorial-photoshosop-escrito-texto-escrito-en-madera-by-ildefonsosegura/attachment/5/" rel="attachment wp-att-3121"><img loading="lazy" decoding="async" class="alignnone size-full wp-image-3121 aligncenter" src="http://ildefonsosegura.es/wp-content/uploads/5.jpg" alt="5" width="680" height="457" srcset="https://ildefonsosegura.es/wp-content/uploads/5.jpg 680w, https://ildefonsosegura.es/wp-content/uploads/5-300x201.jpg 300w" sizes="(max-width: 680px) 100vw, 680px" /></a></p><p style="text-align: left;"><a href="http://ildefonsosegura.es/tutorial-photoshosop-escrito-texto-escrito-en-madera-by-ildefonsosegura/attachment/6/" rel="attachment wp-att-3122"><img loading="lazy" decoding="async" class="alignnone size-full wp-image-3122 aligncenter" src="http://ildefonsosegura.es/wp-content/uploads/6.jpg" alt="6" width="680" height="448" srcset="https://ildefonsosegura.es/wp-content/uploads/6.jpg 680w, https://ildefonsosegura.es/wp-content/uploads/6-300x197.jpg 300w" sizes="(max-width: 680px) 100vw, 680px" /></a></p><p style="text-align: left;"><a href="http://ildefonsosegura.es/tutorial-photoshosop-escrito-texto-escrito-en-madera-by-ildefonsosegura/attachment/7/" rel="attachment wp-att-3123"><img loading="lazy" decoding="async" class="size-full wp-image-3123 aligncenter" src="http://ildefonsosegura.es/wp-content/uploads/7.jpg" alt="7" width="680" height="457" srcset="https://ildefonsosegura.es/wp-content/uploads/7.jpg 680w, https://ildefonsosegura.es/wp-content/uploads/7-300x201.jpg 300w" sizes="(max-width: 680px) 100vw, 680px" /></a></p><p style="text-align: left;"><strong>PASO 11.-</strong>  El estilo nos queda como sigue</p><p style="text-align: left;"><a href="http://ildefonsosegura.es/tutorial-photoshosop-escrito-texto-escrito-en-madera-by-ildefonsosegura/8-2/" rel="attachment wp-att-3124"><img loading="lazy" decoding="async" class="alignnone size-full wp-image-3124 aligncenter" src="http://ildefonsosegura.es/wp-content/uploads/8.jpg" alt="8" width="680" height="510" srcset="https://ildefonsosegura.es/wp-content/uploads/8.jpg 680w, https://ildefonsosegura.es/wp-content/uploads/8-300x225.jpg 300w" sizes="(max-width: 680px) 100vw, 680px" /></a></p><p style="text-align: left;"><strong>PASO 12.-</strong>  En el menú TEXTO rasterizamos el texto</p><p style="text-align: left;"><img loading="lazy" decoding="async" class="size-full wp-image-3125 aligncenter" src="http://ildefonsosegura.es/wp-content/uploads/9.jpg" alt="9" width="680" height="510" srcset="https://ildefonsosegura.es/wp-content/uploads/9.jpg 680w, https://ildefonsosegura.es/wp-content/uploads/9-300x225.jpg 300w" sizes="(max-width: 680px) 100vw, 680px" /></p><p style="text-align: left;"><strong>PASO 13.-</strong>  Seleccionamos un pack de pinceles de grietas. Os hago la misma recomendación que hice con los de sangre.</p><p style="text-align: left;"><a href="http://ildefonsosegura.es/tutorial-photoshosop-escrito-texto-escrito-en-madera-by-ildefonsosegura/attachment/91/" rel="attachment wp-att-3126"><img loading="lazy" decoding="async" class="alignnone size-full wp-image-3126 aligncenter" src="http://ildefonsosegura.es/wp-content/uploads/91.jpg" alt="91" width="680" height="510" srcset="https://ildefonsosegura.es/wp-content/uploads/91.jpg 680w, https://ildefonsosegura.es/wp-content/uploads/91-300x225.jpg 300w" sizes="(max-width: 680px) 100vw, 680px" /></a></p><p style="text-align: left;"><strong>PASO 14.-</strong>  Seleccionamos el color frontal blanco (como el texto). Un atajo rápido para hacerlo es pulsar D y luego X. Así el color frontal es blanco con total seguridad</p><p style="text-align: left;"><a href="http://ildefonsosegura.es/tutorial-photoshosop-escrito-texto-escrito-en-madera-by-ildefonsosegura/attachment/92/" rel="attachment wp-att-3127"><img loading="lazy" decoding="async" class="alignnone size-full wp-image-3127 aligncenter" src="http://ildefonsosegura.es/wp-content/uploads/92.jpg" alt="92" width="680" height="510" srcset="https://ildefonsosegura.es/wp-content/uploads/92.jpg 680w, https://ildefonsosegura.es/wp-content/uploads/92-300x225.jpg 300w" sizes="(max-width: 680px) 100vw, 680px" /></a></p><p style="text-align: left;"><strong>PASO 15.-</strong>  Si por un momento ponemos el relleno de la capa en el 100% y ocultamos los estilos de capa, podemos ver un ejemplo de como hemos pintado con las grietas el texto</p><p style="text-align: left;"><a href="http://ildefonsosegura.es/tutorial-photoshosop-escrito-texto-escrito-en-madera-by-ildefonsosegura/attachment/94/" rel="attachment wp-att-3129"><img loading="lazy" decoding="async" class="alignnone size-full wp-image-3129 aligncenter" src="http://ildefonsosegura.es/wp-content/uploads/94.jpg" alt="94" width="680" height="510" srcset="https://ildefonsosegura.es/wp-content/uploads/94.jpg 680w, https://ildefonsosegura.es/wp-content/uploads/94-300x225.jpg 300w" sizes="(max-width: 680px) 100vw, 680px" /></a></p><p style="text-align: left;">Si volvemos a poner el relleno en 25% y hacemos visibles los efectos tendemos este resultado</p><p style="text-align: left;"><a href="http://ildefonsosegura.es/tutorial-photoshosop-escrito-texto-escrito-en-madera-by-ildefonsosegura/attachment/93/" rel="attachment wp-att-3128"><img loading="lazy" decoding="async" class="size-full wp-image-3128 aligncenter" src="http://ildefonsosegura.es/wp-content/uploads/93.jpg" alt="93" width="680" height="510" srcset="https://ildefonsosegura.es/wp-content/uploads/93.jpg 680w, https://ildefonsosegura.es/wp-content/uploads/93-300x225.jpg 300w" sizes="(max-width: 680px) 100vw, 680px" /></a></p><p style="text-align: left;"><strong>PASO 16.-</strong>  Añadimos a la capa una máscara de capa con el icono que está abajo del panel de capas</p><p style="text-align: left;"><a href="http://ildefonsosegura.es/tutorial-photoshosop-escrito-texto-escrito-en-madera-by-ildefonsosegura/attachment/95/" rel="attachment wp-att-3130"><img loading="lazy" decoding="async" class="alignnone size-full wp-image-3130 aligncenter" src="http://ildefonsosegura.es/wp-content/uploads/95.jpg" alt="95" width="680" height="510" srcset="https://ildefonsosegura.es/wp-content/uploads/95.jpg 680w, https://ildefonsosegura.es/wp-content/uploads/95-300x225.jpg 300w" sizes="(max-width: 680px) 100vw, 680px" /></a></p><p style="text-align: left;"><strong>PASO 17.-</strong>  Mantenemos tecleada la techa ALT y hacemos clic en el ojo de la capa textura de madera. Con eso conseguimos que solo se vea esa capa</p><p style="text-align: left;"><a href="http://ildefonsosegura.es/tutorial-photoshosop-escrito-texto-escrito-en-madera-by-ildefonsosegura/attachment/96/" rel="attachment wp-att-3131"><img loading="lazy" decoding="async" class="alignnone size-full wp-image-3131 aligncenter" src="http://ildefonsosegura.es/wp-content/uploads/96.jpg" alt="96" width="680" height="510" srcset="https://ildefonsosegura.es/wp-content/uploads/96.jpg 680w, https://ildefonsosegura.es/wp-content/uploads/96-300x225.jpg 300w" sizes="(max-width: 680px) 100vw, 680px" /></a></p><p style="text-align: left;"><strong>PASO 18.-</strong>  Nos vamos a la paleta de canales. Con el botón derecho del ratón hacemos clic en el canal azul y le indicamos que duplique el canal</p><p style="text-align: left;"><a href="http://ildefonsosegura.es/tutorial-photoshosop-escrito-texto-escrito-en-madera-by-ildefonsosegura/attachment/97/" rel="attachment wp-att-3132"><img loading="lazy" decoding="async" class="alignnone size-full wp-image-3132 aligncenter" src="http://ildefonsosegura.es/wp-content/uploads/97.jpg" alt="97" width="680" height="510" srcset="https://ildefonsosegura.es/wp-content/uploads/97.jpg 680w, https://ildefonsosegura.es/wp-content/uploads/97-300x225.jpg 300w" sizes="(max-width: 680px) 100vw, 680px" /></a></p><p style="text-align: left;"><strong>PASO 19.-</strong>  Con CTRL+L vemos la paleta de niveles y buscamos acercarnos con los tonos hacia la izquierda dando luz a la mayoría del canal</p><p style="text-align: left;"><a href="http://ildefonsosegura.es/tutorial-photoshosop-escrito-texto-escrito-en-madera-by-ildefonsosegura/attachment/98/" rel="attachment wp-att-3133"><img loading="lazy" decoding="async" class="alignnone size-full wp-image-3133 aligncenter" src="http://ildefonsosegura.es/wp-content/uploads/98.jpg" alt="98" width="680" height="510" srcset="https://ildefonsosegura.es/wp-content/uploads/98.jpg 680w, https://ildefonsosegura.es/wp-content/uploads/98-300x225.jpg 300w" sizes="(max-width: 680px) 100vw, 680px" /></a></p><p style="text-align: left;"><strong>PASO 20.-</strong>  Con CTRL+clic en el canal se seleccionan las áreas blancas del mismo.</p><p style="text-align: left;"><a href="http://ildefonsosegura.es/tutorial-photoshosop-escrito-texto-escrito-en-madera-by-ildefonsosegura/attachment/99/" rel="attachment wp-att-3134"><img loading="lazy" decoding="async" class="alignnone size-full wp-image-3134 aligncenter" src="http://ildefonsosegura.es/wp-content/uploads/99.jpg" alt="99" width="680" height="510" srcset="https://ildefonsosegura.es/wp-content/uploads/99.jpg 680w, https://ildefonsosegura.es/wp-content/uploads/99-300x225.jpg 300w" sizes="(max-width: 680px) 100vw, 680px" /></a></p><p style="text-align: left;"><strong>PASO 21.-</strong>  Con esa selección realizada volvemos a la paleta de capas RGB</p><p style="text-align: left;"><a href="http://ildefonsosegura.es/tutorial-photoshosop-escrito-texto-escrito-en-madera-by-ildefonsosegura/attachment/991/" rel="attachment wp-att-3135"><img loading="lazy" decoding="async" class="alignnone size-full wp-image-3135 aligncenter" src="http://ildefonsosegura.es/wp-content/uploads/991.jpg" alt="991" width="680" height="510" srcset="https://ildefonsosegura.es/wp-content/uploads/991.jpg 680w, https://ildefonsosegura.es/wp-content/uploads/991-300x225.jpg 300w" sizes="(max-width: 680px) 100vw, 680px" /></a></p><p style="text-align: left;"><strong>PASO 22.-</strong> Añadimos una máscara de capa y automáticamente las zonas no seleccionadas se pintan de negro en la máscara y por lo tanto se ocultan esas zonas en la capa del texto</p><p style="text-align: left;"><a href="http://ildefonsosegura.es/tutorial-photoshosop-escrito-texto-escrito-en-madera-by-ildefonsosegura/attachment/992/" rel="attachment wp-att-3136"><img loading="lazy" decoding="async" class="alignnone size-full wp-image-3136 aligncenter" src="http://ildefonsosegura.es/wp-content/uploads/992.jpg" alt="992" width="680" height="510" srcset="https://ildefonsosegura.es/wp-content/uploads/992.jpg 680w, https://ildefonsosegura.es/wp-content/uploads/992-300x225.jpg 300w" sizes="(max-width: 680px) 100vw, 680px" /></a></p><p style="text-align: left;"><strong>PASO 23.-</strong>  Situados en la máscara podemos cambiar sus niveles (CTRL+L) para ajustar la apariencia de las zonas a ocultar o visualizar. En mi composición le di estos valores a los niveles</p><p style="text-align: left;"><a href="http://ildefonsosegura.es/tutorial-photoshosop-escrito-texto-escrito-en-madera-by-ildefonsosegura/attachment/993/" rel="attachment wp-att-3137"><img loading="lazy" decoding="async" class="alignnone size-full wp-image-3137 aligncenter" src="http://ildefonsosegura.es/wp-content/uploads/993.jpg" alt="993" width="680" height="510" srcset="https://ildefonsosegura.es/wp-content/uploads/993.jpg 680w, https://ildefonsosegura.es/wp-content/uploads/993-300x225.jpg 300w" sizes="(max-width: 680px) 100vw, 680px" /></a></p><p style="text-align: left;"><strong>PASO 24.-</strong>  El resultado hasta el momento es este</p><p style="text-align: left;"><a href="http://ildefonsosegura.es/tutorial-photoshosop-escrito-texto-escrito-en-madera-by-ildefonsosegura/attachment/994/" rel="attachment wp-att-3147"><img loading="lazy" decoding="async" class="size-full wp-image-3147 aligncenter" src="http://ildefonsosegura.es/wp-content/uploads/994.jpg" alt="994" width="680" height="510" srcset="https://ildefonsosegura.es/wp-content/uploads/994.jpg 680w, https://ildefonsosegura.es/wp-content/uploads/994-300x225.jpg 300w" sizes="(max-width: 680px) 100vw, 680px" /></a></p><p style="text-align: left;"><strong>PASO 25.-</strong>  Quitamos la unión entre la capa y su máscara de capa haciendo simplemente clic con el ratón en la cadena que las une. Esta debe desaparecer como en la imagen</p><p style="text-align: left;"><a href="http://ildefonsosegura.es/tutorial-photoshosop-escrito-texto-escrito-en-madera-by-ildefonsosegura/994a/" rel="attachment wp-att-3149"><img loading="lazy" decoding="async" class="alignnone size-full wp-image-3149 aligncenter" src="http://ildefonsosegura.es/wp-content/uploads/994a.jpg" alt="994a" width="680" height="467" srcset="https://ildefonsosegura.es/wp-content/uploads/994a.jpg 680w, https://ildefonsosegura.es/wp-content/uploads/994a-300x206.jpg 300w" sizes="(max-width: 680px) 100vw, 680px" /></a></p><p style="text-align: left;"><strong>PASO 26.-</strong>  Aplicamos un filtro en la capa. Filtro, distorsionar, RIZO con el valor que se muestra en la imagen</p><p style="text-align: left;"><a href="http://ildefonsosegura.es/tutorial-photoshosop-escrito-texto-escrito-en-madera-by-ildefonsosegura/994b/" rel="attachment wp-att-3150"><img loading="lazy" decoding="async" class="alignnone size-full wp-image-3150 aligncenter" src="http://ildefonsosegura.es/wp-content/uploads/994b.jpg" alt="994b" width="680" height="467" srcset="https://ildefonsosegura.es/wp-content/uploads/994b.jpg 680w, https://ildefonsosegura.es/wp-content/uploads/994b-300x206.jpg 300w" sizes="(max-width: 680px) 100vw, 680px" /></a></p><p style="text-align: left;"><strong>PASO 27.-</strong>  Con CTRL+F se repite el filtro y conseguimos un efecto de irregularidad en los bordes bastante real al objeto que buscamos</p><p style="text-align: left;"><a href="http://ildefonsosegura.es/tutorial-photoshosop-escrito-texto-escrito-en-madera-by-ildefonsosegura/994c/" rel="attachment wp-att-3151"><img loading="lazy" decoding="async" class="alignnone size-full wp-image-3151 aligncenter" src="http://ildefonsosegura.es/wp-content/uploads/994c.jpg" alt="994c" width="680" height="467" srcset="https://ildefonsosegura.es/wp-content/uploads/994c.jpg 680w, https://ildefonsosegura.es/wp-content/uploads/994c-300x206.jpg 300w" sizes="(max-width: 680px) 100vw, 680px" /></a></p><h1 style="text-align: left;"><span style="color: #800000;"><strong>CONCLUSION</strong></span></h1><p style="text-align: left;"><a href="http://ildefonsosegura.es/tutorial-photoshosop-escrito-texto-escrito-en-madera-by-ildefonsosegura/attachment/995/" rel="attachment wp-att-3148"><img loading="lazy" decoding="async" class="alignnone size-full wp-image-3148 aligncenter" src="http://ildefonsosegura.es/wp-content/uploads/995.jpg" alt="995" width="680" height="510" srcset="https://ildefonsosegura.es/wp-content/uploads/995.jpg 680w, https://ildefonsosegura.es/wp-content/uploads/995-300x225.jpg 300w" sizes="(max-width: 680px) 100vw, 680px" /></a></p><p style="text-align: justify;">Si te ha gustado el tutorial, espero que dejes un comentario y que lo compartas con tus amigos. Asi me ayudas a continuar. Gracias</p><p style="text-align: left;"> </p>								</div>
				</div>
					</div>
		</div>
					</div>
		</section>
				</div>La entrada <a href="https://ildefonsosegura.es/tutorial-photoshosop-escrito-texto-escrito-en-madera-by-ildefonsosegura/">#Tutorial #Photoshop escrito: Texto tallado en madera by @ildefonsosegura</a> apareció primero en <a href="https://ildefonsosegura.es">Ildefonso Segura</a>.]]></content:encoded>
					
					<wfw:commentRss>https://ildefonsosegura.es/tutorial-photoshosop-escrito-texto-escrito-en-madera-by-ildefonsosegura/feed/</wfw:commentRss>
			<slash:comments>1</slash:comments>
		
		
			</item>
		<item>
		<title>Grabado en corteza de árbol // Tutorial Photoshop (San Valentín)</title>
		<link>https://ildefonsosegura.es/grabado-en-corteza-de-arbol-con-photoshop-san-valentin/</link>
					<comments>https://ildefonsosegura.es/grabado-en-corteza-de-arbol-con-photoshop-san-valentin/#respond</comments>
		
		<dc:creator><![CDATA[Ildefonso Segura]]></dc:creator>
		<pubDate>Sun, 23 Dec 2012 11:10:27 +0000</pubDate>
				<category><![CDATA[Efectos]]></category>
		<category><![CDATA[Fotocomposición]]></category>
		<category><![CDATA[Photoshop]]></category>
		<category><![CDATA[Tecnicas]]></category>
		<category><![CDATA[Textos]]></category>
		<category><![CDATA[Tutoriales]]></category>
		<category><![CDATA[Wallpaper]]></category>
		<category><![CDATA[amor]]></category>
		<category><![CDATA[arbol]]></category>
		<category><![CDATA[cincel]]></category>
		<category><![CDATA[cincelado]]></category>
		<category><![CDATA[cortex]]></category>
		<category><![CDATA[corteza]]></category>
		<category><![CDATA[cupido]]></category>
		<category><![CDATA[enamorados]]></category>
		<category><![CDATA[gloriasanis]]></category>
		<category><![CDATA[grabado]]></category>
		<category><![CDATA[ildefonsosegura]]></category>
		<category><![CDATA[san valentin]]></category>
		<category><![CDATA[tree]]></category>
		<guid isPermaLink="false">http://ildefonsosegura.es/?p=1037</guid>

					<description><![CDATA[<p>Nuevo tutorial de photoshop en las fechas en que los enamorados se rinden su propio homenaje aunque el amor es ajeno al tiempo. Con photoshop te ayudo a crear una bonita composición grabando tu mensaje de amor en la corteza de un árbol. Regálaselo a tu pareja. En este tutorial aprenderemos a crear una ilusión [&#8230;]</p>
La entrada <a href="https://ildefonsosegura.es/grabado-en-corteza-de-arbol-con-photoshop-san-valentin/">Grabado en corteza de árbol // Tutorial Photoshop (San Valentín)</a> apareció primero en <a href="https://ildefonsosegura.es">Ildefonso Segura</a>.]]></description>
										<content:encoded><![CDATA[<p><a href="https://ildefonsosegura.es/grabado-en-corteza-de-arbol-con-photoshop-san-valentin/corteza-abrol/" rel="attachment wp-att-1038"><img loading="lazy" decoding="async" class="size-full wp-image-1038 aligncenter" alt="corteza abrol" src="https://ildefonsosegura.es/wp-content/uploads/corteza-abrol.jpg" width="500" height="375" srcset="https://ildefonsosegura.es/wp-content/uploads/corteza-abrol.jpg 500w, https://ildefonsosegura.es/wp-content/uploads/corteza-abrol-300x225.jpg 300w" sizes="(max-width: 500px) 100vw, 500px" /></a></p>
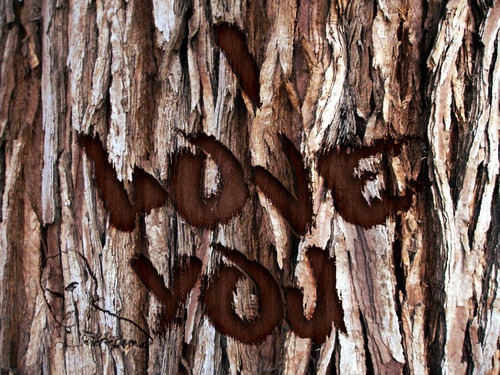
<p>Nuevo tutorial de photoshop en las fechas en que los enamorados se rinden su propio homenaje aunque el amor es ajeno al tiempo. Con photoshop te ayudo a crear una bonita composición <strong>grabando tu mensaje de amor en la corteza de un árbol</strong>. Regálaselo a tu pareja.</p>
<p>En este tutorial aprenderemos a crear una ilusión con las técnicas de photoshop. En primer lugar aprenderemos a crear un mapa de desplazamiento que nos ayudará a adaptar nuestra forma o texto a la orografía de la corteza a la vez que conseguiemos crear un rasgado del objeto principal de acuerdo al mapa creado.</p>
<p>La <strong>textura original no se toca para nada</strong>. Es la forma quien se adapta a la textura y con opciones de fusión se consigue un efecto de grabado. Posteriormente cambiamos el modo de fusión de la capa de la forma o texto a MULTIPLICAR y conseguimos nuestro primer acercamiento al grabado que buscamos. debemos crear un <strong>efecto profundidad y volumen</strong> a los bores de la corteza grabada. En segundo lugar, teniendo en cuenta que hemos mantenido la orografía de la corteza, no podemos mantener la <strong>textura de la misma en el interior</strong>. Para ello crearemos dos capas:</p>
<p>1.- Capa con un filtro de fibras</p>
<p>2.- Capa  con un filtro de ruido</p>
<p>El resto sería incorporar correcciones de color y algunas muescas en el interior de la forma que nos recuerde que se ha estado grabando con un objeto puntiagudo.</p>
<p><span style="color: #800000;"><strong>VIDEOTUTORIAL </strong></span></p>
<p><center><iframe src="https://www.youtube.com/embed/oiJqoCz2oz4" height="360" width="640" allowfullscreen="" frameborder="0"></iframe></center>&nbsp;<br />
<center>[vc_button title=»BAJATE LOS MATERIALES» target=»blank» color=»btn-danger» size=»btn-large» href=»https://drive.google.com/open?id=0B_nJkCGJubucTjVab01ac2p0aTA»]</center>&nbsp;</p>
<p>&nbsp;</p>
<div align="right">
<p><script src="https://apis.google.com/js/platform.js"></script><script>// <![CDATA[
function onYtEvent(payload) { if (payload.eventType == 'subscribe') { // Add code to handle subscribe event. } else if (payload.eventType == 'unsubscribe') { // Add code to handle unsubscribe event. } if (window.console) { // for debugging only window.console.log('YT event: ', payload); } }
// ]]&gt;</script></p>
<div class="g-ytsubscribe" data-channel="ildefonsosegura" data-layout="default" data-count="default" data-onytevent="onYtEvent"></div>
</div>
</div>
<p style="text-align: left;">No dejes de compartir este post.</p>
<p style="text-align: left;">Así es como me puedes ayudar 🙂 Gracias</p>
<p>&nbsp;</p>La entrada <a href="https://ildefonsosegura.es/grabado-en-corteza-de-arbol-con-photoshop-san-valentin/">Grabado en corteza de árbol // Tutorial Photoshop (San Valentín)</a> apareció primero en <a href="https://ildefonsosegura.es">Ildefonso Segura</a>.]]></content:encoded>
					
					<wfw:commentRss>https://ildefonsosegura.es/grabado-en-corteza-de-arbol-con-photoshop-san-valentin/feed/</wfw:commentRss>
			<slash:comments>0</slash:comments>
		
		
			</item>
		<item>
		<title>Pizarrón de corcho y texto grabado // Tutorial Photoshop</title>
		<link>https://ildefonsosegura.es/pizarron-de-corcho-y-texto-grabado-con-photoshop/</link>
					<comments>https://ildefonsosegura.es/pizarron-de-corcho-y-texto-grabado-con-photoshop/#respond</comments>
		
		<dc:creator><![CDATA[Ildefonso Segura]]></dc:creator>
		<pubDate>Sun, 23 Dec 2012 00:34:28 +0000</pubDate>
				<category><![CDATA[Estilos]]></category>
		<category><![CDATA[Photoshop]]></category>
		<category><![CDATA[Psfacilito]]></category>
		<category><![CDATA[Tecnicas]]></category>
		<category><![CDATA[Textos]]></category>
		<category><![CDATA[Tutoriales]]></category>
		<category><![CDATA[bulleting board]]></category>
		<category><![CDATA[chincheta]]></category>
		<category><![CDATA[corcho]]></category>
		<category><![CDATA[cork]]></category>
		<category><![CDATA[gloriasanis]]></category>
		<category><![CDATA[grabado]]></category>
		<category><![CDATA[ildefonsosegura]]></category>
		<category><![CDATA[panel]]></category>
		<category><![CDATA[pizarra]]></category>
		<category><![CDATA[pizarron]]></category>
		<category><![CDATA[psfacilito]]></category>
		<category><![CDATA[text]]></category>
		<category><![CDATA[textura]]></category>
		<guid isPermaLink="false">http://ildefonsosegura.es/?p=998</guid>

					<description><![CDATA[<p>En este tutorial aprenderemos a crear una textura, un marco, un estilo bonito de texto y un efecto de foto pinchada en el panel. Muchos efectos que por separado pueden ser utilizados para otras composiciones. Este tutorial fue publicado en Psfacilito el 19-03-2011 VIDEOTUTORIAL &#160; &#160; No dejes de compartir este post. Así es como [&#8230;]</p>
La entrada <a href="https://ildefonsosegura.es/pizarron-de-corcho-y-texto-grabado-con-photoshop/">Pizarrón de corcho y texto grabado // Tutorial Photoshop</a> apareció primero en <a href="https://ildefonsosegura.es">Ildefonso Segura</a>.]]></description>
										<content:encoded><![CDATA[<p><img loading="lazy" decoding="async" class="size-full wp-image-999 aligncenter" alt="pizarron" src="https://ildefonsosegura.es/wp-content/uploads/pizarron.jpg" width="396" height="223" /></p>
<p>En este tutorial aprenderemos a crear una textura, un marco, un estilo bonito de texto y un efecto de foto pinchada en el panel. Muchos efectos que por separado pueden ser utilizados para otras composiciones. Este tutorial fue publicado en <a title="psfacilito" href="http://www.youtube.com/user/psfacilito" target="_blank">Psfacilito </a>el 19-03-2011</p>
<p><span style="color: #800000;"><strong>VIDEOTUTORIAL </strong></span></p>
<p><center><iframe src="https://www.youtube.com/embed/gac1mw8G9f4" height="360" width="640" allowfullscreen="" frameborder="0"></iframe></center>&nbsp;</p>
<p>&nbsp;</p>
<div align="right">
<p><script src="https://apis.google.com/js/platform.js"></script><script>// <![CDATA[
function onYtEvent(payload) { if (payload.eventType == 'subscribe') { // Add code to handle subscribe event. } else if (payload.eventType == 'unsubscribe') { // Add code to handle unsubscribe event. } if (window.console) { // for debugging only window.console.log('YT event: ', payload); } }
// ]]&gt;</script></p>
<div class="g-ytsubscribe" data-channel="ildefonsosegura" data-layout="default" data-count="default" data-onytevent="onYtEvent"></div>
</div>
</div>
<p style="text-align: left;">No dejes de compartir este post.</p>
<p style="text-align: left;">Así es como me puedes ayudar 🙂 Gracias</p>
<p>&nbsp;</p>La entrada <a href="https://ildefonsosegura.es/pizarron-de-corcho-y-texto-grabado-con-photoshop/">Pizarrón de corcho y texto grabado // Tutorial Photoshop</a> apareció primero en <a href="https://ildefonsosegura.es">Ildefonso Segura</a>.]]></content:encoded>
					
					<wfw:commentRss>https://ildefonsosegura.es/pizarron-de-corcho-y-texto-grabado-con-photoshop/feed/</wfw:commentRss>
			<slash:comments>0</slash:comments>
		
		
			</item>
		<item>
		<title>Tutorial Photoshop // Wallpaper grabado en piedra</title>
		<link>https://ildefonsosegura.es/wallpaper-grabado-en-piedra/</link>
					<comments>https://ildefonsosegura.es/wallpaper-grabado-en-piedra/#respond</comments>
		
		<dc:creator><![CDATA[Ildefonso Segura]]></dc:creator>
		<pubDate>Sat, 22 Dec 2012 10:44:34 +0000</pubDate>
				<category><![CDATA[Fotocomposición]]></category>
		<category><![CDATA[Photoshop]]></category>
		<category><![CDATA[Tecnicas]]></category>
		<category><![CDATA[Tutoriales]]></category>
		<category><![CDATA[Wallpaper]]></category>
		<category><![CDATA[endido]]></category>
		<category><![CDATA[estilo]]></category>
		<category><![CDATA[fusion]]></category>
		<category><![CDATA[grabado]]></category>
		<category><![CDATA[hendido]]></category>
		<category><![CDATA[muro]]></category>
		<category><![CDATA[piedra]]></category>
		<category><![CDATA[pincel]]></category>
		<category><![CDATA[wall]]></category>
		<category><![CDATA[wallpaper]]></category>
		<guid isPermaLink="false">http://ildefonsosegura.es/?p=783</guid>

					<description><![CDATA[<p>  Después de hacer el tutorial de como hacer un pincel para firma de composiciones, vemos la aplicabilidad del mismo en un precioso wallpaper inspirado en la idea de que las personas no pasan por la vida en valde. Todas las personas dejamos algo de nosotros en nuestro entorno y en nuestras amistades y familia. [&#8230;]</p>
La entrada <a href="https://ildefonsosegura.es/wallpaper-grabado-en-piedra/">Tutorial Photoshop // Wallpaper grabado en piedra</a> apareció primero en <a href="https://ildefonsosegura.es">Ildefonso Segura</a>.]]></description>
										<content:encoded><![CDATA[<div data-elementor-type="wp-post" data-elementor-id="783" class="elementor elementor-783">
						<section class="elementor-section elementor-top-section elementor-element elementor-element-62c84ab6 elementor-section-boxed elementor-section-height-default elementor-section-height-default" data-id="62c84ab6" data-element_type="section" data-e-type="section">
						<div class="elementor-container elementor-column-gap-default">
					<div class="elementor-column elementor-col-100 elementor-top-column elementor-element elementor-element-40167e55" data-id="40167e55" data-element_type="column" data-e-type="column">
			<div class="elementor-widget-wrap elementor-element-populated">
						<div class="elementor-element elementor-element-622a588e elementor-widget elementor-widget-text-editor" data-id="622a588e" data-element_type="widget" data-e-type="widget" data-widget_type="text-editor.default">
				<div class="elementor-widget-container">
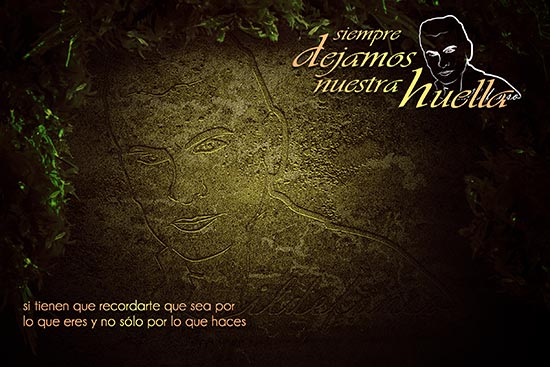
									<p style="text-align: center;"><a href="https://ildefonsosegura.es/wallpaper-grabado-en-piedra/frima-grabado-en-piedra/" rel="attachment wp-att-784"><img loading="lazy" decoding="async" class="alignnone size-full wp-image-784" src="https://ildefonsosegura.es/wp-content/uploads/Frima-grabado-en-piedra.jpg" alt="Frima-grabado-en-piedra" width="550" height="367" srcset="https://ildefonsosegura.es/wp-content/uploads/Frima-grabado-en-piedra.jpg 550w, https://ildefonsosegura.es/wp-content/uploads/Frima-grabado-en-piedra-300x200.jpg 300w" sizes="(max-width: 550px) 100vw, 550px" /></a></p><p> </p><p>Después de hacer el tutorial de como hacer un <a href="https://ildefonsosegura.es/pincel-de-firma/" target="_blank" rel="noopener"><strong>pincel para firma</strong></a> de composiciones, vemos la aplicabilidad del mismo en un precioso wallpaper inspirado en la idea de que las personas no pasan por la vida en valde. Todas las personas dejamos algo de nosotros en nuestro entorno y en nuestras amistades y familia. Lo importante es saber qué dejamos. En mi caso me gusta que me recuerden por lo que soy y no solo por lo que hago.</p><p> </p><p style="text-align: left;"><span style="color: #800000;"><strong>VIDEOTUTORIAL </strong></span></p><p> </p><center><iframe src="https://www.youtube.com/embed/Kb9m98Hlrkk" width="640" height="360" frameborder="0" allowfullscreen="allowfullscreen"></iframe></center><p> </p><p> </p><p> </p>								</div>
				</div>
					</div>
		</div>
					</div>
		</section>
				<section class="elementor-section elementor-top-section elementor-element elementor-element-23dc2ceb elementor-section-boxed elementor-section-height-default elementor-section-height-default" data-id="23dc2ceb" data-element_type="section" data-e-type="section">
						<div class="elementor-container elementor-column-gap-default">
					<div class="elementor-column elementor-col-100 elementor-top-column elementor-element elementor-element-3801a19a" data-id="3801a19a" data-element_type="column" data-e-type="column">
			<div class="elementor-widget-wrap elementor-element-populated">
						<div class="elementor-element elementor-element-77bf3c99 elementor-widget-divider--view-line elementor-widget elementor-widget-divider" data-id="77bf3c99" data-element_type="widget" data-e-type="widget" data-widget_type="divider.default">
				<div class="elementor-widget-container">
							<div class="elementor-divider">
			<span class="elementor-divider-separator">
						</span>
		</div>
						</div>
				</div>
					</div>
		</div>
					</div>
		</section>
				<section class="elementor-section elementor-top-section elementor-element elementor-element-7a38b293 elementor-section-full_width elementor-section-height-default elementor-section-height-default" data-id="7a38b293" data-element_type="section" data-e-type="section">
						<div class="elementor-container elementor-column-gap-default">
					<div class="elementor-column elementor-col-50 elementor-top-column elementor-element elementor-element-6a256968" data-id="6a256968" data-element_type="column" data-e-type="column">
			<div class="elementor-widget-wrap elementor-element-populated">
						<div class="elementor-element elementor-element-1bc1354b elementor-align-right elementor-invisible elementor-widget elementor-widget-button" data-id="1bc1354b" data-element_type="widget" data-e-type="widget" data-settings="{&quot;_animation&quot;:&quot;shake&quot;}" data-widget_type="button.default">
				<div class="elementor-widget-container">
									<div class="elementor-button-wrapper">
					<a class="elementor-button elementor-button-link elementor-size-sm elementor-animation-grow" href="https://drive.google.com/open?id=0B_nJkCGJubucMXdldWxvTmpYeG8" target="_blank">
						<span class="elementor-button-content-wrapper">
									<span class="elementor-button-text">DESCARGA EL MATERIAL</span>
					</span>
					</a>
				</div>
								</div>
				</div>
					</div>
		</div>
				<div class="elementor-column elementor-col-50 elementor-top-column elementor-element elementor-element-f94a3e2" data-id="f94a3e2" data-element_type="column" data-e-type="column">
			<div class="elementor-widget-wrap elementor-element-populated">
						<div class="elementor-element elementor-element-170c52d5 elementor-widget elementor-widget-html" data-id="170c52d5" data-element_type="widget" data-e-type="widget" data-settings="{&quot;_animation&quot;:&quot;none&quot;}" data-widget_type="html.default">
				<div class="elementor-widget-container">
					<form action="https://www.paypal.com/cgi-bin/webscr" method="post" target="_blank">
<input type="hidden" name="cmd" value="_donations">
<input type="hidden" name="business" value="ildefonsosegura@gmail.com">
<input type="hidden" name="lc" value="ES">
<input type="hidden" name="item_name" value="MANTENIMIENTO DE LA PAGINA DE ILDEFONSOSEGURA">
<input type="hidden" name="no_note" value="0">
<input type="hidden" name="currency_code" value="EUR">
<input type="hidden" name="bn" value="PP-DonationsBF:paypal1.jpg:NonHostedGuest">
<input type="image" src="http://ildefonsosegura.es/wp-content/uploads/paypal-updated-1.png" border="0" name="submit" alt="PayPal. La forma rápida y segura de pagar en Internet.">
<img decoding="async" alt="" border="0" src="https://www.paypalobjects.com/es_ES/i/scr/pixel.gif" width="1" height="1">
</form>				</div>
				</div>
					</div>
		</div>
					</div>
		</section>
				<section class="elementor-section elementor-top-section elementor-element elementor-element-1eca43bf elementor-section-boxed elementor-section-height-default elementor-section-height-default" data-id="1eca43bf" data-element_type="section" data-e-type="section">
						<div class="elementor-container elementor-column-gap-default">
					<div class="elementor-column elementor-col-100 elementor-top-column elementor-element elementor-element-1e1e97c2" data-id="1e1e97c2" data-element_type="column" data-e-type="column">
			<div class="elementor-widget-wrap elementor-element-populated">
						<div class="elementor-element elementor-element-2562961c elementor-widget-divider--view-line elementor-widget elementor-widget-divider" data-id="2562961c" data-element_type="widget" data-e-type="widget" data-widget_type="divider.default">
				<div class="elementor-widget-container">
							<div class="elementor-divider">
			<span class="elementor-divider-separator">
						</span>
		</div>
						</div>
				</div>
					</div>
		</div>
					</div>
		</section>
				<section class="elementor-section elementor-top-section elementor-element elementor-element-5ea60c0a elementor-section-full_width elementor-section-height-default elementor-section-height-default" data-id="5ea60c0a" data-element_type="section" data-e-type="section">
						<div class="elementor-container elementor-column-gap-default">
					<div class="elementor-column elementor-col-100 elementor-top-column elementor-element elementor-element-4286f217" data-id="4286f217" data-element_type="column" data-e-type="column">
			<div class="elementor-widget-wrap elementor-element-populated">
						<div class="elementor-element elementor-element-50dccaf7 elementor-widget elementor-widget-text-editor" data-id="50dccaf7" data-element_type="widget" data-e-type="widget" data-widget_type="text-editor.default">
				<div class="elementor-widget-container">
									<div><div align="center"><center><strong style="color: #ff0000;">Suscríbete a mi canal de Youtube:</strong></center><div><div><div align="center"><p><script src="https://apis.google.com/js/platform.js"></script></p><div class="g-ytsubscribe" data-channel="ildefonsosegura" data-layout="full" data-count="default"> </div></div></div><p> </p><p style="text-align: center;">No te lo pierdas y comparte tus trabajos en mi página de facebook (<span style="color: #0000ff;"><strong><a style="color: #0000ff;" href="http://www.facebook.com/IldefonsoSeguraPage" target="_blank" rel="noopener noreferrer">IldefonsoSeguraPage</a></strong></span>)<br />Espero que te guste y compartas el vídeo. No dejes de compartir este post.</p><p style="text-align: center;">Así es como me puedes ayudar 🙂 Gracias</p></div></div></div>								</div>
				</div>
					</div>
		</div>
					</div>
		</section>
				</div>La entrada <a href="https://ildefonsosegura.es/wallpaper-grabado-en-piedra/">Tutorial Photoshop // Wallpaper grabado en piedra</a> apareció primero en <a href="https://ildefonsosegura.es">Ildefonso Segura</a>.]]></content:encoded>
					
					<wfw:commentRss>https://ildefonsosegura.es/wallpaper-grabado-en-piedra/feed/</wfw:commentRss>
			<slash:comments>0</slash:comments>
		
		
			</item>
		<item>
		<title>Texto 3D estilo Brave con Photoshop</title>
		<link>https://ildefonsosegura.es/texto-3d-estilo-brave-con-photoshop/</link>
					<comments>https://ildefonsosegura.es/texto-3d-estilo-brave-con-photoshop/#respond</comments>
		
		<dc:creator><![CDATA[Ildefonso Segura]]></dc:creator>
		<pubDate>Tue, 18 Sep 2012 11:07:05 +0000</pubDate>
				<category><![CDATA[3D]]></category>
		<category><![CDATA[Conectatutoriales]]></category>
		<category><![CDATA[Estilos]]></category>
		<category><![CDATA[Películas]]></category>
		<category><![CDATA[Photoshop]]></category>
		<category><![CDATA[Tecnicas]]></category>
		<category><![CDATA[Textos]]></category>
		<category><![CDATA[Tutoriales]]></category>
		<category><![CDATA[Wallpaper]]></category>
		<category><![CDATA[animación]]></category>
		<category><![CDATA[barve]]></category>
		<category><![CDATA[conectatutoriales]]></category>
		<category><![CDATA[estilo]]></category>
		<category><![CDATA[extrusión]]></category>
		<category><![CDATA[gloriasanis]]></category>
		<category><![CDATA[grabado]]></category>
		<category><![CDATA[ildefonsosegura]]></category>
		<category><![CDATA[movie]]></category>
		<category><![CDATA[pelicula]]></category>
		<category><![CDATA[piedra]]></category>
		<category><![CDATA[roca]]></category>
		<category><![CDATA[style]]></category>
		<category><![CDATA[text]]></category>
		<category><![CDATA[tuto]]></category>
		<category><![CDATA[video]]></category>
		<category><![CDATA[youtube]]></category>
		<guid isPermaLink="false">http://ildefonsosegura.es/?p=1384</guid>

					<description><![CDATA[<p>Explicamos como podemos crear este especatular efecto basado en el estilo de la película animada BRAVE. No usamos el módulo 3D de photoshop con lo que podemos hacer el tutorial con versiones anteriores a la CS5. Aprende a crear extrusión y grabados bonitos. En el canal de Conectatutoriales VIDEOTUTORIAL &#160; &#160; DESCARGA EL MATERIAL Suscríbete [&#8230;]</p>
La entrada <a href="https://ildefonsosegura.es/texto-3d-estilo-brave-con-photoshop/">Texto 3D estilo Brave con Photoshop</a> apareció primero en <a href="https://ildefonsosegura.es">Ildefonso Segura</a>.]]></description>
										<content:encoded><![CDATA[<div data-elementor-type="wp-post" data-elementor-id="1384" class="elementor elementor-1384">
						<section class="elementor-section elementor-top-section elementor-element elementor-element-877b56e elementor-section-boxed elementor-section-height-default elementor-section-height-default" data-id="877b56e" data-element_type="section" data-e-type="section">
						<div class="elementor-container elementor-column-gap-default">
					<div class="elementor-column elementor-col-100 elementor-top-column elementor-element elementor-element-357e31e6" data-id="357e31e6" data-element_type="column" data-e-type="column">
			<div class="elementor-widget-wrap elementor-element-populated">
						<div class="elementor-element elementor-element-56620a13 elementor-widget elementor-widget-text-editor" data-id="56620a13" data-element_type="widget" data-e-type="widget" data-widget_type="text-editor.default">
				<div class="elementor-widget-container">
									<p style="text-align: center;"><span style="color: #800000;"><strong><img loading="lazy" decoding="async" class="size-full wp-image-1385 aligncenter" src="https://ildefonsosegura.es/wp-content/uploads/brave-piedra.jpg" alt="brave-piedra" width="600" height="189" srcset="https://ildefonsosegura.es/wp-content/uploads/brave-piedra.jpg 600w, https://ildefonsosegura.es/wp-content/uploads/brave-piedra-300x94.jpg 300w" sizes="(max-width: 600px) 100vw, 600px" /></strong></span></p>
<p></p><center></center>Explicamos como podemos crear este especatular efecto basado en el estilo de la película animada BRAVE. No usamos el módulo 3D de photoshop con lo que podemos hacer el tutorial con versiones anteriores a la CS5. Aprende a crear extrusión y grabados bonitos. En el canal de <strong><a href="http://www.youtube.com/user/conectatutoriales" target="_blank" rel="noopener">Conectatutoriales</a></strong><div><br /><p></p>
<p><span style="color: #800000;"><strong>VIDEOTUTORIAL </strong></span></p>
<p></p><center><iframe src="https://www.youtube.com/embed/Zx8EX8mqIxk" width="640" height="360" frameborder="0" allowfullscreen="allowfullscreen"></iframe></center>&nbsp;<p></p>
<p>&nbsp;</p>
</div>								</div>
				</div>
					</div>
		</div>
					</div>
		</section>
				<section class="elementor-section elementor-top-section elementor-element elementor-element-51b8a296 elementor-section-boxed elementor-section-height-default elementor-section-height-default" data-id="51b8a296" data-element_type="section" data-e-type="section">
						<div class="elementor-container elementor-column-gap-default">
					<div class="elementor-column elementor-col-100 elementor-top-column elementor-element elementor-element-1691b614" data-id="1691b614" data-element_type="column" data-e-type="column">
			<div class="elementor-widget-wrap elementor-element-populated">
						<div class="elementor-element elementor-element-319406cf elementor-widget-divider--view-line elementor-widget elementor-widget-divider" data-id="319406cf" data-element_type="widget" data-e-type="widget" data-widget_type="divider.default">
				<div class="elementor-widget-container">
							<div class="elementor-divider">
			<span class="elementor-divider-separator">
						</span>
		</div>
						</div>
				</div>
					</div>
		</div>
					</div>
		</section>
				<section class="elementor-section elementor-top-section elementor-element elementor-element-1c339488 elementor-section-full_width elementor-section-height-default elementor-section-height-default" data-id="1c339488" data-element_type="section" data-e-type="section">
						<div class="elementor-container elementor-column-gap-default">
					<div class="elementor-column elementor-col-50 elementor-top-column elementor-element elementor-element-214be099" data-id="214be099" data-element_type="column" data-e-type="column">
			<div class="elementor-widget-wrap elementor-element-populated">
						<div class="elementor-element elementor-element-5b5efd0e elementor-align-right elementor-invisible elementor-widget elementor-widget-button" data-id="5b5efd0e" data-element_type="widget" data-e-type="widget" data-settings="{&quot;_animation&quot;:&quot;shake&quot;}" data-widget_type="button.default">
				<div class="elementor-widget-container">
									<div class="elementor-button-wrapper">
					<a class="elementor-button elementor-button-link elementor-size-sm elementor-animation-grow" href="https://drive.google.com/open?id=0B_nJkCGJubucc3M4YXMyaEhzNUE" target="_blank">
						<span class="elementor-button-content-wrapper">
									<span class="elementor-button-text">DESCARGA EL MATERIAL</span>
					</span>
					</a>
				</div>
								</div>
				</div>
					</div>
		</div>
				<div class="elementor-column elementor-col-50 elementor-top-column elementor-element elementor-element-52a0e98c" data-id="52a0e98c" data-element_type="column" data-e-type="column">
			<div class="elementor-widget-wrap elementor-element-populated">
						<div class="elementor-element elementor-element-4fbec77e elementor-widget elementor-widget-html" data-id="4fbec77e" data-element_type="widget" data-e-type="widget" data-settings="{&quot;_animation&quot;:&quot;none&quot;}" data-widget_type="html.default">
				<div class="elementor-widget-container">
					<form action="https://www.paypal.com/cgi-bin/webscr" method="post" target="_blank">
<input type="hidden" name="cmd" value="_donations">
<input type="hidden" name="business" value="ildefonsosegura@gmail.com">
<input type="hidden" name="lc" value="ES">
<input type="hidden" name="item_name" value="MANTENIMIENTO DE LA PAGINA DE ILDEFONSOSEGURA">
<input type="hidden" name="no_note" value="0">
<input type="hidden" name="currency_code" value="EUR">
<input type="hidden" name="bn" value="PP-DonationsBF:paypal1.jpg:NonHostedGuest">
<input type="image" src="http://ildefonsosegura.es/wp-content/uploads/paypal-updated-1.png" border="0" name="submit" alt="PayPal. La forma rápida y segura de pagar en Internet.">
<img decoding="async" alt="" border="0" src="https://www.paypalobjects.com/es_ES/i/scr/pixel.gif" width="1" height="1">
</form>				</div>
				</div>
					</div>
		</div>
					</div>
		</section>
				<section class="elementor-section elementor-top-section elementor-element elementor-element-5f85836f elementor-section-boxed elementor-section-height-default elementor-section-height-default" data-id="5f85836f" data-element_type="section" data-e-type="section">
						<div class="elementor-container elementor-column-gap-default">
					<div class="elementor-column elementor-col-100 elementor-top-column elementor-element elementor-element-47b1fce8" data-id="47b1fce8" data-element_type="column" data-e-type="column">
			<div class="elementor-widget-wrap elementor-element-populated">
						<div class="elementor-element elementor-element-7214c3fa elementor-widget-divider--view-line elementor-widget elementor-widget-divider" data-id="7214c3fa" data-element_type="widget" data-e-type="widget" data-widget_type="divider.default">
				<div class="elementor-widget-container">
							<div class="elementor-divider">
			<span class="elementor-divider-separator">
						</span>
		</div>
						</div>
				</div>
					</div>
		</div>
					</div>
		</section>
				<section class="elementor-section elementor-top-section elementor-element elementor-element-42a57036 elementor-section-full_width elementor-section-height-default elementor-section-height-default" data-id="42a57036" data-element_type="section" data-e-type="section">
						<div class="elementor-container elementor-column-gap-default">
					<div class="elementor-column elementor-col-100 elementor-top-column elementor-element elementor-element-35c7396a" data-id="35c7396a" data-element_type="column" data-e-type="column">
			<div class="elementor-widget-wrap elementor-element-populated">
						<div class="elementor-element elementor-element-2e44d0a5 elementor-widget elementor-widget-text-editor" data-id="2e44d0a5" data-element_type="widget" data-e-type="widget" data-widget_type="text-editor.default">
				<div class="elementor-widget-container">
									<div><div align="center"><center><strong style="color: #ff0000;">Suscríbete a mi canal de Youtube:</strong></center><div><div><div align="center"><p><script src="https://apis.google.com/js/platform.js"></script></p><div class="g-ytsubscribe" data-channel="ildefonsosegura" data-layout="full" data-count="default"> </div></div></div><p> </p><p style="text-align: center;">No te lo pierdas y comparte tus trabajos en mi página de facebook (<span style="color: #0000ff;"><strong><a style="color: #0000ff;" href="http://www.facebook.com/IldefonsoSeguraPage" target="_blank" rel="noopener noreferrer">IldefonsoSeguraPage</a></strong></span>)<br />Espero que te guste y compartas el vídeo. No dejes de compartir este post.</p><p style="text-align: center;">Así es como me puedes ayudar 🙂 Gracias</p></div></div></div>								</div>
				</div>
					</div>
		</div>
					</div>
		</section>
				</div>La entrada <a href="https://ildefonsosegura.es/texto-3d-estilo-brave-con-photoshop/">Texto 3D estilo Brave con Photoshop</a> apareció primero en <a href="https://ildefonsosegura.es">Ildefonso Segura</a>.]]></content:encoded>
					
					<wfw:commentRss>https://ildefonsosegura.es/texto-3d-estilo-brave-con-photoshop/feed/</wfw:commentRss>
			<slash:comments>0</slash:comments>
		
		
			</item>
	</channel>
</rss>
<br />
<b>Fatal error</b>:  Uncaught TypeError: mysqli_num_fields(): Argument #1 ($result) must be of type mysqli_result, bool given in /var/www/vhosts/ildefonsosegura.es/httpdocs/wp-includes/class-wpdb.php:3941
Stack trace:
#0 /var/www/vhosts/ildefonsosegura.es/httpdocs/wp-includes/class-wpdb.php(3941): mysqli_num_fields()
#1 /var/www/vhosts/ildefonsosegura.es/httpdocs/wp-includes/class-wpdb.php(785): wpdb-&gt;load_col_info()
#2 /var/www/vhosts/ildefonsosegura.es/httpdocs/wp-content/plugins/w3-total-cache/DbCache_WpdbInjection_QueryCaching.php(230): wpdb-&gt;__get()
#3 /var/www/vhosts/ildefonsosegura.es/httpdocs/wp-content/plugins/w3-total-cache/DbCache_WpdbNew.php(220): W3TC\DbCache_WpdbInjection_QueryCaching-&gt;query()
#4 /var/www/vhosts/ildefonsosegura.es/httpdocs/wp-content/plugins/aaa-option-optimizer/src/class-database.php(199): W3TC\DbCache_WpdbNew-&gt;query()
#5 /var/www/vhosts/ildefonsosegura.es/httpdocs/wp-content/plugins/aaa-option-optimizer/src/class-plugin.php(182): Progress_Planner\OptionOptimizer\Database::batch_insert()
#6 /var/www/vhosts/ildefonsosegura.es/httpdocs/wp-includes/class-wp-hook.php(353): Progress_Planner\OptionOptimizer\Plugin-&gt;update_tracked_options()
#7 /var/www/vhosts/ildefonsosegura.es/httpdocs/wp-includes/class-wp-hook.php(377): WP_Hook-&gt;apply_filters()
#8 /var/www/vhosts/ildefonsosegura.es/httpdocs/wp-includes/plugin.php(523): WP_Hook-&gt;do_action()
#9 /var/www/vhosts/ildefonsosegura.es/httpdocs/wp-includes/load.php(1308): do_action()
#10 [internal function]: shutdown_action_hook()
#11 {main}
  thrown in <b>/var/www/vhosts/ildefonsosegura.es/httpdocs/wp-includes/class-wpdb.php</b> on line <b>3941</b><br />