<?xml version="1.0" encoding="UTF-8"?><rss version="2.0"
	xmlns:content="http://purl.org/rss/1.0/modules/content/"
	xmlns:wfw="http://wellformedweb.org/CommentAPI/"
	xmlns:dc="http://purl.org/dc/elements/1.1/"
	xmlns:atom="http://www.w3.org/2005/Atom"
	xmlns:sy="http://purl.org/rss/1.0/modules/syndication/"
	xmlns:slash="http://purl.org/rss/1.0/modules/slash/"
	>

<channel>
	<title>gloriasanis | Ildefonso Segura</title>
	<atom:link href="https://ildefonsosegura.es/tag/gloriasanis/feed/" rel="self" type="application/rss+xml" />
	<link>https://ildefonsosegura.es</link>
	<description>Tutoriales de diseño y animación</description>
	<lastBuildDate>Sat, 26 Nov 2022 13:19:29 +0000</lastBuildDate>
	<language>es</language>
	<sy:updatePeriod>
	hourly	</sy:updatePeriod>
	<sy:updateFrequency>
	1	</sy:updateFrequency>
	<generator>https://wordpress.org/?v=7.0</generator>

<image>
	<url>https://ildefonsosegura.es/wp-content/uploads/cropped-Favicon-new-logo-website-32x32.png</url>
	<title>gloriasanis | Ildefonso Segura</title>
	<link>https://ildefonsosegura.es</link>
	<width>32</width>
	<height>32</height>
</image> 
	<item>
		<title>Animar un espacio 2D creando profundidad 3D con After Effects y Photoshop by @ildefonsosegura</title>
		<link>https://ildefonsosegura.es/animar-un-espacio-2d-creando-profundidad-3d-con-after-effects-y-photoshop-by-ildefonsosegura/</link>
					<comments>https://ildefonsosegura.es/animar-un-espacio-2d-creando-profundidad-3d-con-after-effects-y-photoshop-by-ildefonsosegura/#comments</comments>
		
		<dc:creator><![CDATA[Ildefonso Segura]]></dc:creator>
		<pubDate>Sat, 22 Feb 2020 11:59:36 +0000</pubDate>
				<category><![CDATA[3D]]></category>
		<category><![CDATA[After Effects]]></category>
		<category><![CDATA[Intro]]></category>
		<category><![CDATA[Photoshop]]></category>
		<category><![CDATA[Tecnicas]]></category>
		<category><![CDATA[Textura]]></category>
		<category><![CDATA[Tutoriales]]></category>
		<category><![CDATA[Video]]></category>
		<category><![CDATA[2d a 3d]]></category>
		<category><![CDATA[adobe]]></category>
		<category><![CDATA[after effects]]></category>
		<category><![CDATA[animación]]></category>
		<category><![CDATA[cabecera]]></category>
		<category><![CDATA[camara]]></category>
		<category><![CDATA[cc2019]]></category>
		<category><![CDATA[cc2020]]></category>
		<category><![CDATA[gloriasanis]]></category>
		<category><![CDATA[ildefonsosegura]]></category>
		<category><![CDATA[intro]]></category>
		<category><![CDATA[metalico]]></category>
		<category><![CDATA[metalizado]]></category>
		<category><![CDATA[movimiento camara]]></category>
		<category><![CDATA[opener]]></category>
		<category><![CDATA[opening]]></category>
		<category><![CDATA[photoshop]]></category>
		<category><![CDATA[punto de fuga]]></category>
		<category><![CDATA[textura logo]]></category>
		<category><![CDATA[textura metal]]></category>
		<category><![CDATA[texturizar]]></category>
		<category><![CDATA[tutorial]]></category>
		<category><![CDATA[vanishing point]]></category>
		<category><![CDATA[video]]></category>
		<category><![CDATA[youtube]]></category>
		<guid isPermaLink="false">http://ildefonsosegura.es/?p=61246</guid>

					<description><![CDATA[<p>Antes de comenzar quiero recordarte que tienes disponible el tutorial de Photoshop que sirvió de inspiración para crear una animación que diera vida a una composición del estilo que veis a continuación.   &#160;   &#160;     &#160;   Ver esta publicación en Instagram   &#160;   &#160;   &#160;     &#160;   [&#8230;]</p>
La entrada <a href="https://ildefonsosegura.es/animar-un-espacio-2d-creando-profundidad-3d-con-after-effects-y-photoshop-by-ildefonsosegura/">Animar un espacio 2D creando profundidad 3D con After Effects y Photoshop by @ildefonsosegura</a> apareció primero en <a href="https://ildefonsosegura.es">Ildefonso Segura</a>.]]></description>
										<content:encoded><![CDATA[<div data-elementor-type="wp-post" data-elementor-id="61246" class="elementor elementor-61246">
						<section class="elementor-section elementor-top-section elementor-element elementor-element-1c3aba3e elementor-section-boxed elementor-section-height-default elementor-section-height-default" data-id="1c3aba3e" data-element_type="section" data-e-type="section">
						<div class="elementor-container elementor-column-gap-default">
					<div class="elementor-column elementor-col-100 elementor-top-column elementor-element elementor-element-638a4a7f" data-id="638a4a7f" data-element_type="column" data-e-type="column">
			<div class="elementor-widget-wrap elementor-element-populated">
						<div class="elementor-element elementor-element-71dbe2b4 elementor-widget elementor-widget-text-editor" data-id="71dbe2b4" data-element_type="widget" data-e-type="widget" data-widget_type="text-editor.default">
				<div class="elementor-widget-container">
									
<p class="wp-block-paragraph">Antes de comenzar quiero recordarte que tienes disponible el tutorial de Photoshop que sirvió de inspiración para crear una animación que diera vida a una composición del estilo que veis a continuación.</p>
<center>
<blockquote class="instagram-media" style="background: #FFF; border: 0; border-radius: 3px; box-shadow: 0 0 1px 0 rgba(0,0,0,0.5),0 1px 10px 0 rgba(0,0,0,0.15); margin: 1px; max-width: 540px; min-width: 326px; padding: 0; width: calc(100% - 2px);" data-instgrm-captioned="" data-instgrm-permalink="https://www.instagram.com/p/B7UVFRXo5W3/?utm_source=ig_embed&amp;utm_campaign=loading" data-instgrm-version="12">
<div style="padding: 16px;">
<div style="display: flex; flex-direction: row; align-items: center;">
<div style="background-color: #f4f4f4; border-radius: 50%; flex-grow: 0; height: 40px; margin-right: 14px; width: 40px;"> </div>
<p> </p>
<div style="display: flex; flex-direction: column; flex-grow: 1; justify-content: center;">
<div style="background-color: #f4f4f4; border-radius: 4px; flex-grow: 0; height: 14px; margin-bottom: 6px; width: 100px;"> </div>
<p> </p>
<div style="background-color: #f4f4f4; border-radius: 4px; flex-grow: 0; height: 14px; width: 60px;"> </div>
</div>
</div>
<div style="padding: 19% 0;"> </div>
<p> </p>
<div style="display: block; height: 50px; margin: 0 auto 12px; width: 50px;"> </div>
<div style="padding-top: 8px;">
<div style="color: #3897f0; font-family: Arial,sans-serif; font-size: 14px; font-style: normal; font-weight: 550; line-height: 18px;">Ver esta publicación en Instagram</div>
</div>
<div style="padding: 12.5% 0;"> </div>
<p> </p>
<div style="display: flex; flex-direction: row; margin-bottom: 14px; align-items: center;">
<div>
<div style="background-color: #f4f4f4; border-radius: 50%; height: 12.5px; width: 12.5px; transform: translateX(0px) translateY(7px);"> </div>
<p> </p>
<div style="background-color: #f4f4f4; height: 12.5px; transform: rotate(-45deg) translateX(3px) translateY(1px); width: 12.5px; flex-grow: 0; margin-right: 14px; margin-left: 2px;"> </div>
<p> </p>
<div style="background-color: #f4f4f4; border-radius: 50%; height: 12.5px; width: 12.5px; transform: translateX(9px) translateY(-18px);"> </div>
</div>
<div style="margin-left: 8px;">
<div style="background-color: #f4f4f4; border-radius: 50%; flex-grow: 0; height: 20px; width: 20px;"> </div>
<p> </p>
<div style="width: 0; height: 0; border-top: 2px solid transparent; border-left: 6px solid #f4f4f4; border-bottom: 2px solid transparent; transform: translateX(16px) translateY(-4px) rotate(30deg);"> </div>
</div>
<div style="margin-left: auto;">
<div style="width: 0px; border-top: 8px solid #F4F4F4; border-right: 8px solid transparent; transform: translateY(16px);"> </div>
<p> </p>
<div style="background-color: #f4f4f4; flex-grow: 0; height: 12px; width: 16px; transform: translateY(-4px);"> </div>
<p> </p>
<div style="width: 0; height: 0; border-top: 8px solid #F4F4F4; border-left: 8px solid transparent; transform: translateY(-4px) translateX(8px);"> </div>
</div>
</div>
<p> </p>
<p style="margin: 8px 0 0 0; padding: 0 4px;"><a style="color: #000; font-family: Arial,sans-serif; font-size: 14px; font-style: normal; font-weight: normal; line-height: 17px; text-decoration: none; word-wrap: break-word;" href="https://www.instagram.com/p/B7UVFRXo5W3/?utm_source=ig_embed&amp;utm_campaign=loading" target="_blank" rel="noopener noreferrer">Con una imagen 2D creamos una escena 3D. Fácil con #photoshop y #aftereffects #adobeaftereffects #vfx #motiongraphics #motiongraphicsdesign #adobe #creativity</a></p>
<p> </p>
<p style="color: #c9c8cd; font-family: Arial,sans-serif; font-size: 14px; line-height: 17px; margin-bottom: 0; margin-top: 8px; overflow: hidden; padding: 8px 0 7px; text-align: center; text-overflow: ellipsis; white-space: nowrap;">Una publicación compartida de <a style="color: #c9c8cd; font-family: Arial,sans-serif; font-size: 14px; font-style: normal; font-weight: normal; line-height: 17px;" href="https://www.instagram.com/ildefonsosegura/?utm_source=ig_embed&amp;utm_campaign=loading" target="_blank" rel="noopener noreferrer"> Ildefonso Segura</a> (@ildefonsosegura) el <time style="font-family: Arial,sans-serif; font-size: 14px; line-height: 17px;" datetime="2020-01-14T22:57:32+00:00">14 Ene, 2020 a las 2:57 PST</time></p>
</div>
</blockquote>
<p><script async="" src="//www.instagram.com/embed.js"></script></p>
<p style="text-align: justify;">Esta animación ha sido el resultado de combinar Photoshop y After effects y por eso te mostraré como, a partir de una imagen 2D puedes hacer un mapeo de la misma creando una ilusión de profundidad y efecto 3D. Te introducirás en la imagen creando la ilusión de caminar dentro de la misma.</p>
</center>
<p class="wp-block-paragraph">Aprenderás muchas técnicas de para montajes y animación en after effects.</p>

<p class="wp-block-paragraph">En primer lugar y con Photoshop, crearemos y exportaremos un archivo con datos concretos del punto de fuga o vanishing point de la imagen. Estos datos nos permitan crear la ilusión en After Effects. Conseguimos una imagen mapeada que nos sirve para realizar una intro con tu logo.</p>

<p class="wp-block-paragraph">Los resultados son muy profesionales con aspecto muy real.</p>

<p class="wp-block-paragraph">Aquí te dejo el resultado final</p>
<center>
<blockquote class="instagram-media" style="background: #FFF; border: 0; border-radius: 3px; box-shadow: 0 0 1px 0 rgba(0,0,0,0.5),0 1px 10px 0 rgba(0,0,0,0.15); margin: 1px; max-width: 540px; min-width: 326px; padding: 0; width: calc(100% - 2px);" data-instgrm-captioned="" data-instgrm-permalink="https://www.instagram.com/p/B8UKeXlobna/?utm_source=ig_embed&amp;utm_campaign=loading" data-instgrm-version="12">
<div style="padding: 16px;">
<div style="display: flex; flex-direction: row; align-items: center;">
<div style="background-color: #f4f4f4; border-radius: 50%; flex-grow: 0; height: 40px; margin-right: 14px; width: 40px;"> </div>
<div style="display: flex; flex-direction: column; flex-grow: 1; justify-content: center;">
<div style="background-color: #f4f4f4; border-radius: 4px; flex-grow: 0; height: 14px; margin-bottom: 6px; width: 100px;"> </div>
<div style="background-color: #f4f4f4; border-radius: 4px; flex-grow: 0; height: 14px; width: 60px;"> </div>
</div>
</div>
<div style="padding: 19% 0;"> </div>
<div style="display: block; height: 50px; margin: 0 auto 12px; width: 50px;"> </div>
<div style="padding-top: 8px;">
<div style="color: #3897f0; font-family: Arial,sans-serif; font-size: 14px; font-style: normal; font-weight: 550; line-height: 18px;">Ver esta publicación en Instagram</div>
</div>
<div style="padding: 12.5% 0;"> </div>
<div style="display: flex; flex-direction: row; margin-bottom: 14px; align-items: center;">
<div>
<div style="background-color: #f4f4f4; border-radius: 50%; height: 12.5px; width: 12.5px; transform: translateX(0px) translateY(7px);"> </div>
<div style="background-color: #f4f4f4; height: 12.5px; transform: rotate(-45deg) translateX(3px) translateY(1px); width: 12.5px; flex-grow: 0; margin-right: 14px; margin-left: 2px;"> </div>
<div style="background-color: #f4f4f4; border-radius: 50%; height: 12.5px; width: 12.5px; transform: translateX(9px) translateY(-18px);"> </div>
</div>
<div style="margin-left: 8px;">
<div style="background-color: #f4f4f4; border-radius: 50%; flex-grow: 0; height: 20px; width: 20px;"> </div>
<div style="width: 0; height: 0; border-top: 2px solid transparent; border-left: 6px solid #f4f4f4; border-bottom: 2px solid transparent; transform: translateX(16px) translateY(-4px) rotate(30deg);"> </div>
</div>
<div style="margin-left: auto;">
<div style="width: 0px; border-top: 8px solid #F4F4F4; border-right: 8px solid transparent; transform: translateY(16px);"> </div>
<div style="background-color: #f4f4f4; flex-grow: 0; height: 12px; width: 16px; transform: translateY(-4px);"> </div>
<div style="width: 0; height: 0; border-top: 8px solid #F4F4F4; border-left: 8px solid transparent; transform: translateY(-4px) translateX(8px);"> </div>
</div>
</div>
<p style="margin: 8px 0 0 0; padding: 0 4px;"><a style="color: #000; font-family: Arial,sans-serif; font-size: 14px; font-style: normal; font-weight: normal; line-height: 17px; text-decoration: none; word-wrap: break-word;" href="https://www.instagram.com/p/B8UKeXlobna/?utm_source=ig_embed&amp;utm_campaign=loading" target="_blank" rel="noopener noreferrer">Making of // A partir de una imagen 2D podemos realizar una intro. ================= #aftereffects #fx #vfx #vfxbreakdown #vfxbreakdowns #intro #opening #opener #vanishingpoint #photoshop #metal #logometal</a></p>
<p style="color: #c9c8cd; font-family: Arial,sans-serif; font-size: 14px; line-height: 17px; margin-bottom: 0; margin-top: 8px; overflow: hidden; padding: 8px 0 7px; text-align: center; text-overflow: ellipsis; white-space: nowrap;">Una publicación compartida de <a style="color: #c9c8cd; font-family: Arial,sans-serif; font-size: 14px; font-style: normal; font-weight: normal; line-height: 17px;" href="https://www.instagram.com/ildefonsosegura/?utm_source=ig_embed&amp;utm_campaign=loading" target="_blank" rel="noopener noreferrer"> Ildefonso Segura</a> (@ildefonsosegura) el <time style="font-family: Arial,sans-serif; font-size: 14px; line-height: 17px;" datetime="2020-02-08T17:59:01+00:00">8 Feb, 2020 a las 9:59 PST</time></p>
</div>
</blockquote>
</center>
<p><script async="" src="//www.instagram.com/embed.js"></script></p>

<p class="wp-block-paragraph">La realización de la animación se hace de forma procedimental creando :</p>

<ul class="wp-block-list">
<li>Reflexiones</li>
<li>Reflejo</li>
<li>Sombras</li>
</ul>

<p class="wp-block-paragraph">Estos efectos los conseguimos siguiendo <strong>2 tutoriales</strong>.</p>

<p class="wp-block-paragraph">En el <strong>primero</strong> conseguimos crear la escena, animarla y la reflexión realista que podéis ver.</p>

<p class="wp-block-paragraph"><strong><span style="color: #800000;">TUTORIAL ANIMACION CON REFLEXIONES CON AFTER EFFECTS</span></strong></p>
<center>
<figure><iframe title="YouTube video player" src="https://www.youtube.com/embed/2uYwaSopcKg" width="640" height="420" frameborder="0" allowfullscreen="allowfullscreen"></iframe></figure>
<!--<figure><iframe src="https://www.youtube.com/embed/2uYwaSopcKg" width="640" height="420" frameborder="0" allowfullscreen="allowfullscreen">&lt;span data-mce-type="bookmark" style="display: inline-block; width: 0px; overflow: hidden; line-height: 0;" class="mce_SELRES_start"</iframe></figure>--></center>
<p class="wp-block-paragraph"> </p>
								</div>
				</div>
					</div>
		</div>
					</div>
		</section>
				<section class="elementor-section elementor-top-section elementor-element elementor-element-bcf9dad elementor-section-boxed elementor-section-height-default elementor-section-height-default" data-id="bcf9dad" data-element_type="section" data-e-type="section">
						<div class="elementor-container elementor-column-gap-default">
					<div class="elementor-column elementor-col-100 elementor-top-column elementor-element elementor-element-8f21a8f" data-id="8f21a8f" data-element_type="column" data-e-type="column">
			<div class="elementor-widget-wrap elementor-element-populated">
						<div class="elementor-element elementor-element-3956641 elementor-widget elementor-widget-text-editor" data-id="3956641" data-element_type="widget" data-e-type="widget" data-widget_type="text-editor.default">
				<div class="elementor-widget-container">
									
<p class="wp-block-paragraph">Aquí tienes el link al tutorial que publiqué sobre como crear reflexiones realistas de un logo en una imagen con Photoshop .</p>

<div class="wp-block-image">
<figure class="aligncenter is-resized"><a href="https://ildefonsosegura.es/crea-reflexiones-realistas-tutorial-photoshop-by-ildefonsosegura/" target="_blank" rel="noreferrer noopener"><img decoding="async" class="wp-image-61234" src="https://ildefonsosegura.es/wp-content/uploads/reflexiones-realistas.jpg" alt="" width="240" height="135" srcset="https://ildefonsosegura.es/wp-content/uploads/reflexiones-realistas.jpg 960w, https://ildefonsosegura.es/wp-content/uploads/reflexiones-realistas-300x169.jpg 300w, https://ildefonsosegura.es/wp-content/uploads/reflexiones-realistas-768x432.jpg 768w, https://ildefonsosegura.es/wp-content/uploads/reflexiones-realistas-720x406.jpg 720w" sizes="(max-width: 240px) 100vw, 240px" /></a></figure>
</div>

<p class="wp-block-paragraph">Me gustaría ver tu animación con las reflexiones que consigues siguiendo mis tutoriales de photoshop y after effects.</p>

<p class="wp-block-paragraph">Disfruta de los tutoriales. Hay mucho trabajo detrás. Compártelo y así nos ayudas.</p>
								</div>
				</div>
					</div>
		</div>
					</div>
		</section>
				<section class="elementor-section elementor-top-section elementor-element elementor-element-4b209df elementor-section-boxed elementor-section-height-default elementor-section-height-default" data-id="4b209df" data-element_type="section" data-e-type="section">
						<div class="elementor-container elementor-column-gap-default">
					<div class="elementor-column elementor-col-100 elementor-top-column elementor-element elementor-element-e418672" data-id="e418672" data-element_type="column" data-e-type="column">
			<div class="elementor-widget-wrap elementor-element-populated">
						<div class="elementor-element elementor-element-d9a74dd elementor-widget elementor-widget-text-editor" data-id="d9a74dd" data-element_type="widget" data-e-type="widget" data-widget_type="text-editor.default">
				<div class="elementor-widget-container">
									<p>En el <strong>segundo </strong>tutorial texturizamos un logo metalizado desde cero. Aprenderás técnicas para crear una apariencia de metal en elementos planos a la vez que incorporarás detalles dinámicos que hagan más real las reflexiones en el logo.</p>
<p><!-- /wp:paragraph --><!-- wp:paragraph --></p>
<p><strong><span style="color: #800000;">TUTORIAL TEXTURA METALIZADA CON AFTER EFFECTS</span></strong></p>
<p><!-- /wp:paragraph --><!-- wp:html --></p>								</div>
				</div>
					</div>
		</div>
					</div>
		</section>
				<section class="elementor-section elementor-top-section elementor-element elementor-element-1917054 elementor-section-boxed elementor-section-height-default elementor-section-height-default" data-id="1917054" data-element_type="section" data-e-type="section">
						<div class="elementor-container elementor-column-gap-default">
					<div class="elementor-column elementor-col-100 elementor-top-column elementor-element elementor-element-f592c86" data-id="f592c86" data-element_type="column" data-e-type="column">
			<div class="elementor-widget-wrap elementor-element-populated">
						<div class="elementor-element elementor-element-44a9f57 elementor-widget elementor-widget-video" data-id="44a9f57" data-element_type="widget" data-e-type="widget" data-settings="{&quot;youtube_url&quot;:&quot;https:\/\/youtu.be\/Y_json7XZLo&quot;,&quot;video_type&quot;:&quot;youtube&quot;,&quot;controls&quot;:&quot;yes&quot;}" data-widget_type="video.default">
				<div class="elementor-widget-container">
							<div class="elementor-wrapper elementor-open-inline">
			<div class="elementor-video"></div>		</div>
						</div>
				</div>
					</div>
		</div>
					</div>
		</section>
				<section class="elementor-section elementor-top-section elementor-element elementor-element-6b69d34 elementor-section-boxed elementor-section-height-default elementor-section-height-default" data-id="6b69d34" data-element_type="section" data-e-type="section">
						<div class="elementor-container elementor-column-gap-default">
					<div class="elementor-column elementor-col-100 elementor-top-column elementor-element elementor-element-97d5a84" data-id="97d5a84" data-element_type="column" data-e-type="column">
			<div class="elementor-widget-wrap elementor-element-populated">
						<div class="elementor-element elementor-element-c16acd1 elementor-widget-divider--view-line elementor-widget elementor-widget-divider" data-id="c16acd1" data-element_type="widget" data-e-type="widget" data-widget_type="divider.default">
				<div class="elementor-widget-container">
							<div class="elementor-divider">
			<span class="elementor-divider-separator">
						</span>
		</div>
						</div>
				</div>
					</div>
		</div>
					</div>
		</section>
				<section class="elementor-section elementor-top-section elementor-element elementor-element-463d6774 elementor-section-full_width elementor-section-height-default elementor-section-height-default" data-id="463d6774" data-element_type="section" data-e-type="section">
						<div class="elementor-container elementor-column-gap-default">
					<div class="elementor-column elementor-col-50 elementor-top-column elementor-element elementor-element-42499c" data-id="42499c" data-element_type="column" data-e-type="column">
			<div class="elementor-widget-wrap elementor-element-populated">
						<div class="elementor-element elementor-element-6b1f5382 elementor-align-right elementor-invisible elementor-widget elementor-widget-button" data-id="6b1f5382" data-element_type="widget" data-e-type="widget" data-settings="{&quot;_animation&quot;:&quot;shake&quot;}" data-widget_type="button.default">
				<div class="elementor-widget-container">
									<div class="elementor-button-wrapper">
					<a class="elementor-button elementor-button-link elementor-size-sm elementor-animation-grow" href="https://drive.google.com/open?id=111zuVYC0PKGqILgJ2YU-jN8LgdCD5j3D" target="_blank">
						<span class="elementor-button-content-wrapper">
									<span class="elementor-button-text">DESCARGA EL MATERIAL</span>
					</span>
					</a>
				</div>
								</div>
				</div>
					</div>
		</div>
				<div class="elementor-column elementor-col-50 elementor-top-column elementor-element elementor-element-4935d3c9" data-id="4935d3c9" data-element_type="column" data-e-type="column">
			<div class="elementor-widget-wrap elementor-element-populated">
						<div class="elementor-element elementor-element-58ab27a7 elementor-widget elementor-widget-html" data-id="58ab27a7" data-element_type="widget" data-e-type="widget" data-settings="{&quot;_animation&quot;:&quot;none&quot;}" data-widget_type="html.default">
				<div class="elementor-widget-container">
					<form action="https://www.paypal.com/cgi-bin/webscr" method="post" target="_blank">
<input type="hidden" name="cmd" value="_donations">
<input type="hidden" name="business" value="ildefonsosegura@gmail.com">
<input type="hidden" name="lc" value="ES">
<input type="hidden" name="item_name" value="MANTENIMIENTO DE LA PAGINA DE ILDEFONSOSEGURA">
<input type="hidden" name="no_note" value="0">
<input type="hidden" name="currency_code" value="EUR">
<input type="hidden" name="bn" value="PP-DonationsBF:paypal1.jpg:NonHostedGuest">
<input type="image" src="http://ildefonsosegura.es/wp-content/uploads/paypal-updated-1.png" border="0" name="submit" alt="PayPal. La forma rápida y segura de pagar en Internet.">
<img decoding="async" alt="" border="0" src="https://www.paypalobjects.com/es_ES/i/scr/pixel.gif" width="1" height="1">
</form>				</div>
				</div>
					</div>
		</div>
					</div>
		</section>
				<section class="elementor-section elementor-top-section elementor-element elementor-element-cb7856e elementor-section-boxed elementor-section-height-default elementor-section-height-default" data-id="cb7856e" data-element_type="section" data-e-type="section">
						<div class="elementor-container elementor-column-gap-default">
					<div class="elementor-column elementor-col-100 elementor-top-column elementor-element elementor-element-87b4506" data-id="87b4506" data-element_type="column" data-e-type="column">
			<div class="elementor-widget-wrap elementor-element-populated">
						<div class="elementor-element elementor-element-481f400 elementor-widget-divider--view-line elementor-widget elementor-widget-divider" data-id="481f400" data-element_type="widget" data-e-type="widget" data-widget_type="divider.default">
				<div class="elementor-widget-container">
							<div class="elementor-divider">
			<span class="elementor-divider-separator">
						</span>
		</div>
						</div>
				</div>
					</div>
		</div>
					</div>
		</section>
				<section class="elementor-section elementor-top-section elementor-element elementor-element-7aeb0fc6 elementor-section-boxed elementor-section-height-default elementor-section-height-default" data-id="7aeb0fc6" data-element_type="section" data-e-type="section">
						<div class="elementor-container elementor-column-gap-default">
					<div class="elementor-column elementor-col-100 elementor-top-column elementor-element elementor-element-65599f18" data-id="65599f18" data-element_type="column" data-e-type="column">
			<div class="elementor-widget-wrap elementor-element-populated">
						<div class="elementor-element elementor-element-5c2922c1 elementor-widget elementor-widget-html" data-id="5c2922c1" data-element_type="widget" data-e-type="widget" data-widget_type="html.default">
				<div class="elementor-widget-container">
					&nbsp;
<center><span style="color: #333333;"><strong>SUSCRÍBETE A MI CANAL DE YouTube</strong></span></center>&nbsp;
<div>
<div>
<div align="center">

<script src="https://apis.google.com/js/platform.js"></script><script>// <![CDATA[ function onYtEvent(payload) { if (payload.eventType == 'subscribe') { // Add code to handle subscribe event. } else if (payload.eventType == 'unsubscribe') { // Add code to handle unsubscribe event. } if (window.console) { // for debugging only window.console.log('YT event: ', payload); } } // ]]&gt;</script>
<div class="g-ytsubscribe" data-channel="ildefonsosegura" data-layout="default" data-count="default" data-onytevent="onYtEvent"></div>
</div>
</div>
<p style="text-align: left;">No te lo pierdas y comparte tus trabajos en mi página de facebook (<span style="color: #ff0000;"><strong><a style="color: #ff0000;" href="http://www.facebook.com/IldefonsoSeguraPage" target="_blank" rel="noopener noreferrer">IldefonsoSeguraPage</a></strong></span>)</p>
Espero que te guste y compartas el vídeo. No dejes de compartir este post.
<p style="text-align: left;">Así es como me puedes ayudar 🙂 Gracias</p>

</div>				</div>
				</div>
					</div>
		</div>
					</div>
		</section>
				</div>La entrada <a href="https://ildefonsosegura.es/animar-un-espacio-2d-creando-profundidad-3d-con-after-effects-y-photoshop-by-ildefonsosegura/">Animar un espacio 2D creando profundidad 3D con After Effects y Photoshop by @ildefonsosegura</a> apareció primero en <a href="https://ildefonsosegura.es">Ildefonso Segura</a>.]]></content:encoded>
					
					<wfw:commentRss>https://ildefonsosegura.es/animar-un-espacio-2d-creando-profundidad-3d-con-after-effects-y-photoshop-by-ildefonsosegura/feed/</wfw:commentRss>
			<slash:comments>2</slash:comments>
		
		
			</item>
		<item>
		<title>Tutorial After Effects integración de texto e imágenes en animación creada con Google Earth Studio by @ildefonsosegura</title>
		<link>https://ildefonsosegura.es/tutorial-after-effects-integracion-de-texto-e-imagenes-en-animacion-creada-con-google-earth-studio-by-ildefonsosegura/</link>
					<comments>https://ildefonsosegura.es/tutorial-after-effects-integracion-de-texto-e-imagenes-en-animacion-creada-con-google-earth-studio-by-ildefonsosegura/#respond</comments>
		
		<dc:creator><![CDATA[Ildefonso Segura]]></dc:creator>
		<pubDate>Mon, 25 Nov 2019 15:00:51 +0000</pubDate>
				<category><![CDATA[3D]]></category>
		<category><![CDATA[After Effects]]></category>
		<category><![CDATA[Editable]]></category>
		<category><![CDATA[Efectos]]></category>
		<category><![CDATA[Tecnicas]]></category>
		<category><![CDATA[Textos]]></category>
		<category><![CDATA[Tutoriales]]></category>
		<category><![CDATA[Video]]></category>
		<category><![CDATA[adobe]]></category>
		<category><![CDATA[after effects]]></category>
		<category><![CDATA[aftereffects]]></category>
		<category><![CDATA[animación]]></category>
		<category><![CDATA[coliseo]]></category>
		<category><![CDATA[dron]]></category>
		<category><![CDATA[efecto 3D]]></category>
		<category><![CDATA[foto satélite]]></category>
		<category><![CDATA[fotografía integrada]]></category>
		<category><![CDATA[gloogle earth studio]]></category>
		<category><![CDATA[gloriasanis]]></category>
		<category><![CDATA[google earth]]></category>
		<category><![CDATA[ildefonsosegura]]></category>
		<category><![CDATA[imágen integrada]]></category>
		<category><![CDATA[integración]]></category>
		<category><![CDATA[monumento]]></category>
		<category><![CDATA[recuerdo]]></category>
		<category><![CDATA[roma]]></category>
		<category><![CDATA[studio]]></category>
		<category><![CDATA[texto]]></category>
		<category><![CDATA[texto integrado]]></category>
		<category><![CDATA[tour]]></category>
		<category><![CDATA[vfx]]></category>
		<category><![CDATA[viaje]]></category>
		<category><![CDATA[vista aérea]]></category>
		<category><![CDATA[vuelo]]></category>
		<guid isPermaLink="false">http://ildefonsosegura.es/?p=61174</guid>

					<description><![CDATA[<p>Ya mostré en un post previo las posibilidades de la combinación de Google Earth Studio y After Effects. Publiqué un vídeo promocionando la ciudad de Valencia (España) en el que mostraba vistas aéreas dinámicas de la ciudad usando esta herramienta que facilita fotografías de satélite e imágenes de google. Ahora os presento un tutorial donde [&#8230;]</p>
La entrada <a href="https://ildefonsosegura.es/tutorial-after-effects-integracion-de-texto-e-imagenes-en-animacion-creada-con-google-earth-studio-by-ildefonsosegura/">Tutorial After Effects integración de texto e imágenes en animación creada con Google Earth Studio by @ildefonsosegura</a> apareció primero en <a href="https://ildefonsosegura.es">Ildefonso Segura</a>.]]></description>
										<content:encoded><![CDATA[<div data-elementor-type="wp-post" data-elementor-id="61174" class="elementor elementor-61174">
						<section class="elementor-section elementor-top-section elementor-element elementor-element-3559dd0d elementor-section-boxed elementor-section-height-default elementor-section-height-default" data-id="3559dd0d" data-element_type="section" data-e-type="section">
						<div class="elementor-container elementor-column-gap-default">
					<div class="elementor-column elementor-col-100 elementor-top-column elementor-element elementor-element-5f9988f5" data-id="5f9988f5" data-element_type="column" data-e-type="column">
			<div class="elementor-widget-wrap elementor-element-populated">
						<div class="elementor-element elementor-element-3607ade0 elementor-widget elementor-widget-text-editor" data-id="3607ade0" data-element_type="widget" data-e-type="widget" data-widget_type="text-editor.default">
				<div class="elementor-widget-container">
									<p style="text-align: justify;">Ya mostré en un post previo las posibilidades de la combinación de <strong>Google Earth Studio</strong> y <strong>After Effects</strong>. Publiqué un vídeo promocionando la ciudad de Valencia (España) en el que mostraba vistas aéreas dinámicas de la ciudad usando esta herramienta que facilita fotografías de satélite e imágenes de google. Ahora os presento un tutorial donde enseño cómo integrar imágenes y/o textos en la animación creada con <strong>Google Earth Studio</strong> pero con Adobe <strong>After Effects</strong>.</p><p style="text-align: justify;">Desde <strong>Google Earth Studio</strong> creamos puntos de referencia que, una vez renderizada la animación, sirven como nulos en <strong>After Effects</strong>. Estos nulos continenen información de posición, rotación y dimensión geográfica dentro de la animación exportada.</p><p>El proceso de exportación desde Google Earth Studio a After Effects es muy sencillo. El resultado es un «script» que se abre en adobe After Effects creando una capa nulo y texto por cada punto de referencia, una cámara y una capa que reúne todos las imágenes por fotograma que representa el movimiento y dinámica de la animación creada. Es alucinante.</p><p>El resultado es evidentemente atractivo y como has visto en mi vídeo de muestra, invita incluso a visitar la localización o localizaciones que muestras. Espero que vengas a Valencia.</p><p>Para usar <span style="color: #ff0000;"><strong>Google Earth Studio</strong></span> primero tienes que solicitar autorización. Para ello debes visitar este sitio y <span style="color: #ff0000;"><strong>rellenar el formulario de solicitud</strong></span>. En mi vídeo muestro cómo lo hice yo y me funcionó.</p><p>Pronto publicaré algún tutorial para mostrar cómo se hacen algunas otras cosas del vídeo para que vosotros podáis crear vuestras propias producciones. Os dejo primero el vídeo y después el tutorial. Disfruta por un ratito:</p><center><strong><span style="color: #800000;">VIDEO GOOGLE EARTH STUDIO Y AFTER EFFECTS</span></strong></center><center><iframe src="https://www.youtube.com/embed/h60K0FQxcEY" width="640" height="420" frameborder="0" allowfullscreen="allowfullscreen">&lt;span data-mce-type=»bookmark» style=»display: inline-block; width: 0px; overflow: hidden; line-height: 0;» class=»mce_SELRES_start»&gt;&lt;/span&gt;</iframe></center>								</div>
				</div>
					</div>
		</div>
					</div>
		</section>
				<section class="elementor-section elementor-top-section elementor-element elementor-element-84423cf elementor-section-boxed elementor-section-height-default elementor-section-height-default" data-id="84423cf" data-element_type="section" data-e-type="section">
						<div class="elementor-container elementor-column-gap-default">
					<div class="elementor-column elementor-col-100 elementor-top-column elementor-element elementor-element-086529f" data-id="086529f" data-element_type="column" data-e-type="column">
			<div class="elementor-widget-wrap elementor-element-populated">
						<div class="elementor-element elementor-element-4a68e28 elementor-widget elementor-widget-heading" data-id="4a68e28" data-element_type="widget" data-e-type="widget" data-widget_type="heading.default">
				<div class="elementor-widget-container">
					<h1 class="elementor-heading-title elementor-size-default">TUTORIAL INTEGRACIÓN TEXTO E IMÁGENES EN ANIMACIÓN DE GOOGLE EARTH STUDIO</h1>				</div>
				</div>
					</div>
		</div>
					</div>
		</section>
				<section class="elementor-section elementor-top-section elementor-element elementor-element-13c5a6e elementor-section-boxed elementor-section-height-default elementor-section-height-default" data-id="13c5a6e" data-element_type="section" data-e-type="section">
						<div class="elementor-container elementor-column-gap-default">
					<div class="elementor-column elementor-col-100 elementor-top-column elementor-element elementor-element-df98d33" data-id="df98d33" data-element_type="column" data-e-type="column">
			<div class="elementor-widget-wrap elementor-element-populated">
						<div class="elementor-element elementor-element-767f2f3 elementor-widget elementor-widget-video" data-id="767f2f3" data-element_type="widget" data-e-type="widget" data-settings="{&quot;youtube_url&quot;:&quot;https:\/\/youtu.be\/GiChfLwiKhM&quot;,&quot;video_type&quot;:&quot;youtube&quot;,&quot;controls&quot;:&quot;yes&quot;}" data-widget_type="video.default">
				<div class="elementor-widget-container">
							<div class="elementor-wrapper elementor-open-inline">
			<div class="elementor-video"></div>		</div>
						</div>
				</div>
					</div>
		</div>
					</div>
		</section>
				<section class="elementor-section elementor-top-section elementor-element elementor-element-1e8ed87 elementor-section-boxed elementor-section-height-default elementor-section-height-default" data-id="1e8ed87" data-element_type="section" data-e-type="section">
						<div class="elementor-container elementor-column-gap-default">
					<div class="elementor-column elementor-col-100 elementor-top-column elementor-element elementor-element-152e0d4" data-id="152e0d4" data-element_type="column" data-e-type="column">
			<div class="elementor-widget-wrap elementor-element-populated">
						<div class="elementor-element elementor-element-ef6b5e2 elementor-widget-divider--view-line elementor-widget elementor-widget-divider" data-id="ef6b5e2" data-element_type="widget" data-e-type="widget" data-widget_type="divider.default">
				<div class="elementor-widget-container">
							<div class="elementor-divider">
			<span class="elementor-divider-separator">
						</span>
		</div>
						</div>
				</div>
					</div>
		</div>
					</div>
		</section>
				<section class="elementor-section elementor-top-section elementor-element elementor-element-258e6b43 elementor-section-full_width elementor-section-height-default elementor-section-height-default" data-id="258e6b43" data-element_type="section" data-e-type="section">
						<div class="elementor-container elementor-column-gap-default">
					<div class="elementor-column elementor-col-50 elementor-top-column elementor-element elementor-element-6100a72" data-id="6100a72" data-element_type="column" data-e-type="column">
			<div class="elementor-widget-wrap elementor-element-populated">
						<div class="elementor-element elementor-element-7d3e2cef elementor-align-right elementor-invisible elementor-widget elementor-widget-button" data-id="7d3e2cef" data-element_type="widget" data-e-type="widget" data-settings="{&quot;_animation&quot;:&quot;shake&quot;}" data-widget_type="button.default">
				<div class="elementor-widget-container">
									<div class="elementor-button-wrapper">
					<a class="elementor-button elementor-button-link elementor-size-sm elementor-animation-grow" href="https://ildefonsosegura.es/regalos/">
						<span class="elementor-button-content-wrapper">
									<span class="elementor-button-text">BAJATE EL EDITABLE</span>
					</span>
					</a>
				</div>
								</div>
				</div>
					</div>
		</div>
				<div class="elementor-column elementor-col-50 elementor-top-column elementor-element elementor-element-59fefd46" data-id="59fefd46" data-element_type="column" data-e-type="column">
			<div class="elementor-widget-wrap elementor-element-populated">
						<div class="elementor-element elementor-element-11d22559 elementor-widget elementor-widget-html" data-id="11d22559" data-element_type="widget" data-e-type="widget" data-settings="{&quot;_animation&quot;:&quot;none&quot;}" data-widget_type="html.default">
				<div class="elementor-widget-container">
					<form action="https://www.paypal.com/cgi-bin/webscr" method="post" target="_blank">
<input type="hidden" name="cmd" value="_donations">
<input type="hidden" name="business" value="ildefonsosegura@gmail.com">
<input type="hidden" name="lc" value="ES">
<input type="hidden" name="item_name" value="MANTENIMIENTO DE LA PAGINA DE ILDEFONSOSEGURA">
<input type="hidden" name="no_note" value="0">
<input type="hidden" name="currency_code" value="EUR">
<input type="hidden" name="bn" value="PP-DonationsBF:paypal1.jpg:NonHostedGuest">
<input type="image" src="http://ildefonsosegura.es/wp-content/uploads/paypal-updated-1.png" border="0" name="submit" alt="PayPal. La forma rápida y segura de pagar en Internet.">
<img decoding="async" alt="" border="0" src="https://www.paypalobjects.com/es_ES/i/scr/pixel.gif" width="1" height="1">
</form>				</div>
				</div>
					</div>
		</div>
					</div>
		</section>
				<section class="elementor-section elementor-top-section elementor-element elementor-element-897f9ec elementor-section-boxed elementor-section-height-default elementor-section-height-default" data-id="897f9ec" data-element_type="section" data-e-type="section">
						<div class="elementor-container elementor-column-gap-default">
					<div class="elementor-column elementor-col-100 elementor-top-column elementor-element elementor-element-7e0bfbe" data-id="7e0bfbe" data-element_type="column" data-e-type="column">
			<div class="elementor-widget-wrap elementor-element-populated">
						<div class="elementor-element elementor-element-9415d6c elementor-widget-divider--view-line elementor-widget elementor-widget-divider" data-id="9415d6c" data-element_type="widget" data-e-type="widget" data-widget_type="divider.default">
				<div class="elementor-widget-container">
							<div class="elementor-divider">
			<span class="elementor-divider-separator">
						</span>
		</div>
						</div>
				</div>
					</div>
		</div>
					</div>
		</section>
				<section class="elementor-section elementor-top-section elementor-element elementor-element-374315a1 elementor-section-boxed elementor-section-height-default elementor-section-height-default" data-id="374315a1" data-element_type="section" data-e-type="section">
						<div class="elementor-container elementor-column-gap-default">
					<div class="elementor-column elementor-col-100 elementor-top-column elementor-element elementor-element-69f1053a" data-id="69f1053a" data-element_type="column" data-e-type="column">
			<div class="elementor-widget-wrap elementor-element-populated">
						<div class="elementor-element elementor-element-4de7b22d elementor-widget elementor-widget-html" data-id="4de7b22d" data-element_type="widget" data-e-type="widget" data-widget_type="html.default">
				<div class="elementor-widget-container">
					&nbsp;
<center><span style="color: #333333;"><strong>SUSCRÍBETE A MI CANAL DE YouTube</strong></span></center>&nbsp;
<div>
<div>
<div align="center">


<script src="https://apis.google.com/js/platform.js"></script>

<div class="g-ytsubscribe" data-channel="ildefonsosegura" data-layout="full" data-count="default"></div>
</div>
</div>
&nbsp;<p style="text-align: left;">No te lo pierdas y comparte tus trabajos en mi página de facebook (<span style="color: #ff0000;"><strong><a style="color: #ff0000;" href="http://www.facebook.com/IldefonsoSeguraPage" target="_blank" rel="noopener noreferrer">IldefonsoSeguraPage</a></strong></span>)</p>
Espero que te guste y compartas el vídeo. No dejes de compartir este post.
<p style="text-align: left;">Así es como me puedes ayudar 🙂 Gracias</p>

</div>				</div>
				</div>
					</div>
		</div>
					</div>
		</section>
				</div>La entrada <a href="https://ildefonsosegura.es/tutorial-after-effects-integracion-de-texto-e-imagenes-en-animacion-creada-con-google-earth-studio-by-ildefonsosegura/">Tutorial After Effects integración de texto e imágenes en animación creada con Google Earth Studio by @ildefonsosegura</a> apareció primero en <a href="https://ildefonsosegura.es">Ildefonso Segura</a>.]]></content:encoded>
					
					<wfw:commentRss>https://ildefonsosegura.es/tutorial-after-effects-integracion-de-texto-e-imagenes-en-animacion-creada-con-google-earth-studio-by-ildefonsosegura/feed/</wfw:commentRss>
			<slash:comments>0</slash:comments>
		
		
			</item>
		<item>
		<title>#Tutorial #Photoshop texto estilo globo, plástico, látex by @ildefonsosegura (incluye editable psd con estilo)</title>
		<link>https://ildefonsosegura.es/tutorial-photoshop-texto-estilo-globo-by-ildefonsosegura-incluye-editable/</link>
					<comments>https://ildefonsosegura.es/tutorial-photoshop-texto-estilo-globo-by-ildefonsosegura-incluye-editable/#respond</comments>
		
		<dc:creator><![CDATA[Ildefonso Segura]]></dc:creator>
		<pubDate>Tue, 30 Jul 2019 10:00:06 +0000</pubDate>
				<category><![CDATA[Editable]]></category>
		<category><![CDATA[Estilos]]></category>
		<category><![CDATA[Photoshop]]></category>
		<category><![CDATA[Tecnicas]]></category>
		<category><![CDATA[Textos]]></category>
		<category><![CDATA[Tutorial Escrito]]></category>
		<category><![CDATA[Tutoriales]]></category>
		<category><![CDATA[capas]]></category>
		<category><![CDATA[descarga]]></category>
		<category><![CDATA[editable]]></category>
		<category><![CDATA[efecto]]></category>
		<category><![CDATA[efectos]]></category>
		<category><![CDATA[estilo]]></category>
		<category><![CDATA[estilos]]></category>
		<category><![CDATA[fondo]]></category>
		<category><![CDATA[fusion]]></category>
		<category><![CDATA[globo]]></category>
		<category><![CDATA[gloriasanis]]></category>
		<category><![CDATA[ildefonso]]></category>
		<category><![CDATA[ildefonsosegura]]></category>
		<category><![CDATA[latex]]></category>
		<category><![CDATA[material]]></category>
		<category><![CDATA[materiales]]></category>
		<category><![CDATA[photoshop]]></category>
		<category><![CDATA[plastico]]></category>
		<category><![CDATA[style]]></category>
		<category><![CDATA[text]]></category>
		<category><![CDATA[texto]]></category>
		<category><![CDATA[textura]]></category>
		<category><![CDATA[tuto]]></category>
		<category><![CDATA[tutorial]]></category>
		<category><![CDATA[youtube]]></category>
		<guid isPermaLink="false">http://ildefonsosegura.es/?p=2945</guid>

					<description><![CDATA[<p>Con este tutorial aprenderemos a usar los estilos de capa para emular un efecto de material de globo, plástico o latex. Si usas variaciones sencillas del ejemplo, puedes conseguir otros efectos que harán que el texto parezca otro material. En cualquier caso, abajo te dejo el editable, estilo y la fuente para que puedas tener [&#8230;]</p>
La entrada <a href="https://ildefonsosegura.es/tutorial-photoshop-texto-estilo-globo-by-ildefonsosegura-incluye-editable/">#Tutorial #Photoshop texto estilo globo, plástico, látex by @ildefonsosegura (incluye editable psd con estilo)</a> apareció primero en <a href="https://ildefonsosegura.es">Ildefonso Segura</a>.]]></description>
										<content:encoded><![CDATA[<div data-elementor-type="wp-post" data-elementor-id="2945" class="elementor elementor-2945">
						<section class="elementor-section elementor-top-section elementor-element elementor-element-70f89c23 elementor-section-boxed elementor-section-height-default elementor-section-height-default" data-id="70f89c23" data-element_type="section" data-e-type="section">
						<div class="elementor-container elementor-column-gap-default">
					<div class="elementor-column elementor-col-100 elementor-top-column elementor-element elementor-element-2387411d" data-id="2387411d" data-element_type="column" data-e-type="column">
			<div class="elementor-widget-wrap elementor-element-populated">
						<div class="elementor-element elementor-element-1905c002 elementor-widget elementor-widget-text-editor" data-id="1905c002" data-element_type="widget" data-e-type="widget" data-widget_type="text-editor.default">
				<div class="elementor-widget-container">
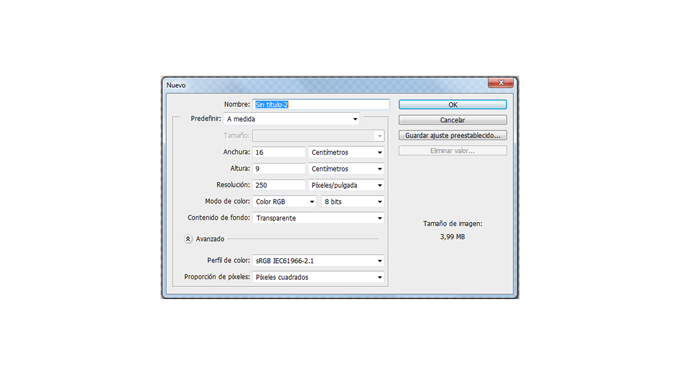
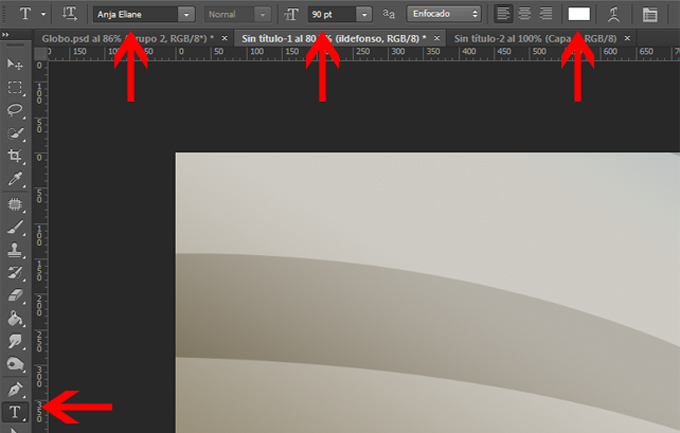
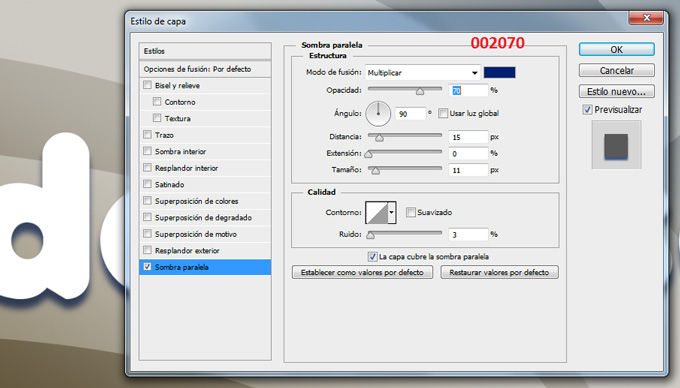
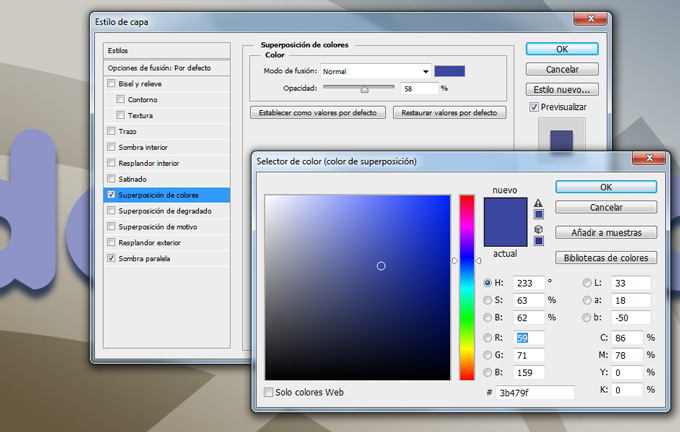
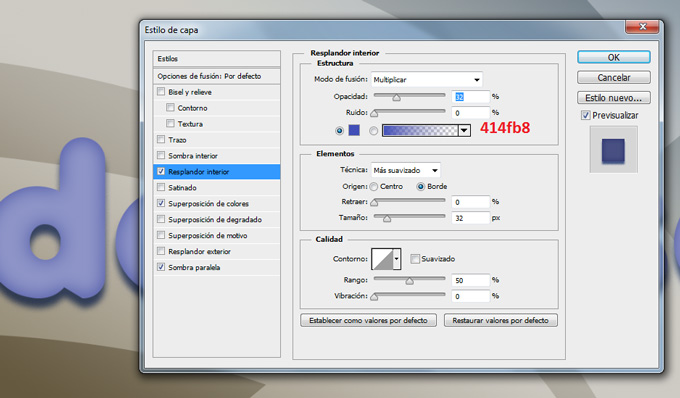
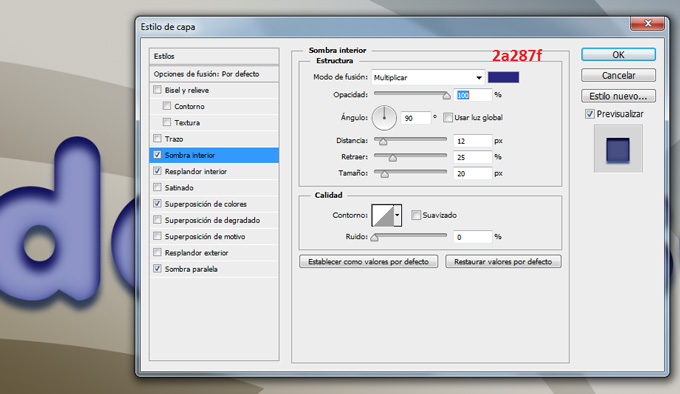
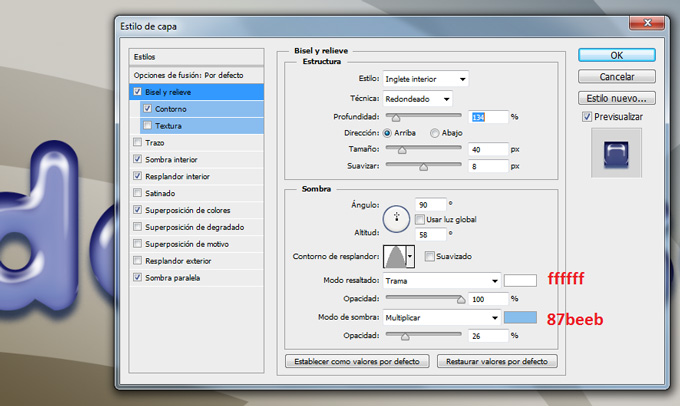
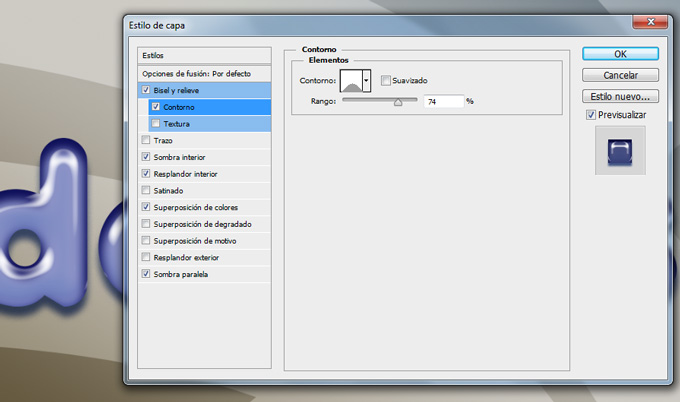
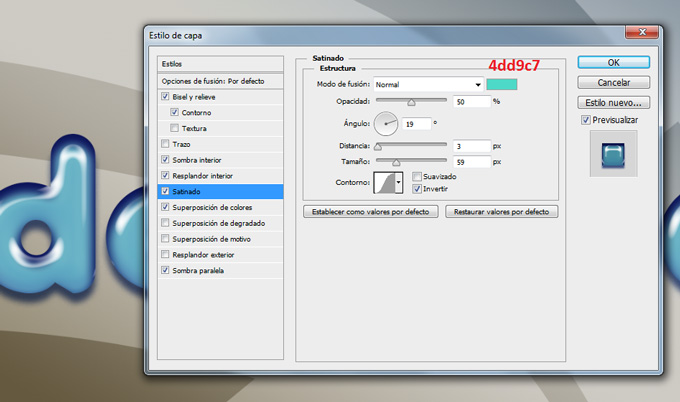
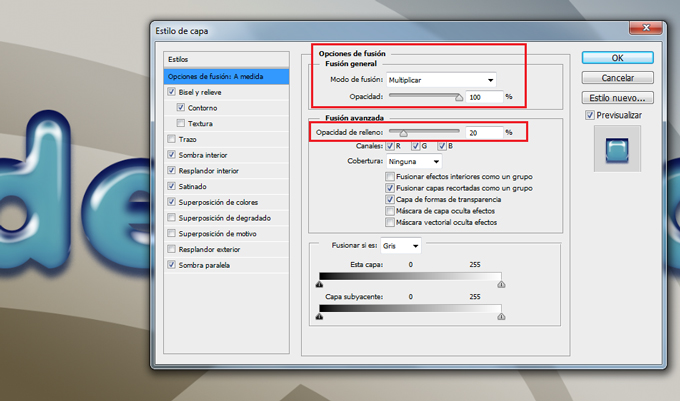
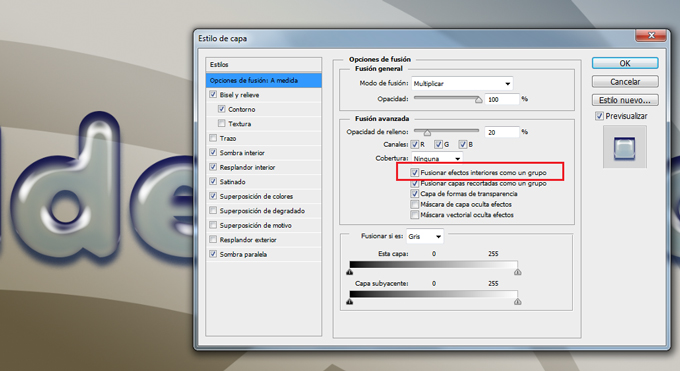
									<p><a href="https://ildefonsosegura.es/tutorial-photoshop-texto-estilo-globo-by-ildefonsosegura-incluye-editable/globo-15/" rel="attachment wp-att-2960"><img fetchpriority="high" decoding="async" class="aligncenter" src="https://ildefonsosegura.es/wp-content/uploads/globo-15.jpg" alt="globo-15" width="680" height="383" /></a></p><p>Con este tutorial aprenderemos a usar los estilos de capa para emular un efecto de material de globo, plástico o latex. Si usas variaciones sencillas del ejemplo, puedes conseguir otros efectos que harán que el texto parezca otro material. En cualquier caso, abajo te dejo el <strong>editable</strong>, estilo y la fuente para que puedas tener el efecto sin necesidad de crearlo.</p><p> </p><p>1.- Abre un nuevo canvas de trabajo con una resolución de 250 ppp. Yo usé un tamaño en cm de 16:9 (wide screen)</p><p><a href="https://ildefonsosegura.es/tutorial-photoshop-texto-estilo-globo-by-ildefonsosegura-incluye-editable/globo-1/" rel="attachment wp-att-2946"><img loading="lazy" decoding="async" class="size-full wp-image-2946 aligncenter" src="https://ildefonsosegura.es/wp-content/uploads/globo-1.jpg" alt="globo-1" width="680" height="383" srcset="https://ildefonsosegura.es/wp-content/uploads/globo-1.jpg 680w, https://ildefonsosegura.es/wp-content/uploads/globo-1-300x168.jpg 300w" sizes="(max-width: 680px) 100vw, 680px" /></a></p><p> </p><p>2.- Pon un fondo que tu elijas. Yo usé uno creado por mi sencillo</p><p><a href="https://ildefonsosegura.es/tutorial-photoshop-texto-estilo-globo-by-ildefonsosegura-incluye-editable/globo-2/" rel="attachment wp-att-2947"><img loading="lazy" decoding="async" class="size-full wp-image-2947 aligncenter" src="https://ildefonsosegura.es/wp-content/uploads/globo-2.jpg" alt="globo-2" width="680" height="383" srcset="https://ildefonsosegura.es/wp-content/uploads/globo-2.jpg 680w, https://ildefonsosegura.es/wp-content/uploads/globo-2-300x168.jpg 300w" sizes="(max-width: 680px) 100vw, 680px" /></a></p><p>3.- Selecciona la herramienta texto de la barra de herramientas. Usa la fuente Anja con color blanco ffffff y tamaño aproximadamente 90 px</p><p><a href="https://ildefonsosegura.es/tutorial-photoshop-texto-estilo-globo-by-ildefonsosegura-incluye-editable/globo-3/" rel="attachment wp-att-2948"><img loading="lazy" decoding="async" class="size-full wp-image-2948 aligncenter" src="https://ildefonsosegura.es/wp-content/uploads/globo-3.jpg" alt="globo-3" width="680" height="433" srcset="https://ildefonsosegura.es/wp-content/uploads/globo-3.jpg 680w, https://ildefonsosegura.es/wp-content/uploads/globo-3-300x191.jpg 300w" sizes="(max-width: 680px) 100vw, 680px" /></a></p><p>4.- Escribe tu texto</p><p><a href="https://ildefonsosegura.es/tutorial-photoshop-texto-estilo-globo-by-ildefonsosegura-incluye-editable/globo-4/" rel="attachment wp-att-2949"><img loading="lazy" decoding="async" class="size-full wp-image-2949 aligncenter" src="https://ildefonsosegura.es/wp-content/uploads/globo-4.jpg" alt="globo-4" width="680" height="383" srcset="https://ildefonsosegura.es/wp-content/uploads/globo-4.jpg 680w, https://ildefonsosegura.es/wp-content/uploads/globo-4-300x168.jpg 300w" sizes="(max-width: 680px) 100vw, 680px" /></a></p><p>5.- Haz clic derecho en la capa de texto y selecciona OPCIONES DE FUSION. Comienza seleccionando SOMBRA PARALELA</p><p><a href="https://ildefonsosegura.es/tutorial-photoshop-texto-estilo-globo-by-ildefonsosegura-incluye-editable/globo-5/" rel="attachment wp-att-2950"><img loading="lazy" decoding="async" class="size-full wp-image-2950 aligncenter" src="https://ildefonsosegura.es/wp-content/uploads/globo-5.jpg" alt="globo-5" width="680" height="388" srcset="https://ildefonsosegura.es/wp-content/uploads/globo-5.jpg 680w, https://ildefonsosegura.es/wp-content/uploads/globo-5-300x171.jpg 300w" sizes="(max-width: 680px) 100vw, 680px" /></a></p><p>6.- Continuamos con SUPERPOSICION DE COLORES buscando un tono azul</p><p><a href="https://ildefonsosegura.es/tutorial-photoshop-texto-estilo-globo-by-ildefonsosegura-incluye-editable/globo-6/" rel="attachment wp-att-2951"><img loading="lazy" decoding="async" class="size-full wp-image-2951 aligncenter" src="https://ildefonsosegura.es/wp-content/uploads/globo-6.jpg" alt="globo-6" width="680" height="432" srcset="https://ildefonsosegura.es/wp-content/uploads/globo-6.jpg 680w, https://ildefonsosegura.es/wp-content/uploads/globo-6-300x190.jpg 300w" sizes="(max-width: 680px) 100vw, 680px" /></a></p><p>7.- Aplicamos ahora la variable RESPLANDOR INTERIOR</p><p><a href="https://ildefonsosegura.es/tutorial-photoshop-texto-estilo-globo-by-ildefonsosegura-incluye-editable/globo-7/" rel="attachment wp-att-2952"><img loading="lazy" decoding="async" class="size-full wp-image-2952 aligncenter" src="https://ildefonsosegura.es/wp-content/uploads/globo-7.jpg" alt="globo-7" width="680" height="398" srcset="https://ildefonsosegura.es/wp-content/uploads/globo-7.jpg 680w, https://ildefonsosegura.es/wp-content/uploads/globo-7-300x175.jpg 300w" sizes="(max-width: 680px) 100vw, 680px" /></a></p><p>8.- A continuación le damos SOMBRA INTERIOR</p><p><a href="https://ildefonsosegura.es/tutorial-photoshop-texto-estilo-globo-by-ildefonsosegura-incluye-editable/globo-8/" rel="attachment wp-att-2953"><img loading="lazy" decoding="async" class="size-full wp-image-2953 aligncenter" src="https://ildefonsosegura.es/wp-content/uploads/globo-8.jpg" alt="globo-8" width="680" height="394" srcset="https://ildefonsosegura.es/wp-content/uploads/globo-8.jpg 680w, https://ildefonsosegura.es/wp-content/uploads/globo-8-300x173.jpg 300w" sizes="(max-width: 680px) 100vw, 680px" /></a></p><p>9.- Nos situamos en BISEL Y RELIEVE dándole unos valores como sigue:</p><p><a href="https://ildefonsosegura.es/tutorial-photoshop-texto-estilo-globo-by-ildefonsosegura-incluye-editable/globo-9/" rel="attachment wp-att-2954"><img loading="lazy" decoding="async" class="size-full wp-image-2954 aligncenter" src="https://ildefonsosegura.es/wp-content/uploads/globo-9.jpg" alt="globo-9" width="680" height="406" srcset="https://ildefonsosegura.es/wp-content/uploads/globo-9.jpg 680w, https://ildefonsosegura.es/wp-content/uploads/globo-9-300x179.jpg 300w" sizes="(max-width: 680px) 100vw, 680px" /></a></p><p>10.- Dentro de bisel y relieve seleccionamos CONTORNO</p><p><a href="https://ildefonsosegura.es/tutorial-photoshop-texto-estilo-globo-by-ildefonsosegura-incluye-editable/globo-10/" rel="attachment wp-att-2955"><img loading="lazy" decoding="async" class="size-full wp-image-2955 aligncenter" src="https://ildefonsosegura.es/wp-content/uploads/globo-10.jpg" alt="globo-10" width="680" height="402" srcset="https://ildefonsosegura.es/wp-content/uploads/globo-10.jpg 680w, https://ildefonsosegura.es/wp-content/uploads/globo-10-300x177.jpg 300w" sizes="(max-width: 680px) 100vw, 680px" /></a></p><p> </p><p>11.- Casi finalizando aplicamos SATINADO</p><p><a href="https://ildefonsosegura.es/tutorial-photoshop-texto-estilo-globo-by-ildefonsosegura-incluye-editable/globo-11/" rel="attachment wp-att-2956"><img loading="lazy" decoding="async" class="size-full wp-image-2956 aligncenter" src="https://ildefonsosegura.es/wp-content/uploads/globo-11.jpg" alt="globo-11" width="680" height="402" srcset="https://ildefonsosegura.es/wp-content/uploads/globo-11.jpg 680w, https://ildefonsosegura.es/wp-content/uploads/globo-11-300x177.jpg 300w" sizes="(max-width: 680px) 100vw, 680px" /></a></p><p>12.- Hasta aquí ya tendríamos un efecto de texto de globo bastante aceptable.</p><p><a href="https://ildefonsosegura.es/tutorial-photoshop-texto-estilo-globo-by-ildefonsosegura-incluye-editable/globo-12/" rel="attachment wp-att-2957"><img loading="lazy" decoding="async" class="size-full wp-image-2957 aligncenter" src="https://ildefonsosegura.es/wp-content/uploads/globo-12.jpg" alt="globo-12" width="680" height="383" srcset="https://ildefonsosegura.es/wp-content/uploads/globo-12.jpg 680w, https://ildefonsosegura.es/wp-content/uploads/globo-12-300x168.jpg 300w" sizes="(max-width: 680px) 100vw, 680px" /></a></p><p>13.- En las opciones de fusión vamos a cambiar variables tanto de la sección de FUSION GENERAL como de FUSION AVANZADA</p><p>En la fusión general cambiaremos el tipo de fusión de capa a MULIPLICAR. En la fusión avanzada cambiaremos el porcentaje de relleno al 20%</p><p><a href="https://ildefonsosegura.es/tutorial-photoshop-texto-estilo-globo-by-ildefonsosegura-incluye-editable/globo-13/" rel="attachment wp-att-2958"><img loading="lazy" decoding="async" class="size-full wp-image-2958 aligncenter" src="https://ildefonsosegura.es/wp-content/uploads/globo-13.jpg" alt="globo-13" width="680" height="401" srcset="https://ildefonsosegura.es/wp-content/uploads/globo-13.jpg 680w, https://ildefonsosegura.es/wp-content/uploads/globo-13-300x176.jpg 300w" sizes="(max-width: 680px) 100vw, 680px" /></a></p><p> </p><p>14.- Para conseguir mayor transparencia en el texto seleccionaremos una variable dentro de la FUSIÓN AVANZADA que no he visto en ningún tutorial. Esa opción es FUSIONAR EFECTOS INTERIORES COMO UN GRUPO. Con esta opción seleccionada lo que se hace es fusionar los efectos de «resplandor interior», «satinado» y «superposición» con la capa antes de fusionarlos con el documento. Todas las opciones de fusión se fusionan con el documento y en función del contenido de las otras capas el resultado de las variables es diferente. Si tienes esta opción de FUSIONAR EFECTOS INTERIORES COMO UN GRUPO, los efectos interactuan con el contenido de la capa y no con el resto de capas.</p><p><a href="https://ildefonsosegura.es/tutorial-photoshop-texto-estilo-globo-by-ildefonsosegura-incluye-editable/globo-14/" rel="attachment wp-att-2959"><img loading="lazy" decoding="async" class="size-full wp-image-2959 aligncenter" src="https://ildefonsosegura.es/wp-content/uploads/globo-14.jpg" alt="globo-14" width="680" height="371" srcset="https://ildefonsosegura.es/wp-content/uploads/globo-14.jpg 680w, https://ildefonsosegura.es/wp-content/uploads/globo-14-300x163.jpg 300w" sizes="(max-width: 680px) 100vw, 680px" /></a></p><p>15.- Así el resultado es el siguiente que íbamos buscando:</p><p><a href="https://ildefonsosegura.es/tutorial-photoshop-texto-estilo-globo-by-ildefonsosegura-incluye-editable/globo-15/" rel="attachment wp-att-2960"><img loading="lazy" decoding="async" class="size-full wp-image-2960 aligncenter" src="https://ildefonsosegura.es/wp-content/uploads/globo-15.jpg" alt="globo-15" width="680" height="383" srcset="https://ildefonsosegura.es/wp-content/uploads/globo-15.jpg 680w, https://ildefonsosegura.es/wp-content/uploads/globo-15-300x168.jpg 300w" sizes="(max-width: 680px) 100vw, 680px" /></a></p><p> </p><p> </p>								</div>
				</div>
					</div>
		</div>
					</div>
		</section>
				<section class="elementor-section elementor-top-section elementor-element elementor-element-1272db76 elementor-section-full_width elementor-section-height-default elementor-section-height-default" data-id="1272db76" data-element_type="section" data-e-type="section">
						<div class="elementor-container elementor-column-gap-default">
					<div class="elementor-column elementor-col-50 elementor-top-column elementor-element elementor-element-1834e7b8" data-id="1834e7b8" data-element_type="column" data-e-type="column">
			<div class="elementor-widget-wrap elementor-element-populated">
						<div class="elementor-element elementor-element-5393f42d elementor-align-right elementor-invisible elementor-widget elementor-widget-button" data-id="5393f42d" data-element_type="widget" data-e-type="widget" data-settings="{&quot;_animation&quot;:&quot;shake&quot;}" data-widget_type="button.default">
				<div class="elementor-widget-container">
									<div class="elementor-button-wrapper">
					<a class="elementor-button elementor-button-link elementor-size-sm elementor-animation-grow" href="https://drive.google.com/open?id=0B_nJkCGJubucWFU4eTFhMzF1YVU">
						<span class="elementor-button-content-wrapper">
									<span class="elementor-button-text">BAJATE EL EDITABLE</span>
					</span>
					</a>
				</div>
								</div>
				</div>
					</div>
		</div>
				<div class="elementor-column elementor-col-50 elementor-top-column elementor-element elementor-element-726d94ee" data-id="726d94ee" data-element_type="column" data-e-type="column">
			<div class="elementor-widget-wrap elementor-element-populated">
						<div class="elementor-element elementor-element-38a200b6 elementor-widget elementor-widget-html" data-id="38a200b6" data-element_type="widget" data-e-type="widget" data-settings="{&quot;_animation&quot;:&quot;none&quot;}" data-widget_type="html.default">
				<div class="elementor-widget-container">
					<form action="https://www.paypal.com/cgi-bin/webscr" method="post" target="_blank">
<input type="hidden" name="cmd" value="_donations">
<input type="hidden" name="business" value="ildefonsosegura@gmail.com">
<input type="hidden" name="lc" value="ES">
<input type="hidden" name="item_name" value="MANTENIMIENTO DE LA PAGINA DE ILDEFONSOSEGURA">
<input type="hidden" name="no_note" value="0">
<input type="hidden" name="currency_code" value="EUR">
<input type="hidden" name="bn" value="PP-DonationsBF:paypal1.jpg:NonHostedGuest">
<input type="image" src="http://ildefonsosegura.es/wp-content/uploads/paypal-updated-1.png" border="0" name="submit" alt="PayPal. La forma rápida y segura de pagar en Internet.">
<img decoding="async" alt="" border="0" src="https://www.paypalobjects.com/es_ES/i/scr/pixel.gif" width="1" height="1">
</form>				</div>
				</div>
					</div>
		</div>
					</div>
		</section>
				<section class="elementor-section elementor-top-section elementor-element elementor-element-29087141 elementor-section-boxed elementor-section-height-default elementor-section-height-default" data-id="29087141" data-element_type="section" data-e-type="section">
						<div class="elementor-container elementor-column-gap-default">
					<div class="elementor-column elementor-col-100 elementor-top-column elementor-element elementor-element-994285d" data-id="994285d" data-element_type="column" data-e-type="column">
			<div class="elementor-widget-wrap elementor-element-populated">
						<div class="elementor-element elementor-element-2089d69f elementor-widget elementor-widget-html" data-id="2089d69f" data-element_type="widget" data-e-type="widget" data-widget_type="html.default">
				<div class="elementor-widget-container">
					&nbsp;
<center><span style="color: #333333;"><strong>SUSCRÍBETE A MI CANAL DE YouTube</strong></span></center>&nbsp;
<div>
<div>
<div align="center">


<script src="https://apis.google.com/js/platform.js"></script>

<div class="g-ytsubscribe" data-channel="ildefonsosegura" data-layout="full" data-count="default"></div>
</div>
</div>
&nbsp;<p style="text-align: left;">No te lo pierdas y comparte tus trabajos en mi página de facebook (<span style="color: #ff0000;"><strong><a style="color: #ff0000;" href="http://www.facebook.com/IldefonsoSeguraPage" target="_blank" rel="noopener noreferrer">IldefonsoSeguraPage</a></strong></span>)</p>
Espero que te guste y compartas el vídeo. No dejes de compartir este post.
<p style="text-align: left;">Así es como me puedes ayudar 🙂 Gracias</p>

</div>				</div>
				</div>
					</div>
		</div>
					</div>
		</section>
				</div>La entrada <a href="https://ildefonsosegura.es/tutorial-photoshop-texto-estilo-globo-by-ildefonsosegura-incluye-editable/">#Tutorial #Photoshop texto estilo globo, plástico, látex by @ildefonsosegura (incluye editable psd con estilo)</a> apareció primero en <a href="https://ildefonsosegura.es">Ildefonso Segura</a>.]]></content:encoded>
					
					<wfw:commentRss>https://ildefonsosegura.es/tutorial-photoshop-texto-estilo-globo-by-ildefonsosegura-incluye-editable/feed/</wfw:commentRss>
			<slash:comments>0</slash:comments>
		
		
			</item>
		<item>
		<title>#Tutorial #Photoshop escrito: Texto tallado en madera by @ildefonsosegura</title>
		<link>https://ildefonsosegura.es/tutorial-photoshosop-escrito-texto-escrito-en-madera-by-ildefonsosegura/</link>
					<comments>https://ildefonsosegura.es/tutorial-photoshosop-escrito-texto-escrito-en-madera-by-ildefonsosegura/#comments</comments>
		
		<dc:creator><![CDATA[Ildefonso Segura]]></dc:creator>
		<pubDate>Mon, 29 Jul 2019 15:00:14 +0000</pubDate>
				<category><![CDATA[Efectos]]></category>
		<category><![CDATA[Estilos]]></category>
		<category><![CDATA[Photoshop]]></category>
		<category><![CDATA[PREMIUM]]></category>
		<category><![CDATA[Tecnicas]]></category>
		<category><![CDATA[Textos]]></category>
		<category><![CDATA[Tutorial Escrito]]></category>
		<category><![CDATA[Tutoriales]]></category>
		<category><![CDATA[CC]]></category>
		<category><![CDATA[cs4]]></category>
		<category><![CDATA[cs5]]></category>
		<category><![CDATA[cs6]]></category>
		<category><![CDATA[escrito]]></category>
		<category><![CDATA[estilo]]></category>
		<category><![CDATA[gloriasanis]]></category>
		<category><![CDATA[grabado]]></category>
		<category><![CDATA[halloween]]></category>
		<category><![CDATA[ildefonsosegura]]></category>
		<category><![CDATA[madera]]></category>
		<category><![CDATA[photoshop]]></category>
		<category><![CDATA[style]]></category>
		<category><![CDATA[text]]></category>
		<category><![CDATA[texto]]></category>
		<category><![CDATA[textura]]></category>
		<category><![CDATA[tuto]]></category>
		<category><![CDATA[tutorial]]></category>
		<category><![CDATA[wallpaper]]></category>
		<category><![CDATA[written]]></category>
		<guid isPermaLink="false">http://ildefonsosegura.es/?p=3143</guid>

					<description><![CDATA[<p>Con fecha 21 de octubre de 2013 se publica un videotutorial donde explico como conseguir un efecto de tallado de una calavera en una textura de madera. Con la misma técnica podrías conseguir la integración de un volumen sencillo en una textura determinada. Aprovechando estas fechas cercanas a Halloween, tienes a tu disposición un videotutorial [&#8230;]</p>
La entrada <a href="https://ildefonsosegura.es/tutorial-photoshosop-escrito-texto-escrito-en-madera-by-ildefonsosegura/">#Tutorial #Photoshop escrito: Texto tallado en madera by @ildefonsosegura</a> apareció primero en <a href="https://ildefonsosegura.es">Ildefonso Segura</a>.]]></description>
										<content:encoded><![CDATA[<div data-elementor-type="wp-post" data-elementor-id="3143" class="elementor elementor-3143">
						<section class="elementor-section elementor-top-section elementor-element elementor-element-28fd328 elementor-section-boxed elementor-section-height-default elementor-section-height-default" data-id="28fd328" data-element_type="section" data-e-type="section">
						<div class="elementor-container elementor-column-gap-default">
					<div class="elementor-column elementor-col-100 elementor-top-column elementor-element elementor-element-60bcc37" data-id="60bcc37" data-element_type="column" data-e-type="column">
			<div class="elementor-widget-wrap elementor-element-populated">
						<div class="elementor-element elementor-element-0f19028 elementor-widget elementor-widget-text-editor" data-id="0f19028" data-element_type="widget" data-e-type="widget" data-widget_type="text-editor.default">
				<div class="elementor-widget-container">
									<p>Con fecha <span style="color: #800000;"><strong>21 de octubre de 2013</strong></span> se publica un videotutorial donde explico como conseguir un efecto de tallado de una calavera en una textura de madera. Con la misma técnica podrías conseguir la integración de un volumen sencillo en una textura determinada.</p><p>Aprovechando estas fechas cercanas a Halloween, tienes a tu disposición un videotutorial junto con otros que ya publiqué y que te pueden servir también, donde te muestro unas técnicas sencillas con máscaras, filtros y capas de ajuste. El resultado es fantástico y te invito a ver el videotutorial haciendo clic en la imagen siguiente.</p><p style="text-align: center;"><a href="http://ildefonsosegura.es/tutorial-photoshop-fusionar-volumenes-con-texturas-by-ildefonsosegura-wallpaper-halloween" target="_blank" rel="attachment wp-att-3142 noopener noreferrer"><img loading="lazy" decoding="async" class="size-full wp-image-3142 aligncenter" src="http://ildefonsosegura.es/wp-content/uploads/Calavera-de-madera-wallpaper.jpg" alt="Calavera-de-madera-wallpaper" width="680" height="383" srcset="https://ildefonsosegura.es/wp-content/uploads/Calavera-de-madera-wallpaper.jpg 680w, https://ildefonsosegura.es/wp-content/uploads/Calavera-de-madera-wallpaper-300x168.jpg 300w" sizes="(max-width: 680px) 100vw, 680px" /></a></p><p style="text-align: center;"><strong style="color: #800000;">HAZ CLIC EN LA IMAGEN PARA VER EL VIDEOTUTORIAL</strong></p>								</div>
				</div>
					</div>
		</div>
					</div>
		</section>
				<section class="elementor-section elementor-top-section elementor-element elementor-element-52db58ed elementor-section-full_width elementor-section-height-default elementor-section-height-default" data-id="52db58ed" data-element_type="section" data-e-type="section">
						<div class="elementor-container elementor-column-gap-default">
					<div class="elementor-column elementor-col-50 elementor-top-column elementor-element elementor-element-1406c6bf" data-id="1406c6bf" data-element_type="column" data-e-type="column">
			<div class="elementor-widget-wrap elementor-element-populated">
						<div class="elementor-element elementor-element-5eda612a elementor-align-right elementor-widget elementor-widget-button" data-id="5eda612a" data-element_type="widget" data-e-type="widget" data-widget_type="button.default">
				<div class="elementor-widget-container">
									<div class="elementor-button-wrapper">
					<a class="elementor-button elementor-button-link elementor-size-sm elementor-animation-grow" href="https://drive.google.com/open?id=0B_nJkCGJubuca2tUelpSTUlDSmc">
						<span class="elementor-button-content-wrapper">
						<span class="elementor-button-icon">
				<i aria-hidden="true" class="far fa-arrow-alt-circle-down"></i>			</span>
									<span class="elementor-button-text">DESCARGA EL MATERIAL</span>
					</span>
					</a>
				</div>
								</div>
				</div>
					</div>
		</div>
				<div class="elementor-column elementor-col-50 elementor-top-column elementor-element elementor-element-460e16d1" data-id="460e16d1" data-element_type="column" data-e-type="column">
			<div class="elementor-widget-wrap elementor-element-populated">
						<div class="elementor-element elementor-element-471c22fd elementor-widget elementor-widget-html" data-id="471c22fd" data-element_type="widget" data-e-type="widget" data-settings="{&quot;_animation&quot;:&quot;none&quot;}" data-widget_type="html.default">
				<div class="elementor-widget-container">
					<center><form action="https://www.paypal.com/cgi-bin/webscr" method="post" target="_blank">
<input type="hidden" name="cmd" value="_donations">
<input type="hidden" name="business" value="ildefonsosegura@gmail.com">
<input type="hidden" name="lc" value="ES">
<input type="hidden" name="item_name" value="MANTENIMIENTO DE LA PAGINA DE ILDEFONSOSEGURA">
<input type="hidden" name="no_note" value="0">
<input type="hidden" name="currency_code" value="EUR">
<input type="hidden" name="bn" value="PP-DonationsBF:paypal1.jpg:NonHostedGuest">
<input type="image" src="http://ildefonsosegura.es/wp-content/uploads/paypal-updated-1.png" border="0" name="submit" alt="PayPal. La forma rápida y segura de pagar en Internet.">
<img decoding="async" alt="" border="0" src="https://www.paypalobjects.com/es_ES/i/scr/pixel.gif" width="1" height="1">
</form></center>				</div>
				</div>
					</div>
		</div>
					</div>
		</section>
				<section class="elementor-section elementor-top-section elementor-element elementor-element-792abb9a elementor-section-boxed elementor-section-height-default elementor-section-height-default" data-id="792abb9a" data-element_type="section" data-e-type="section">
						<div class="elementor-container elementor-column-gap-default">
					<div class="elementor-column elementor-col-100 elementor-top-column elementor-element elementor-element-448b7dc7" data-id="448b7dc7" data-element_type="column" data-e-type="column">
			<div class="elementor-widget-wrap elementor-element-populated">
						<div class="elementor-element elementor-element-122cd2cf elementor-widget elementor-widget-text-editor" data-id="122cd2cf" data-element_type="widget" data-e-type="widget" data-widget_type="text-editor.default">
				<div class="elementor-widget-container">
									<pre> [widget id="custom_html-8"]</pre><p>Tutoriales relacionados con la temática Halloween</p><p><a href="http://ildefonsosegura.es/texto-con-textura-de-calabaza-con-cinema4d-y-photoshop-wallpaper-halloween/" target="_blank" rel="noopener noreferrer"><img loading="lazy" decoding="async" class="wp-image-1298 aligncenter" src="http://ildefonsosegura.es/wp-content/uploads/texto-calabaza4.jpg" alt="texto-calabaza4" width="194" height="110" srcset="https://ildefonsosegura.es/wp-content/uploads/texto-calabaza4.jpg 600w, https://ildefonsosegura.es/wp-content/uploads/texto-calabaza4-300x169.jpg 300w" sizes="(max-width: 194px) 100vw, 194px" /></a>  <a href="http://ildefonsosegura.es/vaciado-de-volumenes-con-boleanos-en-cinema4d/" target="_blank" rel="attachment wp-att-1304 noopener noreferrer"><img loading="lazy" decoding="async" class="wp-image-1304 aligncenter" src="http://ildefonsosegura.es/wp-content/uploads/Cara-de-calabaza.jpg" alt="Cara-de-calabaza" width="194" height="110" /></a>  <a href="http://ildefonsosegura.es/convertir-personas-en-zombis/" target="_blank" rel="attachment wp-att-3163 noopener noreferrer"><img loading="lazy" decoding="async" class="wp-image-3163 aligncenter" src="http://ildefonsosegura.es/wp-content/uploads/ZOMBIS-by-Ildefonsosegura1.jpg" alt="ZOMBIS-by-Ildefonsosegura" width="194" height="110" srcset="https://ildefonsosegura.es/wp-content/uploads/ZOMBIS-by-Ildefonsosegura1.jpg 600w, https://ildefonsosegura.es/wp-content/uploads/ZOMBIS-by-Ildefonsosegura1-300x169.jpg 300w" sizes="(max-width: 194px) 100vw, 194px" /></a></p><p>En este post te muestro un tutorial que completa al videotutorial citado dado que nos enseña a realizar el texto que aparece en el wallpaper de Halloween. El resultado es este y lo vemos paso a paso:</p><p><a href="http://ildefonsosegura.es/tutorial-photoshosop-escrito-texto-escrito-en-madera-by-ildefonsosegura/attachment/995/" rel="attachment wp-att-3148"><img loading="lazy" decoding="async" class="size-full wp-image-3148 aligncenter" src="http://ildefonsosegura.es/wp-content/uploads/995.jpg" alt="995" width="680" height="510" srcset="https://ildefonsosegura.es/wp-content/uploads/995.jpg 680w, https://ildefonsosegura.es/wp-content/uploads/995-300x225.jpg 300w" sizes="(max-width: 680px) 100vw, 680px" /></a></p><h1><span style="color: #800000;"><strong> TUTORIAL PHOTOSHOP</strong></span></h1><p><strong> PASO 1.-</strong>  Abrimos textura de madera donde pondremos el texto</p><p><a href="http://ildefonsosegura.es/tutorial-photoshosop-escrito-texto-escrito-en-madera-by-ildefonsosegura/attachment/1/" rel="attachment wp-att-3110"><img loading="lazy" decoding="async" class="alignnone size-full wp-image-3110 aligncenter" src="http://ildefonsosegura.es/wp-content/uploads/1.jpg" alt="1" width="680" height="510" srcset="https://ildefonsosegura.es/wp-content/uploads/1.jpg 680w, https://ildefonsosegura.es/wp-content/uploads/1-300x225.jpg 300w" sizes="(max-width: 680px) 100vw, 680px" /></a></p><p><strong>PASO 2.-</strong>  Añadimos capa de ajuste de Blanco y negro con los valores por defecto que son los que se ven en la imagen. Ponemos el modo de fusión de la capa en MULTIPLICAR</p><p style="text-align: center;"> <a href="http://ildefonsosegura.es/tutorial-photoshosop-escrito-texto-escrito-en-madera-by-ildefonsosegura/1a/" rel="attachment wp-att-3111"><img loading="lazy" decoding="async" class="alignnone size-full wp-image-3111" src="http://ildefonsosegura.es/wp-content/uploads/1a.jpg" alt="1a" width="680" height="504" srcset="https://ildefonsosegura.es/wp-content/uploads/1a.jpg 680w, https://ildefonsosegura.es/wp-content/uploads/1a-300x222.jpg 300w" sizes="(max-width: 680px) 100vw, 680px" /></a></p><p style="text-align: left;"><strong>PASO 3.-</strong>  Añadimos caja de ajuste de equilibrio de color con los valores de la imagen tanto en medios tonos como en sombras como en iluminaciones. Ponemos el modo de fusión de la capa en COLOR</p><p style="text-align: left;"><a href="http://ildefonsosegura.es/tutorial-photoshosop-escrito-texto-escrito-en-madera-by-ildefonsosegura/1b/" rel="attachment wp-att-3112"><img loading="lazy" decoding="async" class="alignnone size-full wp-image-3112 aligncenter" src="http://ildefonsosegura.es/wp-content/uploads/1b.jpg" alt="1b" width="680" height="504" srcset="https://ildefonsosegura.es/wp-content/uploads/1b.jpg 680w, https://ildefonsosegura.es/wp-content/uploads/1b-300x222.jpg 300w" sizes="(max-width: 680px) 100vw, 680px" /></a></p><p style="text-align: left;"><strong>PASO 4.-</strong>  tendríamos este resultado en la textura a partir del cual podemos trabajar el texto</p><p style="text-align: left;"><a href="http://ildefonsosegura.es/tutorial-photoshosop-escrito-texto-escrito-en-madera-by-ildefonsosegura/1c/" rel="attachment wp-att-3113"><img loading="lazy" decoding="async" class="size-full wp-image-3113 aligncenter" src="http://ildefonsosegura.es/wp-content/uploads/1c.jpg" alt="1c" width="680" height="510" srcset="https://ildefonsosegura.es/wp-content/uploads/1c.jpg 680w, https://ildefonsosegura.es/wp-content/uploads/1c-300x225.jpg 300w" sizes="(max-width: 680px) 100vw, 680px" /></a></p><p style="text-align: left;"><strong>PASO 5.-</strong>  Seleccionamos un color rojo oscuro para emular el color de la sangre. Código 550000</p><p style="text-align: left;"><a href="http://ildefonsosegura.es/tutorial-photoshosop-escrito-texto-escrito-en-madera-by-ildefonsosegura/1d/" rel="attachment wp-att-3114"><img loading="lazy" decoding="async" class="alignnone size-full wp-image-3114 aligncenter" src="http://ildefonsosegura.es/wp-content/uploads/1d.jpg" alt="1d" width="680" height="510" srcset="https://ildefonsosegura.es/wp-content/uploads/1d.jpg 680w, https://ildefonsosegura.es/wp-content/uploads/1d-300x225.jpg 300w" sizes="(max-width: 680px) 100vw, 680px" /></a></p><p style="text-align: left;"><strong>PASO 6.-</strong>  Seleccionamos un pincel de sangre que puedes encontrar en la red. Acuérdate de chequear que no tiene derecho de copyright</p><p style="text-align: left;"><a href="http://ildefonsosegura.es/tutorial-photoshosop-escrito-texto-escrito-en-madera-by-ildefonsosegura/1e/" rel="attachment wp-att-3115"><img loading="lazy" decoding="async" class="alignnone size-full wp-image-3115 aligncenter" src="http://ildefonsosegura.es/wp-content/uploads/1e.jpg" alt="1e" width="680" height="510" srcset="https://ildefonsosegura.es/wp-content/uploads/1e.jpg 680w, https://ildefonsosegura.es/wp-content/uploads/1e-300x225.jpg 300w" sizes="(max-width: 680px) 100vw, 680px" /></a></p><p style="text-align: left;"><strong>PASO 7.-</strong>  Vamos pintando con diferentes tamaños, pinceles, rotacion,&#8230; y bajamos la opacidad de la capa en torno al 65%</p><p style="text-align: left;"><a href="http://ildefonsosegura.es/tutorial-photoshosop-escrito-texto-escrito-en-madera-by-ildefonsosegura/1f/" rel="attachment wp-att-3116"><img loading="lazy" decoding="async" class="alignnone size-full wp-image-3116 aligncenter" src="http://ildefonsosegura.es/wp-content/uploads/1f.jpg" alt="1f" width="680" height="510" srcset="https://ildefonsosegura.es/wp-content/uploads/1f.jpg 680w, https://ildefonsosegura.es/wp-content/uploads/1f-300x225.jpg 300w" sizes="(max-width: 680px) 100vw, 680px" /></a></p><p style="text-align: left;"><strong>PASO 8.-</strong>  Tendríamo un resultado como este</p><p style="text-align: left;"><a href="http://ildefonsosegura.es/tutorial-photoshosop-escrito-texto-escrito-en-madera-by-ildefonsosegura/1g/" rel="attachment wp-att-3117"><img loading="lazy" decoding="async" class="alignnone size-full wp-image-3117 aligncenter" src="http://ildefonsosegura.es/wp-content/uploads/1g.jpg" alt="1g" width="680" height="510" srcset="https://ildefonsosegura.es/wp-content/uploads/1g.jpg 680w, https://ildefonsosegura.es/wp-content/uploads/1g-300x225.jpg 300w" sizes="(max-width: 680px) 100vw, 680px" /></a></p><p style="text-align: left;"><strong>PASO 9.-</strong>  Ponemos nuestro texto. El tipo de fuente que usé fue MULAN</p><p style="text-align: left;"><a href="http://ildefonsosegura.es/tutorial-photoshosop-escrito-texto-escrito-en-madera-by-ildefonsosegura/attachment/2/" rel="attachment wp-att-3118"><img loading="lazy" decoding="async" class="alignnone size-full wp-image-3118 aligncenter" src="http://ildefonsosegura.es/wp-content/uploads/2.jpg" alt="2" width="680" height="510" srcset="https://ildefonsosegura.es/wp-content/uploads/2.jpg 680w, https://ildefonsosegura.es/wp-content/uploads/2-300x225.jpg 300w" sizes="(max-width: 680px) 100vw, 680px" /></a></p><p style="text-align: left;"><strong>PASO 10.-</strong>  Aplicamos un estilo de capa. Clic derecho del ratón sobre la capa de texto y selecciona OPCIONES DE FUSION. Sigue los cuadros siguientes para copiar los valores de los atributos del estilo. Ojo&#8230; el relleno de la capa se reduce al 25%</p><p style="text-align: left;"><img loading="lazy" decoding="async" class="alignnone size-full wp-image-3119 aligncenter" src="http://ildefonsosegura.es/wp-content/uploads/3.jpg" alt="3" width="680" height="454" srcset="https://ildefonsosegura.es/wp-content/uploads/3.jpg 680w, https://ildefonsosegura.es/wp-content/uploads/3-300x200.jpg 300w" sizes="(max-width: 680px) 100vw, 680px" /></p><p style="text-align: left;"><a href="http://ildefonsosegura.es/tutorial-photoshosop-escrito-texto-escrito-en-madera-by-ildefonsosegura/attachment/4/" rel="attachment wp-att-3120"><img loading="lazy" decoding="async" class="alignnone size-full wp-image-3120 aligncenter" src="http://ildefonsosegura.es/wp-content/uploads/4.jpg" alt="4" width="680" height="454" srcset="https://ildefonsosegura.es/wp-content/uploads/4.jpg 680w, https://ildefonsosegura.es/wp-content/uploads/4-300x200.jpg 300w" sizes="(max-width: 680px) 100vw, 680px" /></a></p><p style="text-align: left;"><a href="http://ildefonsosegura.es/tutorial-photoshosop-escrito-texto-escrito-en-madera-by-ildefonsosegura/attachment/5/" rel="attachment wp-att-3121"><img loading="lazy" decoding="async" class="alignnone size-full wp-image-3121 aligncenter" src="http://ildefonsosegura.es/wp-content/uploads/5.jpg" alt="5" width="680" height="457" srcset="https://ildefonsosegura.es/wp-content/uploads/5.jpg 680w, https://ildefonsosegura.es/wp-content/uploads/5-300x201.jpg 300w" sizes="(max-width: 680px) 100vw, 680px" /></a></p><p style="text-align: left;"><a href="http://ildefonsosegura.es/tutorial-photoshosop-escrito-texto-escrito-en-madera-by-ildefonsosegura/attachment/6/" rel="attachment wp-att-3122"><img loading="lazy" decoding="async" class="alignnone size-full wp-image-3122 aligncenter" src="http://ildefonsosegura.es/wp-content/uploads/6.jpg" alt="6" width="680" height="448" srcset="https://ildefonsosegura.es/wp-content/uploads/6.jpg 680w, https://ildefonsosegura.es/wp-content/uploads/6-300x197.jpg 300w" sizes="(max-width: 680px) 100vw, 680px" /></a></p><p style="text-align: left;"><a href="http://ildefonsosegura.es/tutorial-photoshosop-escrito-texto-escrito-en-madera-by-ildefonsosegura/attachment/7/" rel="attachment wp-att-3123"><img loading="lazy" decoding="async" class="size-full wp-image-3123 aligncenter" src="http://ildefonsosegura.es/wp-content/uploads/7.jpg" alt="7" width="680" height="457" srcset="https://ildefonsosegura.es/wp-content/uploads/7.jpg 680w, https://ildefonsosegura.es/wp-content/uploads/7-300x201.jpg 300w" sizes="(max-width: 680px) 100vw, 680px" /></a></p><p style="text-align: left;"><strong>PASO 11.-</strong>  El estilo nos queda como sigue</p><p style="text-align: left;"><a href="http://ildefonsosegura.es/tutorial-photoshosop-escrito-texto-escrito-en-madera-by-ildefonsosegura/8-2/" rel="attachment wp-att-3124"><img loading="lazy" decoding="async" class="alignnone size-full wp-image-3124 aligncenter" src="http://ildefonsosegura.es/wp-content/uploads/8.jpg" alt="8" width="680" height="510" srcset="https://ildefonsosegura.es/wp-content/uploads/8.jpg 680w, https://ildefonsosegura.es/wp-content/uploads/8-300x225.jpg 300w" sizes="(max-width: 680px) 100vw, 680px" /></a></p><p style="text-align: left;"><strong>PASO 12.-</strong>  En el menú TEXTO rasterizamos el texto</p><p style="text-align: left;"><img loading="lazy" decoding="async" class="size-full wp-image-3125 aligncenter" src="http://ildefonsosegura.es/wp-content/uploads/9.jpg" alt="9" width="680" height="510" srcset="https://ildefonsosegura.es/wp-content/uploads/9.jpg 680w, https://ildefonsosegura.es/wp-content/uploads/9-300x225.jpg 300w" sizes="(max-width: 680px) 100vw, 680px" /></p><p style="text-align: left;"><strong>PASO 13.-</strong>  Seleccionamos un pack de pinceles de grietas. Os hago la misma recomendación que hice con los de sangre.</p><p style="text-align: left;"><a href="http://ildefonsosegura.es/tutorial-photoshosop-escrito-texto-escrito-en-madera-by-ildefonsosegura/attachment/91/" rel="attachment wp-att-3126"><img loading="lazy" decoding="async" class="alignnone size-full wp-image-3126 aligncenter" src="http://ildefonsosegura.es/wp-content/uploads/91.jpg" alt="91" width="680" height="510" srcset="https://ildefonsosegura.es/wp-content/uploads/91.jpg 680w, https://ildefonsosegura.es/wp-content/uploads/91-300x225.jpg 300w" sizes="(max-width: 680px) 100vw, 680px" /></a></p><p style="text-align: left;"><strong>PASO 14.-</strong>  Seleccionamos el color frontal blanco (como el texto). Un atajo rápido para hacerlo es pulsar D y luego X. Así el color frontal es blanco con total seguridad</p><p style="text-align: left;"><a href="http://ildefonsosegura.es/tutorial-photoshosop-escrito-texto-escrito-en-madera-by-ildefonsosegura/attachment/92/" rel="attachment wp-att-3127"><img loading="lazy" decoding="async" class="alignnone size-full wp-image-3127 aligncenter" src="http://ildefonsosegura.es/wp-content/uploads/92.jpg" alt="92" width="680" height="510" srcset="https://ildefonsosegura.es/wp-content/uploads/92.jpg 680w, https://ildefonsosegura.es/wp-content/uploads/92-300x225.jpg 300w" sizes="(max-width: 680px) 100vw, 680px" /></a></p><p style="text-align: left;"><strong>PASO 15.-</strong>  Si por un momento ponemos el relleno de la capa en el 100% y ocultamos los estilos de capa, podemos ver un ejemplo de como hemos pintado con las grietas el texto</p><p style="text-align: left;"><a href="http://ildefonsosegura.es/tutorial-photoshosop-escrito-texto-escrito-en-madera-by-ildefonsosegura/attachment/94/" rel="attachment wp-att-3129"><img loading="lazy" decoding="async" class="alignnone size-full wp-image-3129 aligncenter" src="http://ildefonsosegura.es/wp-content/uploads/94.jpg" alt="94" width="680" height="510" srcset="https://ildefonsosegura.es/wp-content/uploads/94.jpg 680w, https://ildefonsosegura.es/wp-content/uploads/94-300x225.jpg 300w" sizes="(max-width: 680px) 100vw, 680px" /></a></p><p style="text-align: left;">Si volvemos a poner el relleno en 25% y hacemos visibles los efectos tendemos este resultado</p><p style="text-align: left;"><a href="http://ildefonsosegura.es/tutorial-photoshosop-escrito-texto-escrito-en-madera-by-ildefonsosegura/attachment/93/" rel="attachment wp-att-3128"><img loading="lazy" decoding="async" class="size-full wp-image-3128 aligncenter" src="http://ildefonsosegura.es/wp-content/uploads/93.jpg" alt="93" width="680" height="510" srcset="https://ildefonsosegura.es/wp-content/uploads/93.jpg 680w, https://ildefonsosegura.es/wp-content/uploads/93-300x225.jpg 300w" sizes="(max-width: 680px) 100vw, 680px" /></a></p><p style="text-align: left;"><strong>PASO 16.-</strong>  Añadimos a la capa una máscara de capa con el icono que está abajo del panel de capas</p><p style="text-align: left;"><a href="http://ildefonsosegura.es/tutorial-photoshosop-escrito-texto-escrito-en-madera-by-ildefonsosegura/attachment/95/" rel="attachment wp-att-3130"><img loading="lazy" decoding="async" class="alignnone size-full wp-image-3130 aligncenter" src="http://ildefonsosegura.es/wp-content/uploads/95.jpg" alt="95" width="680" height="510" srcset="https://ildefonsosegura.es/wp-content/uploads/95.jpg 680w, https://ildefonsosegura.es/wp-content/uploads/95-300x225.jpg 300w" sizes="(max-width: 680px) 100vw, 680px" /></a></p><p style="text-align: left;"><strong>PASO 17.-</strong>  Mantenemos tecleada la techa ALT y hacemos clic en el ojo de la capa textura de madera. Con eso conseguimos que solo se vea esa capa</p><p style="text-align: left;"><a href="http://ildefonsosegura.es/tutorial-photoshosop-escrito-texto-escrito-en-madera-by-ildefonsosegura/attachment/96/" rel="attachment wp-att-3131"><img loading="lazy" decoding="async" class="alignnone size-full wp-image-3131 aligncenter" src="http://ildefonsosegura.es/wp-content/uploads/96.jpg" alt="96" width="680" height="510" srcset="https://ildefonsosegura.es/wp-content/uploads/96.jpg 680w, https://ildefonsosegura.es/wp-content/uploads/96-300x225.jpg 300w" sizes="(max-width: 680px) 100vw, 680px" /></a></p><p style="text-align: left;"><strong>PASO 18.-</strong>  Nos vamos a la paleta de canales. Con el botón derecho del ratón hacemos clic en el canal azul y le indicamos que duplique el canal</p><p style="text-align: left;"><a href="http://ildefonsosegura.es/tutorial-photoshosop-escrito-texto-escrito-en-madera-by-ildefonsosegura/attachment/97/" rel="attachment wp-att-3132"><img loading="lazy" decoding="async" class="alignnone size-full wp-image-3132 aligncenter" src="http://ildefonsosegura.es/wp-content/uploads/97.jpg" alt="97" width="680" height="510" srcset="https://ildefonsosegura.es/wp-content/uploads/97.jpg 680w, https://ildefonsosegura.es/wp-content/uploads/97-300x225.jpg 300w" sizes="(max-width: 680px) 100vw, 680px" /></a></p><p style="text-align: left;"><strong>PASO 19.-</strong>  Con CTRL+L vemos la paleta de niveles y buscamos acercarnos con los tonos hacia la izquierda dando luz a la mayoría del canal</p><p style="text-align: left;"><a href="http://ildefonsosegura.es/tutorial-photoshosop-escrito-texto-escrito-en-madera-by-ildefonsosegura/attachment/98/" rel="attachment wp-att-3133"><img loading="lazy" decoding="async" class="alignnone size-full wp-image-3133 aligncenter" src="http://ildefonsosegura.es/wp-content/uploads/98.jpg" alt="98" width="680" height="510" srcset="https://ildefonsosegura.es/wp-content/uploads/98.jpg 680w, https://ildefonsosegura.es/wp-content/uploads/98-300x225.jpg 300w" sizes="(max-width: 680px) 100vw, 680px" /></a></p><p style="text-align: left;"><strong>PASO 20.-</strong>  Con CTRL+clic en el canal se seleccionan las áreas blancas del mismo.</p><p style="text-align: left;"><a href="http://ildefonsosegura.es/tutorial-photoshosop-escrito-texto-escrito-en-madera-by-ildefonsosegura/attachment/99/" rel="attachment wp-att-3134"><img loading="lazy" decoding="async" class="alignnone size-full wp-image-3134 aligncenter" src="http://ildefonsosegura.es/wp-content/uploads/99.jpg" alt="99" width="680" height="510" srcset="https://ildefonsosegura.es/wp-content/uploads/99.jpg 680w, https://ildefonsosegura.es/wp-content/uploads/99-300x225.jpg 300w" sizes="(max-width: 680px) 100vw, 680px" /></a></p><p style="text-align: left;"><strong>PASO 21.-</strong>  Con esa selección realizada volvemos a la paleta de capas RGB</p><p style="text-align: left;"><a href="http://ildefonsosegura.es/tutorial-photoshosop-escrito-texto-escrito-en-madera-by-ildefonsosegura/attachment/991/" rel="attachment wp-att-3135"><img loading="lazy" decoding="async" class="alignnone size-full wp-image-3135 aligncenter" src="http://ildefonsosegura.es/wp-content/uploads/991.jpg" alt="991" width="680" height="510" srcset="https://ildefonsosegura.es/wp-content/uploads/991.jpg 680w, https://ildefonsosegura.es/wp-content/uploads/991-300x225.jpg 300w" sizes="(max-width: 680px) 100vw, 680px" /></a></p><p style="text-align: left;"><strong>PASO 22.-</strong> Añadimos una máscara de capa y automáticamente las zonas no seleccionadas se pintan de negro en la máscara y por lo tanto se ocultan esas zonas en la capa del texto</p><p style="text-align: left;"><a href="http://ildefonsosegura.es/tutorial-photoshosop-escrito-texto-escrito-en-madera-by-ildefonsosegura/attachment/992/" rel="attachment wp-att-3136"><img loading="lazy" decoding="async" class="alignnone size-full wp-image-3136 aligncenter" src="http://ildefonsosegura.es/wp-content/uploads/992.jpg" alt="992" width="680" height="510" srcset="https://ildefonsosegura.es/wp-content/uploads/992.jpg 680w, https://ildefonsosegura.es/wp-content/uploads/992-300x225.jpg 300w" sizes="(max-width: 680px) 100vw, 680px" /></a></p><p style="text-align: left;"><strong>PASO 23.-</strong>  Situados en la máscara podemos cambiar sus niveles (CTRL+L) para ajustar la apariencia de las zonas a ocultar o visualizar. En mi composición le di estos valores a los niveles</p><p style="text-align: left;"><a href="http://ildefonsosegura.es/tutorial-photoshosop-escrito-texto-escrito-en-madera-by-ildefonsosegura/attachment/993/" rel="attachment wp-att-3137"><img loading="lazy" decoding="async" class="alignnone size-full wp-image-3137 aligncenter" src="http://ildefonsosegura.es/wp-content/uploads/993.jpg" alt="993" width="680" height="510" srcset="https://ildefonsosegura.es/wp-content/uploads/993.jpg 680w, https://ildefonsosegura.es/wp-content/uploads/993-300x225.jpg 300w" sizes="(max-width: 680px) 100vw, 680px" /></a></p><p style="text-align: left;"><strong>PASO 24.-</strong>  El resultado hasta el momento es este</p><p style="text-align: left;"><a href="http://ildefonsosegura.es/tutorial-photoshosop-escrito-texto-escrito-en-madera-by-ildefonsosegura/attachment/994/" rel="attachment wp-att-3147"><img loading="lazy" decoding="async" class="size-full wp-image-3147 aligncenter" src="http://ildefonsosegura.es/wp-content/uploads/994.jpg" alt="994" width="680" height="510" srcset="https://ildefonsosegura.es/wp-content/uploads/994.jpg 680w, https://ildefonsosegura.es/wp-content/uploads/994-300x225.jpg 300w" sizes="(max-width: 680px) 100vw, 680px" /></a></p><p style="text-align: left;"><strong>PASO 25.-</strong>  Quitamos la unión entre la capa y su máscara de capa haciendo simplemente clic con el ratón en la cadena que las une. Esta debe desaparecer como en la imagen</p><p style="text-align: left;"><a href="http://ildefonsosegura.es/tutorial-photoshosop-escrito-texto-escrito-en-madera-by-ildefonsosegura/994a/" rel="attachment wp-att-3149"><img loading="lazy" decoding="async" class="alignnone size-full wp-image-3149 aligncenter" src="http://ildefonsosegura.es/wp-content/uploads/994a.jpg" alt="994a" width="680" height="467" srcset="https://ildefonsosegura.es/wp-content/uploads/994a.jpg 680w, https://ildefonsosegura.es/wp-content/uploads/994a-300x206.jpg 300w" sizes="(max-width: 680px) 100vw, 680px" /></a></p><p style="text-align: left;"><strong>PASO 26.-</strong>  Aplicamos un filtro en la capa. Filtro, distorsionar, RIZO con el valor que se muestra en la imagen</p><p style="text-align: left;"><a href="http://ildefonsosegura.es/tutorial-photoshosop-escrito-texto-escrito-en-madera-by-ildefonsosegura/994b/" rel="attachment wp-att-3150"><img loading="lazy" decoding="async" class="alignnone size-full wp-image-3150 aligncenter" src="http://ildefonsosegura.es/wp-content/uploads/994b.jpg" alt="994b" width="680" height="467" srcset="https://ildefonsosegura.es/wp-content/uploads/994b.jpg 680w, https://ildefonsosegura.es/wp-content/uploads/994b-300x206.jpg 300w" sizes="(max-width: 680px) 100vw, 680px" /></a></p><p style="text-align: left;"><strong>PASO 27.-</strong>  Con CTRL+F se repite el filtro y conseguimos un efecto de irregularidad en los bordes bastante real al objeto que buscamos</p><p style="text-align: left;"><a href="http://ildefonsosegura.es/tutorial-photoshosop-escrito-texto-escrito-en-madera-by-ildefonsosegura/994c/" rel="attachment wp-att-3151"><img loading="lazy" decoding="async" class="alignnone size-full wp-image-3151 aligncenter" src="http://ildefonsosegura.es/wp-content/uploads/994c.jpg" alt="994c" width="680" height="467" srcset="https://ildefonsosegura.es/wp-content/uploads/994c.jpg 680w, https://ildefonsosegura.es/wp-content/uploads/994c-300x206.jpg 300w" sizes="(max-width: 680px) 100vw, 680px" /></a></p><h1 style="text-align: left;"><span style="color: #800000;"><strong>CONCLUSION</strong></span></h1><p style="text-align: left;"><a href="http://ildefonsosegura.es/tutorial-photoshosop-escrito-texto-escrito-en-madera-by-ildefonsosegura/attachment/995/" rel="attachment wp-att-3148"><img loading="lazy" decoding="async" class="alignnone size-full wp-image-3148 aligncenter" src="http://ildefonsosegura.es/wp-content/uploads/995.jpg" alt="995" width="680" height="510" srcset="https://ildefonsosegura.es/wp-content/uploads/995.jpg 680w, https://ildefonsosegura.es/wp-content/uploads/995-300x225.jpg 300w" sizes="(max-width: 680px) 100vw, 680px" /></a></p><p style="text-align: justify;">Si te ha gustado el tutorial, espero que dejes un comentario y que lo compartas con tus amigos. Asi me ayudas a continuar. Gracias</p><p style="text-align: left;"> </p>								</div>
				</div>
					</div>
		</div>
					</div>
		</section>
				</div>La entrada <a href="https://ildefonsosegura.es/tutorial-photoshosop-escrito-texto-escrito-en-madera-by-ildefonsosegura/">#Tutorial #Photoshop escrito: Texto tallado en madera by @ildefonsosegura</a> apareció primero en <a href="https://ildefonsosegura.es">Ildefonso Segura</a>.]]></content:encoded>
					
					<wfw:commentRss>https://ildefonsosegura.es/tutorial-photoshosop-escrito-texto-escrito-en-madera-by-ildefonsosegura/feed/</wfw:commentRss>
			<slash:comments>1</slash:comments>
		
		
			</item>
		<item>
		<title>Tutorial Photoshop wallpaper superheroe para smartphone</title>
		<link>https://ildefonsosegura.es/tutorial-photoshop-wallpaper-superheroe-para-smartphone/</link>
					<comments>https://ildefonsosegura.es/tutorial-photoshop-wallpaper-superheroe-para-smartphone/#respond</comments>
		
		<dc:creator><![CDATA[Ildefonso Segura]]></dc:creator>
		<pubDate>Thu, 25 Apr 2019 16:18:57 +0000</pubDate>
				<category><![CDATA[3D]]></category>
		<category><![CDATA[Efectos]]></category>
		<category><![CDATA[Estilos]]></category>
		<category><![CDATA[Fotocomposición]]></category>
		<category><![CDATA[Películas]]></category>
		<category><![CDATA[Photoshop]]></category>
		<category><![CDATA[Tecnicas]]></category>
		<category><![CDATA[Textos]]></category>
		<category><![CDATA[Tutoriales]]></category>
		<category><![CDATA[Video]]></category>
		<category><![CDATA[Wallpaper]]></category>
		<category><![CDATA[adobe]]></category>
		<category><![CDATA[adobe cc]]></category>
		<category><![CDATA[avengers]]></category>
		<category><![CDATA[cartel]]></category>
		<category><![CDATA[creatividad]]></category>
		<category><![CDATA[extrusión]]></category>
		<category><![CDATA[gloriasanis]]></category>
		<category><![CDATA[ildefonsosegura]]></category>
		<category><![CDATA[imagen]]></category>
		<category><![CDATA[luces]]></category>
		<category><![CDATA[mobil]]></category>
		<category><![CDATA[movil]]></category>
		<category><![CDATA[photoshop]]></category>
		<category><![CDATA[poster]]></category>
		<category><![CDATA[smartphone]]></category>
		<category><![CDATA[spiderman]]></category>
		<category><![CDATA[spidey]]></category>
		<category><![CDATA[texto 3d]]></category>
		<category><![CDATA[tuto]]></category>
		<category><![CDATA[tutorial]]></category>
		<category><![CDATA[vengadores]]></category>
		<category><![CDATA[video]]></category>
		<category><![CDATA[VIDEOTUTORIAL]]></category>
		<category><![CDATA[wallpaper]]></category>
		<category><![CDATA[youtube]]></category>
		<guid isPermaLink="false">http://ildefonsosegura.es/?p=61141</guid>

					<description><![CDATA[<p>En este tutorial de photoshop te muestro como crear un wallpaper para smartphone con tu superheroe preferido. Dividimos el tutorial en 3 partes Parte 1 : Creamos el texto, lo formateamos, trabajaremos técnicas de extrusión a través de acciones, aplicaremos estilos de texto para conseguir una perfecta iluminación y mostreremos cómo mejorar los brillos o [&#8230;]</p>
La entrada <a href="https://ildefonsosegura.es/tutorial-photoshop-wallpaper-superheroe-para-smartphone/">Tutorial Photoshop wallpaper superheroe para smartphone</a> apareció primero en <a href="https://ildefonsosegura.es">Ildefonso Segura</a>.]]></description>
										<content:encoded><![CDATA[<div data-elementor-type="wp-post" data-elementor-id="61141" class="elementor elementor-61141">
						<section class="elementor-section elementor-top-section elementor-element elementor-element-5551dfbb elementor-section-boxed elementor-section-height-default elementor-section-height-default" data-id="5551dfbb" data-element_type="section" data-e-type="section">
						<div class="elementor-container elementor-column-gap-default">
					<div class="elementor-column elementor-col-100 elementor-top-column elementor-element elementor-element-dd87ead" data-id="dd87ead" data-element_type="column" data-e-type="column">
			<div class="elementor-widget-wrap elementor-element-populated">
						<div class="elementor-element elementor-element-58431a4a elementor-widget elementor-widget-text-editor" data-id="58431a4a" data-element_type="widget" data-e-type="widget" data-widget_type="text-editor.default">
				<div class="elementor-widget-container">
									<p style="text-align: justify;">En este tutorial de photoshop te muestro como crear un wallpaper para smartphone con tu superheroe preferido.</p><p>Dividimos el tutorial en 3 partes</p><ul><li><strong>Parte 1</strong> : Creamos el texto, lo formateamos, trabajaremos técnicas de extrusión a través de acciones, aplicaremos estilos de texto para conseguir una perfecta iluminación y mostreremos cómo mejorar los brillos o «high ligths con algún truquillo muy sencillo.</li><li><strong>Parte 2</strong> : Creamos un fondo apropiado a un superheroe con diferentes capas de ajuste que consigan una luz consistente con la que hemos simulado en el texto anteriormente.</li><li><strong>Parte 3</strong> : Trabajaremos la iluminación sobre el mismo superheroe que usamos como stock. Muestro unos trucos para crear high lights y modificar el tono discriminando entre sombras y luces que vienen con el propio stock.</li></ul><p>El resultado es evidente. Tú puedes ver el antes y el después</p><p>[twenty20 img1=»61145&#8243; img2=»61146&#8243; offset=»0.5&#8243;]</p><p>Me gustaría ver tu wallpaper de superheroe para smartphone siguiendo mi tutorial de photoshop</p><p>Disfruta del tutorial de Photoshop. Hay mucho trabajo detrás. Compártelo y así nos ayudas.</p><p><strong><span style="color: #800000;">TUTORIAL WALLPAPER AVENGERS</span></strong></p><center><iframe src="https://www.youtube.com/embed/T2Sc2Lynlq4" width="640" height="420" frameborder="0" allowfullscreen="allowfullscreen">&lt;span data-mce-type=»bookmark» style=»display: inline-block; width: 0px; overflow: hidden; line-height: 0;» class=»mce_SELRES_start»&gt;&lt;/span&gt;</iframe></center><div><div><p style="text-align: left;"> </p></div></div>								</div>
				</div>
					</div>
		</div>
					</div>
		</section>
				<section class="elementor-section elementor-top-section elementor-element elementor-element-b311e30 elementor-section-boxed elementor-section-height-default elementor-section-height-default" data-id="b311e30" data-element_type="section" data-e-type="section">
						<div class="elementor-container elementor-column-gap-default">
					<div class="elementor-column elementor-col-50 elementor-top-column elementor-element elementor-element-b93681f" data-id="b93681f" data-element_type="column" data-e-type="column">
			<div class="elementor-widget-wrap elementor-element-populated">
						<div class="elementor-element elementor-element-adfc8e1 elementor-widget elementor-widget-text-editor" data-id="adfc8e1" data-element_type="widget" data-e-type="widget" data-widget_type="text-editor.default">
				<div class="elementor-widget-container">
									<p>Puedes ver muchos más tutoriales relacionados con los <span style="color: #ff0000;"><strong><em>Avengers</em> </strong></span>haciendo clic en el botón:</p>								</div>
				</div>
					</div>
		</div>
				<div class="elementor-column elementor-col-50 elementor-top-column elementor-element elementor-element-c958f88" data-id="c958f88" data-element_type="column" data-e-type="column">
			<div class="elementor-widget-wrap elementor-element-populated">
						<div class="elementor-element elementor-element-d929b6e elementor-align-center elementor-widget elementor-widget-button" data-id="d929b6e" data-element_type="widget" data-e-type="widget" data-widget_type="button.default">
				<div class="elementor-widget-container">
									<div class="elementor-button-wrapper">
					<a class="elementor-button elementor-button-link elementor-size-md" href="https://ildefonsosegura.es/?s=avengers" target="_blank">
						<span class="elementor-button-content-wrapper">
									<span class="elementor-button-text">Tutos Avengers</span>
					</span>
					</a>
				</div>
								</div>
				</div>
					</div>
		</div>
					</div>
		</section>
				<section class="elementor-section elementor-top-section elementor-element elementor-element-2ff11e47 elementor-section-full_width elementor-section-height-default elementor-section-height-default" data-id="2ff11e47" data-element_type="section" data-e-type="section">
						<div class="elementor-container elementor-column-gap-default">
					<div class="elementor-column elementor-col-50 elementor-top-column elementor-element elementor-element-6b381bf3" data-id="6b381bf3" data-element_type="column" data-e-type="column">
			<div class="elementor-widget-wrap elementor-element-populated">
						<div class="elementor-element elementor-element-1aeb7d6b elementor-align-right elementor-invisible elementor-widget elementor-widget-button" data-id="1aeb7d6b" data-element_type="widget" data-e-type="widget" data-settings="{&quot;_animation&quot;:&quot;shake&quot;}" data-widget_type="button.default">
				<div class="elementor-widget-container">
									<div class="elementor-button-wrapper">
					<a class="elementor-button elementor-button-link elementor-size-sm elementor-animation-grow" href="https://drive.google.com/open?id=16t71Lo1sja_E8A6Az-eZPXDIs5ZdeUFe" target="_blank">
						<span class="elementor-button-content-wrapper">
									<span class="elementor-button-text">DESCARGA EL MATERIAL</span>
					</span>
					</a>
				</div>
								</div>
				</div>
					</div>
		</div>
				<div class="elementor-column elementor-col-50 elementor-top-column elementor-element elementor-element-1974ca2" data-id="1974ca2" data-element_type="column" data-e-type="column">
			<div class="elementor-widget-wrap elementor-element-populated">
						<div class="elementor-element elementor-element-acda019 elementor-widget elementor-widget-html" data-id="acda019" data-element_type="widget" data-e-type="widget" data-settings="{&quot;_animation&quot;:&quot;none&quot;}" data-widget_type="html.default">
				<div class="elementor-widget-container">
					<form action="https://www.paypal.com/cgi-bin/webscr" method="post" target="_blank">
<input type="hidden" name="cmd" value="_donations">
<input type="hidden" name="business" value="ildefonsosegura@gmail.com">
<input type="hidden" name="lc" value="ES">
<input type="hidden" name="item_name" value="MANTENIMIENTO DE LA PAGINA DE ILDEFONSOSEGURA">
<input type="hidden" name="no_note" value="0">
<input type="hidden" name="currency_code" value="EUR">
<input type="hidden" name="bn" value="PP-DonationsBF:paypal1.jpg:NonHostedGuest">
<input type="image" src="http://ildefonsosegura.es/wp-content/uploads/paypal-updated-1.png" border="0" name="submit" alt="PayPal. La forma rápida y segura de pagar en Internet.">
<img decoding="async" alt="" border="0" src="https://www.paypalobjects.com/es_ES/i/scr/pixel.gif" width="1" height="1">
</form>				</div>
				</div>
					</div>
		</div>
					</div>
		</section>
				<section class="elementor-section elementor-top-section elementor-element elementor-element-24c5a1bf elementor-section-full_width elementor-section-height-default elementor-section-height-default" data-id="24c5a1bf" data-element_type="section" data-e-type="section">
						<div class="elementor-container elementor-column-gap-default">
					<div class="elementor-column elementor-col-100 elementor-top-column elementor-element elementor-element-6c525d4a" data-id="6c525d4a" data-element_type="column" data-e-type="column">
			<div class="elementor-widget-wrap elementor-element-populated">
						<div class="elementor-element elementor-element-1f2ff6e5 elementor-widget elementor-widget-text-editor" data-id="1f2ff6e5" data-element_type="widget" data-e-type="widget" data-widget_type="text-editor.default">
				<div class="elementor-widget-container">
									<div><div align="center"><center><strong style="color: #ff0000;">Suscríbete a mi canal de Youtube:</strong></center><div><div><div align="center"><p><script src="https://apis.google.com/js/platform.js"></script></p><div class="g-ytsubscribe" data-channel="ildefonsosegura" data-layout="full" data-count="default"> </div></div></div><p> </p><p style="text-align: center;">No te lo pierdas y comparte tus trabajos en mi página de facebook (<span style="color: #0000ff;"><strong><a style="color: #0000ff;" href="http://www.facebook.com/IldefonsoSeguraPage" target="_blank" rel="noopener noreferrer">IldefonsoSeguraPage</a></strong></span>)<br />Espero que te guste y compartas el vídeo. No dejes de compartir este post.</p><p style="text-align: center;">Así es como me puedes ayudar 🙂 Gracias</p></div></div></div>								</div>
				</div>
					</div>
		</div>
					</div>
		</section>
				</div>La entrada <a href="https://ildefonsosegura.es/tutorial-photoshop-wallpaper-superheroe-para-smartphone/">Tutorial Photoshop wallpaper superheroe para smartphone</a> apareció primero en <a href="https://ildefonsosegura.es">Ildefonso Segura</a>.]]></content:encoded>
					
					<wfw:commentRss>https://ildefonsosegura.es/tutorial-photoshop-wallpaper-superheroe-para-smartphone/feed/</wfw:commentRss>
			<slash:comments>0</slash:comments>
		
		
			</item>
		<item>
		<title>Cómo crear, texturizar e iluminar el logo de Cinema4D</title>
		<link>https://ildefonsosegura.es/como-crear-texturizar-e-iluminar-el-logo-de-cinema4d/</link>
					<comments>https://ildefonsosegura.es/como-crear-texturizar-e-iluminar-el-logo-de-cinema4d/#respond</comments>
		
		<dc:creator><![CDATA[Ildefonso Segura]]></dc:creator>
		<pubDate>Tue, 24 Jul 2018 16:15:03 +0000</pubDate>
				<category><![CDATA[3D]]></category>
		<category><![CDATA[Cinema4D]]></category>
		<category><![CDATA[Efectos]]></category>
		<category><![CDATA[Tecnicas]]></category>
		<category><![CDATA[Tutoriales]]></category>
		<category><![CDATA[bola]]></category>
		<category><![CDATA[boleano]]></category>
		<category><![CDATA[brillo]]></category>
		<category><![CDATA[c4d]]></category>
		<category><![CDATA[cinema4D]]></category>
		<category><![CDATA[efectos]]></category>
		<category><![CDATA[gloriasanis]]></category>
		<category><![CDATA[ildefonsosegura]]></category>
		<category><![CDATA[illustrator]]></category>
		<category><![CDATA[iluminación]]></category>
		<category><![CDATA[lighting]]></category>
		<category><![CDATA[logo]]></category>
		<category><![CDATA[logo 3d]]></category>
		<category><![CDATA[logo cinema4d]]></category>
		<category><![CDATA[luz]]></category>
		<category><![CDATA[maxon]]></category>
		<category><![CDATA[modelar]]></category>
		<category><![CDATA[r11]]></category>
		<category><![CDATA[r12]]></category>
		<category><![CDATA[r13]]></category>
		<category><![CDATA[r14]]></category>
		<category><![CDATA[r15]]></category>
		<category><![CDATA[r16]]></category>
		<category><![CDATA[r17]]></category>
		<category><![CDATA[r18]]></category>
		<category><![CDATA[r19]]></category>
		<category><![CDATA[reflejo]]></category>
		<category><![CDATA[reflejos]]></category>
		<category><![CDATA[reflexión]]></category>
		<category><![CDATA[textura]]></category>
		<category><![CDATA[texturizar]]></category>
		<category><![CDATA[tutorial]]></category>
		<category><![CDATA[wallpaper]]></category>
		<category><![CDATA[youtube]]></category>
		<guid isPermaLink="false">http://ildefonsosegura.es/?p=2332</guid>

					<description><![CDATA[<p>  Fantástico y realista resultado tridimensional para el logo de Cinema4D a través del boleano en el propio software de Cinema4D. Aprenderemos a realizar un trazao en photoshop para exportarlo como trazado de illustrator a Cinema4D. Este trazado se puede realizar también dentro de C4D con las «splines». Confieso que yo no se usar mucho [&#8230;]</p>
La entrada <a href="https://ildefonsosegura.es/como-crear-texturizar-e-iluminar-el-logo-de-cinema4d/">Cómo crear, texturizar e iluminar el logo de Cinema4D</a> apareció primero en <a href="https://ildefonsosegura.es">Ildefonso Segura</a>.]]></description>
										<content:encoded><![CDATA[<div data-elementor-type="wp-post" data-elementor-id="2332" class="elementor elementor-2332">
						<section class="elementor-section elementor-top-section elementor-element elementor-element-657d49c0 elementor-section-boxed elementor-section-height-default elementor-section-height-default" data-id="657d49c0" data-element_type="section" data-e-type="section">
						<div class="elementor-container elementor-column-gap-default">
					<div class="elementor-column elementor-col-100 elementor-top-column elementor-element elementor-element-394aa8b1" data-id="394aa8b1" data-element_type="column" data-e-type="column">
			<div class="elementor-widget-wrap elementor-element-populated">
						<div class="elementor-element elementor-element-382317c elementor-widget elementor-widget-text-editor" data-id="382317c" data-element_type="widget" data-e-type="widget" data-widget_type="text-editor.default">
				<div class="elementor-widget-container">
									<p> </p><p>Fantástico y realista resultado tridimensional para el logo de Cinema4D a través del boleano en el propio software de Cinema4D.</p><p><img loading="lazy" decoding="async" class="size-full wp-image-2333 aligncenter" src="https://ildefonsosegura.es/wp-content/uploads/wallpaper-c4d-ilde-3.jpg" alt="wallpaper-c4d-ilde-3" width="550" height="309" /></p><p>Aprenderemos a realizar un trazao en photoshop para exportarlo como trazado de illustrator a Cinema4D. Este trazado se puede realizar también dentro de C4D con las «splines». Confieso que yo no se usar mucho las splines dado que me es mucho más fácil trabajar los trazados en photoshop. En cualqueir caso, esa técnica de exportar puede aplicarse a cualquier otra composición que puedas plantear.</p><p>El trazado nos ayuda a modelar el vaciado de una esfera de acuerdo con el logo origina de <a href="http://www.maxon.net" target="_blank" rel="noopener"><strong>Maxon</strong></a> (Cinema4D). Aqui tenes una muestra del <a href="http://goo.gl/DbRzG" target="_blank" rel="noopener">logo original.</a></p><p>Podrás haber visto más tutoriales para hacer este logo pero el resultado de este es super-diferente. Animate a ver el tutorial donde además te enseño:</p><ol><li>Texturizar con reflejos y brillos</li><li>Iluminar a través de elementos de reflejo interesantes que hacen el logo más atractivo</li><li>Aplicamos efectos de iluminación global y oclusión ambiental</li></ol><p> </p><p> </p><p><span style="color: #800000;"><strong>VIDEOTUTORIAL </strong></span></p><center><iframe src="https://www.youtube.com/embed/qB0siUUhVMQ" width="640" height="420" frameborder="0" allowfullscreen="allowfullscreen"><span data-mce-type="bookmark" style="display: inline-block; width: 0px; overflow: hidden; line-height: 0;" class="mce_SELRES_start">﻿</span></iframe></center><div><p> </p></div>								</div>
				</div>
					</div>
		</div>
					</div>
		</section>
				<section class="elementor-section elementor-top-section elementor-element elementor-element-6b40dd2c elementor-section-full_width elementor-section-height-default elementor-section-height-default" data-id="6b40dd2c" data-element_type="section" data-e-type="section">
						<div class="elementor-container elementor-column-gap-default">
					<div class="elementor-column elementor-col-100 elementor-top-column elementor-element elementor-element-4355004f" data-id="4355004f" data-element_type="column" data-e-type="column">
			<div class="elementor-widget-wrap elementor-element-populated">
						<div class="elementor-element elementor-element-72c4619a elementor-widget elementor-widget-text-editor" data-id="72c4619a" data-element_type="widget" data-e-type="widget" data-widget_type="text-editor.default">
				<div class="elementor-widget-container">
									<div><div align="center"><center><strong style="color: #ff0000;">Suscríbete a mi canal de Youtube:</strong></center><div><div><div align="center"><p><script src="https://apis.google.com/js/platform.js"></script></p><div class="g-ytsubscribe" data-channel="ildefonsosegura" data-layout="full" data-count="default"> </div></div></div><p> </p><p style="text-align: center;">No te lo pierdas y comparte tus trabajos en mi página de facebook (<span style="color: #0000ff;"><strong><a style="color: #0000ff;" href="http://www.facebook.com/IldefonsoSeguraPage" target="_blank" rel="noopener noreferrer">IldefonsoSeguraPage</a></strong></span>)<br />Espero que te guste y compartas el vídeo. No dejes de compartir este post.</p><p style="text-align: center;">Así es como me puedes ayudar 🙂 Gracias</p></div></div></div>								</div>
				</div>
					</div>
		</div>
					</div>
		</section>
				</div>La entrada <a href="https://ildefonsosegura.es/como-crear-texturizar-e-iluminar-el-logo-de-cinema4d/">Cómo crear, texturizar e iluminar el logo de Cinema4D</a> apareció primero en <a href="https://ildefonsosegura.es">Ildefonso Segura</a>.]]></content:encoded>
					
					<wfw:commentRss>https://ildefonsosegura.es/como-crear-texturizar-e-iluminar-el-logo-de-cinema4d/feed/</wfw:commentRss>
			<slash:comments>0</slash:comments>
		
		
			</item>
		<item>
		<title>Vaciado de volúmenes con boleanos en Cinema4D</title>
		<link>https://ildefonsosegura.es/vaciado-de-volumenes-con-boleanos-en-cinema4d/</link>
					<comments>https://ildefonsosegura.es/vaciado-de-volumenes-con-boleanos-en-cinema4d/#respond</comments>
		
		<dc:creator><![CDATA[Ildefonso Segura]]></dc:creator>
		<pubDate>Tue, 24 Jul 2018 16:10:53 +0000</pubDate>
				<category><![CDATA[3D]]></category>
		<category><![CDATA[Cinema4D]]></category>
		<category><![CDATA[Tecnicas]]></category>
		<category><![CDATA[Tutoriales]]></category>
		<category><![CDATA[Wallpaper]]></category>
		<category><![CDATA[boleano]]></category>
		<category><![CDATA[c4d]]></category>
		<category><![CDATA[calabaza]]></category>
		<category><![CDATA[cara]]></category>
		<category><![CDATA[cinema4D]]></category>
		<category><![CDATA[extrusión]]></category>
		<category><![CDATA[gloriasanis]]></category>
		<category><![CDATA[halloween]]></category>
		<category><![CDATA[ildefonsosegura]]></category>
		<category><![CDATA[r15]]></category>
		<category><![CDATA[r16]]></category>
		<category><![CDATA[r17]]></category>
		<category><![CDATA[r18]]></category>
		<category><![CDATA[r19]]></category>
		<category><![CDATA[texto 3d]]></category>
		<category><![CDATA[texto vacío]]></category>
		<category><![CDATA[textura]]></category>
		<category><![CDATA[texturizar]]></category>
		<category><![CDATA[tuto]]></category>
		<category><![CDATA[tutorial]]></category>
		<category><![CDATA[vaciado]]></category>
		<category><![CDATA[wallpaper]]></category>
		<category><![CDATA[youtube]]></category>
		<guid isPermaLink="false">http://ildefonsosegura.es/?p=1303</guid>

					<description><![CDATA[<p>Ya hicimos un tutorial previo donde explicabamos cómo hacer la textura de calabaza que veis. Ve a ver el tutorial. Ahora vamos a usar el BOLEANO en cinema4D para crear vaciados que nos ofrece una gran posibilidad de realizar combinaciones graciosas como la que veis.     VIDEOTUTORIAL ﻿   Suscríbete a mi canal de [&#8230;]</p>
La entrada <a href="https://ildefonsosegura.es/vaciado-de-volumenes-con-boleanos-en-cinema4d/">Vaciado de volúmenes con boleanos en Cinema4D</a> apareció primero en <a href="https://ildefonsosegura.es">Ildefonso Segura</a>.]]></description>
										<content:encoded><![CDATA[<div data-elementor-type="wp-post" data-elementor-id="1303" class="elementor elementor-1303">
						<section class="elementor-section elementor-top-section elementor-element elementor-element-3e56669b elementor-section-boxed elementor-section-height-default elementor-section-height-default" data-id="3e56669b" data-element_type="section" data-e-type="section">
						<div class="elementor-container elementor-column-gap-default">
					<div class="elementor-column elementor-col-100 elementor-top-column elementor-element elementor-element-71586457" data-id="71586457" data-element_type="column" data-e-type="column">
			<div class="elementor-widget-wrap elementor-element-populated">
						<div class="elementor-element elementor-element-7e44d4c8 elementor-widget elementor-widget-text-editor" data-id="7e44d4c8" data-element_type="widget" data-e-type="widget" data-widget_type="text-editor.default">
				<div class="elementor-widget-container">
									<p><span style="color: #800000;"><strong><img loading="lazy" decoding="async" class="size-full wp-image-1304 aligncenter" src="https://ildefonsosegura.es/wp-content/uploads/Cara-de-calabaza.jpg" alt="Cara-de-calabaza" width="600" height="338" /></strong></span></p><center></center><p>Ya hicimos un tutorial previo donde explicabamos cómo hacer la textura de calabaza que veis. <a title="Texto con textura de calabaza con Cinema4D y Photoshop (Wallpaper halloween)" href="https://ildefonsosegura.es/texto-con-textura-de-calabaza-con-cinema4d-y-photoshop-wallpaper-halloween/" target="_blank" rel="noopener noreferrer">Ve a ver el tutorial</a>.</p><p>Ahora vamos a usar el BOLEANO en cinema4D para crear vaciados que nos ofrece una gran posibilidad de realizar combinaciones graciosas como la que veis.</p><p> </p><p> </p><p><span style="color: #800000;"><strong>VIDEOTUTORIAL </strong></span></p><center><iframe src="https://www.youtube.com/embed/XipXSyzl6-s" width="640" height="420" frameborder="0" allowfullscreen="allowfullscreen"><span data-mce-type="bookmark" style="display: inline-block; width: 0px; overflow: hidden; line-height: 0;" class="mce_SELRES_start">﻿</span></iframe></center><div align="right"><div><p style="text-align: left;"> </p></div></div>								</div>
				</div>
					</div>
		</div>
					</div>
		</section>
				<section class="elementor-section elementor-top-section elementor-element elementor-element-4c900ceb elementor-section-full_width elementor-section-height-default elementor-section-height-default" data-id="4c900ceb" data-element_type="section" data-e-type="section">
						<div class="elementor-container elementor-column-gap-default">
					<div class="elementor-column elementor-col-100 elementor-top-column elementor-element elementor-element-49c8f601" data-id="49c8f601" data-element_type="column" data-e-type="column">
			<div class="elementor-widget-wrap elementor-element-populated">
						<div class="elementor-element elementor-element-5bcab826 elementor-widget elementor-widget-text-editor" data-id="5bcab826" data-element_type="widget" data-e-type="widget" data-widget_type="text-editor.default">
				<div class="elementor-widget-container">
									<div><div align="center"><center><strong style="color: #ff0000;">Suscríbete a mi canal de Youtube:</strong></center><div><div><div align="center"><p><script src="https://apis.google.com/js/platform.js"></script></p><div class="g-ytsubscribe" data-channel="ildefonsosegura" data-layout="full" data-count="default"> </div></div></div><p> </p><p style="text-align: center;">No te lo pierdas y comparte tus trabajos en mi página de facebook (<span style="color: #0000ff;"><strong><a style="color: #0000ff;" href="http://www.facebook.com/IldefonsoSeguraPage" target="_blank" rel="noopener noreferrer">IldefonsoSeguraPage</a></strong></span>)<br />Espero que te guste y compartas el vídeo. No dejes de compartir este post.</p><p style="text-align: center;">Así es como me puedes ayudar 🙂 Gracias</p></div></div></div>								</div>
				</div>
					</div>
		</div>
					</div>
		</section>
				</div>La entrada <a href="https://ildefonsosegura.es/vaciado-de-volumenes-con-boleanos-en-cinema4d/">Vaciado de volúmenes con boleanos en Cinema4D</a> apareció primero en <a href="https://ildefonsosegura.es">Ildefonso Segura</a>.]]></content:encoded>
					
					<wfw:commentRss>https://ildefonsosegura.es/vaciado-de-volumenes-con-boleanos-en-cinema4d/feed/</wfw:commentRss>
			<slash:comments>0</slash:comments>
		
		
			</item>
		<item>
		<title>Intro formación de planeta #cinema4D by @ildefonsosegura</title>
		<link>https://ildefonsosegura.es/intro-formacion-de-planeta-con-cinema4d-by-ildefonsosegura/</link>
					<comments>https://ildefonsosegura.es/intro-formacion-de-planeta-con-cinema4d-by-ildefonsosegura/#respond</comments>
		
		<dc:creator><![CDATA[Ildefonso Segura]]></dc:creator>
		<pubDate>Sun, 22 Apr 2018 13:35:11 +0000</pubDate>
				<category><![CDATA[3D]]></category>
		<category><![CDATA[Cinema4D]]></category>
		<category><![CDATA[Conectatutoriales]]></category>
		<category><![CDATA[Editable]]></category>
		<category><![CDATA[Intro]]></category>
		<category><![CDATA[Tutoriales]]></category>
		<category><![CDATA[cinema4D]]></category>
		<category><![CDATA[conectatutoriales]]></category>
		<category><![CDATA[descarga]]></category>
		<category><![CDATA[earth]]></category>
		<category><![CDATA[editable]]></category>
		<category><![CDATA[explosion]]></category>
		<category><![CDATA[gloriasanis]]></category>
		<category><![CDATA[ildefonso]]></category>
		<category><![CDATA[ildefonsosegura]]></category>
		<category><![CDATA[intro]]></category>
		<category><![CDATA[lentes]]></category>
		<category><![CDATA[material]]></category>
		<category><![CDATA[materiales]]></category>
		<category><![CDATA[mograph]]></category>
		<category><![CDATA[planeta]]></category>
		<category><![CDATA[polifx]]></category>
		<category><![CDATA[tuto]]></category>
		<category><![CDATA[tutorial]]></category>
		<category><![CDATA[VIDEOTUTORIAL]]></category>
		<category><![CDATA[youtube]]></category>
		<guid isPermaLink="false">http://ildefonsosegura.es/?p=2661</guid>

					<description><![CDATA[<p>El 18 de marzo de 2013 publicamos un tutorial en CONECTATUTORIALES.COM un tutorial en el que hablábamos del atributo alfa en los materiales que nos ayudan a conseguir zonas invisibles de forma parcial en los materiales de cinema4d. Ver videotutorial atributo alfa en materiales Fruto de las peticiones realizadas en ese tutorial, he publicado otro [&#8230;]</p>

La entrada <a href="https://ildefonsosegura.es/intro-formacion-de-planeta-con-cinema4d-by-ildefonsosegura/">Intro formación de planeta #cinema4D by @ildefonsosegura</a> apareció primero en <a href="https://ildefonsosegura.es">Ildefonso Segura</a>.]]></description>
										<content:encoded><![CDATA[<div data-elementor-type="wp-post" data-elementor-id="2661" class="elementor elementor-2661">
						<section class="elementor-section elementor-top-section elementor-element elementor-element-3379a48c elementor-section-boxed elementor-section-height-default elementor-section-height-default" data-id="3379a48c" data-element_type="section" data-e-type="section">
						<div class="elementor-container elementor-column-gap-default">
					<div class="elementor-column elementor-col-100 elementor-top-column elementor-element elementor-element-62c36430" data-id="62c36430" data-element_type="column" data-e-type="column">
			<div class="elementor-widget-wrap elementor-element-populated">
						<div class="elementor-element elementor-element-1bebb4b2 elementor-widget elementor-widget-text-editor" data-id="1bebb4b2" data-element_type="widget" data-e-type="widget" data-widget_type="text-editor.default">
				<div class="elementor-widget-container">
									<p>El 18 de marzo de 2013 publicamos un tutorial en <a title="comunidad oficial de adobe" href="http://www.youtube.com/user/conectatutoriales" target="_blank" rel="noopener noreferrer">CONECTATUTORIALES.COM</a> un tutorial en el que hablábamos del atributo alfa en los materiales que nos ayudan a conseguir zonas invisibles de forma parcial en los materiales de cinema4d.</p><p style="text-align: center;">Ver videotutorial atributo alfa en materiales</p><p style="text-align: center;"><a href="https://ildefonsosegura.es/consigue-transparencias-parciales-con-el-atributo-alfa-en-los-materiales-de-cinema4d-by-ildefonsosegura/" rel="attachment wp-att-2687"><img loading="lazy" decoding="async" class=" wp-image-2687 aligncenter" src="https://ildefonsosegura.es/wp-content/uploads/formacion-planeta1.jpg" alt="formacion-planeta" width="504" height="283" /></a></p><p>Fruto de las peticiones realizadas en ese tutorial, he publicado otro donde explico de forma sencilla cómo hacer la intro que aparece allí y que puedes visualizar mejorada en el siguiente video y cuya <strong>EDITABLE</strong> tienes a tu disposición</p><p><span style="color: #800000;"><strong>INTRO DE LA FORMACION DEL PLANETA </strong></span></p><center><iframe src="https://www.youtube.com/embed/vvtE0NKoi0k" width="640" height="420" frameborder="0" allowfullscreen="allowfullscreen"></iframe></center><center></center><p> </p><p>A continuación y un ratito te explico la forma tan fácil de hacer este animación. Aplicaremos efectos como:</p><ol><li>Deformador explosión</li><li>Mograph efecto polifx</li><li>Mograph efecto aleatorio</li><li>Movimiento de cámaras</li><li>Uso de materiales con atributo alfa activo</li><li>Animiación de luz con efecto de lente</li></ol><p>Disfrutala, aplicala y enséñame tus resultados en mi <a title="fanpage de ildefonsosegura" href="http://www.facebook.com/ildefonsosegurapage" target="_blank" rel="noopener noreferrer"><strong>fanpage de facebook</strong></a></p><p><span style="color: #800000;"><strong>VIDEOTUTORIAL DE LA NTRO DE LA FORMACION DEL PLANETA </strong></span></p><center><iframe src="https://www.youtube.com/embed/XiJdn0YU53U" width="640" height="420" frameborder="0" allowfullscreen="allowfullscreen"></iframe></center><div><div> </div><p style="text-align: left;"> </p></div>								</div>
				</div>
					</div>
		</div>
					</div>
		</section>
				<section class="elementor-section elementor-top-section elementor-element elementor-element-3ce263ef elementor-section-boxed elementor-section-height-default elementor-section-height-default" data-id="3ce263ef" data-element_type="section" data-e-type="section">
						<div class="elementor-container elementor-column-gap-default">
					<div class="elementor-column elementor-col-100 elementor-top-column elementor-element elementor-element-4204fe3c" data-id="4204fe3c" data-element_type="column" data-e-type="column">
			<div class="elementor-widget-wrap elementor-element-populated">
						<div class="elementor-element elementor-element-a4d7390 elementor-widget elementor-widget-spacer" data-id="a4d7390" data-element_type="widget" data-e-type="widget" data-widget_type="spacer.default">
				<div class="elementor-widget-container">
							<div class="elementor-spacer">
			<div class="elementor-spacer-inner"></div>
		</div>
						</div>
				</div>
					</div>
		</div>
					</div>
		</section>
				<section class="elementor-section elementor-top-section elementor-element elementor-element-2fd989d5 elementor-section-boxed elementor-section-height-default elementor-section-height-default" data-id="2fd989d5" data-element_type="section" data-e-type="section">
						<div class="elementor-container elementor-column-gap-default">
					<div class="elementor-column elementor-col-100 elementor-top-column elementor-element elementor-element-e90588a" data-id="e90588a" data-element_type="column" data-e-type="column">
			<div class="elementor-widget-wrap elementor-element-populated">
						<div class="elementor-element elementor-element-5933146d elementor-widget-divider--view-line elementor-widget elementor-widget-divider" data-id="5933146d" data-element_type="widget" data-e-type="widget" data-widget_type="divider.default">
				<div class="elementor-widget-container">
							<div class="elementor-divider">
			<span class="elementor-divider-separator">
						</span>
		</div>
						</div>
				</div>
					</div>
		</div>
					</div>
		</section>
				<section class="elementor-section elementor-top-section elementor-element elementor-element-4fd913db elementor-section-full_width elementor-section-height-default elementor-section-height-default" data-id="4fd913db" data-element_type="section" data-e-type="section">
						<div class="elementor-container elementor-column-gap-default">
					<div class="elementor-column elementor-col-50 elementor-top-column elementor-element elementor-element-388c767f" data-id="388c767f" data-element_type="column" data-e-type="column">
			<div class="elementor-widget-wrap elementor-element-populated">
						<div class="elementor-element elementor-element-594cef4 elementor-align-right elementor-invisible elementor-widget elementor-widget-button" data-id="594cef4" data-element_type="widget" data-e-type="widget" data-settings="{&quot;_animation&quot;:&quot;shake&quot;}" data-widget_type="button.default">
				<div class="elementor-widget-container">
									<div class="elementor-button-wrapper">
					<a class="elementor-button elementor-button-link elementor-size-sm elementor-animation-grow" href="https://drive.google.com/open?id=0B_nJkCGJubucWUM2X0FIWlpRZWc">
						<span class="elementor-button-content-wrapper">
									<span class="elementor-button-text">BAJATE EL EDITABLE</span>
					</span>
					</a>
				</div>
								</div>
				</div>
					</div>
		</div>
				<div class="elementor-column elementor-col-50 elementor-top-column elementor-element elementor-element-6800c546" data-id="6800c546" data-element_type="column" data-e-type="column">
			<div class="elementor-widget-wrap elementor-element-populated">
						<div class="elementor-element elementor-element-5a62fa9e elementor-widget elementor-widget-html" data-id="5a62fa9e" data-element_type="widget" data-e-type="widget" data-settings="{&quot;_animation&quot;:&quot;none&quot;}" data-widget_type="html.default">
				<div class="elementor-widget-container">
					<form action="https://www.paypal.com/cgi-bin/webscr" method="post" target="_blank">
<input type="hidden" name="cmd" value="_donations">
<input type="hidden" name="business" value="ildefonsosegura@gmail.com">
<input type="hidden" name="lc" value="ES">
<input type="hidden" name="item_name" value="MANTENIMIENTO DE LA PAGINA DE ILDEFONSOSEGURA">
<input type="hidden" name="no_note" value="0">
<input type="hidden" name="currency_code" value="EUR">
<input type="hidden" name="bn" value="PP-DonationsBF:paypal1.jpg:NonHostedGuest">
<input type="image" src="http://ildefonsosegura.es/wp-content/uploads/paypal-updated-1.png" border="0" name="submit" alt="PayPal. La forma rápida y segura de pagar en Internet.">
<img decoding="async" alt="" border="0" src="https://www.paypalobjects.com/es_ES/i/scr/pixel.gif" width="1" height="1">
</form>				</div>
				</div>
					</div>
		</div>
					</div>
		</section>
				<section class="elementor-section elementor-top-section elementor-element elementor-element-3e682425 elementor-section-boxed elementor-section-height-default elementor-section-height-default" data-id="3e682425" data-element_type="section" data-e-type="section">
						<div class="elementor-container elementor-column-gap-default">
					<div class="elementor-column elementor-col-100 elementor-top-column elementor-element elementor-element-155aef9" data-id="155aef9" data-element_type="column" data-e-type="column">
			<div class="elementor-widget-wrap elementor-element-populated">
						<div class="elementor-element elementor-element-6ab38ab4 elementor-widget-divider--view-line elementor-widget elementor-widget-divider" data-id="6ab38ab4" data-element_type="widget" data-e-type="widget" data-widget_type="divider.default">
				<div class="elementor-widget-container">
							<div class="elementor-divider">
			<span class="elementor-divider-separator">
						</span>
		</div>
						</div>
				</div>
					</div>
		</div>
					</div>
		</section>
				<section class="elementor-section elementor-top-section elementor-element elementor-element-605a14a6 elementor-section-boxed elementor-section-height-default elementor-section-height-default" data-id="605a14a6" data-element_type="section" data-e-type="section">
						<div class="elementor-container elementor-column-gap-default">
					<div class="elementor-column elementor-col-100 elementor-top-column elementor-element elementor-element-3e8b483" data-id="3e8b483" data-element_type="column" data-e-type="column">
			<div class="elementor-widget-wrap elementor-element-populated">
						<div class="elementor-element elementor-element-2f422e09 elementor-widget elementor-widget-spacer" data-id="2f422e09" data-element_type="widget" data-e-type="widget" data-widget_type="spacer.default">
				<div class="elementor-widget-container">
							<div class="elementor-spacer">
			<div class="elementor-spacer-inner"></div>
		</div>
						</div>
				</div>
					</div>
		</div>
					</div>
		</section>
				<section class="elementor-section elementor-top-section elementor-element elementor-element-5149b85c elementor-section-full_width elementor-section-height-default elementor-section-height-default" data-id="5149b85c" data-element_type="section" data-e-type="section">
						<div class="elementor-container elementor-column-gap-default">
					<div class="elementor-column elementor-col-100 elementor-top-column elementor-element elementor-element-7aad4d7d" data-id="7aad4d7d" data-element_type="column" data-e-type="column">
			<div class="elementor-widget-wrap elementor-element-populated">
						<div class="elementor-element elementor-element-616a2c58 elementor-widget elementor-widget-text-editor" data-id="616a2c58" data-element_type="widget" data-e-type="widget" data-widget_type="text-editor.default">
				<div class="elementor-widget-container">
									<div><div align="center"><center><strong style="color: #ff0000;">Suscríbete a mi canal de Youtube:</strong></center><div><div><div align="center"><p><script src="https://apis.google.com/js/platform.js"></script></p><div class="g-ytsubscribe" data-channel="ildefonsosegura" data-layout="full" data-count="default"> </div></div></div><p> </p><p style="text-align: center;">No te lo pierdas y comparte tus trabajos en mi página de facebook (<span style="color: #0000ff;"><strong><a style="color: #0000ff;" href="http://www.facebook.com/IldefonsoSeguraPage" target="_blank" rel="noopener noreferrer">IldefonsoSeguraPage</a></strong></span>)<br />Espero que te guste y compartas el vídeo. No dejes de compartir este post.</p><p style="text-align: center;">Así es como me puedes ayudar 🙂 Gracias</p></div></div></div>								</div>
				</div>
					</div>
		</div>
					</div>
		</section>
				</div>La entrada <a href="https://ildefonsosegura.es/intro-formacion-de-planeta-con-cinema4d-by-ildefonsosegura/">Intro formación de planeta #cinema4D by @ildefonsosegura</a> apareció primero en <a href="https://ildefonsosegura.es">Ildefonso Segura</a>.]]></content:encoded>
					
					<wfw:commentRss>https://ildefonsosegura.es/intro-formacion-de-planeta-con-cinema4d-by-ildefonsosegura/feed/</wfw:commentRss>
			<slash:comments>0</slash:comments>
		
		
			</item>
		<item>
		<title>Intro The Avengers – Los Vengadores con Cinema4D y After Effects</title>
		<link>https://ildefonsosegura.es/intro-the-avengers-los-vengadores/</link>
					<comments>https://ildefonsosegura.es/intro-the-avengers-los-vengadores/#respond</comments>
		
		<dc:creator><![CDATA[Ildefonso Segura]]></dc:creator>
		<pubDate>Sat, 07 Apr 2018 14:38:24 +0000</pubDate>
				<category><![CDATA[3D]]></category>
		<category><![CDATA[After Effects]]></category>
		<category><![CDATA[Cinema4D]]></category>
		<category><![CDATA[Efectos]]></category>
		<category><![CDATA[Intro]]></category>
		<category><![CDATA[Películas]]></category>
		<category><![CDATA[Tecnicas]]></category>
		<category><![CDATA[Textos]]></category>
		<category><![CDATA[Tutoriales]]></category>
		<category><![CDATA[Video]]></category>
		<category><![CDATA[avengers]]></category>
		<category><![CDATA[cine]]></category>
		<category><![CDATA[effects]]></category>
		<category><![CDATA[gloriasanis]]></category>
		<category><![CDATA[ildefonsosegura]]></category>
		<category><![CDATA[introducción]]></category>
		<category><![CDATA[máscara]]></category>
		<category><![CDATA[mascara de spline]]></category>
		<category><![CDATA[movie]]></category>
		<category><![CDATA[peliculas]]></category>
		<category><![CDATA[spline]]></category>
		<category><![CDATA[the avengers]]></category>
		<category><![CDATA[vengadores]]></category>
		<category><![CDATA[youtube]]></category>
		<guid isPermaLink="false">http://ildefonsosegura.es/?p=1114</guid>

					<description><![CDATA[<p>Tienes dos tutoriales a tu disposición para hacer una intro realmente e película Tutorial Cinema4D: Aprende a utilizar la MÁSCARA DE SPLINE en CINEMA4D para formar textos con detalles especiales, rediseño de fuentes, etc.. Adapto la técnica para aplicarla a la intro de la película THE AVENGERS. Tutorial After Effects: En la segunda parte de [&#8230;]</p>
La entrada <a href="https://ildefonsosegura.es/intro-the-avengers-los-vengadores/">Intro The Avengers – Los Vengadores con Cinema4D y After Effects</a> apareció primero en <a href="https://ildefonsosegura.es">Ildefonso Segura</a>.]]></description>
										<content:encoded><![CDATA[<div data-elementor-type="wp-post" data-elementor-id="1114" class="elementor elementor-1114">
						<section class="elementor-section elementor-top-section elementor-element elementor-element-57f6c0f5 elementor-section-boxed elementor-section-height-default elementor-section-height-default" data-id="57f6c0f5" data-element_type="section" data-e-type="section">
						<div class="elementor-container elementor-column-gap-default">
					<div class="elementor-column elementor-col-100 elementor-top-column elementor-element elementor-element-1369ed1d" data-id="1369ed1d" data-element_type="column" data-e-type="column">
			<div class="elementor-widget-wrap elementor-element-populated">
						<div class="elementor-element elementor-element-49705b86 elementor-widget elementor-widget-text-editor" data-id="49705b86" data-element_type="widget" data-e-type="widget" data-widget_type="text-editor.default">
				<div class="elementor-widget-container">
									<p>Tienes dos tutoriales a tu disposición para hacer una intro realmente e película</p><p>Tutorial Cinema4D: Aprende a utilizar la MÁSCARA DE SPLINE en CINEMA4D para formar textos con detalles especiales, rediseño de fuentes, etc.. Adapto la técnica para aplicarla a la intro de la película THE AVENGERS.</p><p>Tutorial After Effects: En la segunda parte de la realización de la intro de la película THE AVENGERS (LOS VENGADORES). Aprendemos a introducir un video dentro del texto animado además de una entrada de texto espectacular.<br /><br /></p>								</div>
				</div>
					</div>
		</div>
					</div>
		</section>
				<section class="elementor-section elementor-top-section elementor-element elementor-element-cb71b85 elementor-section-boxed elementor-section-height-default elementor-section-height-default" data-id="cb71b85" data-element_type="section" data-e-type="section">
						<div class="elementor-container elementor-column-gap-default">
					<div class="elementor-column elementor-col-100 elementor-top-column elementor-element elementor-element-bad854e" data-id="bad854e" data-element_type="column" data-e-type="column">
			<div class="elementor-widget-wrap elementor-element-populated">
						<div class="elementor-element elementor-element-9270c34 elementor-widget elementor-widget-heading" data-id="9270c34" data-element_type="widget" data-e-type="widget" data-widget_type="heading.default">
				<div class="elementor-widget-container">
					<h2 class="elementor-heading-title elementor-size-default">INTRO LOS AVENGERS</h2>				</div>
				</div>
					</div>
		</div>
					</div>
		</section>
				<section class="elementor-section elementor-top-section elementor-element elementor-element-b83a9be elementor-section-boxed elementor-section-height-default elementor-section-height-default" data-id="b83a9be" data-element_type="section" data-e-type="section">
						<div class="elementor-container elementor-column-gap-default">
					<div class="elementor-column elementor-col-100 elementor-top-column elementor-element elementor-element-b4657cc" data-id="b4657cc" data-element_type="column" data-e-type="column">
			<div class="elementor-widget-wrap elementor-element-populated">
						<div class="elementor-element elementor-element-05e6c85 elementor-widget elementor-widget-video" data-id="05e6c85" data-element_type="widget" data-e-type="widget" data-settings="{&quot;youtube_url&quot;:&quot;https:\/\/youtu.be\/5EeCEEDuGCc&quot;,&quot;video_type&quot;:&quot;youtube&quot;,&quot;controls&quot;:&quot;yes&quot;}" data-widget_type="video.default">
				<div class="elementor-widget-container">
							<div class="elementor-wrapper elementor-open-inline">
			<div class="elementor-video"></div>		</div>
						</div>
				</div>
					</div>
		</div>
					</div>
		</section>
				<section class="elementor-section elementor-top-section elementor-element elementor-element-9aed950 elementor-section-boxed elementor-section-height-default elementor-section-height-default" data-id="9aed950" data-element_type="section" data-e-type="section">
						<div class="elementor-container elementor-column-gap-default">
					<div class="elementor-column elementor-col-100 elementor-top-column elementor-element elementor-element-63cba2a" data-id="63cba2a" data-element_type="column" data-e-type="column">
			<div class="elementor-widget-wrap elementor-element-populated">
						<div class="elementor-element elementor-element-e09bb68 elementor-widget elementor-widget-text-editor" data-id="e09bb68" data-element_type="widget" data-e-type="widget" data-widget_type="text-editor.default">
				<div class="elementor-widget-container">
									<p>Puedes ver <span style="color: #ff0000;">más <strong><a style="color: #ff0000;" href="https://ildefonsosegura.es/galeria-de-intros/" target="_blank" rel="noopener">intros haciendo clic aquí</a></strong></span></p>								</div>
				</div>
					</div>
		</div>
					</div>
		</section>
				<section class="elementor-section elementor-top-section elementor-element elementor-element-b3b22cd elementor-section-boxed elementor-section-height-default elementor-section-height-default" data-id="b3b22cd" data-element_type="section" data-e-type="section">
						<div class="elementor-container elementor-column-gap-default">
					<div class="elementor-column elementor-col-100 elementor-top-column elementor-element elementor-element-c35c3c7" data-id="c35c3c7" data-element_type="column" data-e-type="column">
			<div class="elementor-widget-wrap elementor-element-populated">
						<div class="elementor-element elementor-element-979dd12 elementor-widget elementor-widget-spacer" data-id="979dd12" data-element_type="widget" data-e-type="widget" data-widget_type="spacer.default">
				<div class="elementor-widget-container">
							<div class="elementor-spacer">
			<div class="elementor-spacer-inner"></div>
		</div>
						</div>
				</div>
				<div class="elementor-element elementor-element-834739e elementor-widget elementor-widget-heading" data-id="834739e" data-element_type="widget" data-e-type="widget" data-widget_type="heading.default">
				<div class="elementor-widget-container">
					<h2 class="elementor-heading-title elementor-size-default">TUTORIAL CINEMA4D</h2>				</div>
				</div>
					</div>
		</div>
					</div>
		</section>
				<section class="elementor-section elementor-top-section elementor-element elementor-element-c5149df elementor-section-boxed elementor-section-height-default elementor-section-height-default" data-id="c5149df" data-element_type="section" data-e-type="section">
						<div class="elementor-container elementor-column-gap-default">
					<div class="elementor-column elementor-col-100 elementor-top-column elementor-element elementor-element-a10e70d" data-id="a10e70d" data-element_type="column" data-e-type="column">
			<div class="elementor-widget-wrap elementor-element-populated">
						<div class="elementor-element elementor-element-c3e55de elementor-widget elementor-widget-video" data-id="c3e55de" data-element_type="widget" data-e-type="widget" data-settings="{&quot;youtube_url&quot;:&quot;https:\/\/youtu.be\/t1SJ3sKH854&quot;,&quot;video_type&quot;:&quot;youtube&quot;,&quot;controls&quot;:&quot;yes&quot;}" data-widget_type="video.default">
				<div class="elementor-widget-container">
							<div class="elementor-wrapper elementor-open-inline">
			<div class="elementor-video"></div>		</div>
						</div>
				</div>
					</div>
		</div>
					</div>
		</section>
				<section class="elementor-section elementor-top-section elementor-element elementor-element-dee73d8 elementor-section-boxed elementor-section-height-default elementor-section-height-default" data-id="dee73d8" data-element_type="section" data-e-type="section">
						<div class="elementor-container elementor-column-gap-default">
					<div class="elementor-column elementor-col-100 elementor-top-column elementor-element elementor-element-254212f" data-id="254212f" data-element_type="column" data-e-type="column">
			<div class="elementor-widget-wrap elementor-element-populated">
						<div class="elementor-element elementor-element-4b71c69 elementor-widget elementor-widget-spacer" data-id="4b71c69" data-element_type="widget" data-e-type="widget" data-widget_type="spacer.default">
				<div class="elementor-widget-container">
							<div class="elementor-spacer">
			<div class="elementor-spacer-inner"></div>
		</div>
						</div>
				</div>
				<div class="elementor-element elementor-element-6bb8312 elementor-widget elementor-widget-heading" data-id="6bb8312" data-element_type="widget" data-e-type="widget" data-widget_type="heading.default">
				<div class="elementor-widget-container">
					<h2 class="elementor-heading-title elementor-size-default">TUTORIAL AFTER EFFECS</h2>				</div>
				</div>
					</div>
		</div>
					</div>
		</section>
				<section class="elementor-section elementor-top-section elementor-element elementor-element-d51f8e8 elementor-section-boxed elementor-section-height-default elementor-section-height-default" data-id="d51f8e8" data-element_type="section" data-e-type="section">
						<div class="elementor-container elementor-column-gap-default">
					<div class="elementor-column elementor-col-100 elementor-top-column elementor-element elementor-element-51d908c" data-id="51d908c" data-element_type="column" data-e-type="column">
			<div class="elementor-widget-wrap elementor-element-populated">
						<div class="elementor-element elementor-element-044b89f elementor-widget elementor-widget-video" data-id="044b89f" data-element_type="widget" data-e-type="widget" data-settings="{&quot;youtube_url&quot;:&quot;https:\/\/youtu.be\/lNz4XMYJpgM&quot;,&quot;video_type&quot;:&quot;youtube&quot;,&quot;controls&quot;:&quot;yes&quot;}" data-widget_type="video.default">
				<div class="elementor-widget-container">
							<div class="elementor-wrapper elementor-open-inline">
			<div class="elementor-video"></div>		</div>
						</div>
				</div>
					</div>
		</div>
					</div>
		</section>
				<section class="elementor-section elementor-top-section elementor-element elementor-element-7fc1ae98 elementor-section-full_width elementor-section-height-default elementor-section-height-default" data-id="7fc1ae98" data-element_type="section" data-e-type="section">
						<div class="elementor-container elementor-column-gap-default">
					<div class="elementor-column elementor-col-100 elementor-top-column elementor-element elementor-element-4da8d58c" data-id="4da8d58c" data-element_type="column" data-e-type="column">
			<div class="elementor-widget-wrap elementor-element-populated">
						<div class="elementor-element elementor-element-68517c32 elementor-widget elementor-widget-text-editor" data-id="68517c32" data-element_type="widget" data-e-type="widget" data-widget_type="text-editor.default">
				<div class="elementor-widget-container">
									<div><div align="center"><center><strong style="color: #ff0000;">Suscríbete a mi canal de Youtube:</strong></center><div><div><div align="center"><p><script src="https://apis.google.com/js/platform.js"></script></p><div class="g-ytsubscribe" data-channel="ildefonsosegura" data-layout="full" data-count="default"> </div></div></div><p> </p><p style="text-align: center;">No te lo pierdas y comparte tus trabajos en mi página de facebook (<span style="color: #0000ff;"><strong><a style="color: #0000ff;" href="http://www.facebook.com/IldefonsoSeguraPage" target="_blank" rel="noopener noreferrer">IldefonsoSeguraPage</a></strong></span>)<br />Espero que te guste y compartas el vídeo. No dejes de compartir este post.</p><p style="text-align: center;">Así es como me puedes ayudar 🙂 Gracias</p></div></div></div>								</div>
				</div>
					</div>
		</div>
					</div>
		</section>
				</div>La entrada <a href="https://ildefonsosegura.es/intro-the-avengers-los-vengadores/">Intro The Avengers – Los Vengadores con Cinema4D y After Effects</a> apareció primero en <a href="https://ildefonsosegura.es">Ildefonso Segura</a>.]]></content:encoded>
					
					<wfw:commentRss>https://ildefonsosegura.es/intro-the-avengers-los-vengadores/feed/</wfw:commentRss>
			<slash:comments>0</slash:comments>
		
		
			</item>
		<item>
		<title>Creamos una intro elegante con iconos de tus redes sociales con Cinema4D</title>
		<link>https://ildefonsosegura.es/creamos-una-intro-elegante-con-iconos-de-tus-redes-sociales-con-cinema4d/</link>
					<comments>https://ildefonsosegura.es/creamos-una-intro-elegante-con-iconos-de-tus-redes-sociales-con-cinema4d/#respond</comments>
		
		<dc:creator><![CDATA[Ildefonso Segura]]></dc:creator>
		<pubDate>Thu, 29 Mar 2018 09:35:43 +0000</pubDate>
				<category><![CDATA[3D]]></category>
		<category><![CDATA[Cinema4D]]></category>
		<category><![CDATA[Editable]]></category>
		<category><![CDATA[Efectos]]></category>
		<category><![CDATA[Intro]]></category>
		<category><![CDATA[Tutoriales]]></category>
		<category><![CDATA[cinema4D]]></category>
		<category><![CDATA[editable]]></category>
		<category><![CDATA[efecto]]></category>
		<category><![CDATA[efectos]]></category>
		<category><![CDATA[elegante]]></category>
		<category><![CDATA[face]]></category>
		<category><![CDATA[facebook]]></category>
		<category><![CDATA[gloriasanis]]></category>
		<category><![CDATA[iconos]]></category>
		<category><![CDATA[ildefonso]]></category>
		<category><![CDATA[ildefonsosegura]]></category>
		<category><![CDATA[intro]]></category>
		<category><![CDATA[intros]]></category>
		<category><![CDATA[modelar]]></category>
		<category><![CDATA[mograph]]></category>
		<category><![CDATA[movimiento]]></category>
		<category><![CDATA[plano]]></category>
		<category><![CDATA[premium]]></category>
		<category><![CDATA[r12]]></category>
		<category><![CDATA[regalo]]></category>
		<category><![CDATA[retardo]]></category>
		<category><![CDATA[social]]></category>
		<category><![CDATA[tuto]]></category>
		<category><![CDATA[VIDEOTUTORIAL]]></category>
		<category><![CDATA[wall]]></category>
		<category><![CDATA[wallpapers]]></category>
		<category><![CDATA[youtube]]></category>
		<guid isPermaLink="false">http://ildefonsosegura.es/?p=2289</guid>

					<description><![CDATA[<p>Fruto de la petición de muchos de vosotros tras ver el regalo de la intro editable con cinema4D que publiqué recientemente en mi área de intros (VER GALERIA DE INTROS), he realizado este tutorial en el que te enseñaré: Modelar un icono de una red social (ejemplo con facebook y twitter) Efectos de Mograph PLANO [&#8230;]</p>
La entrada <a href="https://ildefonsosegura.es/creamos-una-intro-elegante-con-iconos-de-tus-redes-sociales-con-cinema4d/">Creamos una intro elegante con iconos de tus redes sociales con Cinema4D</a> apareció primero en <a href="https://ildefonsosegura.es">Ildefonso Segura</a>.]]></description>
										<content:encoded><![CDATA[<div data-elementor-type="wp-post" data-elementor-id="2289" class="elementor elementor-2289">
						<section class="elementor-section elementor-top-section elementor-element elementor-element-40661341 elementor-section-boxed elementor-section-height-default elementor-section-height-default" data-id="40661341" data-element_type="section" data-e-type="section">
						<div class="elementor-container elementor-column-gap-default">
					<div class="elementor-column elementor-col-100 elementor-top-column elementor-element elementor-element-4c0e8cf5" data-id="4c0e8cf5" data-element_type="column" data-e-type="column">
			<div class="elementor-widget-wrap elementor-element-populated">
						<div class="elementor-element elementor-element-4a85c408 elementor-widget elementor-widget-text-editor" data-id="4a85c408" data-element_type="widget" data-e-type="widget" data-widget_type="text-editor.default">
				<div class="elementor-widget-container">
									<p>Fruto de la petición de muchos de vosotros tras ver el regalo de la<strong> intro editable con cinema4D</strong> que publiqué recientemente en mi área de intros (<a title="Regalo de una intro editable en Cinema4D R12" href="https://ildefonsosegura.es/galeria-de-intros/" target="_blank" rel="noopener"><strong>VER GALERIA DE INTROS</strong></a>), he realizado este tutorial en el que te enseñaré:</p><ol><li>Modelar un icono de una red social (ejemplo con facebook y twitter)</li><li>Efectos de Mograph PLANO y RETARDO (ya publiqué unos tutoriales en Febrero de 2012 donde explicaba los efectos de una forma más genérica &#8211; <strong><a title="Efectos Mograph para intros con Cinema4D (Plano, coffee y retardo)" href="https://ildefonsosegura.es/efectos-mograph-para-intros-con-cinema4d-plano-coffee-y-retardo/" target="_blank" rel="noopener">VER TUTORIALES CINEMA4D</a></strong>)</li><li>Movimiento de cámara con efectos profesionales</li></ol><p>Además, si ves el video completo tendrás la posibilidad de disfrutar de un <strong>pack de iconos sociales en cinema4D</strong> para que los uses en tus wallpapers, animaciones, banners, etc&#8230;. En alguna parte del video te digo como conseguir este fantástico pack de iconos gratis.</p><p style="text-align: center;"><img loading="lazy" decoding="async" class="size-full wp-image-2290 aligncenter" src="https://ildefonsosegura.es/wp-content/uploads/Tutorial-intro-iconos-sociales.jpg" alt="Tutorial-intro-iconos-sociales" width="500" height="281" srcset="https://ildefonsosegura.es/wp-content/uploads/Tutorial-intro-iconos-sociales.jpg 500w, https://ildefonsosegura.es/wp-content/uploads/Tutorial-intro-iconos-sociales-300x168.jpg 300w" sizes="(max-width: 500px) 100vw, 500px" /></p><p>Te agradecería que postearas el vídeo en alguna red social tuya y así me ayudas a difundir el vídeo. Gracias</p>								</div>
				</div>
					</div>
		</div>
					</div>
		</section>
				<section class="elementor-section elementor-top-section elementor-element elementor-element-89cbcdc elementor-section-boxed elementor-section-height-default elementor-section-height-default" data-id="89cbcdc" data-element_type="section" data-e-type="section">
						<div class="elementor-container elementor-column-gap-default">
					<div class="elementor-column elementor-col-100 elementor-top-column elementor-element elementor-element-d087ad3" data-id="d087ad3" data-element_type="column" data-e-type="column">
			<div class="elementor-widget-wrap elementor-element-populated">
						<div class="elementor-element elementor-element-c4400ce elementor-widget elementor-widget-heading" data-id="c4400ce" data-element_type="widget" data-e-type="widget" data-widget_type="heading.default">
				<div class="elementor-widget-container">
					<h2 class="elementor-heading-title elementor-size-default">VIDEOTUTORIAL</h2>				</div>
				</div>
					</div>
		</div>
					</div>
		</section>
				<section class="elementor-section elementor-top-section elementor-element elementor-element-f8b6b90 elementor-section-boxed elementor-section-height-default elementor-section-height-default" data-id="f8b6b90" data-element_type="section" data-e-type="section">
						<div class="elementor-container elementor-column-gap-default">
					<div class="elementor-column elementor-col-100 elementor-top-column elementor-element elementor-element-9dfdeb5" data-id="9dfdeb5" data-element_type="column" data-e-type="column">
			<div class="elementor-widget-wrap elementor-element-populated">
						<div class="elementor-element elementor-element-c7fa161 elementor-widget elementor-widget-video" data-id="c7fa161" data-element_type="widget" data-e-type="widget" data-settings="{&quot;youtube_url&quot;:&quot;https:\/\/youtu.be\/RywhK8QA2ow&quot;,&quot;video_type&quot;:&quot;youtube&quot;,&quot;controls&quot;:&quot;yes&quot;}" data-widget_type="video.default">
				<div class="elementor-widget-container">
							<div class="elementor-wrapper elementor-open-inline">
			<div class="elementor-video"></div>		</div>
						</div>
				</div>
					</div>
		</div>
					</div>
		</section>
				<section class="elementor-section elementor-top-section elementor-element elementor-element-18019ad elementor-section-boxed elementor-section-height-default elementor-section-height-default" data-id="18019ad" data-element_type="section" data-e-type="section">
						<div class="elementor-container elementor-column-gap-default">
					<div class="elementor-column elementor-col-100 elementor-top-column elementor-element elementor-element-a79ae91" data-id="a79ae91" data-element_type="column" data-e-type="column">
			<div class="elementor-widget-wrap elementor-element-populated">
						<div class="elementor-element elementor-element-bec6b58 elementor-widget elementor-widget-text-editor" data-id="bec6b58" data-element_type="widget" data-e-type="widget" data-widget_type="text-editor.default">
				<div class="elementor-widget-container">
									<p>Al descargar el pack te pedirá una contraseña. Contraseña del archivo : <span style="color: #ff0000;"><strong>iconosilde2013</strong></span></p>								</div>
				</div>
					</div>
		</div>
					</div>
		</section>
				<section class="elementor-section elementor-top-section elementor-element elementor-element-5931f770 elementor-section-full_width elementor-section-height-default elementor-section-height-default" data-id="5931f770" data-element_type="section" data-e-type="section">
						<div class="elementor-container elementor-column-gap-default">
					<div class="elementor-column elementor-col-50 elementor-top-column elementor-element elementor-element-35c2b79a" data-id="35c2b79a" data-element_type="column" data-e-type="column">
			<div class="elementor-widget-wrap elementor-element-populated">
						<div class="elementor-element elementor-element-709b2cf3 elementor-align-right elementor-invisible elementor-widget elementor-widget-button" data-id="709b2cf3" data-element_type="widget" data-e-type="widget" data-settings="{&quot;_animation&quot;:&quot;shake&quot;}" data-widget_type="button.default">
				<div class="elementor-widget-container">
									<div class="elementor-button-wrapper">
					<a class="elementor-button elementor-button-link elementor-size-sm elementor-animation-grow" href="https://mega.nz/#!plNUWL4A!dzxGz8C6e0kauDaAu2oWo0HkFVh9PbwaQYf5s29sv44">
						<span class="elementor-button-content-wrapper">
									<span class="elementor-button-text">BAJATE EL EDITABLE</span>
					</span>
					</a>
				</div>
								</div>
				</div>
					</div>
		</div>
				<div class="elementor-column elementor-col-50 elementor-top-column elementor-element elementor-element-6e33198d" data-id="6e33198d" data-element_type="column" data-e-type="column">
			<div class="elementor-widget-wrap elementor-element-populated">
						<div class="elementor-element elementor-element-7f3e70b5 elementor-widget elementor-widget-html" data-id="7f3e70b5" data-element_type="widget" data-e-type="widget" data-settings="{&quot;_animation&quot;:&quot;none&quot;}" data-widget_type="html.default">
				<div class="elementor-widget-container">
					<form action="https://www.paypal.com/cgi-bin/webscr" method="post" target="_blank">
<input type="hidden" name="cmd" value="_donations">
<input type="hidden" name="business" value="ildefonsosegura@gmail.com">
<input type="hidden" name="lc" value="ES">
<input type="hidden" name="item_name" value="MANTENIMIENTO DE LA PAGINA DE ILDEFONSOSEGURA">
<input type="hidden" name="no_note" value="0">
<input type="hidden" name="currency_code" value="EUR">
<input type="hidden" name="bn" value="PP-DonationsBF:paypal1.jpg:NonHostedGuest">
<input type="image" src="http://ildefonsosegura.es/wp-content/uploads/paypal-updated-1.png" border="0" name="submit" alt="PayPal. La forma rápida y segura de pagar en Internet.">
<img decoding="async" alt="" border="0" src="https://www.paypalobjects.com/es_ES/i/scr/pixel.gif" width="1" height="1">
</form>				</div>
				</div>
					</div>
		</div>
					</div>
		</section>
				<section class="elementor-section elementor-top-section elementor-element elementor-element-008ad80 elementor-section-boxed elementor-section-height-default elementor-section-height-default" data-id="008ad80" data-element_type="section" data-e-type="section">
						<div class="elementor-container elementor-column-gap-default">
					<div class="elementor-column elementor-col-100 elementor-top-column elementor-element elementor-element-cdb836d" data-id="cdb836d" data-element_type="column" data-e-type="column">
			<div class="elementor-widget-wrap elementor-element-populated">
						<div class="elementor-element elementor-element-b457a8f elementor-widget elementor-widget-text-editor" data-id="b457a8f" data-element_type="widget" data-e-type="widget" data-widget_type="text-editor.default">
				<div class="elementor-widget-container">
									<p>Puedes ver más <span style="color: #ff0000;"><strong><a style="color: #ff0000;" href="https://ildefonsosegura.es/galeria-de-intros/" target="_blank" rel="noopener">intros haciendo clic aquí</a></strong></span></p>								</div>
				</div>
					</div>
		</div>
					</div>
		</section>
				<section class="elementor-section elementor-top-section elementor-element elementor-element-736dbb82 elementor-section-boxed elementor-section-height-default elementor-section-height-default" data-id="736dbb82" data-element_type="section" data-e-type="section">
						<div class="elementor-container elementor-column-gap-default">
					<div class="elementor-column elementor-col-100 elementor-top-column elementor-element elementor-element-226bf216" data-id="226bf216" data-element_type="column" data-e-type="column">
			<div class="elementor-widget-wrap">
							</div>
		</div>
					</div>
		</section>
				<section class="elementor-section elementor-top-section elementor-element elementor-element-7e8950e6 elementor-section-full_width elementor-section-height-default elementor-section-height-default" data-id="7e8950e6" data-element_type="section" data-e-type="section">
						<div class="elementor-container elementor-column-gap-default">
					<div class="elementor-column elementor-col-100 elementor-top-column elementor-element elementor-element-5e69bffc" data-id="5e69bffc" data-element_type="column" data-e-type="column">
			<div class="elementor-widget-wrap elementor-element-populated">
						<div class="elementor-element elementor-element-3e407640 elementor-widget elementor-widget-text-editor" data-id="3e407640" data-element_type="widget" data-e-type="widget" data-widget_type="text-editor.default">
				<div class="elementor-widget-container">
									<div><div align="center"><center><strong style="color: #ff0000;">Suscríbete a mi canal de Youtube:</strong></center><div><div><div align="center"><p><script src="https://apis.google.com/js/platform.js"></script></p><div class="g-ytsubscribe" data-channel="ildefonsosegura" data-layout="full" data-count="default"> </div></div></div><p> </p><p style="text-align: center;">No te lo pierdas y comparte tus trabajos en mi página de facebook (<span style="color: #0000ff;"><strong><a style="color: #0000ff;" href="http://www.facebook.com/IldefonsoSeguraPage" target="_blank" rel="noopener noreferrer">IldefonsoSeguraPage</a></strong></span>)<br />Espero que te guste y compartas el vídeo. No dejes de compartir este post.</p><p style="text-align: center;">Así es como me puedes ayudar 🙂 Gracias</p></div></div></div>								</div>
				</div>
					</div>
		</div>
					</div>
		</section>
				</div>La entrada <a href="https://ildefonsosegura.es/creamos-una-intro-elegante-con-iconos-de-tus-redes-sociales-con-cinema4d/">Creamos una intro elegante con iconos de tus redes sociales con Cinema4D</a> apareció primero en <a href="https://ildefonsosegura.es">Ildefonso Segura</a>.]]></content:encoded>
					
					<wfw:commentRss>https://ildefonsosegura.es/creamos-una-intro-elegante-con-iconos-de-tus-redes-sociales-con-cinema4d/feed/</wfw:commentRss>
			<slash:comments>0</slash:comments>
		
		
			</item>
	</channel>
</rss>

<!--
Performance optimized by W3 Total Cache. Learn more: https://www.boldgrid.com/w3-total-cache/?utm_source=w3tc&utm_medium=footer_comment&utm_campaign=free_plugin

Caché de objetos 0/53 objetos usando Redis
Caché de base de datos usando Redis

Served from: ildefonsosegura.es @ 2026-07-10 23:21:12 by W3 Total Cache
--><br />
<b>Fatal error</b>:  Uncaught TypeError: mysqli_num_fields(): Argument #1 ($result) must be of type mysqli_result, bool given in /var/www/vhosts/ildefonsosegura.es/httpdocs/wp-includes/class-wpdb.php:3870
Stack trace:
#0 /var/www/vhosts/ildefonsosegura.es/httpdocs/wp-includes/class-wpdb.php(3870): mysqli_num_fields()
#1 /var/www/vhosts/ildefonsosegura.es/httpdocs/wp-includes/class-wpdb.php(785): wpdb-&gt;load_col_info()
#2 /var/www/vhosts/ildefonsosegura.es/httpdocs/wp-content/plugins/w3-total-cache/DbCache_WpdbInjection_QueryCaching.php(230): wpdb-&gt;__get()
#3 /var/www/vhosts/ildefonsosegura.es/httpdocs/wp-content/plugins/w3-total-cache/DbCache_WpdbNew.php(216): W3TC\DbCache_WpdbInjection_QueryCaching-&gt;query()
#4 /var/www/vhosts/ildefonsosegura.es/httpdocs/wp-content/plugins/aaa-option-optimizer/src/class-database.php(199): W3TC\DbCache_WpdbNew-&gt;query()
#5 /var/www/vhosts/ildefonsosegura.es/httpdocs/wp-content/plugins/aaa-option-optimizer/src/class-plugin.php(182): Progress_Planner\OptionOptimizer\Database::batch_insert()
#6 /var/www/vhosts/ildefonsosegura.es/httpdocs/wp-includes/class-wp-hook.php(341): Progress_Planner\OptionOptimizer\Plugin-&gt;update_tracked_options()
#7 /var/www/vhosts/ildefonsosegura.es/httpdocs/wp-includes/class-wp-hook.php(365): WP_Hook-&gt;apply_filters()
#8 /var/www/vhosts/ildefonsosegura.es/httpdocs/wp-includes/plugin.php(522): WP_Hook-&gt;do_action()
#9 /var/www/vhosts/ildefonsosegura.es/httpdocs/wp-includes/load.php(1308): do_action()
#10 [internal function]: shutdown_action_hook()
#11 {main}
  thrown in <b>/var/www/vhosts/ildefonsosegura.es/httpdocs/wp-includes/class-wpdb.php</b> on line <b>3870</b><br />