<?xml version="1.0" encoding="UTF-8"?><rss version="2.0"
	xmlns:content="http://purl.org/rss/1.0/modules/content/"
	xmlns:wfw="http://wellformedweb.org/CommentAPI/"
	xmlns:dc="http://purl.org/dc/elements/1.1/"
	xmlns:atom="http://www.w3.org/2005/Atom"
	xmlns:sy="http://purl.org/rss/1.0/modules/syndication/"
	xmlns:slash="http://purl.org/rss/1.0/modules/slash/"
	>

<channel>
	<title>cs6 | Ildefonso Segura</title>
	<atom:link href="https://ildefonsosegura.es/tag/cs6/feed/" rel="self" type="application/rss+xml" />
	<link>https://ildefonsosegura.es</link>
	<description>Tutoriales de diseño y animación</description>
	<lastBuildDate>Sun, 30 Oct 2022 18:49:33 +0000</lastBuildDate>
	<language>es</language>
	<sy:updatePeriod>
	hourly	</sy:updatePeriod>
	<sy:updateFrequency>
	1	</sy:updateFrequency>
	<generator>https://wordpress.org/?v=7.0</generator>

<image>
	<url>https://ildefonsosegura.es/wp-content/uploads/cropped-Favicon-new-logo-website-32x32.png</url>
	<title>cs6 | Ildefonso Segura</title>
	<link>https://ildefonsosegura.es</link>
	<width>32</width>
	<height>32</height>
</image> 
	<item>
		<title>#Tutorial #Photoshop escrito: Texto tallado en madera by @ildefonsosegura</title>
		<link>https://ildefonsosegura.es/tutorial-photoshosop-escrito-texto-escrito-en-madera-by-ildefonsosegura/</link>
					<comments>https://ildefonsosegura.es/tutorial-photoshosop-escrito-texto-escrito-en-madera-by-ildefonsosegura/#comments</comments>
		
		<dc:creator><![CDATA[Ildefonso Segura]]></dc:creator>
		<pubDate>Mon, 29 Jul 2019 15:00:14 +0000</pubDate>
				<category><![CDATA[Efectos]]></category>
		<category><![CDATA[Estilos]]></category>
		<category><![CDATA[Photoshop]]></category>
		<category><![CDATA[PREMIUM]]></category>
		<category><![CDATA[Tecnicas]]></category>
		<category><![CDATA[Textos]]></category>
		<category><![CDATA[Tutorial Escrito]]></category>
		<category><![CDATA[Tutoriales]]></category>
		<category><![CDATA[CC]]></category>
		<category><![CDATA[cs4]]></category>
		<category><![CDATA[cs5]]></category>
		<category><![CDATA[cs6]]></category>
		<category><![CDATA[escrito]]></category>
		<category><![CDATA[estilo]]></category>
		<category><![CDATA[gloriasanis]]></category>
		<category><![CDATA[grabado]]></category>
		<category><![CDATA[halloween]]></category>
		<category><![CDATA[ildefonsosegura]]></category>
		<category><![CDATA[madera]]></category>
		<category><![CDATA[photoshop]]></category>
		<category><![CDATA[style]]></category>
		<category><![CDATA[text]]></category>
		<category><![CDATA[texto]]></category>
		<category><![CDATA[textura]]></category>
		<category><![CDATA[tuto]]></category>
		<category><![CDATA[tutorial]]></category>
		<category><![CDATA[wallpaper]]></category>
		<category><![CDATA[written]]></category>
		<guid isPermaLink="false">http://ildefonsosegura.es/?p=3143</guid>

					<description><![CDATA[<p>Con fecha 21 de octubre de 2013 se publica un videotutorial donde explico como conseguir un efecto de tallado de una calavera en una textura de madera. Con la misma técnica podrías conseguir la integración de un volumen sencillo en una textura determinada. Aprovechando estas fechas cercanas a Halloween, tienes a tu disposición un videotutorial [&#8230;]</p>
La entrada <a href="https://ildefonsosegura.es/tutorial-photoshosop-escrito-texto-escrito-en-madera-by-ildefonsosegura/">#Tutorial #Photoshop escrito: Texto tallado en madera by @ildefonsosegura</a> apareció primero en <a href="https://ildefonsosegura.es">Ildefonso Segura</a>.]]></description>
										<content:encoded><![CDATA[<div data-elementor-type="wp-post" data-elementor-id="3143" class="elementor elementor-3143">
						<section class="elementor-section elementor-top-section elementor-element elementor-element-28fd328 elementor-section-boxed elementor-section-height-default elementor-section-height-default" data-id="28fd328" data-element_type="section" data-e-type="section">
						<div class="elementor-container elementor-column-gap-default">
					<div class="elementor-column elementor-col-100 elementor-top-column elementor-element elementor-element-60bcc37" data-id="60bcc37" data-element_type="column" data-e-type="column">
			<div class="elementor-widget-wrap elementor-element-populated">
						<div class="elementor-element elementor-element-0f19028 elementor-widget elementor-widget-text-editor" data-id="0f19028" data-element_type="widget" data-e-type="widget" data-widget_type="text-editor.default">
				<div class="elementor-widget-container">
									<p>Con fecha <span style="color: #800000;"><strong>21 de octubre de 2013</strong></span> se publica un videotutorial donde explico como conseguir un efecto de tallado de una calavera en una textura de madera. Con la misma técnica podrías conseguir la integración de un volumen sencillo en una textura determinada.</p><p>Aprovechando estas fechas cercanas a Halloween, tienes a tu disposición un videotutorial junto con otros que ya publiqué y que te pueden servir también, donde te muestro unas técnicas sencillas con máscaras, filtros y capas de ajuste. El resultado es fantástico y te invito a ver el videotutorial haciendo clic en la imagen siguiente.</p><p style="text-align: center;"><a href="http://ildefonsosegura.es/tutorial-photoshop-fusionar-volumenes-con-texturas-by-ildefonsosegura-wallpaper-halloween" target="_blank" rel="attachment wp-att-3142 noopener noreferrer"><img fetchpriority="high" decoding="async" class="size-full wp-image-3142 aligncenter" src="http://ildefonsosegura.es/wp-content/uploads/Calavera-de-madera-wallpaper.jpg" alt="Calavera-de-madera-wallpaper" width="680" height="383" srcset="https://ildefonsosegura.es/wp-content/uploads/Calavera-de-madera-wallpaper.jpg 680w, https://ildefonsosegura.es/wp-content/uploads/Calavera-de-madera-wallpaper-300x168.jpg 300w" sizes="(max-width: 680px) 100vw, 680px" /></a></p><p style="text-align: center;"><strong style="color: #800000;">HAZ CLIC EN LA IMAGEN PARA VER EL VIDEOTUTORIAL</strong></p>								</div>
				</div>
					</div>
		</div>
					</div>
		</section>
				<section class="elementor-section elementor-top-section elementor-element elementor-element-52db58ed elementor-section-full_width elementor-section-height-default elementor-section-height-default" data-id="52db58ed" data-element_type="section" data-e-type="section">
						<div class="elementor-container elementor-column-gap-default">
					<div class="elementor-column elementor-col-50 elementor-top-column elementor-element elementor-element-1406c6bf" data-id="1406c6bf" data-element_type="column" data-e-type="column">
			<div class="elementor-widget-wrap elementor-element-populated">
						<div class="elementor-element elementor-element-5eda612a elementor-align-right elementor-widget elementor-widget-button" data-id="5eda612a" data-element_type="widget" data-e-type="widget" data-widget_type="button.default">
				<div class="elementor-widget-container">
									<div class="elementor-button-wrapper">
					<a class="elementor-button elementor-button-link elementor-size-sm elementor-animation-grow" href="https://drive.google.com/open?id=0B_nJkCGJubuca2tUelpSTUlDSmc">
						<span class="elementor-button-content-wrapper">
						<span class="elementor-button-icon">
				<i aria-hidden="true" class="far fa-arrow-alt-circle-down"></i>			</span>
									<span class="elementor-button-text">DESCARGA EL MATERIAL</span>
					</span>
					</a>
				</div>
								</div>
				</div>
					</div>
		</div>
				<div class="elementor-column elementor-col-50 elementor-top-column elementor-element elementor-element-460e16d1" data-id="460e16d1" data-element_type="column" data-e-type="column">
			<div class="elementor-widget-wrap elementor-element-populated">
						<div class="elementor-element elementor-element-471c22fd elementor-widget elementor-widget-html" data-id="471c22fd" data-element_type="widget" data-e-type="widget" data-settings="{&quot;_animation&quot;:&quot;none&quot;}" data-widget_type="html.default">
				<div class="elementor-widget-container">
					<center><form action="https://www.paypal.com/cgi-bin/webscr" method="post" target="_blank">
<input type="hidden" name="cmd" value="_donations">
<input type="hidden" name="business" value="ildefonsosegura@gmail.com">
<input type="hidden" name="lc" value="ES">
<input type="hidden" name="item_name" value="MANTENIMIENTO DE LA PAGINA DE ILDEFONSOSEGURA">
<input type="hidden" name="no_note" value="0">
<input type="hidden" name="currency_code" value="EUR">
<input type="hidden" name="bn" value="PP-DonationsBF:paypal1.jpg:NonHostedGuest">
<input type="image" src="http://ildefonsosegura.es/wp-content/uploads/paypal-updated-1.png" border="0" name="submit" alt="PayPal. La forma rápida y segura de pagar en Internet.">
<img decoding="async" alt="" border="0" src="https://www.paypalobjects.com/es_ES/i/scr/pixel.gif" width="1" height="1">
</form></center>				</div>
				</div>
					</div>
		</div>
					</div>
		</section>
				<section class="elementor-section elementor-top-section elementor-element elementor-element-792abb9a elementor-section-boxed elementor-section-height-default elementor-section-height-default" data-id="792abb9a" data-element_type="section" data-e-type="section">
						<div class="elementor-container elementor-column-gap-default">
					<div class="elementor-column elementor-col-100 elementor-top-column elementor-element elementor-element-448b7dc7" data-id="448b7dc7" data-element_type="column" data-e-type="column">
			<div class="elementor-widget-wrap elementor-element-populated">
						<div class="elementor-element elementor-element-122cd2cf elementor-widget elementor-widget-text-editor" data-id="122cd2cf" data-element_type="widget" data-e-type="widget" data-widget_type="text-editor.default">
				<div class="elementor-widget-container">
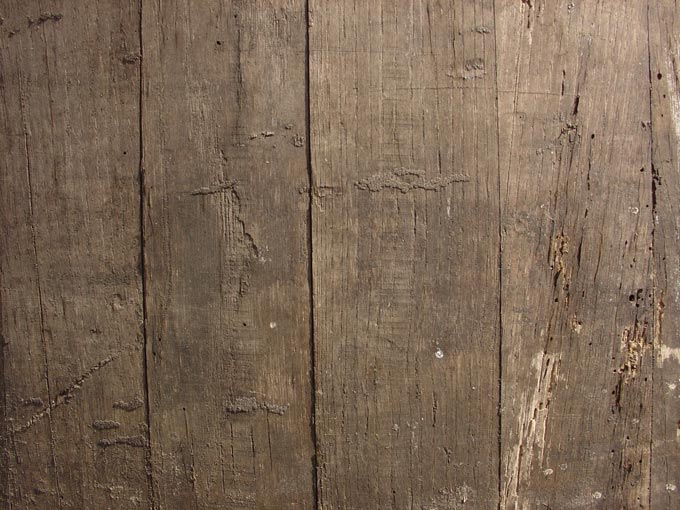
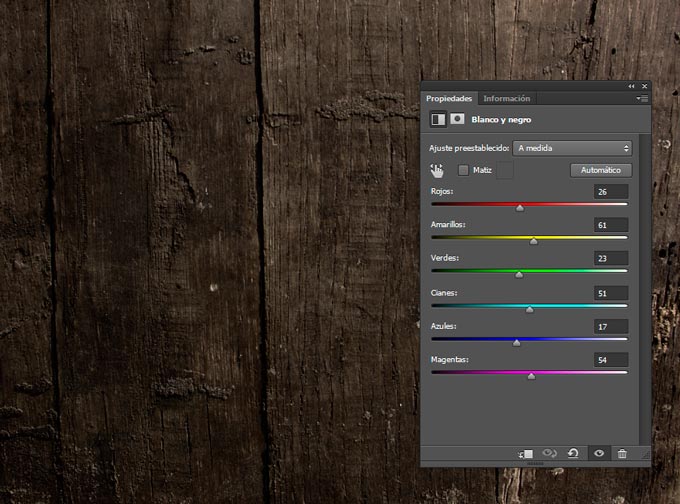
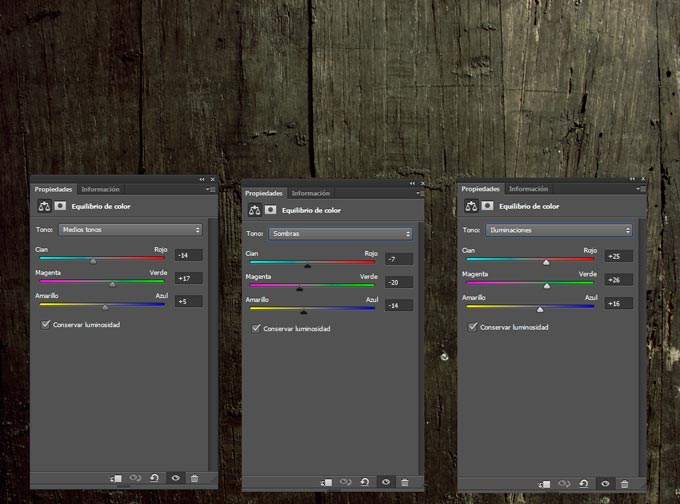
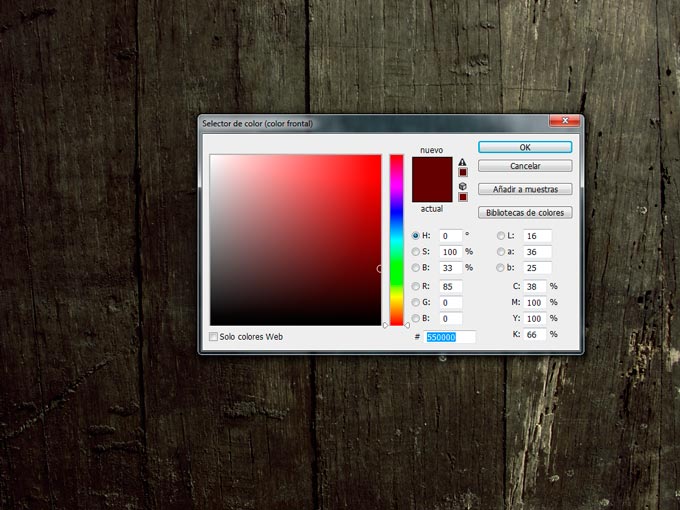
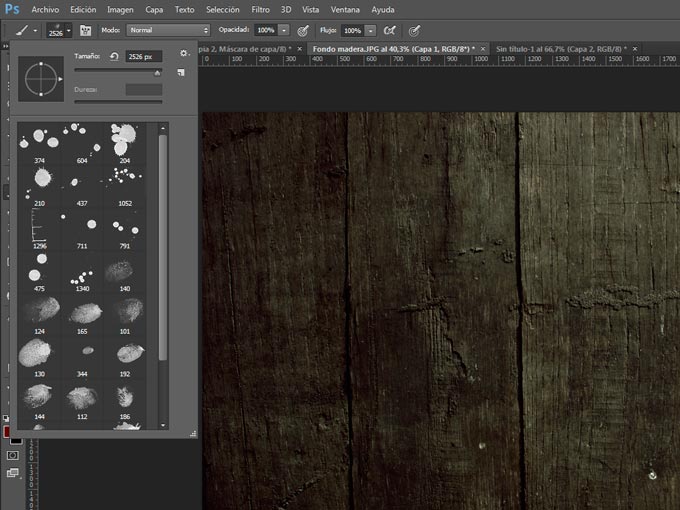
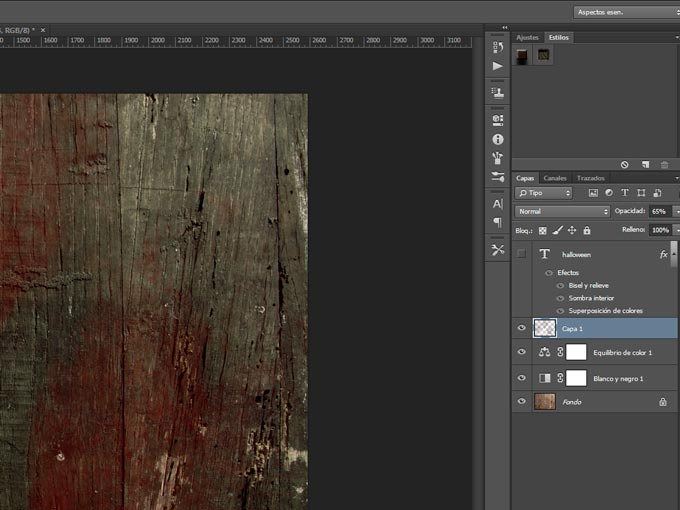
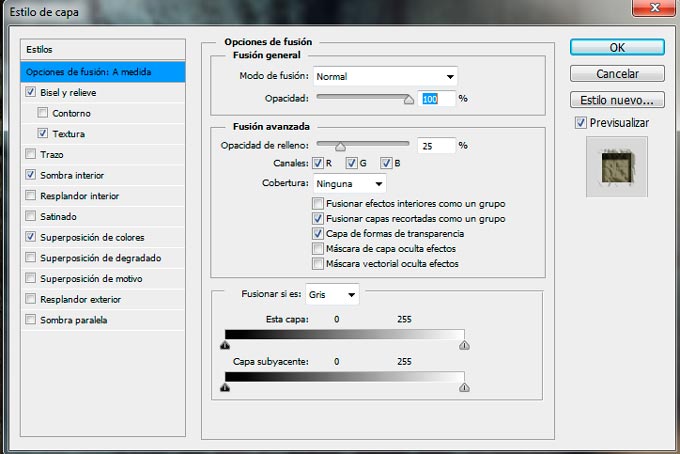
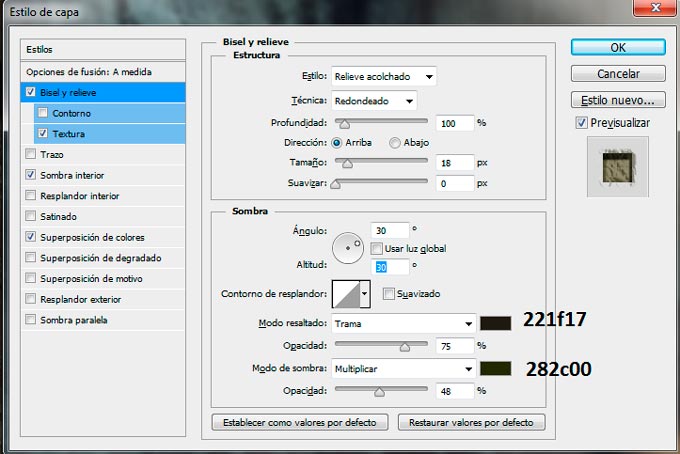
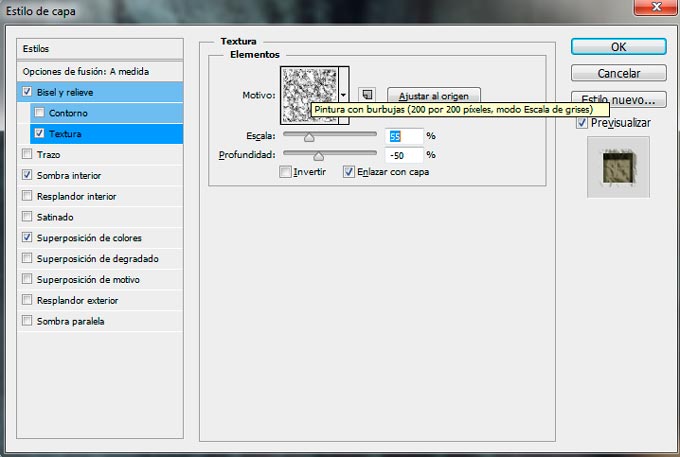
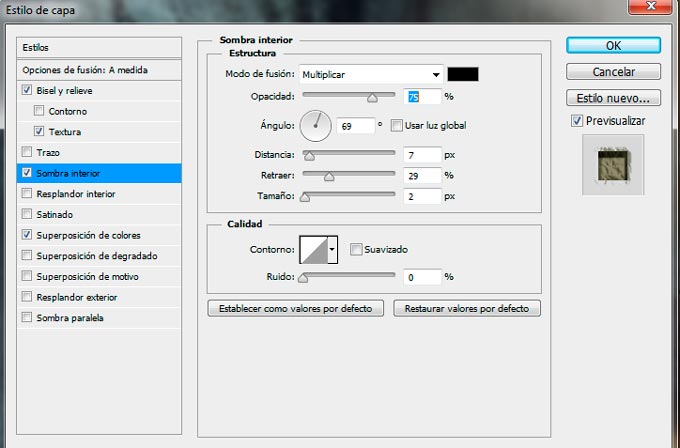
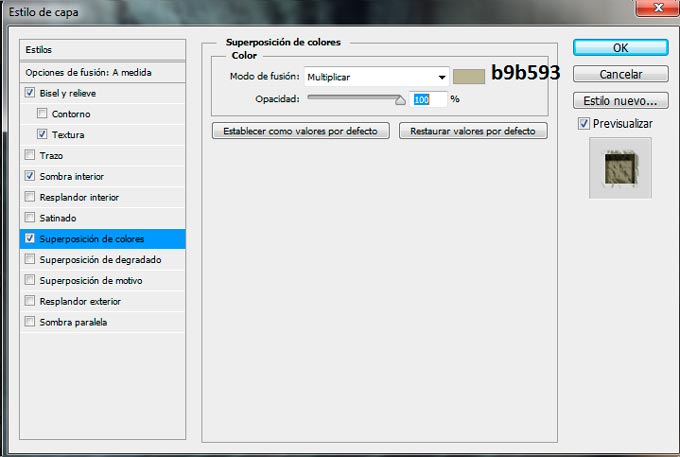
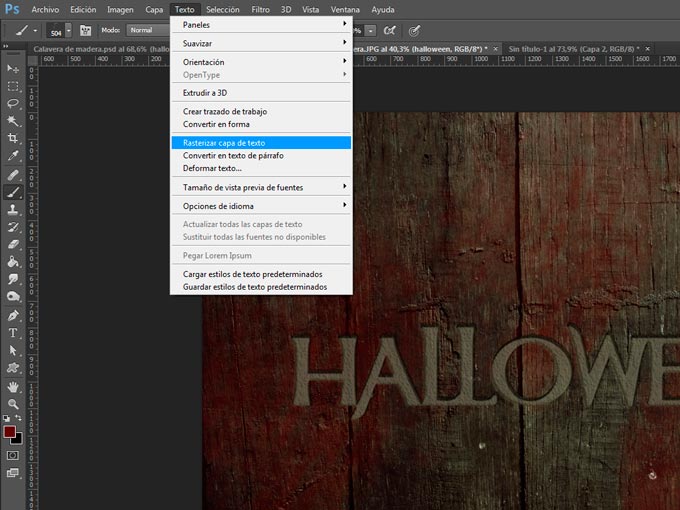
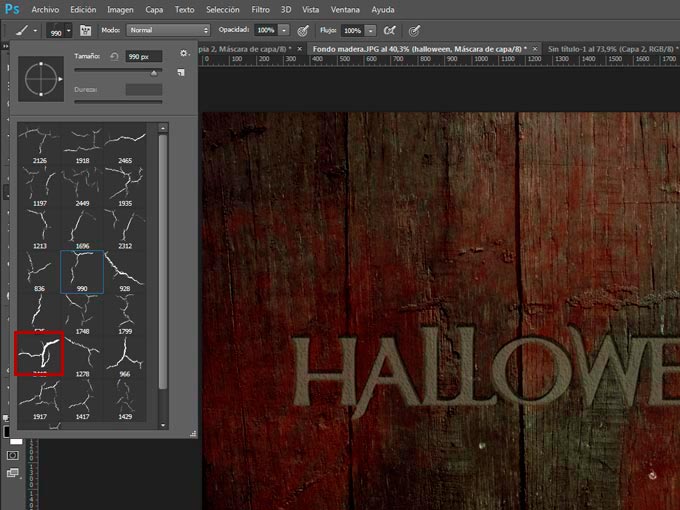
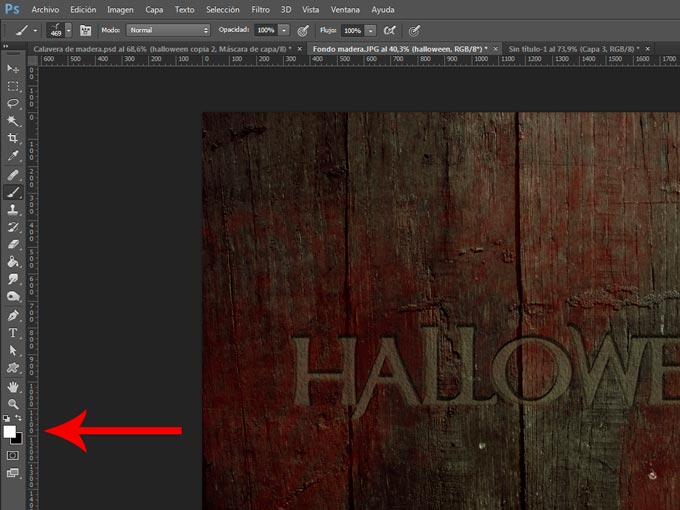
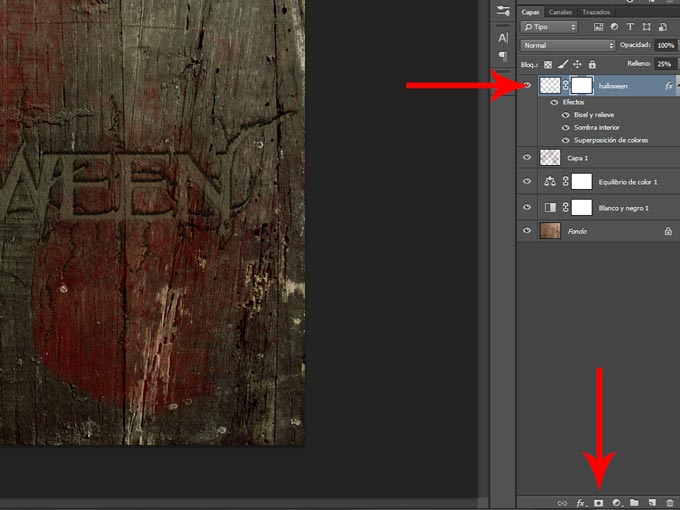
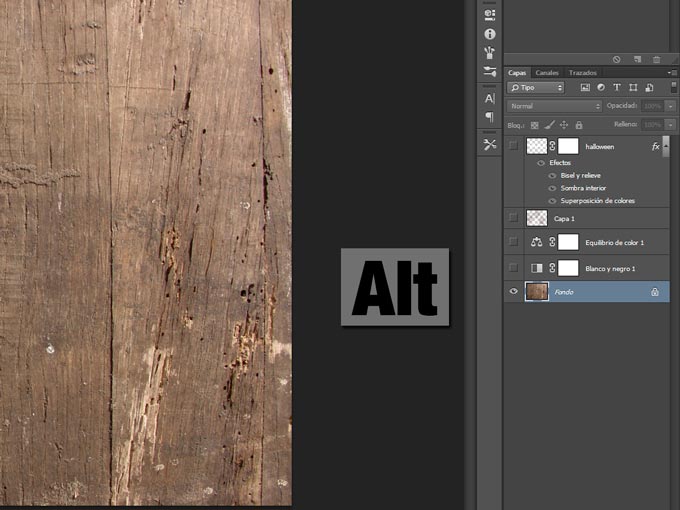
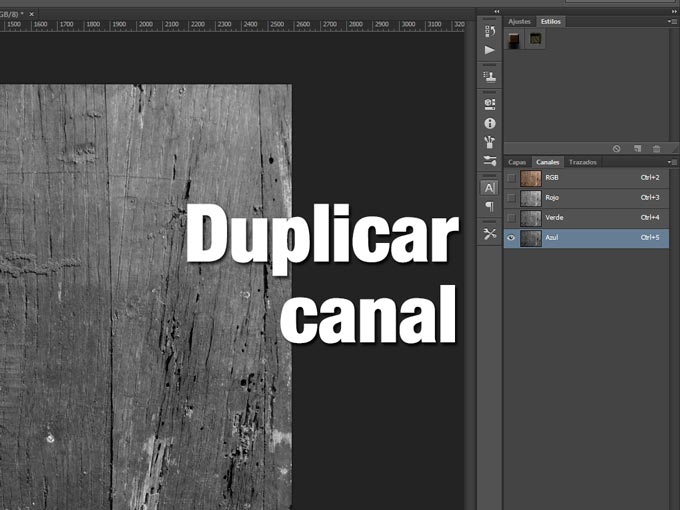
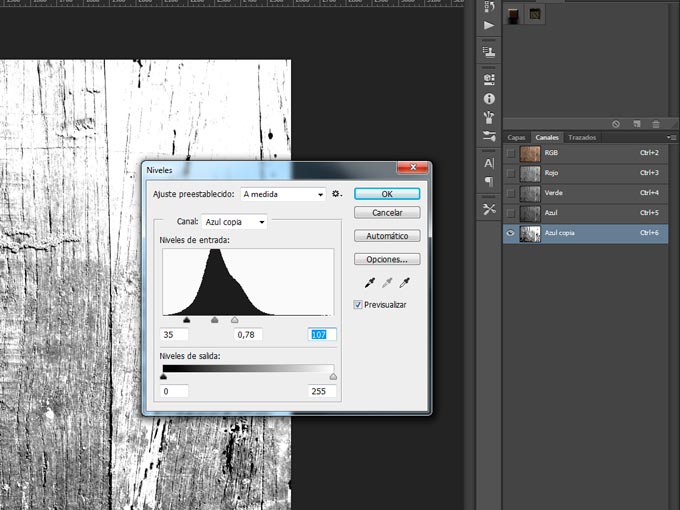
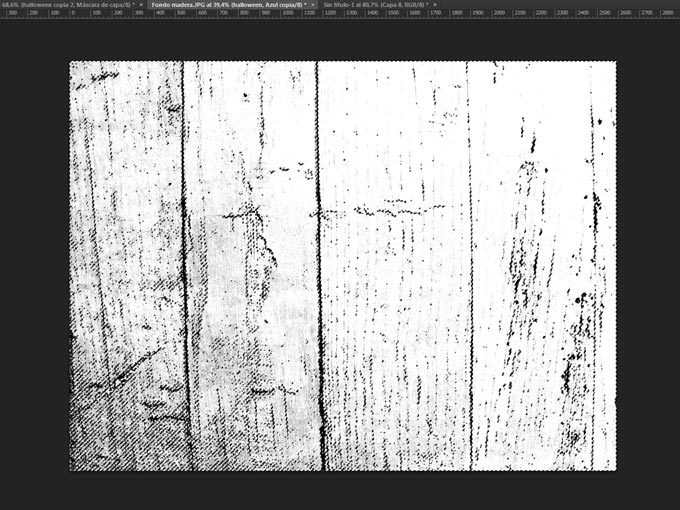
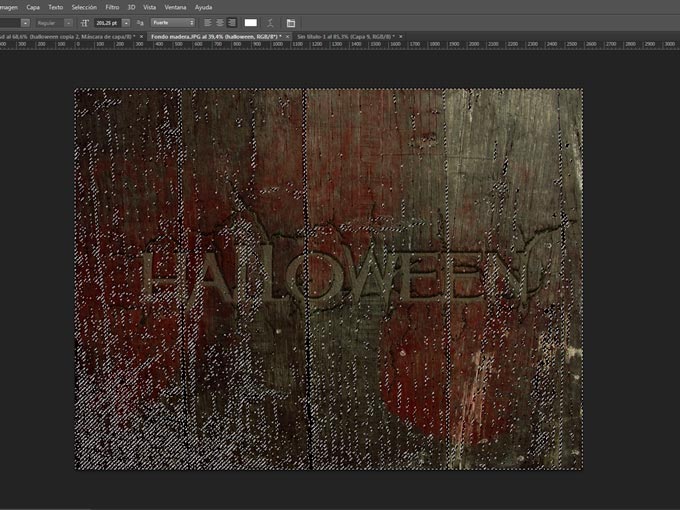
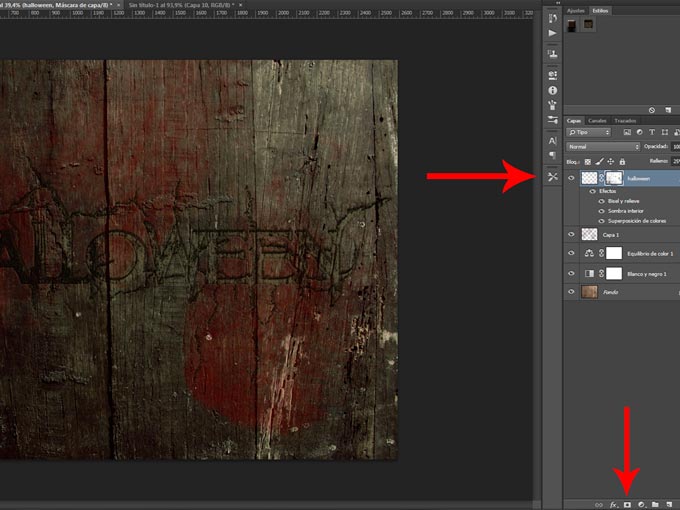
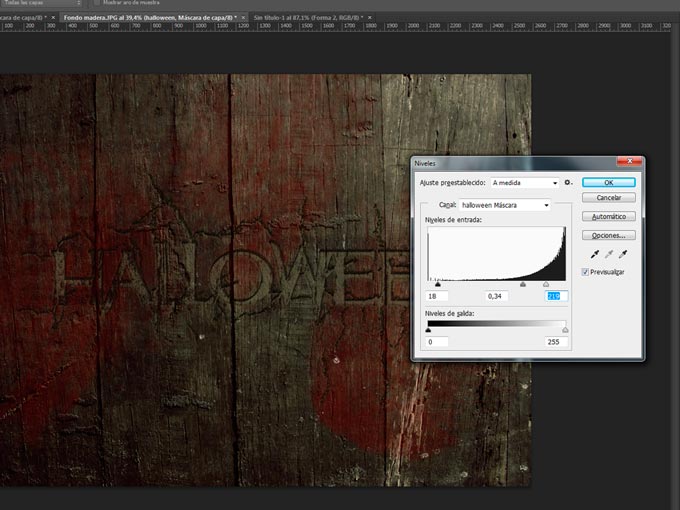
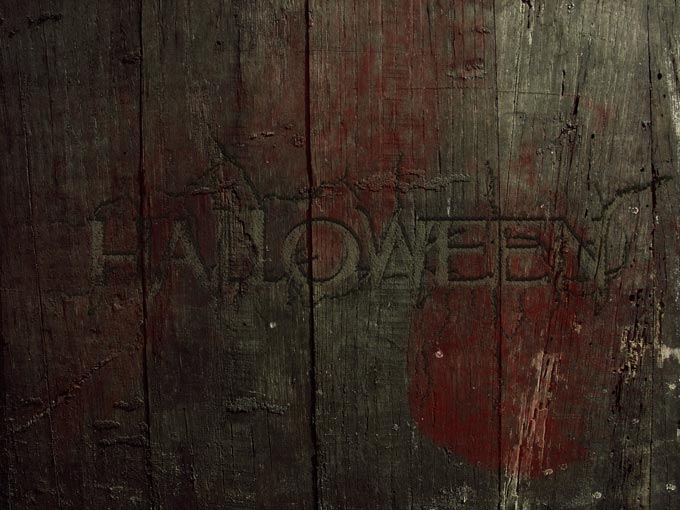
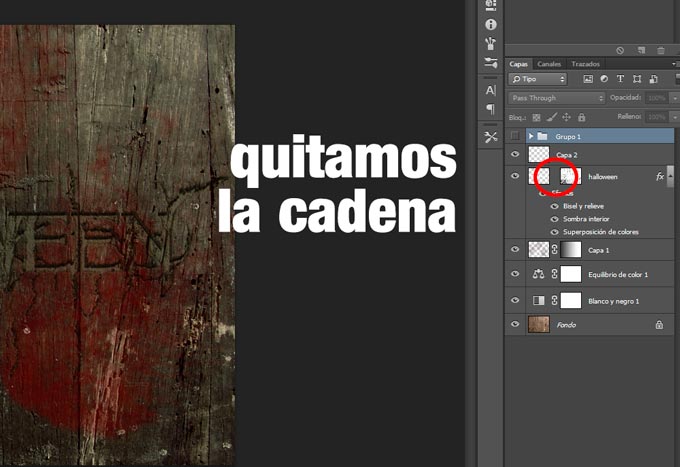
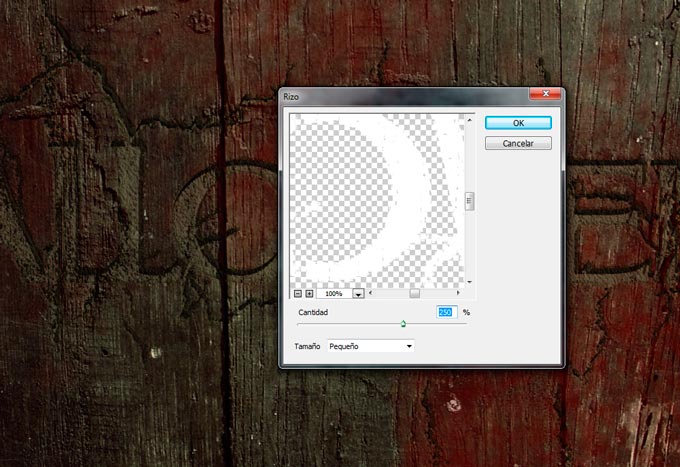
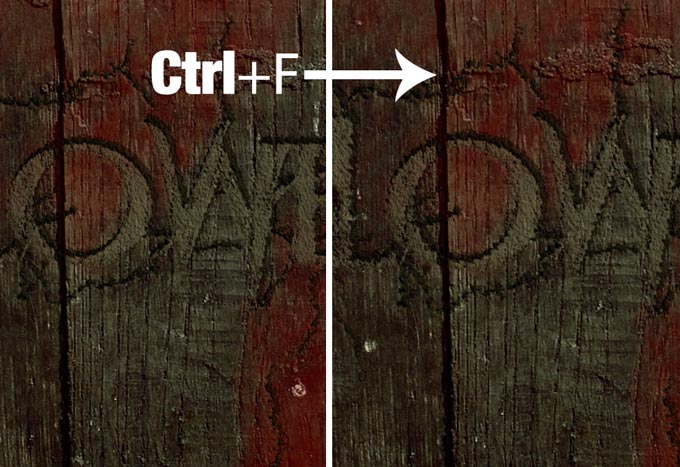
									<pre> [widget id="custom_html-8"]</pre><p>Tutoriales relacionados con la temática Halloween</p><p><a href="http://ildefonsosegura.es/texto-con-textura-de-calabaza-con-cinema4d-y-photoshop-wallpaper-halloween/" target="_blank" rel="noopener noreferrer"><img decoding="async" class="wp-image-1298 aligncenter" src="http://ildefonsosegura.es/wp-content/uploads/texto-calabaza4.jpg" alt="texto-calabaza4" width="194" height="110" srcset="https://ildefonsosegura.es/wp-content/uploads/texto-calabaza4.jpg 600w, https://ildefonsosegura.es/wp-content/uploads/texto-calabaza4-300x169.jpg 300w" sizes="(max-width: 194px) 100vw, 194px" /></a>  <a href="http://ildefonsosegura.es/vaciado-de-volumenes-con-boleanos-en-cinema4d/" target="_blank" rel="attachment wp-att-1304 noopener noreferrer"><img loading="lazy" decoding="async" class="wp-image-1304 aligncenter" src="http://ildefonsosegura.es/wp-content/uploads/Cara-de-calabaza.jpg" alt="Cara-de-calabaza" width="194" height="110" /></a>  <a href="http://ildefonsosegura.es/convertir-personas-en-zombis/" target="_blank" rel="attachment wp-att-3163 noopener noreferrer"><img loading="lazy" decoding="async" class="wp-image-3163 aligncenter" src="http://ildefonsosegura.es/wp-content/uploads/ZOMBIS-by-Ildefonsosegura1.jpg" alt="ZOMBIS-by-Ildefonsosegura" width="194" height="110" srcset="https://ildefonsosegura.es/wp-content/uploads/ZOMBIS-by-Ildefonsosegura1.jpg 600w, https://ildefonsosegura.es/wp-content/uploads/ZOMBIS-by-Ildefonsosegura1-300x169.jpg 300w" sizes="(max-width: 194px) 100vw, 194px" /></a></p><p>En este post te muestro un tutorial que completa al videotutorial citado dado que nos enseña a realizar el texto que aparece en el wallpaper de Halloween. El resultado es este y lo vemos paso a paso:</p><p><a href="http://ildefonsosegura.es/tutorial-photoshosop-escrito-texto-escrito-en-madera-by-ildefonsosegura/attachment/995/" rel="attachment wp-att-3148"><img loading="lazy" decoding="async" class="size-full wp-image-3148 aligncenter" src="http://ildefonsosegura.es/wp-content/uploads/995.jpg" alt="995" width="680" height="510" srcset="https://ildefonsosegura.es/wp-content/uploads/995.jpg 680w, https://ildefonsosegura.es/wp-content/uploads/995-300x225.jpg 300w" sizes="(max-width: 680px) 100vw, 680px" /></a></p><h1><span style="color: #800000;"><strong> TUTORIAL PHOTOSHOP</strong></span></h1><p><strong> PASO 1.-</strong>  Abrimos textura de madera donde pondremos el texto</p><p><a href="http://ildefonsosegura.es/tutorial-photoshosop-escrito-texto-escrito-en-madera-by-ildefonsosegura/attachment/1/" rel="attachment wp-att-3110"><img loading="lazy" decoding="async" class="alignnone size-full wp-image-3110 aligncenter" src="http://ildefonsosegura.es/wp-content/uploads/1.jpg" alt="1" width="680" height="510" srcset="https://ildefonsosegura.es/wp-content/uploads/1.jpg 680w, https://ildefonsosegura.es/wp-content/uploads/1-300x225.jpg 300w" sizes="(max-width: 680px) 100vw, 680px" /></a></p><p><strong>PASO 2.-</strong>  Añadimos capa de ajuste de Blanco y negro con los valores por defecto que son los que se ven en la imagen. Ponemos el modo de fusión de la capa en MULTIPLICAR</p><p style="text-align: center;"> <a href="http://ildefonsosegura.es/tutorial-photoshosop-escrito-texto-escrito-en-madera-by-ildefonsosegura/1a/" rel="attachment wp-att-3111"><img loading="lazy" decoding="async" class="alignnone size-full wp-image-3111" src="http://ildefonsosegura.es/wp-content/uploads/1a.jpg" alt="1a" width="680" height="504" srcset="https://ildefonsosegura.es/wp-content/uploads/1a.jpg 680w, https://ildefonsosegura.es/wp-content/uploads/1a-300x222.jpg 300w" sizes="(max-width: 680px) 100vw, 680px" /></a></p><p style="text-align: left;"><strong>PASO 3.-</strong>  Añadimos caja de ajuste de equilibrio de color con los valores de la imagen tanto en medios tonos como en sombras como en iluminaciones. Ponemos el modo de fusión de la capa en COLOR</p><p style="text-align: left;"><a href="http://ildefonsosegura.es/tutorial-photoshosop-escrito-texto-escrito-en-madera-by-ildefonsosegura/1b/" rel="attachment wp-att-3112"><img loading="lazy" decoding="async" class="alignnone size-full wp-image-3112 aligncenter" src="http://ildefonsosegura.es/wp-content/uploads/1b.jpg" alt="1b" width="680" height="504" srcset="https://ildefonsosegura.es/wp-content/uploads/1b.jpg 680w, https://ildefonsosegura.es/wp-content/uploads/1b-300x222.jpg 300w" sizes="(max-width: 680px) 100vw, 680px" /></a></p><p style="text-align: left;"><strong>PASO 4.-</strong>  tendríamos este resultado en la textura a partir del cual podemos trabajar el texto</p><p style="text-align: left;"><a href="http://ildefonsosegura.es/tutorial-photoshosop-escrito-texto-escrito-en-madera-by-ildefonsosegura/1c/" rel="attachment wp-att-3113"><img loading="lazy" decoding="async" class="size-full wp-image-3113 aligncenter" src="http://ildefonsosegura.es/wp-content/uploads/1c.jpg" alt="1c" width="680" height="510" srcset="https://ildefonsosegura.es/wp-content/uploads/1c.jpg 680w, https://ildefonsosegura.es/wp-content/uploads/1c-300x225.jpg 300w" sizes="(max-width: 680px) 100vw, 680px" /></a></p><p style="text-align: left;"><strong>PASO 5.-</strong>  Seleccionamos un color rojo oscuro para emular el color de la sangre. Código 550000</p><p style="text-align: left;"><a href="http://ildefonsosegura.es/tutorial-photoshosop-escrito-texto-escrito-en-madera-by-ildefonsosegura/1d/" rel="attachment wp-att-3114"><img loading="lazy" decoding="async" class="alignnone size-full wp-image-3114 aligncenter" src="http://ildefonsosegura.es/wp-content/uploads/1d.jpg" alt="1d" width="680" height="510" srcset="https://ildefonsosegura.es/wp-content/uploads/1d.jpg 680w, https://ildefonsosegura.es/wp-content/uploads/1d-300x225.jpg 300w" sizes="(max-width: 680px) 100vw, 680px" /></a></p><p style="text-align: left;"><strong>PASO 6.-</strong>  Seleccionamos un pincel de sangre que puedes encontrar en la red. Acuérdate de chequear que no tiene derecho de copyright</p><p style="text-align: left;"><a href="http://ildefonsosegura.es/tutorial-photoshosop-escrito-texto-escrito-en-madera-by-ildefonsosegura/1e/" rel="attachment wp-att-3115"><img loading="lazy" decoding="async" class="alignnone size-full wp-image-3115 aligncenter" src="http://ildefonsosegura.es/wp-content/uploads/1e.jpg" alt="1e" width="680" height="510" srcset="https://ildefonsosegura.es/wp-content/uploads/1e.jpg 680w, https://ildefonsosegura.es/wp-content/uploads/1e-300x225.jpg 300w" sizes="(max-width: 680px) 100vw, 680px" /></a></p><p style="text-align: left;"><strong>PASO 7.-</strong>  Vamos pintando con diferentes tamaños, pinceles, rotacion,&#8230; y bajamos la opacidad de la capa en torno al 65%</p><p style="text-align: left;"><a href="http://ildefonsosegura.es/tutorial-photoshosop-escrito-texto-escrito-en-madera-by-ildefonsosegura/1f/" rel="attachment wp-att-3116"><img loading="lazy" decoding="async" class="alignnone size-full wp-image-3116 aligncenter" src="http://ildefonsosegura.es/wp-content/uploads/1f.jpg" alt="1f" width="680" height="510" srcset="https://ildefonsosegura.es/wp-content/uploads/1f.jpg 680w, https://ildefonsosegura.es/wp-content/uploads/1f-300x225.jpg 300w" sizes="(max-width: 680px) 100vw, 680px" /></a></p><p style="text-align: left;"><strong>PASO 8.-</strong>  Tendríamo un resultado como este</p><p style="text-align: left;"><a href="http://ildefonsosegura.es/tutorial-photoshosop-escrito-texto-escrito-en-madera-by-ildefonsosegura/1g/" rel="attachment wp-att-3117"><img loading="lazy" decoding="async" class="alignnone size-full wp-image-3117 aligncenter" src="http://ildefonsosegura.es/wp-content/uploads/1g.jpg" alt="1g" width="680" height="510" srcset="https://ildefonsosegura.es/wp-content/uploads/1g.jpg 680w, https://ildefonsosegura.es/wp-content/uploads/1g-300x225.jpg 300w" sizes="(max-width: 680px) 100vw, 680px" /></a></p><p style="text-align: left;"><strong>PASO 9.-</strong>  Ponemos nuestro texto. El tipo de fuente que usé fue MULAN</p><p style="text-align: left;"><a href="http://ildefonsosegura.es/tutorial-photoshosop-escrito-texto-escrito-en-madera-by-ildefonsosegura/attachment/2/" rel="attachment wp-att-3118"><img loading="lazy" decoding="async" class="alignnone size-full wp-image-3118 aligncenter" src="http://ildefonsosegura.es/wp-content/uploads/2.jpg" alt="2" width="680" height="510" srcset="https://ildefonsosegura.es/wp-content/uploads/2.jpg 680w, https://ildefonsosegura.es/wp-content/uploads/2-300x225.jpg 300w" sizes="(max-width: 680px) 100vw, 680px" /></a></p><p style="text-align: left;"><strong>PASO 10.-</strong>  Aplicamos un estilo de capa. Clic derecho del ratón sobre la capa de texto y selecciona OPCIONES DE FUSION. Sigue los cuadros siguientes para copiar los valores de los atributos del estilo. Ojo&#8230; el relleno de la capa se reduce al 25%</p><p style="text-align: left;"><img loading="lazy" decoding="async" class="alignnone size-full wp-image-3119 aligncenter" src="http://ildefonsosegura.es/wp-content/uploads/3.jpg" alt="3" width="680" height="454" srcset="https://ildefonsosegura.es/wp-content/uploads/3.jpg 680w, https://ildefonsosegura.es/wp-content/uploads/3-300x200.jpg 300w" sizes="(max-width: 680px) 100vw, 680px" /></p><p style="text-align: left;"><a href="http://ildefonsosegura.es/tutorial-photoshosop-escrito-texto-escrito-en-madera-by-ildefonsosegura/attachment/4/" rel="attachment wp-att-3120"><img loading="lazy" decoding="async" class="alignnone size-full wp-image-3120 aligncenter" src="http://ildefonsosegura.es/wp-content/uploads/4.jpg" alt="4" width="680" height="454" srcset="https://ildefonsosegura.es/wp-content/uploads/4.jpg 680w, https://ildefonsosegura.es/wp-content/uploads/4-300x200.jpg 300w" sizes="(max-width: 680px) 100vw, 680px" /></a></p><p style="text-align: left;"><a href="http://ildefonsosegura.es/tutorial-photoshosop-escrito-texto-escrito-en-madera-by-ildefonsosegura/attachment/5/" rel="attachment wp-att-3121"><img loading="lazy" decoding="async" class="alignnone size-full wp-image-3121 aligncenter" src="http://ildefonsosegura.es/wp-content/uploads/5.jpg" alt="5" width="680" height="457" srcset="https://ildefonsosegura.es/wp-content/uploads/5.jpg 680w, https://ildefonsosegura.es/wp-content/uploads/5-300x201.jpg 300w" sizes="(max-width: 680px) 100vw, 680px" /></a></p><p style="text-align: left;"><a href="http://ildefonsosegura.es/tutorial-photoshosop-escrito-texto-escrito-en-madera-by-ildefonsosegura/attachment/6/" rel="attachment wp-att-3122"><img loading="lazy" decoding="async" class="alignnone size-full wp-image-3122 aligncenter" src="http://ildefonsosegura.es/wp-content/uploads/6.jpg" alt="6" width="680" height="448" srcset="https://ildefonsosegura.es/wp-content/uploads/6.jpg 680w, https://ildefonsosegura.es/wp-content/uploads/6-300x197.jpg 300w" sizes="(max-width: 680px) 100vw, 680px" /></a></p><p style="text-align: left;"><a href="http://ildefonsosegura.es/tutorial-photoshosop-escrito-texto-escrito-en-madera-by-ildefonsosegura/attachment/7/" rel="attachment wp-att-3123"><img loading="lazy" decoding="async" class="size-full wp-image-3123 aligncenter" src="http://ildefonsosegura.es/wp-content/uploads/7.jpg" alt="7" width="680" height="457" srcset="https://ildefonsosegura.es/wp-content/uploads/7.jpg 680w, https://ildefonsosegura.es/wp-content/uploads/7-300x201.jpg 300w" sizes="(max-width: 680px) 100vw, 680px" /></a></p><p style="text-align: left;"><strong>PASO 11.-</strong>  El estilo nos queda como sigue</p><p style="text-align: left;"><a href="http://ildefonsosegura.es/tutorial-photoshosop-escrito-texto-escrito-en-madera-by-ildefonsosegura/8-2/" rel="attachment wp-att-3124"><img loading="lazy" decoding="async" class="alignnone size-full wp-image-3124 aligncenter" src="http://ildefonsosegura.es/wp-content/uploads/8.jpg" alt="8" width="680" height="510" srcset="https://ildefonsosegura.es/wp-content/uploads/8.jpg 680w, https://ildefonsosegura.es/wp-content/uploads/8-300x225.jpg 300w" sizes="(max-width: 680px) 100vw, 680px" /></a></p><p style="text-align: left;"><strong>PASO 12.-</strong>  En el menú TEXTO rasterizamos el texto</p><p style="text-align: left;"><img loading="lazy" decoding="async" class="size-full wp-image-3125 aligncenter" src="http://ildefonsosegura.es/wp-content/uploads/9.jpg" alt="9" width="680" height="510" srcset="https://ildefonsosegura.es/wp-content/uploads/9.jpg 680w, https://ildefonsosegura.es/wp-content/uploads/9-300x225.jpg 300w" sizes="(max-width: 680px) 100vw, 680px" /></p><p style="text-align: left;"><strong>PASO 13.-</strong>  Seleccionamos un pack de pinceles de grietas. Os hago la misma recomendación que hice con los de sangre.</p><p style="text-align: left;"><a href="http://ildefonsosegura.es/tutorial-photoshosop-escrito-texto-escrito-en-madera-by-ildefonsosegura/attachment/91/" rel="attachment wp-att-3126"><img loading="lazy" decoding="async" class="alignnone size-full wp-image-3126 aligncenter" src="http://ildefonsosegura.es/wp-content/uploads/91.jpg" alt="91" width="680" height="510" srcset="https://ildefonsosegura.es/wp-content/uploads/91.jpg 680w, https://ildefonsosegura.es/wp-content/uploads/91-300x225.jpg 300w" sizes="(max-width: 680px) 100vw, 680px" /></a></p><p style="text-align: left;"><strong>PASO 14.-</strong>  Seleccionamos el color frontal blanco (como el texto). Un atajo rápido para hacerlo es pulsar D y luego X. Así el color frontal es blanco con total seguridad</p><p style="text-align: left;"><a href="http://ildefonsosegura.es/tutorial-photoshosop-escrito-texto-escrito-en-madera-by-ildefonsosegura/attachment/92/" rel="attachment wp-att-3127"><img loading="lazy" decoding="async" class="alignnone size-full wp-image-3127 aligncenter" src="http://ildefonsosegura.es/wp-content/uploads/92.jpg" alt="92" width="680" height="510" srcset="https://ildefonsosegura.es/wp-content/uploads/92.jpg 680w, https://ildefonsosegura.es/wp-content/uploads/92-300x225.jpg 300w" sizes="(max-width: 680px) 100vw, 680px" /></a></p><p style="text-align: left;"><strong>PASO 15.-</strong>  Si por un momento ponemos el relleno de la capa en el 100% y ocultamos los estilos de capa, podemos ver un ejemplo de como hemos pintado con las grietas el texto</p><p style="text-align: left;"><a href="http://ildefonsosegura.es/tutorial-photoshosop-escrito-texto-escrito-en-madera-by-ildefonsosegura/attachment/94/" rel="attachment wp-att-3129"><img loading="lazy" decoding="async" class="alignnone size-full wp-image-3129 aligncenter" src="http://ildefonsosegura.es/wp-content/uploads/94.jpg" alt="94" width="680" height="510" srcset="https://ildefonsosegura.es/wp-content/uploads/94.jpg 680w, https://ildefonsosegura.es/wp-content/uploads/94-300x225.jpg 300w" sizes="(max-width: 680px) 100vw, 680px" /></a></p><p style="text-align: left;">Si volvemos a poner el relleno en 25% y hacemos visibles los efectos tendemos este resultado</p><p style="text-align: left;"><a href="http://ildefonsosegura.es/tutorial-photoshosop-escrito-texto-escrito-en-madera-by-ildefonsosegura/attachment/93/" rel="attachment wp-att-3128"><img loading="lazy" decoding="async" class="size-full wp-image-3128 aligncenter" src="http://ildefonsosegura.es/wp-content/uploads/93.jpg" alt="93" width="680" height="510" srcset="https://ildefonsosegura.es/wp-content/uploads/93.jpg 680w, https://ildefonsosegura.es/wp-content/uploads/93-300x225.jpg 300w" sizes="(max-width: 680px) 100vw, 680px" /></a></p><p style="text-align: left;"><strong>PASO 16.-</strong>  Añadimos a la capa una máscara de capa con el icono que está abajo del panel de capas</p><p style="text-align: left;"><a href="http://ildefonsosegura.es/tutorial-photoshosop-escrito-texto-escrito-en-madera-by-ildefonsosegura/attachment/95/" rel="attachment wp-att-3130"><img loading="lazy" decoding="async" class="alignnone size-full wp-image-3130 aligncenter" src="http://ildefonsosegura.es/wp-content/uploads/95.jpg" alt="95" width="680" height="510" srcset="https://ildefonsosegura.es/wp-content/uploads/95.jpg 680w, https://ildefonsosegura.es/wp-content/uploads/95-300x225.jpg 300w" sizes="(max-width: 680px) 100vw, 680px" /></a></p><p style="text-align: left;"><strong>PASO 17.-</strong>  Mantenemos tecleada la techa ALT y hacemos clic en el ojo de la capa textura de madera. Con eso conseguimos que solo se vea esa capa</p><p style="text-align: left;"><a href="http://ildefonsosegura.es/tutorial-photoshosop-escrito-texto-escrito-en-madera-by-ildefonsosegura/attachment/96/" rel="attachment wp-att-3131"><img loading="lazy" decoding="async" class="alignnone size-full wp-image-3131 aligncenter" src="http://ildefonsosegura.es/wp-content/uploads/96.jpg" alt="96" width="680" height="510" srcset="https://ildefonsosegura.es/wp-content/uploads/96.jpg 680w, https://ildefonsosegura.es/wp-content/uploads/96-300x225.jpg 300w" sizes="(max-width: 680px) 100vw, 680px" /></a></p><p style="text-align: left;"><strong>PASO 18.-</strong>  Nos vamos a la paleta de canales. Con el botón derecho del ratón hacemos clic en el canal azul y le indicamos que duplique el canal</p><p style="text-align: left;"><a href="http://ildefonsosegura.es/tutorial-photoshosop-escrito-texto-escrito-en-madera-by-ildefonsosegura/attachment/97/" rel="attachment wp-att-3132"><img loading="lazy" decoding="async" class="alignnone size-full wp-image-3132 aligncenter" src="http://ildefonsosegura.es/wp-content/uploads/97.jpg" alt="97" width="680" height="510" srcset="https://ildefonsosegura.es/wp-content/uploads/97.jpg 680w, https://ildefonsosegura.es/wp-content/uploads/97-300x225.jpg 300w" sizes="(max-width: 680px) 100vw, 680px" /></a></p><p style="text-align: left;"><strong>PASO 19.-</strong>  Con CTRL+L vemos la paleta de niveles y buscamos acercarnos con los tonos hacia la izquierda dando luz a la mayoría del canal</p><p style="text-align: left;"><a href="http://ildefonsosegura.es/tutorial-photoshosop-escrito-texto-escrito-en-madera-by-ildefonsosegura/attachment/98/" rel="attachment wp-att-3133"><img loading="lazy" decoding="async" class="alignnone size-full wp-image-3133 aligncenter" src="http://ildefonsosegura.es/wp-content/uploads/98.jpg" alt="98" width="680" height="510" srcset="https://ildefonsosegura.es/wp-content/uploads/98.jpg 680w, https://ildefonsosegura.es/wp-content/uploads/98-300x225.jpg 300w" sizes="(max-width: 680px) 100vw, 680px" /></a></p><p style="text-align: left;"><strong>PASO 20.-</strong>  Con CTRL+clic en el canal se seleccionan las áreas blancas del mismo.</p><p style="text-align: left;"><a href="http://ildefonsosegura.es/tutorial-photoshosop-escrito-texto-escrito-en-madera-by-ildefonsosegura/attachment/99/" rel="attachment wp-att-3134"><img loading="lazy" decoding="async" class="alignnone size-full wp-image-3134 aligncenter" src="http://ildefonsosegura.es/wp-content/uploads/99.jpg" alt="99" width="680" height="510" srcset="https://ildefonsosegura.es/wp-content/uploads/99.jpg 680w, https://ildefonsosegura.es/wp-content/uploads/99-300x225.jpg 300w" sizes="(max-width: 680px) 100vw, 680px" /></a></p><p style="text-align: left;"><strong>PASO 21.-</strong>  Con esa selección realizada volvemos a la paleta de capas RGB</p><p style="text-align: left;"><a href="http://ildefonsosegura.es/tutorial-photoshosop-escrito-texto-escrito-en-madera-by-ildefonsosegura/attachment/991/" rel="attachment wp-att-3135"><img loading="lazy" decoding="async" class="alignnone size-full wp-image-3135 aligncenter" src="http://ildefonsosegura.es/wp-content/uploads/991.jpg" alt="991" width="680" height="510" srcset="https://ildefonsosegura.es/wp-content/uploads/991.jpg 680w, https://ildefonsosegura.es/wp-content/uploads/991-300x225.jpg 300w" sizes="(max-width: 680px) 100vw, 680px" /></a></p><p style="text-align: left;"><strong>PASO 22.-</strong> Añadimos una máscara de capa y automáticamente las zonas no seleccionadas se pintan de negro en la máscara y por lo tanto se ocultan esas zonas en la capa del texto</p><p style="text-align: left;"><a href="http://ildefonsosegura.es/tutorial-photoshosop-escrito-texto-escrito-en-madera-by-ildefonsosegura/attachment/992/" rel="attachment wp-att-3136"><img loading="lazy" decoding="async" class="alignnone size-full wp-image-3136 aligncenter" src="http://ildefonsosegura.es/wp-content/uploads/992.jpg" alt="992" width="680" height="510" srcset="https://ildefonsosegura.es/wp-content/uploads/992.jpg 680w, https://ildefonsosegura.es/wp-content/uploads/992-300x225.jpg 300w" sizes="(max-width: 680px) 100vw, 680px" /></a></p><p style="text-align: left;"><strong>PASO 23.-</strong>  Situados en la máscara podemos cambiar sus niveles (CTRL+L) para ajustar la apariencia de las zonas a ocultar o visualizar. En mi composición le di estos valores a los niveles</p><p style="text-align: left;"><a href="http://ildefonsosegura.es/tutorial-photoshosop-escrito-texto-escrito-en-madera-by-ildefonsosegura/attachment/993/" rel="attachment wp-att-3137"><img loading="lazy" decoding="async" class="alignnone size-full wp-image-3137 aligncenter" src="http://ildefonsosegura.es/wp-content/uploads/993.jpg" alt="993" width="680" height="510" srcset="https://ildefonsosegura.es/wp-content/uploads/993.jpg 680w, https://ildefonsosegura.es/wp-content/uploads/993-300x225.jpg 300w" sizes="(max-width: 680px) 100vw, 680px" /></a></p><p style="text-align: left;"><strong>PASO 24.-</strong>  El resultado hasta el momento es este</p><p style="text-align: left;"><a href="http://ildefonsosegura.es/tutorial-photoshosop-escrito-texto-escrito-en-madera-by-ildefonsosegura/attachment/994/" rel="attachment wp-att-3147"><img loading="lazy" decoding="async" class="size-full wp-image-3147 aligncenter" src="http://ildefonsosegura.es/wp-content/uploads/994.jpg" alt="994" width="680" height="510" srcset="https://ildefonsosegura.es/wp-content/uploads/994.jpg 680w, https://ildefonsosegura.es/wp-content/uploads/994-300x225.jpg 300w" sizes="(max-width: 680px) 100vw, 680px" /></a></p><p style="text-align: left;"><strong>PASO 25.-</strong>  Quitamos la unión entre la capa y su máscara de capa haciendo simplemente clic con el ratón en la cadena que las une. Esta debe desaparecer como en la imagen</p><p style="text-align: left;"><a href="http://ildefonsosegura.es/tutorial-photoshosop-escrito-texto-escrito-en-madera-by-ildefonsosegura/994a/" rel="attachment wp-att-3149"><img loading="lazy" decoding="async" class="alignnone size-full wp-image-3149 aligncenter" src="http://ildefonsosegura.es/wp-content/uploads/994a.jpg" alt="994a" width="680" height="467" srcset="https://ildefonsosegura.es/wp-content/uploads/994a.jpg 680w, https://ildefonsosegura.es/wp-content/uploads/994a-300x206.jpg 300w" sizes="(max-width: 680px) 100vw, 680px" /></a></p><p style="text-align: left;"><strong>PASO 26.-</strong>  Aplicamos un filtro en la capa. Filtro, distorsionar, RIZO con el valor que se muestra en la imagen</p><p style="text-align: left;"><a href="http://ildefonsosegura.es/tutorial-photoshosop-escrito-texto-escrito-en-madera-by-ildefonsosegura/994b/" rel="attachment wp-att-3150"><img loading="lazy" decoding="async" class="alignnone size-full wp-image-3150 aligncenter" src="http://ildefonsosegura.es/wp-content/uploads/994b.jpg" alt="994b" width="680" height="467" srcset="https://ildefonsosegura.es/wp-content/uploads/994b.jpg 680w, https://ildefonsosegura.es/wp-content/uploads/994b-300x206.jpg 300w" sizes="(max-width: 680px) 100vw, 680px" /></a></p><p style="text-align: left;"><strong>PASO 27.-</strong>  Con CTRL+F se repite el filtro y conseguimos un efecto de irregularidad en los bordes bastante real al objeto que buscamos</p><p style="text-align: left;"><a href="http://ildefonsosegura.es/tutorial-photoshosop-escrito-texto-escrito-en-madera-by-ildefonsosegura/994c/" rel="attachment wp-att-3151"><img loading="lazy" decoding="async" class="alignnone size-full wp-image-3151 aligncenter" src="http://ildefonsosegura.es/wp-content/uploads/994c.jpg" alt="994c" width="680" height="467" srcset="https://ildefonsosegura.es/wp-content/uploads/994c.jpg 680w, https://ildefonsosegura.es/wp-content/uploads/994c-300x206.jpg 300w" sizes="(max-width: 680px) 100vw, 680px" /></a></p><h1 style="text-align: left;"><span style="color: #800000;"><strong>CONCLUSION</strong></span></h1><p style="text-align: left;"><a href="http://ildefonsosegura.es/tutorial-photoshosop-escrito-texto-escrito-en-madera-by-ildefonsosegura/attachment/995/" rel="attachment wp-att-3148"><img loading="lazy" decoding="async" class="alignnone size-full wp-image-3148 aligncenter" src="http://ildefonsosegura.es/wp-content/uploads/995.jpg" alt="995" width="680" height="510" srcset="https://ildefonsosegura.es/wp-content/uploads/995.jpg 680w, https://ildefonsosegura.es/wp-content/uploads/995-300x225.jpg 300w" sizes="(max-width: 680px) 100vw, 680px" /></a></p><p style="text-align: justify;">Si te ha gustado el tutorial, espero que dejes un comentario y que lo compartas con tus amigos. Asi me ayudas a continuar. Gracias</p><p style="text-align: left;"> </p>								</div>
				</div>
					</div>
		</div>
					</div>
		</section>
				</div>La entrada <a href="https://ildefonsosegura.es/tutorial-photoshosop-escrito-texto-escrito-en-madera-by-ildefonsosegura/">#Tutorial #Photoshop escrito: Texto tallado en madera by @ildefonsosegura</a> apareció primero en <a href="https://ildefonsosegura.es">Ildefonso Segura</a>.]]></content:encoded>
					
					<wfw:commentRss>https://ildefonsosegura.es/tutorial-photoshosop-escrito-texto-escrito-en-madera-by-ildefonsosegura/feed/</wfw:commentRss>
			<slash:comments>1</slash:comments>
		
		
			</item>
		<item>
		<title>Tutorial Photoshop Fotomanipulación hombre con cara de león</title>
		<link>https://ildefonsosegura.es/tutorial-photoshop-fotomanipulacion-hombre-con-cara-de-leon/</link>
					<comments>https://ildefonsosegura.es/tutorial-photoshop-fotomanipulacion-hombre-con-cara-de-leon/#respond</comments>
		
		<dc:creator><![CDATA[Ildefonso Segura]]></dc:creator>
		<pubDate>Mon, 05 Nov 2018 16:15:24 +0000</pubDate>
				<category><![CDATA[Efectos]]></category>
		<category><![CDATA[Fotocomposición]]></category>
		<category><![CDATA[Photoshop]]></category>
		<category><![CDATA[Tecnicas]]></category>
		<category><![CDATA[Tutoriales]]></category>
		<category><![CDATA[Video]]></category>
		<category><![CDATA[Wallpaper]]></category>
		<category><![CDATA[adobe]]></category>
		<category><![CDATA[CC]]></category>
		<category><![CDATA[cc2015]]></category>
		<category><![CDATA[cc2016]]></category>
		<category><![CDATA[cc2017]]></category>
		<category><![CDATA[cc2018]]></category>
		<category><![CDATA[cc2019]]></category>
		<category><![CDATA[composición]]></category>
		<category><![CDATA[cs5]]></category>
		<category><![CDATA[cs6]]></category>
		<category><![CDATA[efectos]]></category>
		<category><![CDATA[effect]]></category>
		<category><![CDATA[face effect]]></category>
		<category><![CDATA[fake]]></category>
		<category><![CDATA[fotomanipulación]]></category>
		<category><![CDATA[humano]]></category>
		<category><![CDATA[ilusión]]></category>
		<category><![CDATA[integración]]></category>
		<category><![CDATA[integration]]></category>
		<category><![CDATA[león]]></category>
		<category><![CDATA[poster]]></category>
		<category><![CDATA[tuto]]></category>
		<category><![CDATA[VIDEOTUTORIAL]]></category>
		<category><![CDATA[wallpaper]]></category>
		<category><![CDATA[youtube]]></category>
		<guid isPermaLink="false">http://ildefonsosegura.es/?p=6262</guid>

					<description><![CDATA[<p>Navegando por instagram descubrí la fotomanipulación que ves aquí. El autor se puso en contacto. Puedes visitar las páginas de Rhys Drakeford &#8211; Bennett . Quise desesperadamente aprender cómo realizar una manipulación así. Busqué tutoriales pero no encontré los adecuados para obtener un resultado aceptable desde mi punto de vista (con todos mis respetos a [&#8230;]</p>
La entrada <a href="https://ildefonsosegura.es/tutorial-photoshop-fotomanipulacion-hombre-con-cara-de-leon/">Tutorial Photoshop Fotomanipulación hombre con cara de león</a> apareció primero en <a href="https://ildefonsosegura.es">Ildefonso Segura</a>.]]></description>
										<content:encoded><![CDATA[<div data-elementor-type="wp-post" data-elementor-id="6262" class="elementor elementor-6262">
						<section class="elementor-section elementor-top-section elementor-element elementor-element-7f905ce9 elementor-section-boxed elementor-section-height-default elementor-section-height-default" data-id="7f905ce9" data-element_type="section" data-e-type="section">
						<div class="elementor-container elementor-column-gap-default">
					<div class="elementor-column elementor-col-100 elementor-top-column elementor-element elementor-element-50349214" data-id="50349214" data-element_type="column" data-e-type="column">
			<div class="elementor-widget-wrap elementor-element-populated">
						<div class="elementor-element elementor-element-6c10184e elementor-widget elementor-widget-text-editor" data-id="6c10184e" data-element_type="widget" data-e-type="widget" data-widget_type="text-editor.default">
				<div class="elementor-widget-container">
									<p><img loading="lazy" decoding="async" class="wp-image-6263 size-medium alignleft" src="http://ildefonsosegura.es/wp-content/uploads/foto-inspiración-tutorial-259x300.jpg" alt="" width="259" height="300" srcset="https://ildefonsosegura.es/wp-content/uploads/foto-inspiración-tutorial-259x300.jpg 259w, https://ildefonsosegura.es/wp-content/uploads/foto-inspiración-tutorial.jpg 500w" sizes="(max-width: 259px) 100vw, 259px" /></p><p style="text-align: justify;">Navegando por instagram descubrí la fotomanipulación que ves aquí. El autor se puso en contacto. Puedes visitar las páginas de <span style="color: #800000;"><strong><a style="color: #800000;" href="https://www.instagram.com/rhysdb03/" target="_blank" rel="noopener">Rhys Drakeford &#8211; Bennett</a> .</strong></span></p><p style="text-align: justify;">Quise desesperadamente aprender cómo realizar una manipulación así. Busqué tutoriales pero no encontré los adecuados para obtener un resultado aceptable desde mi punto de vista (con todos mis respetos a todos los que han editado y publicado tutoriales al respecto).</p><p style="text-align: left;"> </p>								</div>
				</div>
					</div>
		</div>
					</div>
		</section>
				<section class="elementor-section elementor-top-section elementor-element elementor-element-3b12e7b elementor-section-boxed elementor-section-height-default elementor-section-height-default" data-id="3b12e7b" data-element_type="section" data-e-type="section">
						<div class="elementor-container elementor-column-gap-default">
					<div class="elementor-column elementor-col-100 elementor-top-column elementor-element elementor-element-dc5ed23" data-id="dc5ed23" data-element_type="column" data-e-type="column">
			<div class="elementor-widget-wrap elementor-element-populated">
						<div class="elementor-element elementor-element-7b24633 elementor-widget elementor-widget-text-editor" data-id="7b24633" data-element_type="widget" data-e-type="widget" data-widget_type="text-editor.default">
				<div class="elementor-widget-container">
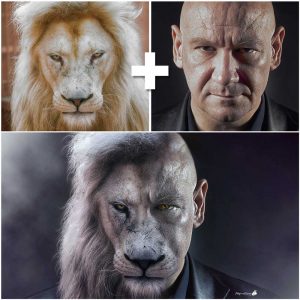
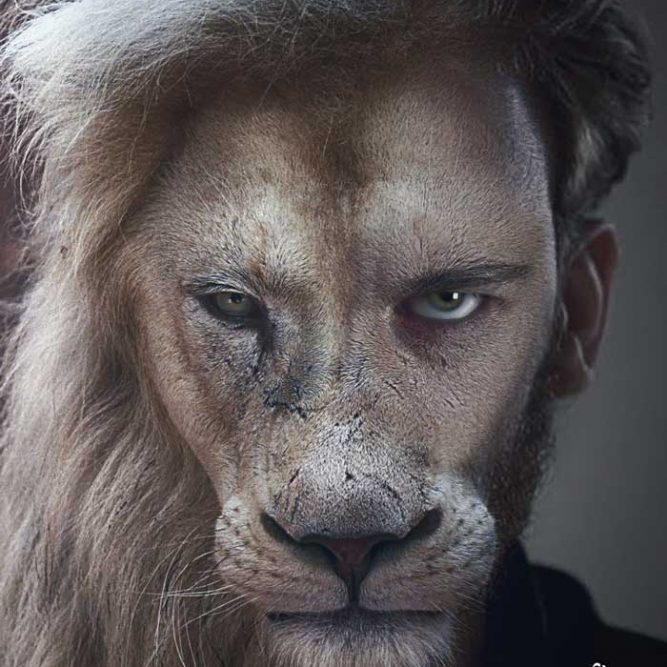
									<p style="text-align: justify;">Siendo así, decidí embarcarme en realizar un tutorial con mis propias manos aplicando cantidad de técnicas de photoshop para conseguir un resultado aceptable. Creo que lo conseguí y te puedo mostrar el antes y el después a continuación:</p><p><img loading="lazy" decoding="async" class="aligncenter wp-image-6265" src="http://ildefonsosegura.es/wp-content/uploads/Leon_Man-5to-intento-making-of-instagram-300x300.jpg" alt="" width="600" height="600" srcset="https://ildefonsosegura.es/wp-content/uploads/Leon_Man-5to-intento-making-of-instagram-300x300.jpg 300w, https://ildefonsosegura.es/wp-content/uploads/Leon_Man-5to-intento-making-of-instagram-150x150.jpg 150w, https://ildefonsosegura.es/wp-content/uploads/Leon_Man-5to-intento-making-of-instagram-768x768.jpg 768w, https://ildefonsosegura.es/wp-content/uploads/Leon_Man-5to-intento-making-of-instagram.jpg 1000w" sizes="(max-width: 600px) 100vw, 600px" /></p><p style="text-align: left;"> </p>								</div>
				</div>
					</div>
		</div>
					</div>
		</section>
				<section class="elementor-section elementor-top-section elementor-element elementor-element-b485ce1 elementor-section-boxed elementor-section-height-default elementor-section-height-default" data-id="b485ce1" data-element_type="section" data-e-type="section">
						<div class="elementor-container elementor-column-gap-default">
					<div class="elementor-column elementor-col-100 elementor-top-column elementor-element elementor-element-1a2df1a" data-id="1a2df1a" data-element_type="column" data-e-type="column">
			<div class="elementor-widget-wrap elementor-element-populated">
						<div class="elementor-element elementor-element-fc869ca elementor-widget elementor-widget-text-editor" data-id="fc869ca" data-element_type="widget" data-e-type="widget" data-widget_type="text-editor.default">
				<div class="elementor-widget-container">
									<p style="text-align: justify;">Comprueba tu mismo/a cómo he pasado de una imagen de un humano a una manipulación que consigue crear una ilusión donde brillos y sombras, colores y texturas se combinan para conseguir el resultado que me gusta. Quizás tú tengas otras preferencias y te invito a que adaptes el tutorial a tu medida.</p><p>[twenty20 img1=»6264&#8243; img2=»6267&#8243; offset=»0.5&#8243;]</p><p>Mira más ejemplos (<a title="galeria wallpapers" href="https://ildefonsosegura.es/flickr_gallery/galeria-ildefonsosegura-wallpapers/" target="_blank" rel="noopener">revisa mi galería también)</a>:</p>								</div>
				</div>
				<section class="elementor-section elementor-inner-section elementor-element elementor-element-e50ea81 elementor-section-boxed elementor-section-height-default elementor-section-height-default" data-id="e50ea81" data-element_type="section" data-e-type="section">
						<div class="elementor-container elementor-column-gap-default">
					<div class="elementor-column elementor-col-50 elementor-inner-column elementor-element elementor-element-519756a" data-id="519756a" data-element_type="column" data-e-type="column">
			<div class="elementor-widget-wrap elementor-element-populated">
						<div class="elementor-element elementor-element-8653b35 elementor-widget elementor-widget-image" data-id="8653b35" data-element_type="widget" data-e-type="widget" data-widget_type="image.default">
				<div class="elementor-widget-container">
															<img decoding="async" src="https://ildefonsosegura.es/wp-content/uploads/elementor/thumbs/Leon_Man-4to-intento-nykxnudzd98loj8x85ce893u30n60fe3yoeoqe7dn2.jpg" title="Leon_Man-4to-intento" alt="Leon_Man-4to-intento" loading="lazy" />															</div>
				</div>
					</div>
		</div>
				<div class="elementor-column elementor-col-50 elementor-inner-column elementor-element elementor-element-7e20659" data-id="7e20659" data-element_type="column" data-e-type="column">
			<div class="elementor-widget-wrap elementor-element-populated">
						<div class="elementor-element elementor-element-1782fdd elementor-widget elementor-widget-image" data-id="1782fdd" data-element_type="widget" data-e-type="widget" data-widget_type="image.default">
				<div class="elementor-widget-container">
															<img loading="lazy" decoding="async" width="667" height="667" src="https://ildefonsosegura.es/wp-content/uploads/LeonManhatacinturaWeb.jpg" class="attachment-large size-large wp-image-6266" alt="" srcset="https://ildefonsosegura.es/wp-content/uploads/LeonManhatacinturaWeb.jpg 667w, https://ildefonsosegura.es/wp-content/uploads/LeonManhatacinturaWeb-150x150.jpg 150w, https://ildefonsosegura.es/wp-content/uploads/LeonManhatacinturaWeb-300x300.jpg 300w" sizes="(max-width: 667px) 100vw, 667px" />															</div>
				</div>
					</div>
		</div>
					</div>
		</section>
					</div>
		</div>
					</div>
		</section>
				<section class="elementor-section elementor-top-section elementor-element elementor-element-d25b748 elementor-section-boxed elementor-section-height-default elementor-section-height-default" data-id="d25b748" data-element_type="section" data-e-type="section">
						<div class="elementor-container elementor-column-gap-default">
					<div class="elementor-column elementor-col-100 elementor-top-column elementor-element elementor-element-0c6fb16" data-id="0c6fb16" data-element_type="column" data-e-type="column">
			<div class="elementor-widget-wrap elementor-element-populated">
						<div class="elementor-element elementor-element-e406987 elementor-widget elementor-widget-text-editor" data-id="e406987" data-element_type="widget" data-e-type="widget" data-widget_type="text-editor.default">
				<div class="elementor-widget-container">
									<p>Disfruta del tutorial. Yo me lo pasé en grande aunque hay mucho trabajo detrás</p><p><strong><span style="color: #800000;">TUTORIAL</span> </strong></p><center><iframe src="https://www.youtube.com/embed/rgaCFkhgze4" width="640" height="420" frameborder="0" allowfullscreen="allowfullscreen"></iframe></center><p style="text-align: center;"><span style="color: #ff0000;"><strong>Aquí debajo te dejo referencia a las imágenes que he usado</strong></span></p><center></center><p style="text-align: left;"><strong>Imágenes usadas:</strong></p><ul><li style="text-align: left;">Imagen Inspiración tutorial: <a href="https://goo.gl/ycDWVT" target="_blank" rel="noopener">https://goo.gl/ycDWVT</a></li><li style="text-align: left;">Foto león: <a href="https://goo.gl/y9ZrZA" target="_blank" rel="noopener">https://goo.gl/y9ZrZA</a></li><li style="text-align: left;">Foto hombre calvo : <a href="https://mx.depositphotos.com/8511579/stock-photo-character-actor-head-shot.html" target="_blank" rel="noopener">https://mx.depositphotos.com/8511579/stock-photo-character-actor-head-shot.html</a> (esta imágen es de pago y lamento no poder compartirla por los derechos de autor)</li></ul>								</div>
				</div>
					</div>
		</div>
					</div>
		</section>
				<section class="elementor-section elementor-top-section elementor-element elementor-element-2eed9621 elementor-section-boxed elementor-section-height-default elementor-section-height-default" data-id="2eed9621" data-element_type="section" data-e-type="section">
						<div class="elementor-container elementor-column-gap-default">
					<div class="elementor-column elementor-col-100 elementor-top-column elementor-element elementor-element-453ff235" data-id="453ff235" data-element_type="column" data-e-type="column">
			<div class="elementor-widget-wrap elementor-element-populated">
						<div class="elementor-element elementor-element-2b1a9423 elementor-widget-divider--view-line elementor-widget elementor-widget-divider" data-id="2b1a9423" data-element_type="widget" data-e-type="widget" data-widget_type="divider.default">
				<div class="elementor-widget-container">
							<div class="elementor-divider">
			<span class="elementor-divider-separator">
						</span>
		</div>
						</div>
				</div>
					</div>
		</div>
					</div>
		</section>
				<section class="elementor-section elementor-top-section elementor-element elementor-element-48384626 elementor-section-full_width elementor-section-height-default elementor-section-height-default" data-id="48384626" data-element_type="section" data-e-type="section">
						<div class="elementor-container elementor-column-gap-default">
					<div class="elementor-column elementor-col-50 elementor-top-column elementor-element elementor-element-8214633" data-id="8214633" data-element_type="column" data-e-type="column">
			<div class="elementor-widget-wrap elementor-element-populated">
						<div class="elementor-element elementor-element-4abdc483 elementor-align-right elementor-invisible elementor-widget elementor-widget-button" data-id="4abdc483" data-element_type="widget" data-e-type="widget" data-settings="{&quot;_animation&quot;:&quot;shake&quot;}" data-widget_type="button.default">
				<div class="elementor-widget-container">
									<div class="elementor-button-wrapper">
					<a class="elementor-button elementor-button-link elementor-size-sm elementor-animation-grow" href="https://drive.google.com/open?id=1ZXBQt6clgucFYxxgnNlCQgN89YvrT2Vf">
						<span class="elementor-button-content-wrapper">
									<span class="elementor-button-text">PINCELES USADOS</span>
					</span>
					</a>
				</div>
								</div>
				</div>
					</div>
		</div>
				<div class="elementor-column elementor-col-50 elementor-top-column elementor-element elementor-element-3ab10fcc" data-id="3ab10fcc" data-element_type="column" data-e-type="column">
			<div class="elementor-widget-wrap elementor-element-populated">
						<div class="elementor-element elementor-element-75400e60 elementor-widget elementor-widget-html" data-id="75400e60" data-element_type="widget" data-e-type="widget" data-settings="{&quot;_animation&quot;:&quot;none&quot;}" data-widget_type="html.default">
				<div class="elementor-widget-container">
					<form action="https://www.paypal.com/cgi-bin/webscr" method="post" target="_blank">
<input type="hidden" name="cmd" value="_donations">
<input type="hidden" name="business" value="ildefonsosegura@gmail.com">
<input type="hidden" name="lc" value="ES">
<input type="hidden" name="item_name" value="MANTENIMIENTO DE LA PAGINA DE ILDEFONSOSEGURA">
<input type="hidden" name="no_note" value="0">
<input type="hidden" name="currency_code" value="EUR">
<input type="hidden" name="bn" value="PP-DonationsBF:paypal1.jpg:NonHostedGuest">
<input type="image" src="http://ildefonsosegura.es/wp-content/uploads/paypal-updated-1.png" border="0" name="submit" alt="PayPal. La forma rápida y segura de pagar en Internet.">
<img decoding="async" alt="" border="0" src="https://www.paypalobjects.com/es_ES/i/scr/pixel.gif" width="1" height="1">
</form>				</div>
				</div>
					</div>
		</div>
					</div>
		</section>
				<section class="elementor-section elementor-top-section elementor-element elementor-element-65d683ec elementor-section-boxed elementor-section-height-default elementor-section-height-default" data-id="65d683ec" data-element_type="section" data-e-type="section">
						<div class="elementor-container elementor-column-gap-default">
					<div class="elementor-column elementor-col-100 elementor-top-column elementor-element elementor-element-27a7fc31" data-id="27a7fc31" data-element_type="column" data-e-type="column">
			<div class="elementor-widget-wrap elementor-element-populated">
						<div class="elementor-element elementor-element-19783ffd elementor-widget-divider--view-line elementor-widget elementor-widget-divider" data-id="19783ffd" data-element_type="widget" data-e-type="widget" data-widget_type="divider.default">
				<div class="elementor-widget-container">
							<div class="elementor-divider">
			<span class="elementor-divider-separator">
						</span>
		</div>
						</div>
				</div>
					</div>
		</div>
					</div>
		</section>
				<section class="elementor-section elementor-top-section elementor-element elementor-element-7fad65b6 elementor-section-full_width elementor-section-height-default elementor-section-height-default" data-id="7fad65b6" data-element_type="section" data-e-type="section">
						<div class="elementor-container elementor-column-gap-default">
					<div class="elementor-column elementor-col-100 elementor-top-column elementor-element elementor-element-6d37c87d" data-id="6d37c87d" data-element_type="column" data-e-type="column">
			<div class="elementor-widget-wrap elementor-element-populated">
						<div class="elementor-element elementor-element-2ee6db4d elementor-widget elementor-widget-text-editor" data-id="2ee6db4d" data-element_type="widget" data-e-type="widget" data-widget_type="text-editor.default">
				<div class="elementor-widget-container">
									<div><div align="center"><center><strong style="color: #ff0000;">Suscríbete a mi canal de Youtube:</strong></center><div><div><div align="center"><p><script src="https://apis.google.com/js/platform.js"></script></p><div class="g-ytsubscribe" data-channel="ildefonsosegura" data-layout="full" data-count="default"> </div></div></div><p> </p><p style="text-align: center;">No te lo pierdas y comparte tus trabajos en mi página de facebook (<span style="color: #0000ff;"><strong><a style="color: #0000ff;" href="http://www.facebook.com/IldefonsoSeguraPage" target="_blank" rel="noopener noreferrer">IldefonsoSeguraPage</a></strong></span>)<br />Espero que te guste y compartas el vídeo. No dejes de compartir este post.</p><p style="text-align: center;">Así es como me puedes ayudar 🙂 Gracias</p></div></div></div>								</div>
				</div>
					</div>
		</div>
					</div>
		</section>
				</div>La entrada <a href="https://ildefonsosegura.es/tutorial-photoshop-fotomanipulacion-hombre-con-cara-de-leon/">Tutorial Photoshop Fotomanipulación hombre con cara de león</a> apareció primero en <a href="https://ildefonsosegura.es">Ildefonso Segura</a>.]]></content:encoded>
					
					<wfw:commentRss>https://ildefonsosegura.es/tutorial-photoshop-fotomanipulacion-hombre-con-cara-de-leon/feed/</wfw:commentRss>
			<slash:comments>0</slash:comments>
		
		
			</item>
		<item>
		<title>Fotomontaje con #PhotoshopCC, integración de objetos</title>
		<link>https://ildefonsosegura.es/fotomontaje-con-photoshopcc-integracion-de-objetos-by-ildefonsosegura/</link>
					<comments>https://ildefonsosegura.es/fotomontaje-con-photoshopcc-integracion-de-objetos-by-ildefonsosegura/#comments</comments>
		
		<dc:creator><![CDATA[Ildefonso Segura]]></dc:creator>
		<pubDate>Tue, 27 Mar 2018 20:40:00 +0000</pubDate>
				<category><![CDATA[Efectos]]></category>
		<category><![CDATA[Fotocomposición]]></category>
		<category><![CDATA[Photoshop]]></category>
		<category><![CDATA[Speed Art]]></category>
		<category><![CDATA[Tecnicas]]></category>
		<category><![CDATA[Tutoriales]]></category>
		<category><![CDATA[Wallpaper]]></category>
		<category><![CDATA[adobe]]></category>
		<category><![CDATA[cacasco]]></category>
		<category><![CDATA[CC]]></category>
		<category><![CDATA[cc2014]]></category>
		<category><![CDATA[cc2015]]></category>
		<category><![CDATA[clonar]]></category>
		<category><![CDATA[color]]></category>
		<category><![CDATA[color efex pro]]></category>
		<category><![CDATA[creativecloud]]></category>
		<category><![CDATA[creatividad]]></category>
		<category><![CDATA[cs4]]></category>
		<category><![CDATA[cs5]]></category>
		<category><![CDATA[cs6]]></category>
		<category><![CDATA[efectos]]></category>
		<category><![CDATA[fondo]]></category>
		<category><![CDATA[fotomanipulación]]></category>
		<category><![CDATA[fotomontaje]]></category>
		<category><![CDATA[gloriasanis]]></category>
		<category><![CDATA[ildefonsosegura]]></category>
		<category><![CDATA[imagen]]></category>
		<category><![CDATA[integración]]></category>
		<category><![CDATA[photoshop]]></category>
		<category><![CDATA[poster]]></category>
		<category><![CDATA[tampon clonar]]></category>
		<category><![CDATA[tutorial]]></category>
		<category><![CDATA[wall]]></category>
		<category><![CDATA[wallpaper]]></category>
		<category><![CDATA[youtube]]></category>
		<guid isPermaLink="false">http://ildefonsosegura.es/?p=4831</guid>

					<description><![CDATA[<p>En este tutorial de #Photoshop cc vamos a realizar una integración de elementos para construir un wallpaper. Un fotomontaje donde aprenderemos cómo poder engañar a la realidad. En un tutorial anterior puedes ver como trabajar las abolladuras del casco y la rotura. Puedes esforzarte menos si bajas los materiales que te ofrezco donde encontrarás el [&#8230;]</p>
La entrada <a href="https://ildefonsosegura.es/fotomontaje-con-photoshopcc-integracion-de-objetos-by-ildefonsosegura/">Fotomontaje con #PhotoshopCC, integración de objetos</a> apareció primero en <a href="https://ildefonsosegura.es">Ildefonso Segura</a>.]]></description>
										<content:encoded><![CDATA[<div data-elementor-type="wp-post" data-elementor-id="4831" class="elementor elementor-4831">
						<section class="elementor-section elementor-top-section elementor-element elementor-element-5b201b6e elementor-section-boxed elementor-section-height-default elementor-section-height-default" data-id="5b201b6e" data-element_type="section" data-e-type="section">
						<div class="elementor-container elementor-column-gap-default">
					<div class="elementor-column elementor-col-100 elementor-top-column elementor-element elementor-element-3cda53f4" data-id="3cda53f4" data-element_type="column" data-e-type="column">
			<div class="elementor-widget-wrap elementor-element-populated">
						<div class="elementor-element elementor-element-57f7a125 elementor-widget elementor-widget-text-editor" data-id="57f7a125" data-element_type="widget" data-e-type="widget" data-widget_type="text-editor.default">
				<div class="elementor-widget-container">
									<p style="text-align: justify;">En este tutorial de #Photoshop cc vamos a realizar una integración de elementos para construir un wallpaper. Un fotomontaje donde aprenderemos cómo poder engañar a la realidad.</p>
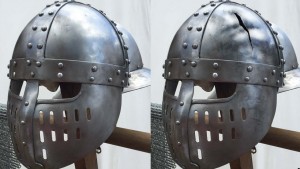
<p style="text-align: justify;">En un tutorial anterior puedes ver como trabajar las abolladuras del casco y la rotura. Puedes esforzarte menos si bajas los materiales que te ofrezco donde encontrarás el stock ya realizado y extraído (eso ya depende de ti). Yo te recomiendo que lo veas pinchando la miniatura siguiente:</p>
<p style="text-align: justify;"><a href="https://ildefonsosegura.es/aprende-a-realizar-abolladuras-y-rotura-en-un-objeto-casco-con-photoshop-by-ildefonsosegura/" target="_blank" rel="attachment noopener wp-att-4820"><img loading="lazy" decoding="async" class=" wp-image-4820 size-medium aligncenter" src="https://ildefonsosegura.es/wp-content/uploads/Casco-rotura-2-300x169.jpg" alt="Casco-rotura-2" width="300" height="169" srcset="https://ildefonsosegura.es/wp-content/uploads/Casco-rotura-2-300x169.jpg 300w, https://ildefonsosegura.es/wp-content/uploads/Casco-rotura-2-1024x576.jpg 1024w, https://ildefonsosegura.es/wp-content/uploads/Casco-rotura-2-720x406.jpg 720w, https://ildefonsosegura.es/wp-content/uploads/Casco-rotura-2.jpg 1280w" sizes="(max-width: 300px) 100vw, 300px" /></a></p>
<p style="text-align: justify;">En el tutorial  que vamos a ver ahora, construiremos este wallpaper</p>
<p style="text-align: justify;"><img loading="lazy" decoding="async" class="aligncenter wp-image-4834 size-full" src="https://ildefonsosegura.es/wp-content/uploads/Casco-en-camino.jpg" alt="Casco-en-camino" width="640" height="420" /></p>
<p style="text-align: justify;">Aprenderemos a:</p>

<ol>
 	<li>Usar máscaras de capa para integrar</li>
 	<li>Usar la herramienta tampón de clonar</li>
 	<li>Texturizar para dar impresión de envejecimiento con máscaras de recorte, capas de ajuste y texturas.</li>
 	<li>Técnicas de integración como desenfoques, sombras, profundidad de campo,&#8230;</li>
 	<li>Despertar el interés por crear escenarios con colores distintos (mención y breve uso del plugin Color Efex Pro 4)</li>
</ol>
Puedes visitar la página del PLUGIN COLOR EFEX PRO 4 para adquirirlo y probarlo. En cualquier caso tienes cientos de tutoriales en la red para ver como funciona y orientación para adquirirlo. Visita su página haciendo clic <strong><a href="https://www.google.com/nikcollection/products/color-efex-pro/" target="_blank" rel="noopener">COLOR EFEX PRO</a></strong>
<p style="text-align: justify;">No te lo pierdas y comparte tus trabajos en mi página de facebook (<a href="http://www.facebook.com/IldefonsoSeguraPage" target="_blank" rel="noopener">IldefonsoSeguraPage</a>)</p>
&nbsp;

Espero que os guste
<p style="text-align: left;"><strong>TUTORIAL</strong>
<iframe src="https://www.youtube.com/embed/5LtrQIwzplU?rel=0" width="640" height="420" frameborder="0" allowfullscreen="allowfullscreen"></iframe></p>

<div><center>

</center><center></center>
<p style="text-align: left;"><strong>SPEEDART</strong>
<iframe src="https://www.youtube.com/embed/vl9AeE3Gts0?rel=0" width="640" height="420" frameborder="0" allowfullscreen="allowfullscreen"></iframe></p>

<div>
<div></div>
<p style="text-align: left;"></p>
&nbsp;

&nbsp;

</div>
</div>								</div>
				</div>
					</div>
		</div>
					</div>
		</section>
				<section class="elementor-section elementor-top-section elementor-element elementor-element-56584954 elementor-section-boxed elementor-section-height-default elementor-section-height-default" data-id="56584954" data-element_type="section" data-e-type="section">
						<div class="elementor-container elementor-column-gap-default">
					<div class="elementor-column elementor-col-100 elementor-top-column elementor-element elementor-element-277c8609" data-id="277c8609" data-element_type="column" data-e-type="column">
			<div class="elementor-widget-wrap elementor-element-populated">
						<div class="elementor-element elementor-element-30496442 elementor-widget-divider--view-line elementor-widget elementor-widget-divider" data-id="30496442" data-element_type="widget" data-e-type="widget" data-widget_type="divider.default">
				<div class="elementor-widget-container">
							<div class="elementor-divider">
			<span class="elementor-divider-separator">
						</span>
		</div>
						</div>
				</div>
					</div>
		</div>
					</div>
		</section>
				<section class="elementor-section elementor-top-section elementor-element elementor-element-5b795a8c elementor-section-full_width elementor-section-height-default elementor-section-height-default" data-id="5b795a8c" data-element_type="section" data-e-type="section">
						<div class="elementor-container elementor-column-gap-default">
					<div class="elementor-column elementor-col-50 elementor-top-column elementor-element elementor-element-48ec4aeb" data-id="48ec4aeb" data-element_type="column" data-e-type="column">
			<div class="elementor-widget-wrap elementor-element-populated">
						<div class="elementor-element elementor-element-3f41d9ec elementor-align-right elementor-invisible elementor-widget elementor-widget-button" data-id="3f41d9ec" data-element_type="widget" data-e-type="widget" data-settings="{&quot;_animation&quot;:&quot;shake&quot;}" data-widget_type="button.default">
				<div class="elementor-widget-container">
									<div class="elementor-button-wrapper">
					<a class="elementor-button elementor-button-link elementor-size-sm elementor-animation-grow" href="https://drive.google.com/open?id=0B_nJkCGJubuceGdseE8xNkV6UE0">
						<span class="elementor-button-content-wrapper">
									<span class="elementor-button-text">DESCARGA EL MATERIAL</span>
					</span>
					</a>
				</div>
								</div>
				</div>
					</div>
		</div>
				<div class="elementor-column elementor-col-50 elementor-top-column elementor-element elementor-element-15e23e96" data-id="15e23e96" data-element_type="column" data-e-type="column">
			<div class="elementor-widget-wrap elementor-element-populated">
						<div class="elementor-element elementor-element-414b8df4 elementor-widget elementor-widget-html" data-id="414b8df4" data-element_type="widget" data-e-type="widget" data-settings="{&quot;_animation&quot;:&quot;none&quot;}" data-widget_type="html.default">
				<div class="elementor-widget-container">
					<form action="https://www.paypal.com/cgi-bin/webscr" method="post" target="_blank">
<input type="hidden" name="cmd" value="_donations">
<input type="hidden" name="business" value="ildefonsosegura@gmail.com">
<input type="hidden" name="lc" value="ES">
<input type="hidden" name="item_name" value="MANTENIMIENTO DE LA PAGINA DE ILDEFONSOSEGURA">
<input type="hidden" name="no_note" value="0">
<input type="hidden" name="currency_code" value="EUR">
<input type="hidden" name="bn" value="PP-DonationsBF:paypal1.jpg:NonHostedGuest">
<input type="image" src="http://ildefonsosegura.es/wp-content/uploads/paypal-updated-1.png" border="0" name="submit" alt="PayPal. La forma rápida y segura de pagar en Internet.">
<img decoding="async" alt="" border="0" src="https://www.paypalobjects.com/es_ES/i/scr/pixel.gif" width="1" height="1">
</form>				</div>
				</div>
					</div>
		</div>
					</div>
		</section>
				<section class="elementor-section elementor-top-section elementor-element elementor-element-619906ad elementor-section-boxed elementor-section-height-default elementor-section-height-default" data-id="619906ad" data-element_type="section" data-e-type="section">
						<div class="elementor-container elementor-column-gap-default">
					<div class="elementor-column elementor-col-100 elementor-top-column elementor-element elementor-element-73edbba6" data-id="73edbba6" data-element_type="column" data-e-type="column">
			<div class="elementor-widget-wrap elementor-element-populated">
						<div class="elementor-element elementor-element-47b8dfc elementor-widget-divider--view-line elementor-widget elementor-widget-divider" data-id="47b8dfc" data-element_type="widget" data-e-type="widget" data-widget_type="divider.default">
				<div class="elementor-widget-container">
							<div class="elementor-divider">
			<span class="elementor-divider-separator">
						</span>
		</div>
						</div>
				</div>
					</div>
		</div>
					</div>
		</section>
				<section class="elementor-section elementor-top-section elementor-element elementor-element-67efbb3c elementor-section-full_width elementor-section-height-default elementor-section-height-default" data-id="67efbb3c" data-element_type="section" data-e-type="section">
						<div class="elementor-container elementor-column-gap-default">
					<div class="elementor-column elementor-col-100 elementor-top-column elementor-element elementor-element-41d07212" data-id="41d07212" data-element_type="column" data-e-type="column">
			<div class="elementor-widget-wrap elementor-element-populated">
						<div class="elementor-element elementor-element-49d1b8e2 elementor-widget elementor-widget-text-editor" data-id="49d1b8e2" data-element_type="widget" data-e-type="widget" data-widget_type="text-editor.default">
				<div class="elementor-widget-container">
									<div><div align="center"><center><strong style="color: #ff0000;">Suscríbete a mi canal de Youtube:</strong></center><div><div><div align="center"><p><script src="https://apis.google.com/js/platform.js"></script></p><div class="g-ytsubscribe" data-channel="ildefonsosegura" data-layout="full" data-count="default"> </div></div></div><p> </p><p style="text-align: center;">No te lo pierdas y comparte tus trabajos en mi página de facebook (<span style="color: #0000ff;"><strong><a style="color: #0000ff;" href="http://www.facebook.com/IldefonsoSeguraPage" target="_blank" rel="noopener noreferrer">IldefonsoSeguraPage</a></strong></span>)<br />Espero que te guste y compartas el vídeo. No dejes de compartir este post.</p><p style="text-align: center;">Así es como me puedes ayudar 🙂 Gracias</p></div></div></div>								</div>
				</div>
					</div>
		</div>
					</div>
		</section>
				</div>La entrada <a href="https://ildefonsosegura.es/fotomontaje-con-photoshopcc-integracion-de-objetos-by-ildefonsosegura/">Fotomontaje con #PhotoshopCC, integración de objetos</a> apareció primero en <a href="https://ildefonsosegura.es">Ildefonso Segura</a>.]]></content:encoded>
					
					<wfw:commentRss>https://ildefonsosegura.es/fotomontaje-con-photoshopcc-integracion-de-objetos-by-ildefonsosegura/feed/</wfw:commentRss>
			<slash:comments>1</slash:comments>
		
		
			</item>
		<item>
		<title>Tutorial Photoshop efectos de brillo e iluminación en un wallpaper by @ildefonsosegura</title>
		<link>https://ildefonsosegura.es/como-hacer-efectos-de-iluminacion-alucinantes-con-photoshop-by-ildefonsosegura/</link>
					<comments>https://ildefonsosegura.es/como-hacer-efectos-de-iluminacion-alucinantes-con-photoshop-by-ildefonsosegura/#respond</comments>
		
		<dc:creator><![CDATA[Ildefonso Segura]]></dc:creator>
		<pubDate>Tue, 20 Mar 2018 12:05:44 +0000</pubDate>
				<category><![CDATA[Efectos]]></category>
		<category><![CDATA[Fotocomposición]]></category>
		<category><![CDATA[Photoshop]]></category>
		<category><![CDATA[Speed Art]]></category>
		<category><![CDATA[Tutoriales]]></category>
		<category><![CDATA[Wallpaper]]></category>
		<category><![CDATA[cc2014]]></category>
		<category><![CDATA[cs5]]></category>
		<category><![CDATA[cs6]]></category>
		<category><![CDATA[flare]]></category>
		<category><![CDATA[flares]]></category>
		<category><![CDATA[fotocomposición]]></category>
		<category><![CDATA[fotomontaje]]></category>
		<category><![CDATA[gloriasanis]]></category>
		<category><![CDATA[haz]]></category>
		<category><![CDATA[ildefonsosegura]]></category>
		<category><![CDATA[iluminación]]></category>
		<category><![CDATA[iluminar]]></category>
		<category><![CDATA[imagen]]></category>
		<category><![CDATA[lighting]]></category>
		<category><![CDATA[luz]]></category>
		<category><![CDATA[montaje]]></category>
		<category><![CDATA[poster]]></category>
		<category><![CDATA[tuto]]></category>
		<category><![CDATA[tutorial]]></category>
		<category><![CDATA[wallpaper]]></category>
		<guid isPermaLink="false">http://ildefonsosegura.es/?p=3677</guid>

					<description><![CDATA[<p>He disfrutado un montón haciendo este fantástico tutorial de photoshop para ayuaros a hacer vuestro propio wallpaper con unos efectos de iluminación y brillo alucinante. En el propio tutorial te muestro unos ejemplos para que te hagas una idea de qué puedes hacer. Cuando veas el tuto podrás hacer unos haces de luces alucinantes y con [&#8230;]</p>
La entrada <a href="https://ildefonsosegura.es/como-hacer-efectos-de-iluminacion-alucinantes-con-photoshop-by-ildefonsosegura/">Tutorial Photoshop efectos de brillo e iluminación en un wallpaper by @ildefonsosegura</a> apareció primero en <a href="https://ildefonsosegura.es">Ildefonso Segura</a>.]]></description>
										<content:encoded><![CDATA[<div data-elementor-type="wp-post" data-elementor-id="3677" class="elementor elementor-3677">
						<section class="elementor-section elementor-top-section elementor-element elementor-element-7f3cdb25 elementor-section-boxed elementor-section-height-default elementor-section-height-default" data-id="7f3cdb25" data-element_type="section" data-e-type="section">
						<div class="elementor-container elementor-column-gap-default">
					<div class="elementor-column elementor-col-100 elementor-top-column elementor-element elementor-element-6f0ce4fa" data-id="6f0ce4fa" data-element_type="column" data-e-type="column">
			<div class="elementor-widget-wrap elementor-element-populated">
						<div class="elementor-element elementor-element-79414706 elementor-widget elementor-widget-text-editor" data-id="79414706" data-element_type="widget" data-e-type="widget" data-widget_type="text-editor.default">
				<div class="elementor-widget-container">
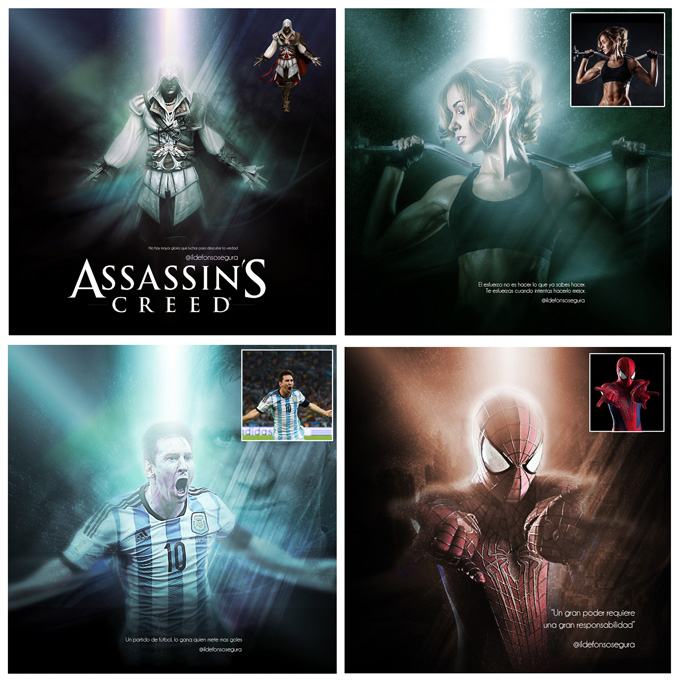
									<p>He disfrutado un montón haciendo este fantástico tutorial de photoshop para ayuaros a hacer vuestro propio wallpaper con unos efectos de iluminación y brillo alucinante. En el propio tutorial te muestro unos ejemplos para que te hagas una idea de qué puedes hacer.</p><p style="text-align: justify;">Cuando veas el tuto podrás hacer unos haces de luces alucinantes y con los modos de fusión podrás crear iluminaciones increíbles.</p><p>[twenty20 img1=»6091&#8243; img2=»6092&#8243; offset=»0.5&#8243;]</p><p style="text-align: justify;">Desde el background hasta la iluminación final con colorido y con un aspecto de fantasía, podrás hacer tus propias creaciones. Espero que te ayude y enseñe algún truco para tus propias creaciones.</p><p>Mira más ejemplos:</p><p><img loading="lazy" decoding="async" class="aligncenter wp-image-3679 size-full" src="https://ildefonsosegura.es/wp-content/uploads/shining-and-lighting.jpg" alt="shining-and-lighting" width="680" height="680" srcset="https://ildefonsosegura.es/wp-content/uploads/shining-and-lighting.jpg 680w, https://ildefonsosegura.es/wp-content/uploads/shining-and-lighting-150x150.jpg 150w, https://ildefonsosegura.es/wp-content/uploads/shining-and-lighting-300x300.jpg 300w, https://ildefonsosegura.es/wp-content/uploads/shining-and-lighting-50x50.jpg 50w" sizes="(max-width: 680px) 100vw, 680px" /></p><p><strong><span style="color: #800000;">TUTORIAL</span> </strong></p><center><iframe src="https://www.youtube.com/embed/gXqWnqcIOH0" width="640" height="420" frameborder="0" allowfullscreen="allowfullscreen"></iframe></center><p>Imagen usada en el tutorial está disponible en el link que te dejo más abajo.</p><p>Si te gustan los speedarts también tienes uno donde verás los mismos efectos pero aplicados a la imagen de Assasin&#8217;s Creed</p><p><strong><span style="color: #800000;">SPEED ART</span> </strong></p><center><iframe src="https://www.youtube.com/embed/b3mwLrV9EXM" width="640" height="420" frameborder="0" allowfullscreen="allowfullscreen"><span data-mce-type="bookmark" style="display: inline-block; width: 0px; overflow: hidden; line-height: 0;" class="mce_SELRES_start">﻿</span></iframe></center><div><div> </div><p style="text-align: left;"> </p></div>								</div>
				</div>
					</div>
		</div>
					</div>
		</section>
				<section class="elementor-section elementor-top-section elementor-element elementor-element-65592945 elementor-section-full_width elementor-section-height-default elementor-section-height-default" data-id="65592945" data-element_type="section" data-e-type="section">
						<div class="elementor-container elementor-column-gap-default">
					<div class="elementor-column elementor-col-33 elementor-top-column elementor-element elementor-element-1e2dc656" data-id="1e2dc656" data-element_type="column" data-e-type="column">
			<div class="elementor-widget-wrap elementor-element-populated">
						<div class="elementor-element elementor-element-7398a4f2 elementor-align-right elementor-invisible elementor-widget elementor-widget-button" data-id="7398a4f2" data-element_type="widget" data-e-type="widget" data-settings="{&quot;_animation&quot;:&quot;shake&quot;}" data-widget_type="button.default">
				<div class="elementor-widget-container">
									<div class="elementor-button-wrapper">
					<a class="elementor-button elementor-button-link elementor-size-sm elementor-animation-grow" href="https://drive.google.com/open?id=0B_nJkCGJubucV2VJTjZLSDJyUWM" target="_blank">
						<span class="elementor-button-content-wrapper">
									<span class="elementor-button-text">DESCARGA EL MATERIAL</span>
					</span>
					</a>
				</div>
								</div>
				</div>
					</div>
		</div>
				<div class="elementor-column elementor-col-33 elementor-top-column elementor-element elementor-element-3676016" data-id="3676016" data-element_type="column" data-e-type="column">
			<div class="elementor-widget-wrap elementor-element-populated">
						<div class="elementor-element elementor-element-7f826463 elementor-align-right elementor-invisible elementor-widget elementor-widget-button" data-id="7f826463" data-element_type="widget" data-e-type="widget" data-settings="{&quot;_animation&quot;:&quot;shake&quot;}" data-widget_type="button.default">
				<div class="elementor-widget-container">
									<div class="elementor-button-wrapper">
					<a class="elementor-button elementor-button-link elementor-size-sm elementor-animation-grow" href="https://es.gamewallpapers.com/viewwallpaper.php?wallpaper=wallpaper_dark_souls_2_01&#038;titel=Dark+Souls+2&#038;nummer=01&#038;normal=1" target="_blank">
						<span class="elementor-button-content-wrapper">
									<span class="elementor-button-text">BAJATE LA IMAGEN DEL GUERRERO</span>
					</span>
					</a>
				</div>
								</div>
				</div>
					</div>
		</div>
				<div class="elementor-column elementor-col-33 elementor-top-column elementor-element elementor-element-6db4982c" data-id="6db4982c" data-element_type="column" data-e-type="column">
			<div class="elementor-widget-wrap elementor-element-populated">
						<div class="elementor-element elementor-element-602f05f7 elementor-widget elementor-widget-html" data-id="602f05f7" data-element_type="widget" data-e-type="widget" data-settings="{&quot;_animation&quot;:&quot;none&quot;}" data-widget_type="html.default">
				<div class="elementor-widget-container">
					<form action="https://www.paypal.com/cgi-bin/webscr" method="post" target="_blank">
<input type="hidden" name="cmd" value="_donations">
<input type="hidden" name="business" value="ildefonsosegura@gmail.com">
<input type="hidden" name="lc" value="ES">
<input type="hidden" name="item_name" value="MANTENIMIENTO DE LA PAGINA DE ILDEFONSOSEGURA">
<input type="hidden" name="no_note" value="0">
<input type="hidden" name="currency_code" value="EUR">
<input type="hidden" name="bn" value="PP-DonationsBF:paypal1.jpg:NonHostedGuest">
<input type="image" src="http://ildefonsosegura.es/wp-content/uploads/paypal-updated-1.png" border="0" name="submit" alt="PayPal. La forma rápida y segura de pagar en Internet.">
<img decoding="async" alt="" border="0" src="https://www.paypalobjects.com/es_ES/i/scr/pixel.gif" width="1" height="1">
</form>				</div>
				</div>
					</div>
		</div>
					</div>
		</section>
				<section class="elementor-section elementor-top-section elementor-element elementor-element-6f344bdf elementor-section-boxed elementor-section-height-default elementor-section-height-default" data-id="6f344bdf" data-element_type="section" data-e-type="section">
						<div class="elementor-container elementor-column-gap-default">
					<div class="elementor-column elementor-col-100 elementor-top-column elementor-element elementor-element-2617939e" data-id="2617939e" data-element_type="column" data-e-type="column">
			<div class="elementor-widget-wrap elementor-element-populated">
						<div class="elementor-element elementor-element-75ece0a4 elementor-widget-divider--view-line elementor-widget elementor-widget-divider" data-id="75ece0a4" data-element_type="widget" data-e-type="widget" data-widget_type="divider.default">
				<div class="elementor-widget-container">
							<div class="elementor-divider">
			<span class="elementor-divider-separator">
						</span>
		</div>
						</div>
				</div>
					</div>
		</div>
					</div>
		</section>
				<section class="elementor-section elementor-top-section elementor-element elementor-element-3f285a4f elementor-section-full_width elementor-section-height-default elementor-section-height-default" data-id="3f285a4f" data-element_type="section" data-e-type="section">
						<div class="elementor-container elementor-column-gap-default">
					<div class="elementor-column elementor-col-100 elementor-top-column elementor-element elementor-element-4c2a2566" data-id="4c2a2566" data-element_type="column" data-e-type="column">
			<div class="elementor-widget-wrap elementor-element-populated">
						<div class="elementor-element elementor-element-2853ebd5 elementor-widget elementor-widget-text-editor" data-id="2853ebd5" data-element_type="widget" data-e-type="widget" data-widget_type="text-editor.default">
				<div class="elementor-widget-container">
									<div><div align="center"><center><strong style="color: #ff0000;">Suscríbete a mi canal de Youtube:</strong></center><div><div><div align="center"><p><script src="https://apis.google.com/js/platform.js"></script></p><div class="g-ytsubscribe" data-channel="ildefonsosegura" data-layout="full" data-count="default"> </div></div></div><p> </p><p style="text-align: center;">No te lo pierdas y comparte tus trabajos en mi página de facebook (<span style="color: #0000ff;"><strong><a style="color: #0000ff;" href="http://www.facebook.com/IldefonsoSeguraPage" target="_blank" rel="noopener noreferrer">IldefonsoSeguraPage</a></strong></span>)<br />Espero que te guste y compartas el vídeo. No dejes de compartir este post.</p><p style="text-align: center;">Así es como me puedes ayudar 🙂 Gracias</p></div></div></div>								</div>
				</div>
					</div>
		</div>
					</div>
		</section>
				</div>La entrada <a href="https://ildefonsosegura.es/como-hacer-efectos-de-iluminacion-alucinantes-con-photoshop-by-ildefonsosegura/">Tutorial Photoshop efectos de brillo e iluminación en un wallpaper by @ildefonsosegura</a> apareció primero en <a href="https://ildefonsosegura.es">Ildefonso Segura</a>.]]></content:encoded>
					
					<wfw:commentRss>https://ildefonsosegura.es/como-hacer-efectos-de-iluminacion-alucinantes-con-photoshop-by-ildefonsosegura/feed/</wfw:commentRss>
			<slash:comments>0</slash:comments>
		
		
			</item>
		<item>
		<title>Fotomontaje estilo Alan Wake en un wallpaper con photoshop by @ildefonsosegura</title>
		<link>https://ildefonsosegura.es/fotomontaje-estilo-alan-wake-en-un-wallpaper-con-photoshop-by-ildefonsosegura/</link>
					<comments>https://ildefonsosegura.es/fotomontaje-estilo-alan-wake-en-un-wallpaper-con-photoshop-by-ildefonsosegura/#respond</comments>
		
		<dc:creator><![CDATA[Ildefonso Segura]]></dc:creator>
		<pubDate>Tue, 20 Mar 2018 11:50:21 +0000</pubDate>
				<category><![CDATA[3D]]></category>
		<category><![CDATA[Estilos]]></category>
		<category><![CDATA[Fotocomposición]]></category>
		<category><![CDATA[Photoshop]]></category>
		<category><![CDATA[Textos]]></category>
		<category><![CDATA[Tutoriales]]></category>
		<category><![CDATA[Wallpaper]]></category>
		<category><![CDATA[3d effect]]></category>
		<category><![CDATA[adobe]]></category>
		<category><![CDATA[alan]]></category>
		<category><![CDATA[alan wake]]></category>
		<category><![CDATA[caratula]]></category>
		<category><![CDATA[cc2014]]></category>
		<category><![CDATA[cc2015]]></category>
		<category><![CDATA[cover]]></category>
		<category><![CDATA[cs4]]></category>
		<category><![CDATA[cs5]]></category>
		<category><![CDATA[cs6]]></category>
		<category><![CDATA[efecto 3D]]></category>
		<category><![CDATA[fotomontaje]]></category>
		<category><![CDATA[game]]></category>
		<category><![CDATA[ildefososegura]]></category>
		<category><![CDATA[juego]]></category>
		<category><![CDATA[photoshop]]></category>
		<category><![CDATA[poster]]></category>
		<category><![CDATA[text]]></category>
		<category><![CDATA[texto]]></category>
		<category><![CDATA[tuto]]></category>
		<category><![CDATA[tutorial]]></category>
		<category><![CDATA[videojuego]]></category>
		<category><![CDATA[wake]]></category>
		<category><![CDATA[wallpaper]]></category>
		<category><![CDATA[youtube]]></category>
		<guid isPermaLink="false">http://ildefonsosegura.es/?p=4936</guid>

					<description><![CDATA[<p>En este tutorial de photoshop aprenderemos a hacer un wallpaper/póster al estilo Alan Wake (vídeo juego del género thriller psicológico) pero añadiendo un esfecto 3D en el texto.En este fotomontaje, usaremos objetos inteligentes, máscaras de capa y pinceles especiales para crear una escena de videojuego. A continuación verás el wallpaper original del juego y más [&#8230;]</p>
La entrada <a href="https://ildefonsosegura.es/fotomontaje-estilo-alan-wake-en-un-wallpaper-con-photoshop-by-ildefonsosegura/">Fotomontaje estilo Alan Wake en un wallpaper con photoshop by @ildefonsosegura</a> apareció primero en <a href="https://ildefonsosegura.es">Ildefonso Segura</a>.]]></description>
										<content:encoded><![CDATA[<div data-elementor-type="wp-post" data-elementor-id="4936" class="elementor elementor-4936">
						<section class="elementor-section elementor-top-section elementor-element elementor-element-544ed057 elementor-section-boxed elementor-section-height-default elementor-section-height-default" data-id="544ed057" data-element_type="section" data-e-type="section">
						<div class="elementor-container elementor-column-gap-default">
					<div class="elementor-column elementor-col-100 elementor-top-column elementor-element elementor-element-35a7d1f4" data-id="35a7d1f4" data-element_type="column" data-e-type="column">
			<div class="elementor-widget-wrap elementor-element-populated">
						<div class="elementor-element elementor-element-58a39408 elementor-widget elementor-widget-text-editor" data-id="58a39408" data-element_type="widget" data-e-type="widget" data-widget_type="text-editor.default">
				<div class="elementor-widget-container">
									<p style="text-align: justify;">En este tutorial de photoshop aprenderemos a hacer un wallpaper/póster al estilo Alan Wake (vídeo juego del género thriller psicológico) pero añadiendo un esfecto 3D en el texto.<br />En este fotomontaje, usaremos objetos inteligentes, máscaras de capa y pinceles especiales para crear una escena de videojuego.</p><p style="text-align: justify;">A continuación verás el wallpaper original del juego y más abajo el que construiremos con el tutorial. Como vés hay una similitud bastante elevada aunque nosotros incorporaremos en el tutorial de Photoshop algunos efectos como más iluminación, efecto 3D y otros &#8230;</p><p style="text-align: justify;"><img loading="lazy" decoding="async" class="aligncenter size-full wp-image-4938" src="https://ildefonsosegura.es/wp-content/uploads/alan-wake2.jpg" alt="alan-wake2" width="1280" height="1440" srcset="https://ildefonsosegura.es/wp-content/uploads/alan-wake2.jpg 1280w, https://ildefonsosegura.es/wp-content/uploads/alan-wake2-267x300.jpg 267w, https://ildefonsosegura.es/wp-content/uploads/alan-wake2-910x1024.jpg 910w" sizes="(max-width: 1280px) 100vw, 1280px" /></p><p>No te lo pierdas y comparte tus trabajos en mi página de facebook (<a href="http://www.facebook.com/IldefonsoSeguraPage" target="_blank" rel="noopener noreferrer">IldefonsoSeguraPage</a>)</p><p>Espero que te guste y compartas el video</p><p> </p><p style="text-align: left;"><strong>TUTORIAL EFECTO ALAN WAKE WALLPAPER</strong></p><p style="text-align: left;"><iframe src="https://www.youtube.com/embed/O95YmaUfpp0?rel=0" width="640" height="420" frameborder="0" allowfullscreen="allowfullscreen"></iframe></p><div><p> </p><p style="text-align: left;"><strong>SPEEDART ALAN WAKE WALLPAPER</strong></p><p style="text-align: left;"><iframe src="https://www.youtube.com/embed/3JJt9L7_074?rel=0" width="640" height="420" frameborder="0" allowfullscreen="allowfullscreen"><span data-mce-type="bookmark" style="display: inline-block; width: 0px; overflow: hidden; line-height: 0;" class="mce_SELRES_start">﻿</span></iframe></p><div><div> </div><p style="text-align: left;"> </p></div></div>								</div>
				</div>
					</div>
		</div>
					</div>
		</section>
				<section class="elementor-section elementor-top-section elementor-element elementor-element-793334fd elementor-section-boxed elementor-section-height-default elementor-section-height-default" data-id="793334fd" data-element_type="section" data-e-type="section">
						<div class="elementor-container elementor-column-gap-default">
					<div class="elementor-column elementor-col-100 elementor-top-column elementor-element elementor-element-329bfa4a" data-id="329bfa4a" data-element_type="column" data-e-type="column">
			<div class="elementor-widget-wrap elementor-element-populated">
						<div class="elementor-element elementor-element-107a983d elementor-widget-divider--view-line elementor-widget elementor-widget-divider" data-id="107a983d" data-element_type="widget" data-e-type="widget" data-widget_type="divider.default">
				<div class="elementor-widget-container">
							<div class="elementor-divider">
			<span class="elementor-divider-separator">
						</span>
		</div>
						</div>
				</div>
					</div>
		</div>
					</div>
		</section>
				<section class="elementor-section elementor-top-section elementor-element elementor-element-57c813d3 elementor-section-full_width elementor-section-height-default elementor-section-height-default" data-id="57c813d3" data-element_type="section" data-e-type="section">
						<div class="elementor-container elementor-column-gap-default">
					<div class="elementor-column elementor-col-50 elementor-top-column elementor-element elementor-element-37178585" data-id="37178585" data-element_type="column" data-e-type="column">
			<div class="elementor-widget-wrap elementor-element-populated">
						<div class="elementor-element elementor-element-41c7ef19 elementor-align-right elementor-invisible elementor-widget elementor-widget-button" data-id="41c7ef19" data-element_type="widget" data-e-type="widget" data-settings="{&quot;_animation&quot;:&quot;shake&quot;}" data-widget_type="button.default">
				<div class="elementor-widget-container">
									<div class="elementor-button-wrapper">
					<a class="elementor-button elementor-button-link elementor-size-sm elementor-animation-grow" href="https://drive.google.com/file/d/0B_nJkCGJubucVTV2Xy1IdkVoUnc/view?usp=sharing">
						<span class="elementor-button-content-wrapper">
									<span class="elementor-button-text">DESCARGA EL MATERIAL</span>
					</span>
					</a>
				</div>
								</div>
				</div>
					</div>
		</div>
				<div class="elementor-column elementor-col-50 elementor-top-column elementor-element elementor-element-1a8ab36" data-id="1a8ab36" data-element_type="column" data-e-type="column">
			<div class="elementor-widget-wrap elementor-element-populated">
						<div class="elementor-element elementor-element-153be98c elementor-widget elementor-widget-html" data-id="153be98c" data-element_type="widget" data-e-type="widget" data-settings="{&quot;_animation&quot;:&quot;none&quot;}" data-widget_type="html.default">
				<div class="elementor-widget-container">
					<form action="https://www.paypal.com/cgi-bin/webscr" method="post" target="_blank">
<input type="hidden" name="cmd" value="_donations">
<input type="hidden" name="business" value="ildefonsosegura@gmail.com">
<input type="hidden" name="lc" value="ES">
<input type="hidden" name="item_name" value="MANTENIMIENTO DE LA PAGINA DE ILDEFONSOSEGURA">
<input type="hidden" name="no_note" value="0">
<input type="hidden" name="currency_code" value="EUR">
<input type="hidden" name="bn" value="PP-DonationsBF:paypal1.jpg:NonHostedGuest">
<input type="image" src="http://ildefonsosegura.es/wp-content/uploads/paypal-updated-1.png" border="0" name="submit" alt="PayPal. La forma rápida y segura de pagar en Internet.">
<img decoding="async" alt="" border="0" src="https://www.paypalobjects.com/es_ES/i/scr/pixel.gif" width="1" height="1">
</form>				</div>
				</div>
					</div>
		</div>
					</div>
		</section>
				<section class="elementor-section elementor-top-section elementor-element elementor-element-6e7c9907 elementor-section-boxed elementor-section-height-default elementor-section-height-default" data-id="6e7c9907" data-element_type="section" data-e-type="section">
						<div class="elementor-container elementor-column-gap-default">
					<div class="elementor-column elementor-col-100 elementor-top-column elementor-element elementor-element-1170ee43" data-id="1170ee43" data-element_type="column" data-e-type="column">
			<div class="elementor-widget-wrap elementor-element-populated">
						<div class="elementor-element elementor-element-691fa630 elementor-widget-divider--view-line elementor-widget elementor-widget-divider" data-id="691fa630" data-element_type="widget" data-e-type="widget" data-widget_type="divider.default">
				<div class="elementor-widget-container">
							<div class="elementor-divider">
			<span class="elementor-divider-separator">
						</span>
		</div>
						</div>
				</div>
					</div>
		</div>
					</div>
		</section>
				<section class="elementor-section elementor-top-section elementor-element elementor-element-5a7f31a8 elementor-section-full_width elementor-section-height-default elementor-section-height-default" data-id="5a7f31a8" data-element_type="section" data-e-type="section">
						<div class="elementor-container elementor-column-gap-default">
					<div class="elementor-column elementor-col-100 elementor-top-column elementor-element elementor-element-1d5bc1b4" data-id="1d5bc1b4" data-element_type="column" data-e-type="column">
			<div class="elementor-widget-wrap elementor-element-populated">
						<div class="elementor-element elementor-element-4e0b2ef4 elementor-widget elementor-widget-text-editor" data-id="4e0b2ef4" data-element_type="widget" data-e-type="widget" data-widget_type="text-editor.default">
				<div class="elementor-widget-container">
									<div><div align="center"><center><strong style="color: #ff0000;">Suscríbete a mi canal de Youtube:</strong></center><div><div><div align="center"><p><script src="https://apis.google.com/js/platform.js"></script></p><div class="g-ytsubscribe" data-channel="ildefonsosegura" data-layout="full" data-count="default"> </div></div></div><p> </p><p style="text-align: center;">No te lo pierdas y comparte tus trabajos en mi página de facebook (<span style="color: #0000ff;"><strong><a style="color: #0000ff;" href="http://www.facebook.com/IldefonsoSeguraPage" target="_blank" rel="noopener noreferrer">IldefonsoSeguraPage</a></strong></span>)<br />Espero que te guste y compartas el vídeo. No dejes de compartir este post.</p><p style="text-align: center;">Así es como me puedes ayudar 🙂 Gracias</p></div></div></div>								</div>
				</div>
					</div>
		</div>
					</div>
		</section>
				</div>La entrada <a href="https://ildefonsosegura.es/fotomontaje-estilo-alan-wake-en-un-wallpaper-con-photoshop-by-ildefonsosegura/">Fotomontaje estilo Alan Wake en un wallpaper con photoshop by @ildefonsosegura</a> apareció primero en <a href="https://ildefonsosegura.es">Ildefonso Segura</a>.]]></content:encoded>
					
					<wfw:commentRss>https://ildefonsosegura.es/fotomontaje-estilo-alan-wake-en-un-wallpaper-con-photoshop-by-ildefonsosegura/feed/</wfw:commentRss>
			<slash:comments>0</slash:comments>
		
		
			</item>
		<item>
		<title>Tutorial Photoshop // Trucos curiosos de iluminación by @ildefonsosegura (Wallpaper Hulk)</title>
		<link>https://ildefonsosegura.es/trucos-curiosos-de-iluminacion-con-photoshop-by-ildefonsosegura-wallpaper-hulk/</link>
					<comments>https://ildefonsosegura.es/trucos-curiosos-de-iluminacion-con-photoshop-by-ildefonsosegura-wallpaper-hulk/#respond</comments>
		
		<dc:creator><![CDATA[Ildefonso Segura]]></dc:creator>
		<pubDate>Wed, 14 Mar 2018 12:20:31 +0000</pubDate>
				<category><![CDATA[Efectos]]></category>
		<category><![CDATA[Fotocomposición]]></category>
		<category><![CDATA[Películas]]></category>
		<category><![CDATA[Photoshop]]></category>
		<category><![CDATA[Speed Art]]></category>
		<category><![CDATA[Tecnicas]]></category>
		<category><![CDATA[Tutoriales]]></category>
		<category><![CDATA[Video]]></category>
		<category><![CDATA[Wallpaper]]></category>
		<category><![CDATA[adobe]]></category>
		<category><![CDATA[CC]]></category>
		<category><![CDATA[cs4]]></category>
		<category><![CDATA[cs5]]></category>
		<category><![CDATA[cs6]]></category>
		<category><![CDATA[effects]]></category>
		<category><![CDATA[fondo]]></category>
		<category><![CDATA[gloriasanis]]></category>
		<category><![CDATA[ildefonso]]></category>
		<category><![CDATA[ildefonsosegura]]></category>
		<category><![CDATA[iluminación]]></category>
		<category><![CDATA[image]]></category>
		<category><![CDATA[movie]]></category>
		<category><![CDATA[pelicula]]></category>
		<category><![CDATA[photoshop]]></category>
		<category><![CDATA[video]]></category>
		<category><![CDATA[VIDEOTUTORIAL]]></category>
		<category><![CDATA[wall]]></category>
		<category><![CDATA[wallpaper]]></category>
		<category><![CDATA[youtube]]></category>
		<guid isPermaLink="false">http://ildefonsosegura.es/?p=4621</guid>

					<description><![CDATA[<p>En este tutorial de photoshop te muestro varios trucos curiosos de iluminación con resultados alucinantes. Ya publiqué algún otro tutorial sobre iluminaciones que puedes chequear en esta web. Usaremos capas de ajuste y selección de tonalidades para conseguir iluminaciones contrastadas. Aprenderás a realizar una bola de luz jugando con los modos de fusión de las [&#8230;]</p>
La entrada <a href="https://ildefonsosegura.es/trucos-curiosos-de-iluminacion-con-photoshop-by-ildefonsosegura-wallpaper-hulk/">Tutorial Photoshop // Trucos curiosos de iluminación by @ildefonsosegura (Wallpaper Hulk)</a> apareció primero en <a href="https://ildefonsosegura.es">Ildefonso Segura</a>.]]></description>
										<content:encoded><![CDATA[<div data-elementor-type="wp-post" data-elementor-id="4621" class="elementor elementor-4621">
						<section class="elementor-section elementor-top-section elementor-element elementor-element-63995f0f elementor-section-boxed elementor-section-height-default elementor-section-height-default" data-id="63995f0f" data-element_type="section" data-e-type="section">
						<div class="elementor-container elementor-column-gap-default">
					<div class="elementor-column elementor-col-100 elementor-top-column elementor-element elementor-element-368e9aa4" data-id="368e9aa4" data-element_type="column" data-e-type="column">
			<div class="elementor-widget-wrap elementor-element-populated">
						<div class="elementor-element elementor-element-456f0039 elementor-widget elementor-widget-text-editor" data-id="456f0039" data-element_type="widget" data-e-type="widget" data-widget_type="text-editor.default">
				<div class="elementor-widget-container">
									<p style="text-align: justify;">En este tutorial de photoshop te muestro varios trucos curiosos de iluminación con resultados alucinantes. Ya publiqué algún otro tutorial sobre <a href="https://ildefonsosegura.es/como-hacer-efectos-de-iluminacion-alucinantes-con-photoshop-by-ildefonsosegura/" target="_blank" rel="noopener">iluminaciones</a> que puedes chequear en esta web.</p>
<p style="text-align: justify;">Usaremos capas de ajuste y selección de tonalidades para conseguir iluminaciones contrastadas. Aprenderás a realizar una bola de luz jugando con los modos de fusión de las capas y pinceles.</p>
<strong>TUTORIAL WALLPAPER HULK</strong>
<iframe src="https://www.youtube.com/embed/uQWeQUMQMoE?rel=0" width="640" height="420" frameborder="0" allowfullscreen="allowfullscreen"><span data-mce-type="bookmark" style="display: inline-block; width: 0px; overflow: hidden; line-height: 0;" class="mce_SELRES_start">﻿</span></iframe>
<p style="text-align: justify;">Verás un antes y un después en la siguiente imagen. Aprecia como sacamos partido a las iluminaciones remarcando las zonas que nos interesan iluminar.</p>
Mueve el deslizador para ver el antes y el después

[twenty20 img1=»6196&#8243; img2=»6197&#8243; offset=»0.5&#8243;]
<p style="text-align: justify;">Igualmente aprenderemos a guardar consistencia en las iluminaciones en función de los elementos de la composición y los focos de luz. Añadiremos un haz de luz en la mano de hulk usando modos de fusión de pinceles creando un efecto propio de una película de #theavengers</p>
<p style="text-align: justify;">Si te gustan los speedarts también tienes la versión aquí&#8230;disfrútala</p>
<strong>SPEEDART</strong>
<iframe src="https://www.youtube.com/embed/cDlby6ad_fY?rel=0" width="640" height="420" frameborder="0" allowfullscreen="allowfullscreen"></iframe>

<center></center><center></center>
<p style="text-align: center;">Puedes encontrar la imagen de HULK aquí <a href="https://goo.gl/fxhYvX" target="_blank" rel="noopener noreferrer">IMAGEN HULK</a></p>

<div>
<div>
<div align="center">
<p style="text-align: left;">Puedes chequear también mi perfil en <a href="http://www.flickr.com/photos/ildefonsosegura" target="_blank" rel="noopener"><strong>Flickr</strong>.</a> Por otro lado, también puedes visitar mi <strong><a href="http://instagram.com/ildefonsosegura" target="_blank" rel="noopener">Instagram</a> </strong>para ver más de mis trabajos.</p>
<p style="text-align: left;"></p>

</div>
</div>
</div>								</div>
				</div>
					</div>
		</div>
					</div>
		</section>
				<section class="elementor-section elementor-top-section elementor-element elementor-element-36c01e27 elementor-section-boxed elementor-section-height-default elementor-section-height-default" data-id="36c01e27" data-element_type="section" data-e-type="section">
						<div class="elementor-container elementor-column-gap-default">
					<div class="elementor-column elementor-col-100 elementor-top-column elementor-element elementor-element-19366565" data-id="19366565" data-element_type="column" data-e-type="column">
			<div class="elementor-widget-wrap elementor-element-populated">
						<div class="elementor-element elementor-element-405b7b78 elementor-widget-divider--view-line elementor-widget elementor-widget-divider" data-id="405b7b78" data-element_type="widget" data-e-type="widget" data-widget_type="divider.default">
				<div class="elementor-widget-container">
							<div class="elementor-divider">
			<span class="elementor-divider-separator">
						</span>
		</div>
						</div>
				</div>
					</div>
		</div>
					</div>
		</section>
				<section class="elementor-section elementor-top-section elementor-element elementor-element-c069ea4 elementor-section-full_width elementor-section-height-default elementor-section-height-default" data-id="c069ea4" data-element_type="section" data-e-type="section">
						<div class="elementor-container elementor-column-gap-default">
					<div class="elementor-column elementor-col-50 elementor-top-column elementor-element elementor-element-5a17837a" data-id="5a17837a" data-element_type="column" data-e-type="column">
			<div class="elementor-widget-wrap elementor-element-populated">
						<div class="elementor-element elementor-element-436c6eea elementor-align-right elementor-invisible elementor-widget elementor-widget-button" data-id="436c6eea" data-element_type="widget" data-e-type="widget" data-settings="{&quot;_animation&quot;:&quot;shake&quot;}" data-widget_type="button.default">
				<div class="elementor-widget-container">
									<div class="elementor-button-wrapper">
					<a class="elementor-button elementor-button-link elementor-size-sm elementor-animation-grow" href="https://drive.google.com/open?id=1RjLybCEnRi_KyosQCR2bh7fYDs7oFQbh">
						<span class="elementor-button-content-wrapper">
									<span class="elementor-button-text">DESCARGA EL MATERIAL</span>
					</span>
					</a>
				</div>
								</div>
				</div>
					</div>
		</div>
				<div class="elementor-column elementor-col-50 elementor-top-column elementor-element elementor-element-3d7a7450" data-id="3d7a7450" data-element_type="column" data-e-type="column">
			<div class="elementor-widget-wrap elementor-element-populated">
						<div class="elementor-element elementor-element-5beeba83 elementor-widget elementor-widget-html" data-id="5beeba83" data-element_type="widget" data-e-type="widget" data-settings="{&quot;_animation&quot;:&quot;none&quot;}" data-widget_type="html.default">
				<div class="elementor-widget-container">
					<form action="https://www.paypal.com/cgi-bin/webscr" method="post" target="_blank">
<input type="hidden" name="cmd" value="_donations">
<input type="hidden" name="business" value="ildefonsosegura@gmail.com">
<input type="hidden" name="lc" value="ES">
<input type="hidden" name="item_name" value="MANTENIMIENTO DE LA PAGINA DE ILDEFONSOSEGURA">
<input type="hidden" name="no_note" value="0">
<input type="hidden" name="currency_code" value="EUR">
<input type="hidden" name="bn" value="PP-DonationsBF:paypal1.jpg:NonHostedGuest">
<input type="image" src="http://ildefonsosegura.es/wp-content/uploads/paypal-updated-1.png" border="0" name="submit" alt="PayPal. La forma rápida y segura de pagar en Internet.">
<img decoding="async" alt="" border="0" src="https://www.paypalobjects.com/es_ES/i/scr/pixel.gif" width="1" height="1">
</form>				</div>
				</div>
					</div>
		</div>
					</div>
		</section>
				<section class="elementor-section elementor-top-section elementor-element elementor-element-2734ab46 elementor-section-boxed elementor-section-height-default elementor-section-height-default" data-id="2734ab46" data-element_type="section" data-e-type="section">
						<div class="elementor-container elementor-column-gap-default">
					<div class="elementor-column elementor-col-100 elementor-top-column elementor-element elementor-element-7acf933e" data-id="7acf933e" data-element_type="column" data-e-type="column">
			<div class="elementor-widget-wrap elementor-element-populated">
						<div class="elementor-element elementor-element-9b34300 elementor-widget-divider--view-line elementor-widget elementor-widget-divider" data-id="9b34300" data-element_type="widget" data-e-type="widget" data-widget_type="divider.default">
				<div class="elementor-widget-container">
							<div class="elementor-divider">
			<span class="elementor-divider-separator">
						</span>
		</div>
						</div>
				</div>
					</div>
		</div>
					</div>
		</section>
				<section class="elementor-section elementor-top-section elementor-element elementor-element-6692b4de elementor-section-full_width elementor-section-height-default elementor-section-height-default" data-id="6692b4de" data-element_type="section" data-e-type="section">
						<div class="elementor-container elementor-column-gap-default">
					<div class="elementor-column elementor-col-100 elementor-top-column elementor-element elementor-element-6b9fa25e" data-id="6b9fa25e" data-element_type="column" data-e-type="column">
			<div class="elementor-widget-wrap elementor-element-populated">
						<div class="elementor-element elementor-element-409c2a10 elementor-widget elementor-widget-text-editor" data-id="409c2a10" data-element_type="widget" data-e-type="widget" data-widget_type="text-editor.default">
				<div class="elementor-widget-container">
									<div><div align="center"><center><strong style="color: #ff0000;">Suscríbete a mi canal de Youtube:</strong></center><div><div><div align="center"><p><script src="https://apis.google.com/js/platform.js"></script></p><div class="g-ytsubscribe" data-channel="ildefonsosegura" data-layout="full" data-count="default"> </div></div></div><p> </p><p style="text-align: center;">No te lo pierdas y comparte tus trabajos en mi página de facebook (<span style="color: #0000ff;"><strong><a style="color: #0000ff;" href="http://www.facebook.com/IldefonsoSeguraPage" target="_blank" rel="noopener noreferrer">IldefonsoSeguraPage</a></strong></span>)<br />Espero que te guste y compartas el vídeo. No dejes de compartir este post.</p><p style="text-align: center;">Así es como me puedes ayudar 🙂 Gracias</p></div></div></div>								</div>
				</div>
					</div>
		</div>
					</div>
		</section>
				</div>La entrada <a href="https://ildefonsosegura.es/trucos-curiosos-de-iluminacion-con-photoshop-by-ildefonsosegura-wallpaper-hulk/">Tutorial Photoshop // Trucos curiosos de iluminación by @ildefonsosegura (Wallpaper Hulk)</a> apareció primero en <a href="https://ildefonsosegura.es">Ildefonso Segura</a>.]]></content:encoded>
					
					<wfw:commentRss>https://ildefonsosegura.es/trucos-curiosos-de-iluminacion-con-photoshop-by-ildefonsosegura-wallpaper-hulk/feed/</wfw:commentRss>
			<slash:comments>0</slash:comments>
		
		
			</item>
		<item>
		<title>Haz un cráneo en llamas con #Photoshop (#ghostrider) by @ildefonsosegura</title>
		<link>https://ildefonsosegura.es/haz-un-craneo-en-llamas-con-photoshop-ghostrider-by-ildefonsosegura/</link>
					<comments>https://ildefonsosegura.es/haz-un-craneo-en-llamas-con-photoshop-ghostrider-by-ildefonsosegura/#respond</comments>
		
		<dc:creator><![CDATA[Ildefonso Segura]]></dc:creator>
		<pubDate>Sun, 11 Mar 2018 13:16:55 +0000</pubDate>
				<category><![CDATA[Efectos]]></category>
		<category><![CDATA[Fotocomposición]]></category>
		<category><![CDATA[Películas]]></category>
		<category><![CDATA[Photoshop]]></category>
		<category><![CDATA[Tecnicas]]></category>
		<category><![CDATA[Tutoriales]]></category>
		<category><![CDATA[Video]]></category>
		<category><![CDATA[Wallpaper]]></category>
		<category><![CDATA[adobe]]></category>
		<category><![CDATA[calavera]]></category>
		<category><![CDATA[cartel]]></category>
		<category><![CDATA[cc2014]]></category>
		<category><![CDATA[cc2015]]></category>
		<category><![CDATA[chispas]]></category>
		<category><![CDATA[cine]]></category>
		<category><![CDATA[cinema]]></category>
		<category><![CDATA[combustion]]></category>
		<category><![CDATA[cráneo]]></category>
		<category><![CDATA[cs6]]></category>
		<category><![CDATA[fantasma.flames]]></category>
		<category><![CDATA[fotomontaje]]></category>
		<category><![CDATA[fuego]]></category>
		<category><![CDATA[fusion]]></category>
		<category><![CDATA[ghost]]></category>
		<category><![CDATA[ildefonsosegura]]></category>
		<category><![CDATA[modo de fusión]]></category>
		<category><![CDATA[motorista]]></category>
		<category><![CDATA[movie]]></category>
		<category><![CDATA[pelicula]]></category>
		<category><![CDATA[photoshop]]></category>
		<category><![CDATA[poster]]></category>
		<category><![CDATA[rider]]></category>
		<category><![CDATA[skull]]></category>
		<category><![CDATA[tecnicas]]></category>
		<category><![CDATA[tuto]]></category>
		<category><![CDATA[tutorial]]></category>
		<category><![CDATA[VIDEOTUTORIAL]]></category>
		<category><![CDATA[wall]]></category>
		<category><![CDATA[wallpaper]]></category>
		<category><![CDATA[youtube]]></category>
		<guid isPermaLink="false">http://ildefonsosegura.es/?p=5264</guid>

					<description><![CDATA[<p>En este tutorial de photoshop te muestro como crear un póster de película inspirado y en homenaje a Ghost Rider (El Motorista Fantasma). Es un personaje que me gustó desde muy pequeño y he encontrado un hueco para poder hacer un trabajo inspirado en él. Creo que el #wallpaper queda muy bien a la vez [&#8230;]</p>
La entrada <a href="https://ildefonsosegura.es/haz-un-craneo-en-llamas-con-photoshop-ghostrider-by-ildefonsosegura/">Haz un cráneo en llamas con #Photoshop (#ghostrider) by @ildefonsosegura</a> apareció primero en <a href="https://ildefonsosegura.es">Ildefonso Segura</a>.]]></description>
										<content:encoded><![CDATA[<div data-elementor-type="wp-post" data-elementor-id="5264" class="elementor elementor-5264">
						<section class="elementor-section elementor-top-section elementor-element elementor-element-7f2cbc6f elementor-section-boxed elementor-section-height-default elementor-section-height-default" data-id="7f2cbc6f" data-element_type="section" data-e-type="section">
						<div class="elementor-container elementor-column-gap-default">
					<div class="elementor-column elementor-col-100 elementor-top-column elementor-element elementor-element-7b7ac83a" data-id="7b7ac83a" data-element_type="column" data-e-type="column">
			<div class="elementor-widget-wrap elementor-element-populated">
						<div class="elementor-element elementor-element-5fc4a9fe elementor-widget elementor-widget-text-editor" data-id="5fc4a9fe" data-element_type="widget" data-e-type="widget" data-widget_type="text-editor.default">
				<div class="elementor-widget-container">
									<p>En este tutorial de photoshop te muestro como crear un póster de película inspirado y en homenaje a Ghost Rider (El Motorista Fantasma). Es un personaje que me gustó desde muy pequeño y he encontrado un hueco para poder hacer un trabajo inspirado en él. Creo que el #wallpaper queda muy bien a la vez que, en su elaboración, muestra varias técnicas que pueden ser aplicables tanto en este tutorial como en otros trabajos</p><p> </p><div><center><img loading="lazy" decoding="async" class="aligncenter size-full wp-image-5268" src="https://ildefonsosegura.es/wp-content/uploads/skull-4.jpg" alt="skull-4" width="800" height="291" srcset="https://ildefonsosegura.es/wp-content/uploads/skull-4.jpg 800w, https://ildefonsosegura.es/wp-content/uploads/skull-4-300x109.jpg 300w, https://ildefonsosegura.es/wp-content/uploads/skull-4-768x279.jpg 768w" sizes="(max-width: 800px) 100vw, 800px" /></center></div><p> </p><p>El resultado del tutorial será este:</p><div><center><img loading="lazy" decoding="async" class="aligncenter size-full wp-image-5265" src="https://ildefonsosegura.es/wp-content/uploads/skull-1.jpg" alt="skull-1" width="400" height="566" srcset="https://ildefonsosegura.es/wp-content/uploads/skull-1.jpg 400w, https://ildefonsosegura.es/wp-content/uploads/skull-1-212x300.jpg 212w" sizes="(max-width: 400px) 100vw, 400px" /></center></div><p> </p><p>En el tutorial aprenderás</p><ol><li style="text-align: justify;">Crear un efecto de incandescencia</li><li style="text-align: justify;">Trabajar con modos de fusión</li><li style="text-align: justify;">Compositing = introducir elementos en la composición para crer contenido que integra el objeto principla del wallpaper</li></ol><p style="text-align: justify;">No te lo pierdas y comparte tus trabajos en mi página de facebook (<a href="http://www.facebook.com/IldefonsoSeguraPage" target="_blank" rel="noopener">IldefonsoSeguraPage</a>)</p><p>Espero que te guste y compartas el video</p><p style="text-align: left;"><strong>TUTORIAL </strong></p><p style="text-align: left;"><iframe src="https://www.youtube.com/embed/V1jAsxCeD6U?rel=0" width="640" height="420" frameborder="0" allowfullscreen="allowfullscreen"></iframe></p><p> </p><p style="text-align: left;"><strong>SPEEDART </strong></p><p style="text-align: left;"><iframe src="https://www.youtube.com/embed/YqdYHtm1eAk?rel=0" width="640" height="420" frameborder="0" allowfullscreen="allowfullscreen"><span data-mce-type="bookmark" style="display: inline-block; width: 0px; overflow: hidden; line-height: 0;" class="mce_SELRES_start">﻿</span></iframe></p><div><p style="text-align: center;">Si quieres los materiales tienes que ver el vídeo. En algunos momentos incluyo la url de los sitios donde he conseguido y/o adquirido los materiales.</p></div><div> </div><p> </p>								</div>
				</div>
					</div>
		</div>
					</div>
		</section>
				<section class="elementor-section elementor-top-section elementor-element elementor-element-59aa5aaf elementor-section-full_width elementor-section-height-default elementor-section-height-default" data-id="59aa5aaf" data-element_type="section" data-e-type="section">
						<div class="elementor-container elementor-column-gap-default">
					<div class="elementor-column elementor-col-100 elementor-top-column elementor-element elementor-element-75cab3d7" data-id="75cab3d7" data-element_type="column" data-e-type="column">
			<div class="elementor-widget-wrap elementor-element-populated">
						<div class="elementor-element elementor-element-592b30fc elementor-widget elementor-widget-text-editor" data-id="592b30fc" data-element_type="widget" data-e-type="widget" data-widget_type="text-editor.default">
				<div class="elementor-widget-container">
									<div><div align="center"><center><strong style="color: #ff0000;">Suscríbete a mi canal de Youtube:</strong></center><div><div><div align="center"><p><script src="https://apis.google.com/js/platform.js"></script></p><div class="g-ytsubscribe" data-channel="ildefonsosegura" data-layout="full" data-count="default"> </div></div></div><p> </p><p style="text-align: center;">No te lo pierdas y comparte tus trabajos en mi página de facebook (<span style="color: #0000ff;"><strong><a style="color: #0000ff;" href="http://www.facebook.com/IldefonsoSeguraPage" target="_blank" rel="noopener noreferrer">IldefonsoSeguraPage</a></strong></span>)<br />Espero que te guste y compartas el vídeo. No dejes de compartir este post.</p><p style="text-align: center;">Así es como me puedes ayudar 🙂 Gracias</p></div></div></div>								</div>
				</div>
					</div>
		</div>
					</div>
		</section>
				</div>La entrada <a href="https://ildefonsosegura.es/haz-un-craneo-en-llamas-con-photoshop-ghostrider-by-ildefonsosegura/">Haz un cráneo en llamas con #Photoshop (#ghostrider) by @ildefonsosegura</a> apareció primero en <a href="https://ildefonsosegura.es">Ildefonso Segura</a>.]]></content:encoded>
					
					<wfw:commentRss>https://ildefonsosegura.es/haz-un-craneo-en-llamas-con-photoshop-ghostrider-by-ildefonsosegura/feed/</wfw:commentRss>
			<slash:comments>0</slash:comments>
		
		
			</item>
		<item>
		<title>Tutorial Photoshop para crear y pintar una máscara de carnaval by @ildefonsosegura</title>
		<link>https://ildefonsosegura.es/tutorial-photoshop-para-crear-y-pintar-una-mascara-de-carnaval-by-ildefonsosegura/</link>
					<comments>https://ildefonsosegura.es/tutorial-photoshop-para-crear-y-pintar-una-mascara-de-carnaval-by-ildefonsosegura/#respond</comments>
		
		<dc:creator><![CDATA[Ildefonso Segura]]></dc:creator>
		<pubDate>Tue, 06 Mar 2018 20:40:39 +0000</pubDate>
				<category><![CDATA[Efectos]]></category>
		<category><![CDATA[Photoshop]]></category>
		<category><![CDATA[Speed Art]]></category>
		<category><![CDATA[Tecnicas]]></category>
		<category><![CDATA[Tutoriales]]></category>
		<category><![CDATA[Video]]></category>
		<category><![CDATA[Wallpaper]]></category>
		<category><![CDATA[adobe]]></category>
		<category><![CDATA[antifaz]]></category>
		<category><![CDATA[cabeza]]></category>
		<category><![CDATA[cara]]></category>
		<category><![CDATA[careta]]></category>
		<category><![CDATA[carnaval]]></category>
		<category><![CDATA[carnavalesca]]></category>
		<category><![CDATA[carnival]]></category>
		<category><![CDATA[cc2014]]></category>
		<category><![CDATA[cc2015]]></category>
		<category><![CDATA[cinta]]></category>
		<category><![CDATA[cs]]></category>
		<category><![CDATA[cs4]]></category>
		<category><![CDATA[cs5]]></category>
		<category><![CDATA[cs6]]></category>
		<category><![CDATA[efecto]]></category>
		<category><![CDATA[humano]]></category>
		<category><![CDATA[image]]></category>
		<category><![CDATA[imagen]]></category>
		<category><![CDATA[máscara]]></category>
		<category><![CDATA[mask]]></category>
		<category><![CDATA[photoshp]]></category>
		<category><![CDATA[pint]]></category>
		<category><![CDATA[pintar]]></category>
		<category><![CDATA[poster]]></category>
		<category><![CDATA[rostro]]></category>
		<category><![CDATA[simulacion]]></category>
		<category><![CDATA[tuto]]></category>
		<category><![CDATA[tutorial]]></category>
		<category><![CDATA[VIDEOTUTORIAL]]></category>
		<guid isPermaLink="false">http://ildefonsosegura.es/?p=5891</guid>

					<description><![CDATA[<p>En este tutorial de photoshop aprenderás a crear una máscara de carnaval usando un rostro humano. Aprenderás también ciertas técnicas que te ayudarán a simular la pintura y los dibujos de la propia máscara creada desde el rostro.Seguro que aprendes algo nuevo. No te lo pierdas y disfruta del photoshop como yo Te muestro varios [&#8230;]</p>
La entrada <a href="https://ildefonsosegura.es/tutorial-photoshop-para-crear-y-pintar-una-mascara-de-carnaval-by-ildefonsosegura/">Tutorial Photoshop para crear y pintar una máscara de carnaval by @ildefonsosegura</a> apareció primero en <a href="https://ildefonsosegura.es">Ildefonso Segura</a>.]]></description>
										<content:encoded><![CDATA[<div data-elementor-type="wp-post" data-elementor-id="5891" class="elementor elementor-5891">
						<section class="elementor-section elementor-top-section elementor-element elementor-element-7f81a906 elementor-section-boxed elementor-section-height-default elementor-section-height-default" data-id="7f81a906" data-element_type="section" data-e-type="section">
						<div class="elementor-container elementor-column-gap-default">
					<div class="elementor-column elementor-col-100 elementor-top-column elementor-element elementor-element-6c3242ec" data-id="6c3242ec" data-element_type="column" data-e-type="column">
			<div class="elementor-widget-wrap elementor-element-populated">
						<div class="elementor-element elementor-element-aa8e54e elementor-widget elementor-widget-text-editor" data-id="aa8e54e" data-element_type="widget" data-e-type="widget" data-widget_type="text-editor.default">
				<div class="elementor-widget-container">
									<p>En este tutorial de photoshop aprenderás a crear una máscara de carnaval usando un rostro humano.</p><p>Aprenderás también ciertas técnicas que te ayudarán a simular la pintura y los dibujos de la propia máscara creada desde el rostro.<br />Seguro que aprendes algo nuevo. No te lo pierdas y disfruta del photoshop como yo</p><p>Te muestro varios pasos en imágenes <img loading="lazy" decoding="async" class="aligncenter size-full wp-image-5892" src="https://ildefonsosegura.es/wp-content/uploads/mascara-1.jpg" alt="" width="1100" height="1100" srcset="https://ildefonsosegura.es/wp-content/uploads/mascara-1.jpg 1100w, https://ildefonsosegura.es/wp-content/uploads/mascara-1-150x150.jpg 150w, https://ildefonsosegura.es/wp-content/uploads/mascara-1-300x300.jpg 300w, https://ildefonsosegura.es/wp-content/uploads/mascara-1-768x768.jpg 768w, https://ildefonsosegura.es/wp-content/uploads/mascara-1-1024x1024.jpg 1024w" sizes="(max-width: 1100px) 100vw, 1100px" /></p><p> </p><p>El resultado final está en tu mano</p><p><strong>TUTORIAL CREAR Y PINTAR MASCARA DE CARNAVAL</strong></p><p style="text-align: left;"><iframe src="https://www.youtube.com/embed/q6JzdOb0Y74?rel=0" width="640" height="420" frameborder="0" allowfullscreen="allowfullscreen"></iframe></p><p style="text-align: left;">En el siguiente vídeo te muestro el speedart si eres uno de los amantes de este tipo de entretenimiento. Disfrútalo</p><p style="text-align: left;"><strong>SPEEDART MASCARA CARNAVAL CON PHOTOSHOP</strong></p><p style="text-align: left;"><iframe src="https://www.youtube.com/embed/hIugVuAzxpc?rel=0" width="640" height="420" frameborder="0" allowfullscreen="allowfullscreen"><span data-mce-type="bookmark" style="display: inline-block; width: 0px; overflow: hidden; line-height: 0;" class="mce_SELRES_start">﻿</span></iframe></p><div> </div><p> </p>								</div>
				</div>
					</div>
		</div>
					</div>
		</section>
				<section class="elementor-section elementor-top-section elementor-element elementor-element-307a708d elementor-section-full_width elementor-section-height-default elementor-section-height-default" data-id="307a708d" data-element_type="section" data-e-type="section">
						<div class="elementor-container elementor-column-gap-default">
					<div class="elementor-column elementor-col-100 elementor-top-column elementor-element elementor-element-34e1b38e" data-id="34e1b38e" data-element_type="column" data-e-type="column">
			<div class="elementor-widget-wrap elementor-element-populated">
						<div class="elementor-element elementor-element-703bee8 elementor-widget elementor-widget-text-editor" data-id="703bee8" data-element_type="widget" data-e-type="widget" data-widget_type="text-editor.default">
				<div class="elementor-widget-container">
									<div><div align="center"><center><strong style="color: #ff0000;">Suscríbete a mi canal de Youtube:</strong></center><div><div><div align="center"><p><script src="https://apis.google.com/js/platform.js"></script></p><div class="g-ytsubscribe" data-channel="ildefonsosegura" data-layout="full" data-count="default"> </div></div></div><p> </p><p style="text-align: center;">No te lo pierdas y comparte tus trabajos en mi página de facebook (<span style="color: #0000ff;"><strong><a style="color: #0000ff;" href="http://www.facebook.com/IldefonsoSeguraPage" target="_blank" rel="noopener noreferrer">IldefonsoSeguraPage</a></strong></span>)<br />Espero que te guste y compartas el vídeo. No dejes de compartir este post.</p><p style="text-align: center;">Así es como me puedes ayudar 🙂 Gracias</p></div></div></div>								</div>
				</div>
					</div>
		</div>
					</div>
		</section>
				</div>La entrada <a href="https://ildefonsosegura.es/tutorial-photoshop-para-crear-y-pintar-una-mascara-de-carnaval-by-ildefonsosegura/">Tutorial Photoshop para crear y pintar una máscara de carnaval by @ildefonsosegura</a> apareció primero en <a href="https://ildefonsosegura.es">Ildefonso Segura</a>.]]></content:encoded>
					
					<wfw:commentRss>https://ildefonsosegura.es/tutorial-photoshop-para-crear-y-pintar-una-mascara-de-carnaval-by-ildefonsosegura/feed/</wfw:commentRss>
			<slash:comments>0</slash:comments>
		
		
			</item>
		<item>
		<title>Boeing 747 #Cinema4d y #AfterEffects: aterriza, sobrevuela el cielo y vuela rasante</title>
		<link>https://ildefonsosegura.es/boeing-747-en-accion-con-cinema4d-y-aftereffects-aterriza-sobrevuela-el-cielo-y-vuela-rasante-en-la-ciudad-by-ildefonsosegura/</link>
					<comments>https://ildefonsosegura.es/boeing-747-en-accion-con-cinema4d-y-aftereffects-aterriza-sobrevuela-el-cielo-y-vuela-rasante-en-la-ciudad-by-ildefonsosegura/#respond</comments>
		
		<dc:creator><![CDATA[Ildefonso Segura]]></dc:creator>
		<pubDate>Sun, 04 Mar 2018 10:30:10 +0000</pubDate>
				<category><![CDATA[3D]]></category>
		<category><![CDATA[After Effects]]></category>
		<category><![CDATA[Cinema4D]]></category>
		<category><![CDATA[Tecnicas]]></category>
		<category><![CDATA[Tutoriales]]></category>
		<category><![CDATA[Video]]></category>
		<category><![CDATA[747]]></category>
		<category><![CDATA[adobe]]></category>
		<category><![CDATA[after effects]]></category>
		<category><![CDATA[airplane]]></category>
		<category><![CDATA[animación]]></category>
		<category><![CDATA[boeing]]></category>
		<category><![CDATA[CC]]></category>
		<category><![CDATA[cinema4D]]></category>
		<category><![CDATA[clouds]]></category>
		<category><![CDATA[cs5]]></category>
		<category><![CDATA[cs6]]></category>
		<category><![CDATA[efectos]]></category>
		<category><![CDATA[filght]]></category>
		<category><![CDATA[ildefonsosegura.gloriasanis]]></category>
		<category><![CDATA[nuebes]]></category>
		<category><![CDATA[r12]]></category>
		<category><![CDATA[r13]]></category>
		<category><![CDATA[r14]]></category>
		<category><![CDATA[sobrevuelo]]></category>
		<category><![CDATA[tuto]]></category>
		<category><![CDATA[tutoriales]]></category>
		<category><![CDATA[vuelo]]></category>
		<guid isPermaLink="false">http://ildefonsosegura.es/?p=3019</guid>

					<description><![CDATA[<p>Después del fantástico tutorial de #photoshop publicado sobre el ataque al Boeing 747 (pincha para verlo) os adelanto una serie de making of de comportamientos del avión trabajados con Cinema4D y After Effects (plugin #cineware) Vereis como fácilmente conseguimos efectos muy realistas, sobre todo en el vuelo rasante de mi casa. Tened en cuenta que [&#8230;]</p>
La entrada <a href="https://ildefonsosegura.es/boeing-747-en-accion-con-cinema4d-y-aftereffects-aterriza-sobrevuela-el-cielo-y-vuela-rasante-en-la-ciudad-by-ildefonsosegura/">Boeing 747 #Cinema4d y #AfterEffects: aterriza, sobrevuela el cielo y vuela rasante</a> apareció primero en <a href="https://ildefonsosegura.es">Ildefonso Segura</a>.]]></description>
										<content:encoded><![CDATA[<div data-elementor-type="wp-post" data-elementor-id="3019" class="elementor elementor-3019">
						<section class="elementor-section elementor-top-section elementor-element elementor-element-2a292c4a elementor-section-boxed elementor-section-height-default elementor-section-height-default" data-id="2a292c4a" data-element_type="section" data-e-type="section">
						<div class="elementor-container elementor-column-gap-default">
					<div class="elementor-column elementor-col-100 elementor-top-column elementor-element elementor-element-6c9d4249" data-id="6c9d4249" data-element_type="column" data-e-type="column">
			<div class="elementor-widget-wrap elementor-element-populated">
						<div class="elementor-element elementor-element-64c6ae3a elementor-widget elementor-widget-text-editor" data-id="64c6ae3a" data-element_type="widget" data-e-type="widget" data-widget_type="text-editor.default">
				<div class="elementor-widget-container">
									<p>Después del fantástico tutorial de #photoshop publicado sobre el ataque al Boeing 747 (<a title="Tutorial #photoshopCC wallpaper ataque al Boeing 747 by @ildefonsosegura" href="https://ildefonsosegura.es/tutorial-photoshopcc-wallpaper-ataque-al-boeing-747-by-ildefonsosegura/" target="_blank" rel="noopener noreferrer">pincha para verlo</a>) os adelanto una serie de making of de comportamientos del avión trabajados con Cinema4D y After Effects (plugin #cineware)</p><p>Vereis como fácilmente conseguimos efectos muy realistas, sobre todo en el vuelo rasante de mi casa.</p><p>Tened en cuenta que en todos los casos he usado el plugin distribuido por <span style="color: #ff0000;"><a style="color: #ff0000;" href="http://videocopilot.net" target="_blank" rel="noopener noreferrer">videocopilot </a></span>para optical flares. Si vosotros tenéis otro compatible con Ae, será fenomenal también</p><p style="text-align: left;"> </p>								</div>
				</div>
					</div>
		</div>
					</div>
		</section>
				<section class="elementor-section elementor-top-section elementor-element elementor-element-dd37836 elementor-section-boxed elementor-section-height-default elementor-section-height-default" data-id="dd37836" data-element_type="section" data-e-type="section">
						<div class="elementor-container elementor-column-gap-default">
					<div class="elementor-column elementor-col-100 elementor-top-column elementor-element elementor-element-21f2acf" data-id="21f2acf" data-element_type="column" data-e-type="column">
			<div class="elementor-widget-wrap elementor-element-populated">
						<div class="elementor-element elementor-element-0b8e73a elementor-widget elementor-widget-heading" data-id="0b8e73a" data-element_type="widget" data-e-type="widget" data-widget_type="heading.default">
				<div class="elementor-widget-container">
					<h2 class="elementor-heading-title elementor-size-default">MAKING OF BOEING 747</h2>				</div>
				</div>
					</div>
		</div>
					</div>
		</section>
				<section class="elementor-section elementor-top-section elementor-element elementor-element-23b03ac elementor-section-boxed elementor-section-height-default elementor-section-height-default" data-id="23b03ac" data-element_type="section" data-e-type="section">
						<div class="elementor-container elementor-column-gap-default">
					<div class="elementor-column elementor-col-100 elementor-top-column elementor-element elementor-element-65b6c91" data-id="65b6c91" data-element_type="column" data-e-type="column">
			<div class="elementor-widget-wrap elementor-element-populated">
						<div class="elementor-element elementor-element-6185684 elementor-widget elementor-widget-text-editor" data-id="6185684" data-element_type="widget" data-e-type="widget" data-widget_type="text-editor.default">
				<div class="elementor-widget-container">
									<p style="text-align: center;"><span style="font-size: 14px;">[su_row][su_column size=»1/3&#8243; center=»no»]</span></p><p style="text-align: center;"><strong>VUELO B747</strong></p><p style="text-align: center;"><span style="color: #000000; font-family: Quicksand, sans-serif; font-size: 14px; font-style: normal; font-variant-ligatures: normal; font-variant-caps: normal; font-weight: 600; text-align: start;"><a id="6a3f951bb2d32" rel="wp-video-lightbox" href="https://www.youtube.com/watch?v=NdUK9ODL6vk&#038;width=800&#038;height=450" title=""><img decoding="async" src="https://ildefonsosegura.es/wp-content/uploads/VUELO-B747.jpg" class="video_lightbox_anchor_image" alt="" /></a>    <script>
    /* <![CDATA[ */
    jQuery(document).ready(function($){
        $(function(){
            var width = $(window).innerWidth();
            var setwidth = parseFloat(800);
            var ratio = parseFloat(0.5625);
            var height = parseFloat(450);
            var link = 'https://www.youtube.com/watch?v=NdUK9ODL6vk&amp;width=800&amp;height=450';
            if(width < setwidth)
            {
                height = Math.floor(width * 0.5625);
                //console.log("device width "+width+", set width "+800+", ratio "+0.5625+", new height "+ height);
                var new_url = wpvl_paramReplace('width', link, width);
                var new_url = wpvl_paramReplace('height', new_url, height);
                $("a#6a3f951bb2d32").attr('href', new_url);
                //console.log(new_url);
            }
        });
    });
    /* ]]&gt; */
    </script></span><span style="font-variant-ligatures: normal; font-variant-caps: normal; font-family: Quicksand, sans-serif; font-size: 14px; font-style: normal; font-weight: 600; color: #000000; text-align: start;"> </span></p><p style="text-align: center;"><span style="font-size: 14px;">[/su_column] [su_column size=»1/3&#8243; center=»no»]</span></p><p style="text-align: center;"><strong>ATERRIZAJE B747</strong></p><p style="text-align: center;"><span style="color: #000000; font-family: Quicksand, sans-serif; font-size: 14px; font-style: normal; font-variant-ligatures: normal; font-variant-caps: normal; font-weight: 600; text-align: start;"><a id="6a3f951bb2d83" rel="wp-video-lightbox" href="https://www.youtube.com/watch?v=qFf-gqkPQ-c&#038;width=800&#038;height=450" title=""><img decoding="async" src="https://ildefonsosegura.es/wp-content/uploads/ATERRIZAJE-B747.jpg" class="video_lightbox_anchor_image" alt="" /></a>    <script>
    /* <![CDATA[ */
    jQuery(document).ready(function($){
        $(function(){
            var width = $(window).innerWidth();
            var setwidth = parseFloat(800);
            var ratio = parseFloat(0.5625);
            var height = parseFloat(450);
            var link = 'https://www.youtube.com/watch?v=qFf-gqkPQ-c&amp;width=800&amp;height=450';
            if(width < setwidth)
            {
                height = Math.floor(width * 0.5625);
                //console.log("device width "+width+", set width "+800+", ratio "+0.5625+", new height "+ height);
                var new_url = wpvl_paramReplace('width', link, width);
                var new_url = wpvl_paramReplace('height', new_url, height);
                $("a#6a3f951bb2d83").attr('href', new_url);
                //console.log(new_url);
            }
        });
    });
    /* ]]&gt; */
    </script></span></p><p style="text-align: center;"><span style="font-size: 14px;">[/su_column] [su_column size=»1/3&#8243; center=»no»]</span></p><p style="text-align: center;"><strong>VUELO RASANTE B747</strong></p><p style="text-align: center;"><span style="font-family: Quicksand, sans-serif; font-size: 14px; font-style: normal; font-variant-ligatures: normal; font-variant-caps: normal; font-weight: 600; color: #000000;"><a id="6a3f951bb2db8" rel="wp-video-lightbox" href="https://www.youtube.com/watch?v=fJLNrDlhNEM&#038;width=800&#038;height=450" title=""><img decoding="async" src="https://ildefonsosegura.es/wp-content/uploads/VUELO-RASANTE.jpg" class="video_lightbox_anchor_image" alt="" /></a>    <script>
    /* <![CDATA[ */
    jQuery(document).ready(function($){
        $(function(){
            var width = $(window).innerWidth();
            var setwidth = parseFloat(800);
            var ratio = parseFloat(0.5625);
            var height = parseFloat(450);
            var link = 'https://www.youtube.com/watch?v=fJLNrDlhNEM&amp;width=800&amp;height=450';
            if(width < setwidth)
            {
                height = Math.floor(width * 0.5625);
                //console.log("device width "+width+", set width "+800+", ratio "+0.5625+", new height "+ height);
                var new_url = wpvl_paramReplace('width', link, width);
                var new_url = wpvl_paramReplace('height', new_url, height);
                $("a#6a3f951bb2db8").attr('href', new_url);
                //console.log(new_url);
            }
        });
    });
    /* ]]&gt; */
    </script></span></p><p style="text-align: center;"><span style="font-size: 14px;">[/su_column] [su_column size=»1/3&#8243; center=»no»]</span></p><p style="text-align: center;"><span style="font-size: 14px;">[/su_column][/su_row]</span></p>								</div>
				</div>
					</div>
		</div>
					</div>
		</section>
				<section class="elementor-section elementor-top-section elementor-element elementor-element-f97c770 elementor-section-boxed elementor-section-height-default elementor-section-height-default" data-id="f97c770" data-element_type="section" data-e-type="section">
						<div class="elementor-container elementor-column-gap-default">
					<div class="elementor-column elementor-col-100 elementor-top-column elementor-element elementor-element-62e4252" data-id="62e4252" data-element_type="column" data-e-type="column">
			<div class="elementor-widget-wrap elementor-element-populated">
						<div class="elementor-element elementor-element-0ac918a elementor-widget-divider--view-line elementor-widget elementor-widget-divider" data-id="0ac918a" data-element_type="widget" data-e-type="widget" data-widget_type="divider.default">
				<div class="elementor-widget-container">
							<div class="elementor-divider">
			<span class="elementor-divider-separator">
						</span>
		</div>
						</div>
				</div>
					</div>
		</div>
					</div>
		</section>
				<section class="elementor-section elementor-top-section elementor-element elementor-element-3889dc7 elementor-section-boxed elementor-section-height-default elementor-section-height-default" data-id="3889dc7" data-element_type="section" data-e-type="section">
						<div class="elementor-container elementor-column-gap-default">
					<div class="elementor-column elementor-col-100 elementor-top-column elementor-element elementor-element-566265a" data-id="566265a" data-element_type="column" data-e-type="column">
			<div class="elementor-widget-wrap elementor-element-populated">
						<div class="elementor-element elementor-element-6d133e0 elementor-widget elementor-widget-text-editor" data-id="6d133e0" data-element_type="widget" data-e-type="widget" data-widget_type="text-editor.default">
				<div class="elementor-widget-container">
									<p><span style="color: #800000;"><strong>VIDEOTUTORIAL CINEMA 4D </strong></span></p><center><iframe src="https://www.youtube.com/embed/34TGYUU-vUA" width="640" height="420" frameborder="0" allowfullscreen="allowfullscreen"></iframe></center><p style="text-align: left;"> </p>								</div>
				</div>
					</div>
		</div>
					</div>
		</section>
				<section class="elementor-section elementor-top-section elementor-element elementor-element-10393332 elementor-section-boxed elementor-section-height-default elementor-section-height-default" data-id="10393332" data-element_type="section" data-e-type="section">
						<div class="elementor-container elementor-column-gap-default">
					<div class="elementor-column elementor-col-100 elementor-top-column elementor-element elementor-element-3b87e80" data-id="3b87e80" data-element_type="column" data-e-type="column">
			<div class="elementor-widget-wrap elementor-element-populated">
						<div class="elementor-element elementor-element-766f6913 elementor-widget-divider--view-line elementor-widget elementor-widget-divider" data-id="766f6913" data-element_type="widget" data-e-type="widget" data-widget_type="divider.default">
				<div class="elementor-widget-container">
							<div class="elementor-divider">
			<span class="elementor-divider-separator">
						</span>
		</div>
						</div>
				</div>
					</div>
		</div>
					</div>
		</section>
				<section class="elementor-section elementor-top-section elementor-element elementor-element-9034655 elementor-section-full_width elementor-section-height-default elementor-section-height-default" data-id="9034655" data-element_type="section" data-e-type="section">
						<div class="elementor-container elementor-column-gap-default">
					<div class="elementor-column elementor-col-50 elementor-top-column elementor-element elementor-element-218bb9a0" data-id="218bb9a0" data-element_type="column" data-e-type="column">
			<div class="elementor-widget-wrap elementor-element-populated">
						<div class="elementor-element elementor-element-1e5a4d16 elementor-align-right elementor-invisible elementor-widget elementor-widget-button" data-id="1e5a4d16" data-element_type="widget" data-e-type="widget" data-settings="{&quot;_animation&quot;:&quot;shake&quot;}" data-widget_type="button.default">
				<div class="elementor-widget-container">
									<div class="elementor-button-wrapper">
					<a class="elementor-button elementor-button-link elementor-size-sm elementor-animation-grow" href="https://drive.google.com/open?id=0B_nJkCGJubucM0ROM3haWF9CaDA">
						<span class="elementor-button-content-wrapper">
									<span class="elementor-button-text">DESCARGA EL MATERIAL</span>
					</span>
					</a>
				</div>
								</div>
				</div>
					</div>
		</div>
				<div class="elementor-column elementor-col-50 elementor-top-column elementor-element elementor-element-7cbd0b4f" data-id="7cbd0b4f" data-element_type="column" data-e-type="column">
			<div class="elementor-widget-wrap elementor-element-populated">
						<div class="elementor-element elementor-element-2f1cff98 elementor-widget elementor-widget-html" data-id="2f1cff98" data-element_type="widget" data-e-type="widget" data-settings="{&quot;_animation&quot;:&quot;none&quot;}" data-widget_type="html.default">
				<div class="elementor-widget-container">
					<form action="https://www.paypal.com/cgi-bin/webscr" method="post" target="_blank">
<input type="hidden" name="cmd" value="_donations">
<input type="hidden" name="business" value="ildefonsosegura@gmail.com">
<input type="hidden" name="lc" value="ES">
<input type="hidden" name="item_name" value="MANTENIMIENTO DE LA PAGINA DE ILDEFONSOSEGURA">
<input type="hidden" name="no_note" value="0">
<input type="hidden" name="currency_code" value="EUR">
<input type="hidden" name="bn" value="PP-DonationsBF:paypal1.jpg:NonHostedGuest">
<input type="image" src="http://ildefonsosegura.es/wp-content/uploads/paypal-updated-1.png" border="0" name="submit" alt="PayPal. La forma rápida y segura de pagar en Internet.">
<img decoding="async" alt="" border="0" src="https://www.paypalobjects.com/es_ES/i/scr/pixel.gif" width="1" height="1">
</form>				</div>
				</div>
					</div>
		</div>
					</div>
		</section>
				<section class="elementor-section elementor-top-section elementor-element elementor-element-4484f42c elementor-section-boxed elementor-section-height-default elementor-section-height-default" data-id="4484f42c" data-element_type="section" data-e-type="section">
						<div class="elementor-container elementor-column-gap-default">
					<div class="elementor-column elementor-col-100 elementor-top-column elementor-element elementor-element-4d89f1d0" data-id="4d89f1d0" data-element_type="column" data-e-type="column">
			<div class="elementor-widget-wrap elementor-element-populated">
						<div class="elementor-element elementor-element-250548e2 elementor-widget-divider--view-line elementor-widget elementor-widget-divider" data-id="250548e2" data-element_type="widget" data-e-type="widget" data-widget_type="divider.default">
				<div class="elementor-widget-container">
							<div class="elementor-divider">
			<span class="elementor-divider-separator">
						</span>
		</div>
						</div>
				</div>
					</div>
		</div>
					</div>
		</section>
				<section class="elementor-section elementor-top-section elementor-element elementor-element-120dd900 elementor-section-full_width elementor-section-height-default elementor-section-height-default" data-id="120dd900" data-element_type="section" data-e-type="section">
						<div class="elementor-container elementor-column-gap-default">
					<div class="elementor-column elementor-col-100 elementor-top-column elementor-element elementor-element-396eee7d" data-id="396eee7d" data-element_type="column" data-e-type="column">
			<div class="elementor-widget-wrap elementor-element-populated">
						<div class="elementor-element elementor-element-5992bc21 elementor-widget elementor-widget-text-editor" data-id="5992bc21" data-element_type="widget" data-e-type="widget" data-widget_type="text-editor.default">
				<div class="elementor-widget-container">
									<div><div align="center"><center><strong style="color: #ff0000;">Suscríbete a mi canal de Youtube:</strong></center><div><div><div align="center"><p><script src="https://apis.google.com/js/platform.js"></script></p><div class="g-ytsubscribe" data-channel="ildefonsosegura" data-layout="full" data-count="default"> </div></div></div><p> </p><p style="text-align: center;">No te lo pierdas y comparte tus trabajos en mi página de facebook (<span style="color: #0000ff;"><strong><a style="color: #0000ff;" href="http://www.facebook.com/IldefonsoSeguraPage" target="_blank" rel="noopener noreferrer">IldefonsoSeguraPage</a></strong></span>)<br />Espero que te guste y compartas el vídeo. No dejes de compartir este post.</p><p style="text-align: center;">Así es como me puedes ayudar 🙂 Gracias</p></div></div></div>								</div>
				</div>
					</div>
		</div>
					</div>
		</section>
				</div>La entrada <a href="https://ildefonsosegura.es/boeing-747-en-accion-con-cinema4d-y-aftereffects-aterriza-sobrevuela-el-cielo-y-vuela-rasante-en-la-ciudad-by-ildefonsosegura/">Boeing 747 #Cinema4d y #AfterEffects: aterriza, sobrevuela el cielo y vuela rasante</a> apareció primero en <a href="https://ildefonsosegura.es">Ildefonso Segura</a>.]]></content:encoded>
					
					<wfw:commentRss>https://ildefonsosegura.es/boeing-747-en-accion-con-cinema4d-y-aftereffects-aterriza-sobrevuela-el-cielo-y-vuela-rasante-en-la-ciudad-by-ildefonsosegura/feed/</wfw:commentRss>
			<slash:comments>0</slash:comments>
		
		
			</item>
		<item>
		<title>Tutorial Photoshop Doble exposición simulada by @ildefonsosegura</title>
		<link>https://ildefonsosegura.es/tutorial-photoshop-doble-exposicion-simulada-by-ildefonsosegura/</link>
					<comments>https://ildefonsosegura.es/tutorial-photoshop-doble-exposicion-simulada-by-ildefonsosegura/#respond</comments>
		
		<dc:creator><![CDATA[Ildefonso Segura]]></dc:creator>
		<pubDate>Mon, 24 Apr 2017 12:08:30 +0000</pubDate>
				<category><![CDATA[Efectos]]></category>
		<category><![CDATA[Fotocomposición]]></category>
		<category><![CDATA[Películas]]></category>
		<category><![CDATA[Photoshop]]></category>
		<category><![CDATA[Tecnicas]]></category>
		<category><![CDATA[Textura]]></category>
		<category><![CDATA[Tutoriales]]></category>
		<category><![CDATA[Video]]></category>
		<category><![CDATA[Wallpaper]]></category>
		<category><![CDATA[beauty and beast]]></category>
		<category><![CDATA[bella]]></category>
		<category><![CDATA[bella y bestia]]></category>
		<category><![CDATA[bestia]]></category>
		<category><![CDATA[cc2015]]></category>
		<category><![CDATA[cc2016]]></category>
		<category><![CDATA[cc2017]]></category>
		<category><![CDATA[cs6]]></category>
		<category><![CDATA[doble exposición]]></category>
		<category><![CDATA[double expousure]]></category>
		<category><![CDATA[exponer]]></category>
		<category><![CDATA[exposición]]></category>
		<category><![CDATA[exposure]]></category>
		<category><![CDATA[ildefonsosegura]]></category>
		<category><![CDATA[pelicula]]></category>
		<category><![CDATA[photoshop]]></category>
		<category><![CDATA[tecnica]]></category>
		<category><![CDATA[tuto]]></category>
		<category><![CDATA[tutorial]]></category>
		<category><![CDATA[video]]></category>
		<category><![CDATA[VIDEOTUTORIAL]]></category>
		<category><![CDATA[wallpaper]]></category>
		<category><![CDATA[youtube]]></category>
		<guid isPermaLink="false">http://ildefonsosegura.es/?p=5952</guid>

					<description><![CDATA[<p>En este tutorial de Photoshop veremos como realizar un efecto de doble exposición simulado aprovechando la silueta bien conocida de la película de la bella y la bestia. Podréis hacer vuestras composiciones siguiendo la misma técnica. Puedes visitar la&#160;Web de Levente Szebó para ver su portfolio. Igualmente tienes una web para ver el&#160;Tutorial del póster [&#8230;]</p>
La entrada <a href="https://ildefonsosegura.es/tutorial-photoshop-doble-exposicion-simulada-by-ildefonsosegura/">Tutorial Photoshop Doble exposición simulada by @ildefonsosegura</a> apareció primero en <a href="https://ildefonsosegura.es">Ildefonso Segura</a>.]]></description>
										<content:encoded><![CDATA[<div data-elementor-type="wp-post" data-elementor-id="5952" class="elementor elementor-5952">
						<section class="elementor-section elementor-top-section elementor-element elementor-element-51bf02a7 elementor-section-boxed elementor-section-height-default elementor-section-height-default" data-id="51bf02a7" data-element_type="section" data-e-type="section">
						<div class="elementor-container elementor-column-gap-default">
					<div class="elementor-column elementor-col-100 elementor-top-column elementor-element elementor-element-55f05ec5" data-id="55f05ec5" data-element_type="column" data-e-type="column">
			<div class="elementor-widget-wrap elementor-element-populated">
						<div class="elementor-element elementor-element-443ea6a4 elementor-widget elementor-widget-text-editor" data-id="443ea6a4" data-element_type="widget" data-e-type="widget" data-widget_type="text-editor.default">
				<div class="elementor-widget-container">
									<p>En este tutorial de Photoshop veremos como realizar un efecto de doble exposición simulado aprovechando la silueta bien conocida de la película de la bella y la bestia. Podréis hacer vuestras composiciones siguiendo la misma técnica.</p>
<p>Puedes visitar la&nbsp;<a href="http://ego-alterego.com/bafta-2016-best-film-posters-illustration-levente-szabo/#.WPPOI1Xyipo" target="_blank" rel="noopener noreferrer">Web de Levente Szebó</a> para ver su portfolio. Igualmente tienes una web para ver el&nbsp;<a href="https://pashtotutorialz.blogspot.com.es/2016/04/photoshop-tutorial-how-to-make-amazing.html" target="_blank" rel="noopener noreferrer">Tutorial del póster original</a></p>
<p>&nbsp;</p>
<p>Te ofrezco un making of del tutorial que verás más abajo junto con los materiales que ofrezco</p>
<p>&nbsp;</p>
<blockquote class="instagram-media" style="background: #FFF; border: 0; border-radius: 3px; box-shadow: 0 0 1px 0 rgba(0,0,0,0.5),0 1px 10px 0 rgba(0,0,0,0.15); margin: 1px; max-width: 658px; padding: 0; width: calc(100% - 2px);" data-instgrm-captioned="" data-instgrm-version="7">
<div style="padding: 8px;">
<div style="background: #F8F8F8; line-height: 0; margin-top: 40px; padding: 50.0% 0; text-align: center; width: 100%;"></div>
<p style="margin: 8px 0 0 0; padding: 0 4px;"><a style="color: #000; font-family: Arial,sans-serif; font-size: 14px; font-style: normal; font-weight: normal; line-height: 17px; text-decoration: none; word-wrap: break-word;" href="https://www.instagram.com/p/BTPJPc2hlY5/" target="_blank" rel="noopener noreferrer">(Ponle sonido) Nuevo tutorial #photoshop para comenzar la semana. Un efecto doble exposición simulada. #beautyandthebeast #bellaybestia #labellaylabestia #double #exposure #doubleexposure</a></p>
<p style="color: #c9c8cd; font-family: Arial,sans-serif; font-size: 14px; line-height: 17px; margin-bottom: 0; margin-top: 8px; overflow: hidden; padding: 8px 0 7px; text-align: center; text-overflow: ellipsis; white-space: nowrap;">Una publicación compartida de Ildefonso Segura (@ildefonsosegura) el <time style="font-family: Arial,sans-serif; font-size: 14px; line-height: 17px;" datetime="2017-04-23T17:42:06+00:00">23 de Abr de 2017 a la(s) 10:42 PDT</time></p>
</div>
</blockquote>
<p><script async="" defer="" src="//platform.instagram.com/en_US/embeds.js"></script></p>
<p><strong><br /></strong></p><p><strong>TUTORIAL&nbsp;INTEGRACION IMAGENES RESPETANDO SOMBRAS</strong></p>
<p style="text-align: left;"><iframe src="https://www.youtube.com/embed/oYzf7yAOFno?rel=0" width="640" height="420" frameborder="0" allowfullscreen="allowfullscreen"></iframe></p>
<div></div>
<p style="text-align: left;">
</p><p>&nbsp;</p>								</div>
				</div>
					</div>
		</div>
					</div>
		</section>
				<section class="elementor-section elementor-top-section elementor-element elementor-element-65abbd36 elementor-section-boxed elementor-section-height-default elementor-section-height-default" data-id="65abbd36" data-element_type="section" data-e-type="section">
						<div class="elementor-container elementor-column-gap-default">
					<div class="elementor-column elementor-col-100 elementor-top-column elementor-element elementor-element-7283f7be" data-id="7283f7be" data-element_type="column" data-e-type="column">
			<div class="elementor-widget-wrap elementor-element-populated">
						<div class="elementor-element elementor-element-3734b430 elementor-widget-divider--view-line elementor-widget elementor-widget-divider" data-id="3734b430" data-element_type="widget" data-e-type="widget" data-widget_type="divider.default">
				<div class="elementor-widget-container">
							<div class="elementor-divider">
			<span class="elementor-divider-separator">
						</span>
		</div>
						</div>
				</div>
					</div>
		</div>
					</div>
		</section>
				<section class="elementor-section elementor-top-section elementor-element elementor-element-7a4c3607 elementor-section-full_width elementor-section-height-default elementor-section-height-default" data-id="7a4c3607" data-element_type="section" data-e-type="section">
						<div class="elementor-container elementor-column-gap-default">
					<div class="elementor-column elementor-col-50 elementor-top-column elementor-element elementor-element-67d766fb" data-id="67d766fb" data-element_type="column" data-e-type="column">
			<div class="elementor-widget-wrap elementor-element-populated">
						<div class="elementor-element elementor-element-18abdd08 elementor-align-right elementor-invisible elementor-widget elementor-widget-button" data-id="18abdd08" data-element_type="widget" data-e-type="widget" data-settings="{&quot;_animation&quot;:&quot;shake&quot;}" data-widget_type="button.default">
				<div class="elementor-widget-container">
									<div class="elementor-button-wrapper">
					<a class="elementor-button elementor-button-link elementor-size-sm elementor-animation-grow" href="https://drive.google.com/file/d/0B_nJkCGJubucb0EtZkk2T0w5ZGM/view?usp=sharing" target="_blank">
						<span class="elementor-button-content-wrapper">
									<span class="elementor-button-text">DESCARGA EL MATERIAL</span>
					</span>
					</a>
				</div>
								</div>
				</div>
					</div>
		</div>
				<div class="elementor-column elementor-col-50 elementor-top-column elementor-element elementor-element-3e65ad17" data-id="3e65ad17" data-element_type="column" data-e-type="column">
			<div class="elementor-widget-wrap elementor-element-populated">
						<div class="elementor-element elementor-element-20ef2c7a elementor-widget elementor-widget-html" data-id="20ef2c7a" data-element_type="widget" data-e-type="widget" data-settings="{&quot;_animation&quot;:&quot;none&quot;}" data-widget_type="html.default">
				<div class="elementor-widget-container">
					<form action="https://www.paypal.com/cgi-bin/webscr" method="post" target="_blank">
<input type="hidden" name="cmd" value="_donations">
<input type="hidden" name="business" value="ildefonsosegura@gmail.com">
<input type="hidden" name="lc" value="ES">
<input type="hidden" name="item_name" value="MANTENIMIENTO DE LA PAGINA DE ILDEFONSOSEGURA">
<input type="hidden" name="no_note" value="0">
<input type="hidden" name="currency_code" value="EUR">
<input type="hidden" name="bn" value="PP-DonationsBF:paypal1.jpg:NonHostedGuest">
<input type="image" src="http://ildefonsosegura.es/wp-content/uploads/paypal-updated-1.png" border="0" name="submit" alt="PayPal. La forma rápida y segura de pagar en Internet.">
<img decoding="async" alt="" border="0" src="https://www.paypalobjects.com/es_ES/i/scr/pixel.gif" width="1" height="1">
</form>				</div>
				</div>
					</div>
		</div>
					</div>
		</section>
				<section class="elementor-section elementor-top-section elementor-element elementor-element-2c56d5e6 elementor-section-boxed elementor-section-height-default elementor-section-height-default" data-id="2c56d5e6" data-element_type="section" data-e-type="section">
						<div class="elementor-container elementor-column-gap-default">
					<div class="elementor-column elementor-col-100 elementor-top-column elementor-element elementor-element-28952703" data-id="28952703" data-element_type="column" data-e-type="column">
			<div class="elementor-widget-wrap elementor-element-populated">
						<div class="elementor-element elementor-element-519d8f9 elementor-widget-divider--view-line elementor-widget elementor-widget-divider" data-id="519d8f9" data-element_type="widget" data-e-type="widget" data-widget_type="divider.default">
				<div class="elementor-widget-container">
							<div class="elementor-divider">
			<span class="elementor-divider-separator">
						</span>
		</div>
						</div>
				</div>
					</div>
		</div>
					</div>
		</section>
				<section class="elementor-section elementor-top-section elementor-element elementor-element-2cb17818 elementor-section-full_width elementor-section-height-default elementor-section-height-default" data-id="2cb17818" data-element_type="section" data-e-type="section">
						<div class="elementor-container elementor-column-gap-default">
					<div class="elementor-column elementor-col-100 elementor-top-column elementor-element elementor-element-2e366af2" data-id="2e366af2" data-element_type="column" data-e-type="column">
			<div class="elementor-widget-wrap elementor-element-populated">
						<div class="elementor-element elementor-element-56b907f5 elementor-widget elementor-widget-text-editor" data-id="56b907f5" data-element_type="widget" data-e-type="widget" data-widget_type="text-editor.default">
				<div class="elementor-widget-container">
									<div><div align="center"><center><strong style="color: #ff0000;">Suscríbete a mi canal de Youtube:</strong></center><div><div><div align="center"><p><script src="https://apis.google.com/js/platform.js"></script></p><div class="g-ytsubscribe" data-channel="ildefonsosegura" data-layout="full" data-count="default"> </div></div></div><p> </p><p style="text-align: center;">No te lo pierdas y comparte tus trabajos en mi página de facebook (<span style="color: #0000ff;"><strong><a style="color: #0000ff;" href="http://www.facebook.com/IldefonsoSeguraPage" target="_blank" rel="noopener noreferrer">IldefonsoSeguraPage</a></strong></span>)<br />Espero que te guste y compartas el vídeo. No dejes de compartir este post.</p><p style="text-align: center;">Así es como me puedes ayudar 🙂 Gracias</p></div></div></div>								</div>
				</div>
					</div>
		</div>
					</div>
		</section>
				</div>La entrada <a href="https://ildefonsosegura.es/tutorial-photoshop-doble-exposicion-simulada-by-ildefonsosegura/">Tutorial Photoshop Doble exposición simulada by @ildefonsosegura</a> apareció primero en <a href="https://ildefonsosegura.es">Ildefonso Segura</a>.]]></content:encoded>
					
					<wfw:commentRss>https://ildefonsosegura.es/tutorial-photoshop-doble-exposicion-simulada-by-ildefonsosegura/feed/</wfw:commentRss>
			<slash:comments>0</slash:comments>
		
		
			</item>
	</channel>
</rss>

<!--
Performance optimized by W3 Total Cache. Learn more: https://www.boldgrid.com/w3-total-cache/?utm_source=w3tc&utm_medium=footer_comment&utm_campaign=free_plugin

Caché de objetos 0/53 objetos usando Redis
Caché de base de datos usando Redis

Served from: ildefonsosegura.es @ 2026-07-17 02:53:29 by W3 Total Cache
--><br />
<b>Fatal error</b>:  Uncaught TypeError: mysqli_num_fields(): Argument #1 ($result) must be of type mysqli_result, bool given in /var/www/vhosts/ildefonsosegura.es/httpdocs/wp-includes/class-wpdb.php:3870
Stack trace:
#0 /var/www/vhosts/ildefonsosegura.es/httpdocs/wp-includes/class-wpdb.php(3870): mysqli_num_fields()
#1 /var/www/vhosts/ildefonsosegura.es/httpdocs/wp-includes/class-wpdb.php(785): wpdb-&gt;load_col_info()
#2 /var/www/vhosts/ildefonsosegura.es/httpdocs/wp-content/plugins/w3-total-cache/DbCache_WpdbInjection_QueryCaching.php(230): wpdb-&gt;__get()
#3 /var/www/vhosts/ildefonsosegura.es/httpdocs/wp-content/plugins/w3-total-cache/DbCache_WpdbNew.php(216): W3TC\DbCache_WpdbInjection_QueryCaching-&gt;query()
#4 /var/www/vhosts/ildefonsosegura.es/httpdocs/wp-content/plugins/aaa-option-optimizer/src/class-database.php(199): W3TC\DbCache_WpdbNew-&gt;query()
#5 /var/www/vhosts/ildefonsosegura.es/httpdocs/wp-content/plugins/aaa-option-optimizer/src/class-plugin.php(182): Progress_Planner\OptionOptimizer\Database::batch_insert()
#6 /var/www/vhosts/ildefonsosegura.es/httpdocs/wp-includes/class-wp-hook.php(341): Progress_Planner\OptionOptimizer\Plugin-&gt;update_tracked_options()
#7 /var/www/vhosts/ildefonsosegura.es/httpdocs/wp-includes/class-wp-hook.php(365): WP_Hook-&gt;apply_filters()
#8 /var/www/vhosts/ildefonsosegura.es/httpdocs/wp-includes/plugin.php(522): WP_Hook-&gt;do_action()
#9 /var/www/vhosts/ildefonsosegura.es/httpdocs/wp-includes/load.php(1308): do_action()
#10 [internal function]: shutdown_action_hook()
#11 {main}
  thrown in <b>/var/www/vhosts/ildefonsosegura.es/httpdocs/wp-includes/class-wpdb.php</b> on line <b>3870</b><br />