<?xml version="1.0" encoding="UTF-8"?><rss version="2.0"
	xmlns:content="http://purl.org/rss/1.0/modules/content/"
	xmlns:wfw="http://wellformedweb.org/CommentAPI/"
	xmlns:dc="http://purl.org/dc/elements/1.1/"
	xmlns:atom="http://www.w3.org/2005/Atom"
	xmlns:sy="http://purl.org/rss/1.0/modules/syndication/"
	xmlns:slash="http://purl.org/rss/1.0/modules/slash/"
	>

<channel>
	<title>cara | Ildefonso Segura</title>
	<atom:link href="https://ildefonsosegura.es/tag/cara/feed/" rel="self" type="application/rss+xml" />
	<link>https://ildefonsosegura.es</link>
	<description>Tutoriales de diseño y animación</description>
	<lastBuildDate>Sun, 11 Jun 2023 17:33:21 +0000</lastBuildDate>
	<language>es</language>
	<sy:updatePeriod>
	hourly	</sy:updatePeriod>
	<sy:updateFrequency>
	1	</sy:updateFrequency>
	<generator>https://wordpress.org/?v=7.0</generator>

<image>
	<url>https://ildefonsosegura.es/wp-content/uploads/cropped-Favicon-new-logo-website-32x32.png</url>
	<title>cara | Ildefonso Segura</title>
	<link>https://ildefonsosegura.es</link>
	<width>32</width>
	<height>32</height>
</image> 
	<item>
		<title>Vaciado de volúmenes con boleanos en Cinema4D</title>
		<link>https://ildefonsosegura.es/vaciado-de-volumenes-con-boleanos-en-cinema4d/</link>
					<comments>https://ildefonsosegura.es/vaciado-de-volumenes-con-boleanos-en-cinema4d/#respond</comments>
		
		<dc:creator><![CDATA[Ildefonso Segura]]></dc:creator>
		<pubDate>Tue, 24 Jul 2018 16:10:53 +0000</pubDate>
				<category><![CDATA[3D]]></category>
		<category><![CDATA[Cinema4D]]></category>
		<category><![CDATA[Tecnicas]]></category>
		<category><![CDATA[Tutoriales]]></category>
		<category><![CDATA[Wallpaper]]></category>
		<category><![CDATA[boleano]]></category>
		<category><![CDATA[c4d]]></category>
		<category><![CDATA[calabaza]]></category>
		<category><![CDATA[cara]]></category>
		<category><![CDATA[cinema4D]]></category>
		<category><![CDATA[extrusión]]></category>
		<category><![CDATA[gloriasanis]]></category>
		<category><![CDATA[halloween]]></category>
		<category><![CDATA[ildefonsosegura]]></category>
		<category><![CDATA[r15]]></category>
		<category><![CDATA[r16]]></category>
		<category><![CDATA[r17]]></category>
		<category><![CDATA[r18]]></category>
		<category><![CDATA[r19]]></category>
		<category><![CDATA[texto 3d]]></category>
		<category><![CDATA[texto vacío]]></category>
		<category><![CDATA[textura]]></category>
		<category><![CDATA[texturizar]]></category>
		<category><![CDATA[tuto]]></category>
		<category><![CDATA[tutorial]]></category>
		<category><![CDATA[vaciado]]></category>
		<category><![CDATA[wallpaper]]></category>
		<category><![CDATA[youtube]]></category>
		<guid isPermaLink="false">http://ildefonsosegura.es/?p=1303</guid>

					<description><![CDATA[<p>Ya hicimos un tutorial previo donde explicabamos cómo hacer la textura de calabaza que veis. Ve a ver el tutorial. Ahora vamos a usar el BOLEANO en cinema4D para crear vaciados que nos ofrece una gran posibilidad de realizar combinaciones graciosas como la que veis.     VIDEOTUTORIAL ﻿   Suscríbete a mi canal de [&#8230;]</p>
La entrada <a href="https://ildefonsosegura.es/vaciado-de-volumenes-con-boleanos-en-cinema4d/">Vaciado de volúmenes con boleanos en Cinema4D</a> apareció primero en <a href="https://ildefonsosegura.es">Ildefonso Segura</a>.]]></description>
										<content:encoded><![CDATA[<div data-elementor-type="wp-post" data-elementor-id="1303" class="elementor elementor-1303">
						<section class="elementor-section elementor-top-section elementor-element elementor-element-3e56669b elementor-section-boxed elementor-section-height-default elementor-section-height-default" data-id="3e56669b" data-element_type="section" data-e-type="section">
						<div class="elementor-container elementor-column-gap-default">
					<div class="elementor-column elementor-col-100 elementor-top-column elementor-element elementor-element-71586457" data-id="71586457" data-element_type="column" data-e-type="column">
			<div class="elementor-widget-wrap elementor-element-populated">
						<div class="elementor-element elementor-element-7e44d4c8 elementor-widget elementor-widget-text-editor" data-id="7e44d4c8" data-element_type="widget" data-e-type="widget" data-widget_type="text-editor.default">
				<div class="elementor-widget-container">
									<p><span style="color: #800000;"><strong><img fetchpriority="high" decoding="async" class="size-full wp-image-1304 aligncenter" src="https://ildefonsosegura.es/wp-content/uploads/Cara-de-calabaza.jpg" alt="Cara-de-calabaza" width="600" height="338" /></strong></span></p><center></center><p>Ya hicimos un tutorial previo donde explicabamos cómo hacer la textura de calabaza que veis. <a title="Texto con textura de calabaza con Cinema4D y Photoshop (Wallpaper halloween)" href="https://ildefonsosegura.es/texto-con-textura-de-calabaza-con-cinema4d-y-photoshop-wallpaper-halloween/" target="_blank" rel="noopener noreferrer">Ve a ver el tutorial</a>.</p><p>Ahora vamos a usar el BOLEANO en cinema4D para crear vaciados que nos ofrece una gran posibilidad de realizar combinaciones graciosas como la que veis.</p><p> </p><p> </p><p><span style="color: #800000;"><strong>VIDEOTUTORIAL </strong></span></p><center><iframe src="https://www.youtube.com/embed/XipXSyzl6-s" width="640" height="420" frameborder="0" allowfullscreen="allowfullscreen"><span data-mce-type="bookmark" style="display: inline-block; width: 0px; overflow: hidden; line-height: 0;" class="mce_SELRES_start">﻿</span></iframe></center><div align="right"><div><p style="text-align: left;"> </p></div></div>								</div>
				</div>
					</div>
		</div>
					</div>
		</section>
				<section class="elementor-section elementor-top-section elementor-element elementor-element-4c900ceb elementor-section-full_width elementor-section-height-default elementor-section-height-default" data-id="4c900ceb" data-element_type="section" data-e-type="section">
						<div class="elementor-container elementor-column-gap-default">
					<div class="elementor-column elementor-col-100 elementor-top-column elementor-element elementor-element-49c8f601" data-id="49c8f601" data-element_type="column" data-e-type="column">
			<div class="elementor-widget-wrap elementor-element-populated">
						<div class="elementor-element elementor-element-5bcab826 elementor-widget elementor-widget-text-editor" data-id="5bcab826" data-element_type="widget" data-e-type="widget" data-widget_type="text-editor.default">
				<div class="elementor-widget-container">
									<div><div align="center"><center><strong style="color: #ff0000;">Suscríbete a mi canal de Youtube:</strong></center><div><div><div align="center"><p><script src="https://apis.google.com/js/platform.js"></script></p><div class="g-ytsubscribe" data-channel="ildefonsosegura" data-layout="full" data-count="default"> </div></div></div><p> </p><p style="text-align: center;">No te lo pierdas y comparte tus trabajos en mi página de facebook (<span style="color: #0000ff;"><strong><a style="color: #0000ff;" href="http://www.facebook.com/IldefonsoSeguraPage" target="_blank" rel="noopener noreferrer">IldefonsoSeguraPage</a></strong></span>)<br />Espero que te guste y compartas el vídeo. No dejes de compartir este post.</p><p style="text-align: center;">Así es como me puedes ayudar 🙂 Gracias</p></div></div></div>								</div>
				</div>
					</div>
		</div>
					</div>
		</section>
				</div>La entrada <a href="https://ildefonsosegura.es/vaciado-de-volumenes-con-boleanos-en-cinema4d/">Vaciado de volúmenes con boleanos en Cinema4D</a> apareció primero en <a href="https://ildefonsosegura.es">Ildefonso Segura</a>.]]></content:encoded>
					
					<wfw:commentRss>https://ildefonsosegura.es/vaciado-de-volumenes-con-boleanos-en-cinema4d/feed/</wfw:commentRss>
			<slash:comments>0</slash:comments>
		
		
			</item>
		<item>
		<title>Tutorial Photoshop para crear y pintar una máscara de carnaval by @ildefonsosegura</title>
		<link>https://ildefonsosegura.es/tutorial-photoshop-para-crear-y-pintar-una-mascara-de-carnaval-by-ildefonsosegura/</link>
					<comments>https://ildefonsosegura.es/tutorial-photoshop-para-crear-y-pintar-una-mascara-de-carnaval-by-ildefonsosegura/#respond</comments>
		
		<dc:creator><![CDATA[Ildefonso Segura]]></dc:creator>
		<pubDate>Tue, 06 Mar 2018 20:40:39 +0000</pubDate>
				<category><![CDATA[Efectos]]></category>
		<category><![CDATA[Photoshop]]></category>
		<category><![CDATA[Speed Art]]></category>
		<category><![CDATA[Tecnicas]]></category>
		<category><![CDATA[Tutoriales]]></category>
		<category><![CDATA[Video]]></category>
		<category><![CDATA[Wallpaper]]></category>
		<category><![CDATA[adobe]]></category>
		<category><![CDATA[antifaz]]></category>
		<category><![CDATA[cabeza]]></category>
		<category><![CDATA[cara]]></category>
		<category><![CDATA[careta]]></category>
		<category><![CDATA[carnaval]]></category>
		<category><![CDATA[carnavalesca]]></category>
		<category><![CDATA[carnival]]></category>
		<category><![CDATA[cc2014]]></category>
		<category><![CDATA[cc2015]]></category>
		<category><![CDATA[cinta]]></category>
		<category><![CDATA[cs]]></category>
		<category><![CDATA[cs4]]></category>
		<category><![CDATA[cs5]]></category>
		<category><![CDATA[cs6]]></category>
		<category><![CDATA[efecto]]></category>
		<category><![CDATA[humano]]></category>
		<category><![CDATA[image]]></category>
		<category><![CDATA[imagen]]></category>
		<category><![CDATA[máscara]]></category>
		<category><![CDATA[mask]]></category>
		<category><![CDATA[photoshp]]></category>
		<category><![CDATA[pint]]></category>
		<category><![CDATA[pintar]]></category>
		<category><![CDATA[poster]]></category>
		<category><![CDATA[rostro]]></category>
		<category><![CDATA[simulacion]]></category>
		<category><![CDATA[tuto]]></category>
		<category><![CDATA[tutorial]]></category>
		<category><![CDATA[VIDEOTUTORIAL]]></category>
		<guid isPermaLink="false">http://ildefonsosegura.es/?p=5891</guid>

					<description><![CDATA[<p>En este tutorial de photoshop aprenderás a crear una máscara de carnaval usando un rostro humano. Aprenderás también ciertas técnicas que te ayudarán a simular la pintura y los dibujos de la propia máscara creada desde el rostro.Seguro que aprendes algo nuevo. No te lo pierdas y disfruta del photoshop como yo Te muestro varios [&#8230;]</p>
La entrada <a href="https://ildefonsosegura.es/tutorial-photoshop-para-crear-y-pintar-una-mascara-de-carnaval-by-ildefonsosegura/">Tutorial Photoshop para crear y pintar una máscara de carnaval by @ildefonsosegura</a> apareció primero en <a href="https://ildefonsosegura.es">Ildefonso Segura</a>.]]></description>
										<content:encoded><![CDATA[<div data-elementor-type="wp-post" data-elementor-id="5891" class="elementor elementor-5891">
						<section class="elementor-section elementor-top-section elementor-element elementor-element-7f81a906 elementor-section-boxed elementor-section-height-default elementor-section-height-default" data-id="7f81a906" data-element_type="section" data-e-type="section">
						<div class="elementor-container elementor-column-gap-default">
					<div class="elementor-column elementor-col-100 elementor-top-column elementor-element elementor-element-6c3242ec" data-id="6c3242ec" data-element_type="column" data-e-type="column">
			<div class="elementor-widget-wrap elementor-element-populated">
						<div class="elementor-element elementor-element-aa8e54e elementor-widget elementor-widget-text-editor" data-id="aa8e54e" data-element_type="widget" data-e-type="widget" data-widget_type="text-editor.default">
				<div class="elementor-widget-container">
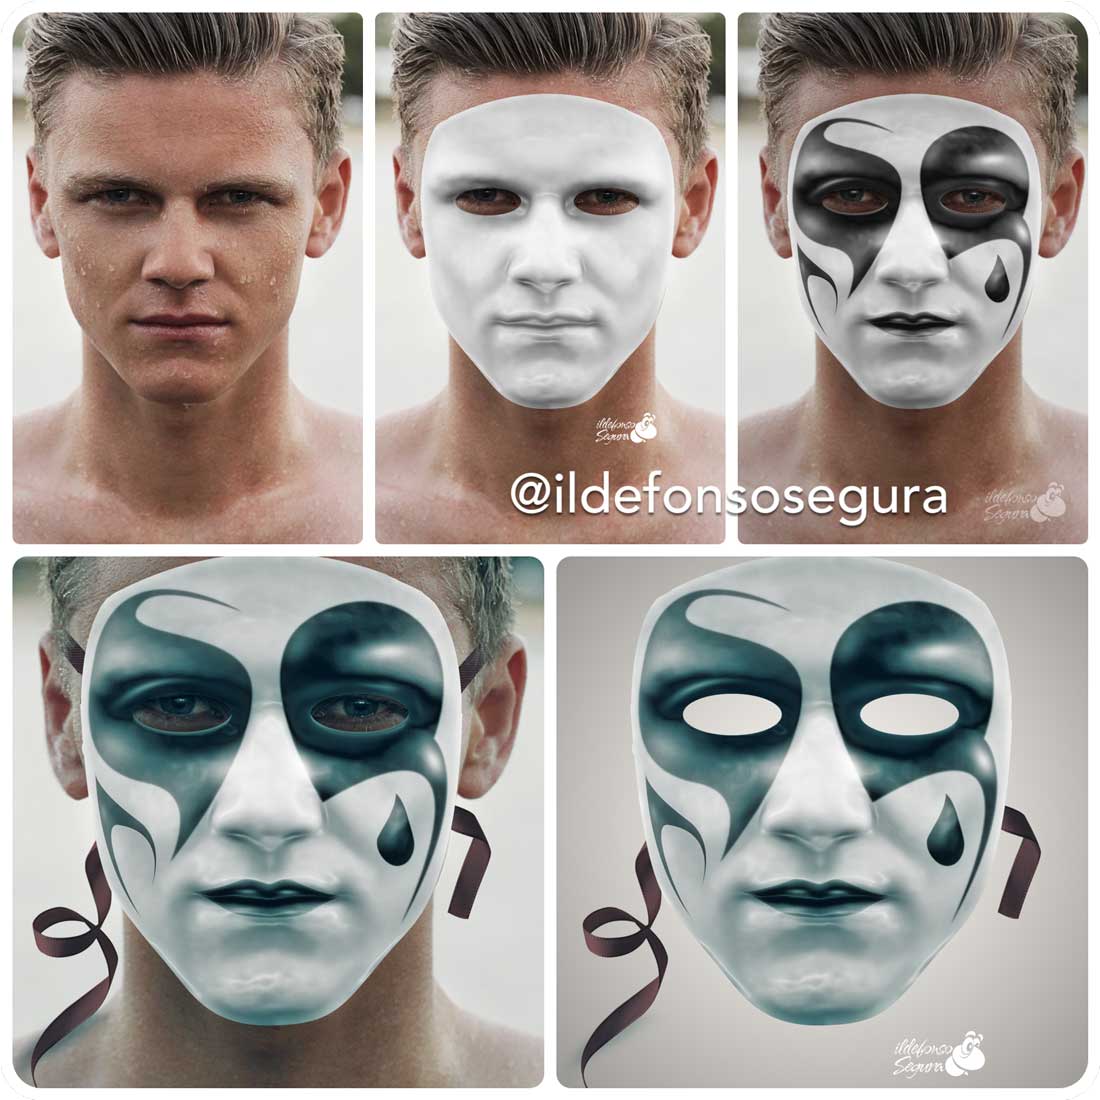
									<p>En este tutorial de photoshop aprenderás a crear una máscara de carnaval usando un rostro humano.</p><p>Aprenderás también ciertas técnicas que te ayudarán a simular la pintura y los dibujos de la propia máscara creada desde el rostro.<br />Seguro que aprendes algo nuevo. No te lo pierdas y disfruta del photoshop como yo</p><p>Te muestro varios pasos en imágenes <img decoding="async" class="aligncenter size-full wp-image-5892" src="https://ildefonsosegura.es/wp-content/uploads/mascara-1.jpg" alt="" width="1100" height="1100" srcset="https://ildefonsosegura.es/wp-content/uploads/mascara-1.jpg 1100w, https://ildefonsosegura.es/wp-content/uploads/mascara-1-150x150.jpg 150w, https://ildefonsosegura.es/wp-content/uploads/mascara-1-300x300.jpg 300w, https://ildefonsosegura.es/wp-content/uploads/mascara-1-768x768.jpg 768w, https://ildefonsosegura.es/wp-content/uploads/mascara-1-1024x1024.jpg 1024w" sizes="(max-width: 1100px) 100vw, 1100px" /></p><p> </p><p>El resultado final está en tu mano</p><p><strong>TUTORIAL CREAR Y PINTAR MASCARA DE CARNAVAL</strong></p><p style="text-align: left;"><iframe src="https://www.youtube.com/embed/q6JzdOb0Y74?rel=0" width="640" height="420" frameborder="0" allowfullscreen="allowfullscreen"></iframe></p><p style="text-align: left;">En el siguiente vídeo te muestro el speedart si eres uno de los amantes de este tipo de entretenimiento. Disfrútalo</p><p style="text-align: left;"><strong>SPEEDART MASCARA CARNAVAL CON PHOTOSHOP</strong></p><p style="text-align: left;"><iframe src="https://www.youtube.com/embed/hIugVuAzxpc?rel=0" width="640" height="420" frameborder="0" allowfullscreen="allowfullscreen"><span data-mce-type="bookmark" style="display: inline-block; width: 0px; overflow: hidden; line-height: 0;" class="mce_SELRES_start">﻿</span></iframe></p><div> </div><p> </p>								</div>
				</div>
					</div>
		</div>
					</div>
		</section>
				<section class="elementor-section elementor-top-section elementor-element elementor-element-307a708d elementor-section-full_width elementor-section-height-default elementor-section-height-default" data-id="307a708d" data-element_type="section" data-e-type="section">
						<div class="elementor-container elementor-column-gap-default">
					<div class="elementor-column elementor-col-100 elementor-top-column elementor-element elementor-element-34e1b38e" data-id="34e1b38e" data-element_type="column" data-e-type="column">
			<div class="elementor-widget-wrap elementor-element-populated">
						<div class="elementor-element elementor-element-703bee8 elementor-widget elementor-widget-text-editor" data-id="703bee8" data-element_type="widget" data-e-type="widget" data-widget_type="text-editor.default">
				<div class="elementor-widget-container">
									<div><div align="center"><center><strong style="color: #ff0000;">Suscríbete a mi canal de Youtube:</strong></center><div><div><div align="center"><p><script src="https://apis.google.com/js/platform.js"></script></p><div class="g-ytsubscribe" data-channel="ildefonsosegura" data-layout="full" data-count="default"> </div></div></div><p> </p><p style="text-align: center;">No te lo pierdas y comparte tus trabajos en mi página de facebook (<span style="color: #0000ff;"><strong><a style="color: #0000ff;" href="http://www.facebook.com/IldefonsoSeguraPage" target="_blank" rel="noopener noreferrer">IldefonsoSeguraPage</a></strong></span>)<br />Espero que te guste y compartas el vídeo. No dejes de compartir este post.</p><p style="text-align: center;">Así es como me puedes ayudar 🙂 Gracias</p></div></div></div>								</div>
				</div>
					</div>
		</div>
					</div>
		</section>
				</div>La entrada <a href="https://ildefonsosegura.es/tutorial-photoshop-para-crear-y-pintar-una-mascara-de-carnaval-by-ildefonsosegura/">Tutorial Photoshop para crear y pintar una máscara de carnaval by @ildefonsosegura</a> apareció primero en <a href="https://ildefonsosegura.es">Ildefonso Segura</a>.]]></content:encoded>
					
					<wfw:commentRss>https://ildefonsosegura.es/tutorial-photoshop-para-crear-y-pintar-una-mascara-de-carnaval-by-ildefonsosegura/feed/</wfw:commentRss>
			<slash:comments>0</slash:comments>
		
		
			</item>
		<item>
		<title>Crea un poster con trucos de luz y color con #photoshop by @ildefonsosegura</title>
		<link>https://ildefonsosegura.es/crea-un-poster-con-trucos-de-luz-y-color-con-photoshop-by-ildefonsosegura/</link>
					<comments>https://ildefonsosegura.es/crea-un-poster-con-trucos-de-luz-y-color-con-photoshop-by-ildefonsosegura/#respond</comments>
		
		<dc:creator><![CDATA[Ildefonso Segura]]></dc:creator>
		<pubDate>Sat, 28 May 2016 08:38:43 +0000</pubDate>
				<category><![CDATA[Efectos]]></category>
		<category><![CDATA[Fotocomposición]]></category>
		<category><![CDATA[Photoshop]]></category>
		<category><![CDATA[Tecnicas]]></category>
		<category><![CDATA[Tutoriales]]></category>
		<category><![CDATA[Video]]></category>
		<category><![CDATA[Wallpaper]]></category>
		<category><![CDATA[cara]]></category>
		<category><![CDATA[cc2015]]></category>
		<category><![CDATA[color]]></category>
		<category><![CDATA[colour]]></category>
		<category><![CDATA[efecto]]></category>
		<category><![CDATA[efectos]]></category>
		<category><![CDATA[effects]]></category>
		<category><![CDATA[face]]></category>
		<category><![CDATA[fotomanipulación]]></category>
		<category><![CDATA[fotomontaje]]></category>
		<category><![CDATA[illuminating]]></category>
		<category><![CDATA[lighting]]></category>
		<category><![CDATA[luz]]></category>
		<category><![CDATA[photoshop]]></category>
		<category><![CDATA[retoque]]></category>
		<category><![CDATA[rostro]]></category>
		<category><![CDATA[tecnicas]]></category>
		<category><![CDATA[trucos]]></category>
		<category><![CDATA[tuto]]></category>
		<category><![CDATA[tutorial]]></category>
		<category><![CDATA[video]]></category>
		<category><![CDATA[VIDEOTUTORIAL]]></category>
		<category><![CDATA[wall]]></category>
		<category><![CDATA[wallpaper]]></category>
		<category><![CDATA[youtube]]></category>
		<guid isPermaLink="false">http://ildefonsosegura.es/?p=5328</guid>

					<description><![CDATA[<p>En este tutorial de photoshop te muestro algunos trucos de iluminación y color con resultados fantásticos. Respeta sombras y contrastes originales cambiando colores y tonos de piel. Haremos un efecto fantasía final que le da un toque distinguido a la composición wallpaper. Pasaremos de esta imagen: &#160; A esta: No te lo pierdas y comparte [&#8230;]</p>

La entrada <a href="https://ildefonsosegura.es/crea-un-poster-con-trucos-de-luz-y-color-con-photoshop-by-ildefonsosegura/">Crea un poster con trucos de luz y color con #photoshop by @ildefonsosegura</a> apareció primero en <a href="https://ildefonsosegura.es">Ildefonso Segura</a>.]]></description>
										<content:encoded><![CDATA[<p>En este tutorial de photoshop te muestro algunos trucos de iluminación y color con resultados fantásticos.</p>
<p>Respeta sombras y contrastes originales cambiando colores y tonos de piel.</p>
<p>Haremos un efecto fantasía final que le da un toque distinguido a la composición wallpaper. Pasaremos de esta imagen:</p>
<p><img decoding="async" class="aligncenter size-full wp-image-5322" src="https://ildefonsosegura.es/wp-content/uploads/blanco-a-nego-4.jpg" alt="blanco-a-nego-4" width="756" height="425" srcset="https://ildefonsosegura.es/wp-content/uploads/blanco-a-nego-4.jpg 756w, https://ildefonsosegura.es/wp-content/uploads/blanco-a-nego-4-300x169.jpg 300w, https://ildefonsosegura.es/wp-content/uploads/blanco-a-nego-4-720x406.jpg 720w" sizes="(max-width: 756px) 100vw, 756px" /></p>
<p>&nbsp;</p>
<p>A esta:</p>
<p><img loading="lazy" decoding="async" class="aligncenter size-full wp-image-5321" src="https://ildefonsosegura.es/wp-content/uploads/blanco-a-nego-3.jpg" alt="blanco-a-nego-3" width="756" height="425" srcset="https://ildefonsosegura.es/wp-content/uploads/blanco-a-nego-3.jpg 756w, https://ildefonsosegura.es/wp-content/uploads/blanco-a-nego-3-300x169.jpg 300w, https://ildefonsosegura.es/wp-content/uploads/blanco-a-nego-3-720x406.jpg 720w" sizes="(max-width: 756px) 100vw, 756px" /></p>
<p>No te lo pierdas y comparte tus trabajos en mi página de facebook (<a href="http://www.facebook.com/IldefonsoSeguraPage" target="_blank">IldefonsoSeguraPage</a>)</p>
<p>Espero que te guste y compartas el video</p>
<p style="text-align: left;"><strong>TUTORIAL TRUCOS DE COLOR E ILUMINACIÓN</strong></p>
<p style="text-align: left;"><iframe src="https://www.youtube.com/embed/E6Wq6GoCR2g?rel=0" width="640" height="420" frameborder="0" allowfullscreen="allowfullscreen"></iframe></p>
<p>&nbsp;</p>
<div>
<p style="text-align: center;">[vc_button title=»BAJATE LOS MATERIALES» target=»blank» color=»btn-danger» size=»btn-large» href=»https://goo.gl/xQFBPu»]</p>
<p style="text-align: right;">Suscríbete a mi canal de Youtube:</p>
<div align="right">
<p><script src="https://apis.google.com/js/platform.js"></script><script>// <![CDATA[ function onYtEvent(payload) { if (payload.eventType == 'subscribe') { // Add code to handle subscribe event. } else if (payload.eventType == 'unsubscribe') { // Add code to handle unsubscribe event. } if (window.console) { // for debugging only window.console.log('YT event: ', payload); } } // ]]&gt;</script></p>
<div class="g-ytsubscribe" data-channel="ildefonsosegura" data-layout="default" data-count="default" data-onytevent="onYtEvent"></div>
</div>
</div>
<p style="text-align: left;">No dejes de compartir este post.</p>
<p style="text-align: left;">Así es como me puedes ayudar 🙂 Gracias</p>
<p>&nbsp;</p>La entrada <a href="https://ildefonsosegura.es/crea-un-poster-con-trucos-de-luz-y-color-con-photoshop-by-ildefonsosegura/">Crea un poster con trucos de luz y color con #photoshop by @ildefonsosegura</a> apareció primero en <a href="https://ildefonsosegura.es">Ildefonso Segura</a>.]]></content:encoded>
					
					<wfw:commentRss>https://ildefonsosegura.es/crea-un-poster-con-trucos-de-luz-y-color-con-photoshop-by-ildefonsosegura/feed/</wfw:commentRss>
			<slash:comments>0</slash:comments>
		
		
			</item>
		<item>
		<title>Fotomanipulación color de la piel a negro con #Photoshop by @ildefonsosegura</title>
		<link>https://ildefonsosegura.es/fotomanipulacion-color-de-la-piel-a-negro-con-photoshop-by-ildefonsosegura/</link>
					<comments>https://ildefonsosegura.es/fotomanipulacion-color-de-la-piel-a-negro-con-photoshop-by-ildefonsosegura/#respond</comments>
		
		<dc:creator><![CDATA[Ildefonso Segura]]></dc:creator>
		<pubDate>Sat, 28 May 2016 08:26:34 +0000</pubDate>
				<category><![CDATA[Efectos]]></category>
		<category><![CDATA[Fotocomposición]]></category>
		<category><![CDATA[Photoshop]]></category>
		<category><![CDATA[Tecnicas]]></category>
		<category><![CDATA[Tutoriales]]></category>
		<category><![CDATA[Video]]></category>
		<category><![CDATA[Wallpaper]]></category>
		<category><![CDATA[adobe]]></category>
		<category><![CDATA[cara]]></category>
		<category><![CDATA[CC]]></category>
		<category><![CDATA[cc2014]]></category>
		<category><![CDATA[cc2015]]></category>
		<category><![CDATA[cc2016]]></category>
		<category><![CDATA[creatividad]]></category>
		<category><![CDATA[diseño]]></category>
		<category><![CDATA[efecto]]></category>
		<category><![CDATA[efectos]]></category>
		<category><![CDATA[effect]]></category>
		<category><![CDATA[effects]]></category>
		<category><![CDATA[face]]></category>
		<category><![CDATA[fotomanipulación]]></category>
		<category><![CDATA[fotomontaje]]></category>
		<category><![CDATA[ildefonsosegura]]></category>
		<category><![CDATA[imagen]]></category>
		<category><![CDATA[montaje]]></category>
		<category><![CDATA[photomanipulation]]></category>
		<category><![CDATA[photoshop]]></category>
		<category><![CDATA[rostro]]></category>
		<category><![CDATA[trucos]]></category>
		<category><![CDATA[tutorial]]></category>
		<category><![CDATA[VIDEOTUTORIAL]]></category>
		<category><![CDATA[wall]]></category>
		<category><![CDATA[wallpaper]]></category>
		<category><![CDATA[youtube]]></category>
		<guid isPermaLink="false">http://ildefonsosegura.es/?p=5318</guid>

					<description><![CDATA[<p>Puedes cambiar de color tu rostro con técnicas que te muestro en este nuevo tutorial de photoshop. Habrás visto tutoriales para hacerte más moreno pero no como éste en el que te muestro como cambiar de blanco a negro en la piel. Mira el efecto que conseguirás en esta animación: &#160; No te lo pierdas [&#8230;]</p>
La entrada <a href="https://ildefonsosegura.es/fotomanipulacion-color-de-la-piel-a-negro-con-photoshop-by-ildefonsosegura/">Fotomanipulación color de la piel a negro con #Photoshop by @ildefonsosegura</a> apareció primero en <a href="https://ildefonsosegura.es">Ildefonso Segura</a>.]]></description>
										<content:encoded><![CDATA[<p>Puedes cambiar de color tu rostro con técnicas que te muestro en este nuevo tutorial de photoshop.</p>
<p>Habrás visto tutoriales para hacerte más moreno pero no como éste en el que te muestro como cambiar de blanco a negro en la piel.</p>
<p>Mira el efecto que conseguirás en esta animación:</p>
<div style="width: 1000px;" class="wp-video"><video class="wp-video-shortcode" id="video-5318-1" width="1000" height="562" preload="metadata" controls="controls"><source type="video/mp4" src="https://ildefonsosegura.es/wp-content/uploads/blanco-a-nego.mp4?_=1" /><a href="https://ildefonsosegura.es/wp-content/uploads/blanco-a-nego.mp4">https://ildefonsosegura.es/wp-content/uploads/blanco-a-nego.mp4</a></video></div>
<p>&nbsp;</p>
<p>No te lo pierdas y comparte tus trabajos en mi página de facebook (<a href="http://www.facebook.com/IldefonsoSeguraPage" target="_blank">IldefonsoSeguraPage</a>)</p>
<p>Espero que te guste y compartas el video</p>
<p style="text-align: left;"><strong>TUTORIAL CAMBIO DE COLOR DE ROSTRO A NEGRO</strong></p>
<p style="text-align: left;"><iframe src="https://www.youtube.com/embed/Pans9TRanAM?rel=0" width="640" height="420" frameborder="0" allowfullscreen="allowfullscreen"></iframe></p>
<p>&nbsp;</p>
<div>
<p style="text-align: center;">[vc_button title=»BAJATE LOS MATERIALES» target=»blank» color=»btn-danger» size=»btn-large» href=»https://goo.gl/xQFBPu»]</p>
<p style="text-align: right;">Suscríbete a mi canal de Youtube:</p>
<div align="right">
<p><script src="https://apis.google.com/js/platform.js"></script><script>// <![CDATA[ function onYtEvent(payload) { if (payload.eventType == 'subscribe') { // Add code to handle subscribe event. } else if (payload.eventType == 'unsubscribe') { // Add code to handle unsubscribe event. } if (window.console) { // for debugging only window.console.log('YT event: ', payload); } } // ]]&gt;</script></p>
<div class="g-ytsubscribe" data-channel="ildefonsosegura" data-layout="default" data-count="default" data-onytevent="onYtEvent"></div>
</div>
</div>
<p style="text-align: left;">No dejes de compartir este post.</p>
<p style="text-align: left;">Así es como me puedes ayudar 🙂 Gracias</p>
<p>&nbsp;</p>La entrada <a href="https://ildefonsosegura.es/fotomanipulacion-color-de-la-piel-a-negro-con-photoshop-by-ildefonsosegura/">Fotomanipulación color de la piel a negro con #Photoshop by @ildefonsosegura</a> apareció primero en <a href="https://ildefonsosegura.es">Ildefonso Segura</a>.]]></content:encoded>
					
					<wfw:commentRss>https://ildefonsosegura.es/fotomanipulacion-color-de-la-piel-a-negro-con-photoshop-by-ildefonsosegura/feed/</wfw:commentRss>
			<slash:comments>0</slash:comments>
		
		<enclosure url="https://ildefonsosegura.es/wp-content/uploads/blanco-a-nego.mp4" length="2433496" type="video/mp4" />

			</item>
		<item>
		<title>Tutorial Photoshop // Aprende ha realizar el efecto TreeFace by @ildefonsosegura</title>
		<link>https://ildefonsosegura.es/aprende-ha-realizar-el-efecto-treeface-con-photoshop-by-ildefonsosegura/</link>
					<comments>https://ildefonsosegura.es/aprende-ha-realizar-el-efecto-treeface-con-photoshop-by-ildefonsosegura/#respond</comments>
		
		<dc:creator><![CDATA[Ildefonso Segura]]></dc:creator>
		<pubDate>Sat, 25 Jul 2015 14:26:19 +0000</pubDate>
				<category><![CDATA[Efectos]]></category>
		<category><![CDATA[Fotocomposición]]></category>
		<category><![CDATA[Photoshop]]></category>
		<category><![CDATA[Speed Art]]></category>
		<category><![CDATA[Tecnicas]]></category>
		<category><![CDATA[Tutoriales]]></category>
		<category><![CDATA[Wallpaper]]></category>
		<category><![CDATA[arbol]]></category>
		<category><![CDATA[cara]]></category>
		<category><![CDATA[cc2015]]></category>
		<category><![CDATA[creatividad]]></category>
		<category><![CDATA[cs4]]></category>
		<category><![CDATA[cs5]]></category>
		<category><![CDATA[cs6]]></category>
		<category><![CDATA[diseño]]></category>
		<category><![CDATA[efecto]]></category>
		<category><![CDATA[fondo]]></category>
		<category><![CDATA[fotomontaje]]></category>
		<category><![CDATA[gloriasanis]]></category>
		<category><![CDATA[ildefonsosegura]]></category>
		<category><![CDATA[imagen]]></category>
		<category><![CDATA[manipulación]]></category>
		<category><![CDATA[photoshop]]></category>
		<category><![CDATA[tecnicas]]></category>
		<category><![CDATA[tree]]></category>
		<category><![CDATA[treebeard]]></category>
		<category><![CDATA[treeface]]></category>
		<category><![CDATA[tuto]]></category>
		<category><![CDATA[tutorial]]></category>
		<category><![CDATA[wallpaper]]></category>
		<category><![CDATA[youtube]]></category>
		<guid isPermaLink="false">http://ildefonsosegura.es/?p=4779</guid>

					<description><![CDATA[<p>En este tutorial de #Photoshop cc2015 veremos como conseguir un efecto especial de conversión de un humano en árbol (efecto TreeFace). El efecto está inspirado en varios trabajos del artista Cal Redback que puedes ver en su web calredback.com dentro de su galería «Tree Beard» Te recomiendo ver primero un tutorial que publiqué recientemente y [&#8230;]</p>
La entrada <a href="https://ildefonsosegura.es/aprende-ha-realizar-el-efecto-treeface-con-photoshop-by-ildefonsosegura/">Tutorial Photoshop // Aprende ha realizar el efecto TreeFace by @ildefonsosegura</a> apareció primero en <a href="https://ildefonsosegura.es">Ildefonso Segura</a>.]]></description>
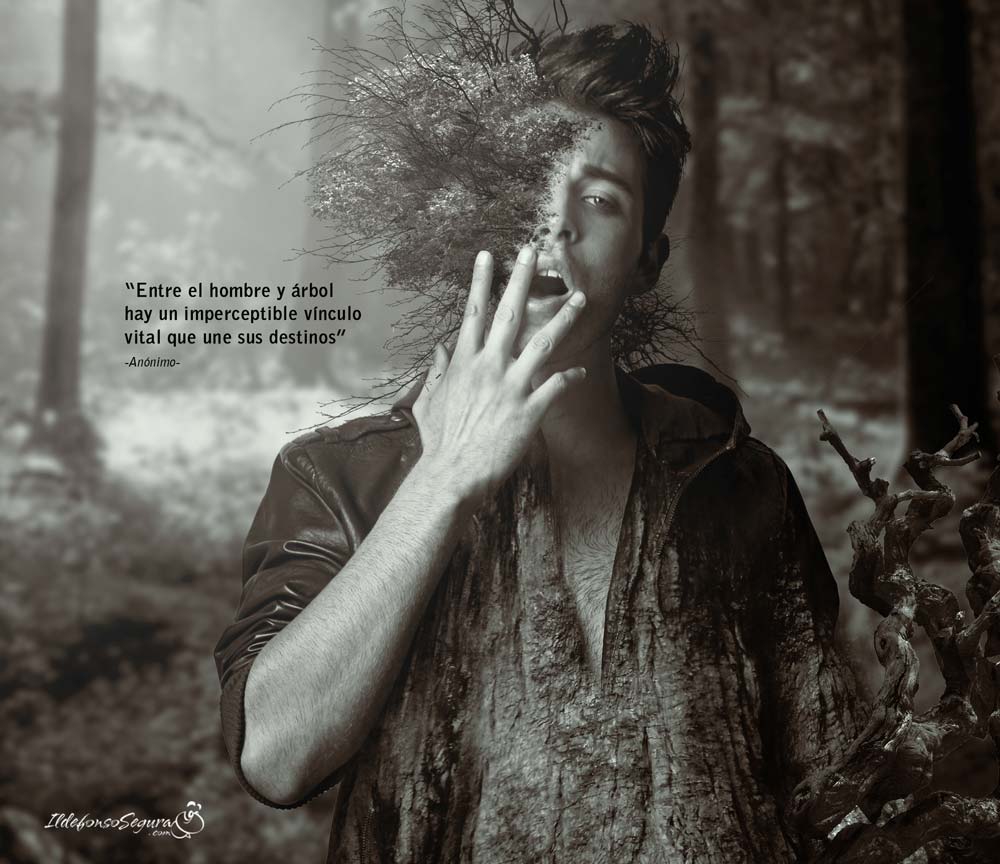
										<content:encoded><![CDATA[<p style="text-align: justify;">En este tutorial de #Photoshop cc2015 veremos como conseguir un efecto especial de conversión de un humano en árbol (efecto TreeFace).</p>
<p style="text-align: justify;"><img loading="lazy" decoding="async" class="aligncenter wp-image-4783 size-full" src="https://ildefonsosegura.es/wp-content/uploads/Treeface7.jpg" alt="Treeface7" width="1500" height="648" srcset="https://ildefonsosegura.es/wp-content/uploads/Treeface7.jpg 1500w, https://ildefonsosegura.es/wp-content/uploads/Treeface7-300x130.jpg 300w, https://ildefonsosegura.es/wp-content/uploads/Treeface7-1024x442.jpg 1024w" sizes="(max-width: 1500px) 100vw, 1500px" /></p>
<p style="text-align: justify;">El efecto está inspirado en varios trabajos del<strong> artista Cal Redback</strong> que puedes ver en su web <a href="http://calredback.com" target="_blank">calredback.com</a> dentro de su galería «Tree Beard»</p>
<p style="text-align: justify;">Te recomiendo ver primero un tutorial que publiqué recientemente y que te mostrará como integrar una imagen en blanco y negro en una composición. Haz clic en la miniatura y verás el tutorial</p>
<p style="text-align: justify;"><a href="https://ildefonsosegura.es/crea-estilos-de-color-instagram-con-photoshop-by-ildefonsosegura/" target="_blank" rel="attachment wp-att-4749"><img loading="lazy" decoding="async" class=" wp-image-4749 size-thumbnail aligncenter" src="https://ildefonsosegura.es/wp-content/uploads/Treeface2-150x150.jpg" alt="Treeface2" width="150" height="150" srcset="https://ildefonsosegura.es/wp-content/uploads/Treeface2-150x150.jpg 150w, https://ildefonsosegura.es/wp-content/uploads/Treeface2-180x180.jpg 180w, https://ildefonsosegura.es/wp-content/uploads/Treeface2-300x300.jpg 300w, https://ildefonsosegura.es/wp-content/uploads/Treeface2-600x600.jpg 600w" sizes="(max-width: 150px) 100vw, 150px" /></a></p>
<p style="text-align: justify;">En el tutorial efecto TREEFACE aprenderás a:</p>
<ol>
<li style="text-align: justify;">Guardar una selección como canal alfa</li>
<li style="text-align: justify;">Realizar selecciones con adiciones y exclusiones de determinadas áreas</li>
<li style="text-align: justify;">Crear un pincel que nos ayudará a enmascarar imágenes con cierta consistencia estética</li>
<li style="text-align: justify;"> Incorporar detalles que ofrecen más realismo a la escena</li>
<li style="text-align: justify;">Técnicas para crear contraste y profundidad (sub exposición y sobre exposición)</li>
<li style="text-align: justify;">Igualar iluminaciones para elementos incorporados a la escena</li>
</ol>
<p style="text-align: justify;">No te lo pierdas y comparte tus trabajos en mi página de facebook (<a href="http://www.facebook.com/IldefonsoSeguraPage" target="_blank">IldefonsoSeguraPage</a>)</p>
<p><a href="https://ildefonsosegura.es/aprende-ha-realizar-el-efecto-treeface-con-photoshop-by-ildefonsosegura/treeface5/" rel="attachment wp-att-4781"><img loading="lazy" decoding="async" class="aligncenter size-full wp-image-4781" src="https://ildefonsosegura.es/wp-content/uploads/Treeface5.jpg" alt="Treeface5" width="1000" height="864" srcset="https://ildefonsosegura.es/wp-content/uploads/Treeface5.jpg 1000w, https://ildefonsosegura.es/wp-content/uploads/Treeface5-300x259.jpg 300w" sizes="(max-width: 1000px) 100vw, 1000px" /></a></p>
<p>Espero que os guste</p>
<p style="text-align: left;"><strong>TUTORIAL</strong><br />
<iframe src="https://www.youtube.com/embed/NH3DbLkWyB4?rel=0" width="640" height="420" frameborder="0" allowfullscreen="allowfullscreen"></iframe></p>
<div>
<center>[vc_button title=»BAJATE LOS MATERIALES» target=»blank» color=»btn-danger» size=»btn-large» href=»https://drive.google.com/open?id=0B_nJkCGJubucVjlJWEZfU1NXNDg»]</center>&nbsp;</p>
<p style="text-align: right;">Suscríbete a mi canal de Youtube:</p>
<div align="right">
<p><script src="https://apis.google.com/js/platform.js"></script><script>// <![CDATA[
function onYtEvent(payload) { if (payload.eventType == 'subscribe') { // Add code to handle subscribe event. } else if (payload.eventType == 'unsubscribe') { // Add code to handle unsubscribe event. } if (window.console) { // for debugging only window.console.log('YT event: ', payload); } }
// ]]&gt;</script></p>
<div class="g-ytsubscribe" data-channel="ildefonsosegura" data-layout="default" data-count="default" data-onytevent="onYtEvent"></div>
</div>
</div>
<p style="text-align: left;">No dejes de compartir este post.</p>
<p style="text-align: left;">Así es como me puedes ayudar 🙂 Gracias</p>
<p>&nbsp;</p>La entrada <a href="https://ildefonsosegura.es/aprende-ha-realizar-el-efecto-treeface-con-photoshop-by-ildefonsosegura/">Tutorial Photoshop // Aprende ha realizar el efecto TreeFace by @ildefonsosegura</a> apareció primero en <a href="https://ildefonsosegura.es">Ildefonso Segura</a>.]]></content:encoded>
					
					<wfw:commentRss>https://ildefonsosegura.es/aprende-ha-realizar-el-efecto-treeface-con-photoshop-by-ildefonsosegura/feed/</wfw:commentRss>
			<slash:comments>0</slash:comments>
		
		
			</item>
		<item>
		<title>Tutorial Photoshop // Efecto de cara de barro seco by @ildefonsosegura (Dry Mud Effect)</title>
		<link>https://ildefonsosegura.es/efecto-de-cara-de-barro-seco-con-photoshop-by-ildefonsosegura-dry-mud-effect/</link>
					<comments>https://ildefonsosegura.es/efecto-de-cara-de-barro-seco-con-photoshop-by-ildefonsosegura-dry-mud-effect/#respond</comments>
		
		<dc:creator><![CDATA[Ildefonso Segura]]></dc:creator>
		<pubDate>Sun, 19 Oct 2014 08:22:51 +0000</pubDate>
				<category><![CDATA[Efectos]]></category>
		<category><![CDATA[Estilos]]></category>
		<category><![CDATA[Fotocomposición]]></category>
		<category><![CDATA[Photoshop]]></category>
		<category><![CDATA[Tecnicas]]></category>
		<category><![CDATA[Tutoriales]]></category>
		<category><![CDATA[Wallpaper]]></category>
		<category><![CDATA[ace]]></category>
		<category><![CDATA[barro]]></category>
		<category><![CDATA[cara]]></category>
		<category><![CDATA[cara de barro]]></category>
		<category><![CDATA[cc 2014]]></category>
		<category><![CDATA[creatividad]]></category>
		<category><![CDATA[cs3]]></category>
		<category><![CDATA[cs4]]></category>
		<category><![CDATA[cs5]]></category>
		<category><![CDATA[cs6]]></category>
		<category><![CDATA[decapado]]></category>
		<category><![CDATA[effect]]></category>
		<category><![CDATA[exfloiante]]></category>
		<category><![CDATA[exfoliar]]></category>
		<category><![CDATA[fotocomposición]]></category>
		<category><![CDATA[fotomanipulación]]></category>
		<category><![CDATA[ildefonsosegura]]></category>
		<category><![CDATA[imagen]]></category>
		<category><![CDATA[manipulaciono]]></category>
		<category><![CDATA[mud]]></category>
		<category><![CDATA[photoshop]]></category>
		<category><![CDATA[technique]]></category>
		<category><![CDATA[tecnicas]]></category>
		<category><![CDATA[tutorial]]></category>
		<guid isPermaLink="false">http://ildefonsosegura.es/?p=3542</guid>

					<description><![CDATA[<p>Nuevo tutorial donde te enseño a realizar un efecto de barro seco en un rostro con Photoshop. Un resultado realista muy diferente a lo que has visto en la red. Aprendemos muchos trucos con modos de fusión, estilos, filtro licuar, luces y sombras. No te lo puedes perder. Si quieres practicar puedes bajarte los recursos [&#8230;]</p>
La entrada <a href="https://ildefonsosegura.es/efecto-de-cara-de-barro-seco-con-photoshop-by-ildefonsosegura-dry-mud-effect/">Tutorial Photoshop // Efecto de cara de barro seco by @ildefonsosegura (Dry Mud Effect)</a> apareció primero en <a href="https://ildefonsosegura.es">Ildefonso Segura</a>.]]></description>
										<content:encoded><![CDATA[<div data-elementor-type="wp-post" data-elementor-id="3542" class="elementor elementor-3542">
						<section class="elementor-section elementor-top-section elementor-element elementor-element-68601537 elementor-section-boxed elementor-section-height-default elementor-section-height-default" data-id="68601537" data-element_type="section" data-e-type="section">
						<div class="elementor-container elementor-column-gap-default">
					<div class="elementor-column elementor-col-100 elementor-top-column elementor-element elementor-element-531b2cd6" data-id="531b2cd6" data-element_type="column" data-e-type="column">
			<div class="elementor-widget-wrap elementor-element-populated">
						<div class="elementor-element elementor-element-74e28bee elementor-widget elementor-widget-text-editor" data-id="74e28bee" data-element_type="widget" data-e-type="widget" data-widget_type="text-editor.default">
				<div class="elementor-widget-container">
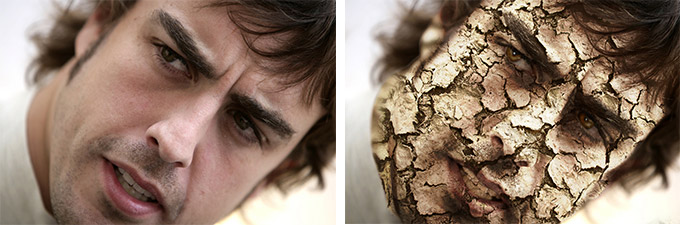
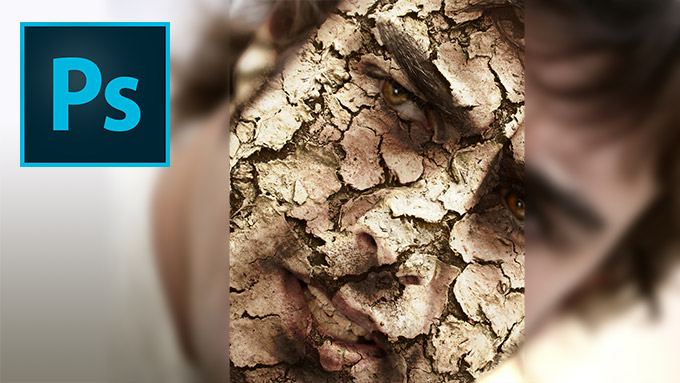
									<p><img loading="lazy" decoding="async" class="aligncenter wp-image-3538 size-full" src="https://ildefonsosegura.es/wp-content/uploads/fernando-1.jpg" alt="fernando-1" width="680" height="225" srcset="https://ildefonsosegura.es/wp-content/uploads/fernando-1.jpg 680w, https://ildefonsosegura.es/wp-content/uploads/fernando-1-300x99.jpg 300w" sizes="(max-width: 680px) 100vw, 680px" /></p><p>Nuevo tutorial donde te enseño a realizar un efecto de barro seco en un rostro con Photoshop. Un resultado realista muy diferente a lo que has visto en la red. Aprendemos muchos trucos con modos de fusión, estilos, filtro licuar, luces y sombras. No te lo puedes perder.</p><p>Si quieres practicar puedes bajarte los recursos en <a href="http://goo.gl/UWXPuE" target="_blank" rel="noopener">http://goo.gl/UWXPuE</a> y <a href="http://goo.gl/CRgC8B" target="_blank" rel="noopener">http://goo.gl/CRgC8B</a></p><p><a href="https://ildefonsosegura.es/como-clonar-hojas-con-movimiento-en-un-trazado-con-cinema4d-by-ildefonsosegura/fernando-2/" rel="attachment wp-att-3539"><img loading="lazy" decoding="async" class="size-full wp-image-3539 aligncenter" src="https://ildefonsosegura.es/wp-content/uploads/fernando-2.jpg" alt="fernando-2" width="680" height="383" srcset="https://ildefonsosegura.es/wp-content/uploads/fernando-2.jpg 680w, https://ildefonsosegura.es/wp-content/uploads/fernando-2-300x168.jpg 300w" sizes="(max-width: 680px) 100vw, 680px" /></a></p><p> </p><p><strong style="color: #800000;">TUTORIAL   </strong></p><center><iframe src="https://www.youtube.com/embed/9JoMUhhPkao" width="640" height="420" frameborder="0" allowfullscreen="allowfullscreen"></iframe></center><center></center><p> </p><p> </p>								</div>
				</div>
					</div>
		</div>
					</div>
		</section>
				<section class="elementor-section elementor-top-section elementor-element elementor-element-5fef18cd elementor-section-full_width elementor-section-height-default elementor-section-height-default" data-id="5fef18cd" data-element_type="section" data-e-type="section">
						<div class="elementor-container elementor-column-gap-default">
					<div class="elementor-column elementor-col-100 elementor-top-column elementor-element elementor-element-10c14f64" data-id="10c14f64" data-element_type="column" data-e-type="column">
			<div class="elementor-widget-wrap elementor-element-populated">
						<div class="elementor-element elementor-element-1bd7c3c3 elementor-widget elementor-widget-text-editor" data-id="1bd7c3c3" data-element_type="widget" data-e-type="widget" data-widget_type="text-editor.default">
				<div class="elementor-widget-container">
									<div><div align="center"><center><strong style="color: #ff0000;">Suscríbete a mi canal de Youtube:</strong></center><div><div><div align="center"><p><script src="https://apis.google.com/js/platform.js"></script></p><div class="g-ytsubscribe" data-channel="ildefonsosegura" data-layout="full" data-count="default"> </div></div></div><p> </p><p style="text-align: center;">No te lo pierdas y comparte tus trabajos en mi página de facebook (<span style="color: #0000ff;"><strong><a style="color: #0000ff;" href="http://www.facebook.com/IldefonsoSeguraPage" target="_blank" rel="noopener noreferrer">IldefonsoSeguraPage</a></strong></span>)<br />Espero que te guste y compartas el vídeo. No dejes de compartir este post.</p><p style="text-align: center;">Así es como me puedes ayudar 🙂 Gracias</p></div></div></div>								</div>
				</div>
					</div>
		</div>
					</div>
		</section>
				</div>La entrada <a href="https://ildefonsosegura.es/efecto-de-cara-de-barro-seco-con-photoshop-by-ildefonsosegura-dry-mud-effect/">Tutorial Photoshop // Efecto de cara de barro seco by @ildefonsosegura (Dry Mud Effect)</a> apareció primero en <a href="https://ildefonsosegura.es">Ildefonso Segura</a>.]]></content:encoded>
					
					<wfw:commentRss>https://ildefonsosegura.es/efecto-de-cara-de-barro-seco-con-photoshop-by-ildefonsosegura-dry-mud-effect/feed/</wfw:commentRss>
			<slash:comments>0</slash:comments>
		
		
			</item>
		<item>
		<title>Fotomanipulación retoque facial manteniendo textura de piel // tutorial Photoshop</title>
		<link>https://ildefonsosegura.es/fotomanipulacion-retoque-facial-manteniendo-textura-de-piel-con-photoshop/</link>
					<comments>https://ildefonsosegura.es/fotomanipulacion-retoque-facial-manteniendo-textura-de-piel-con-photoshop/#respond</comments>
		
		<dc:creator><![CDATA[Ildefonso Segura]]></dc:creator>
		<pubDate>Sun, 23 Dec 2012 18:06:49 +0000</pubDate>
				<category><![CDATA[Efectos]]></category>
		<category><![CDATA[Fotocomposición]]></category>
		<category><![CDATA[Photoshop]]></category>
		<category><![CDATA[Tecnicas]]></category>
		<category><![CDATA[Tutoriales]]></category>
		<category><![CDATA[cara]]></category>
		<category><![CDATA[corregir]]></category>
		<category><![CDATA[face]]></category>
		<category><![CDATA[fotografia]]></category>
		<category><![CDATA[gloriasanis]]></category>
		<category><![CDATA[ildefonso]]></category>
		<category><![CDATA[ildefonsosegura]]></category>
		<category><![CDATA[manipulación]]></category>
		<category><![CDATA[piel]]></category>
		<category><![CDATA[retoque]]></category>
		<category><![CDATA[tampon]]></category>
		<category><![CDATA[textura]]></category>
		<guid isPermaLink="false">http://ildefonsosegura.es/?p=1153</guid>

					<description><![CDATA[<p>Otro tutorial de Photoshop en el que mostraré como realizar un retoque facial de una persona pero manteniendo la textura original. Para ello, quitaremos la textura, homogeneizaremos, buscaremos tonos uniformes sin impurezas y devolveremos la textura ¿como? Miralo VIDEOTUTORIAL &#160; No dejes de compartir este post. Así es como me puedes ayudar 🙂 Gracias &#160;</p>
La entrada <a href="https://ildefonsosegura.es/fotomanipulacion-retoque-facial-manteniendo-textura-de-piel-con-photoshop/">Fotomanipulación retoque facial manteniendo textura de piel // tutorial Photoshop</a> apareció primero en <a href="https://ildefonsosegura.es">Ildefonso Segura</a>.]]></description>
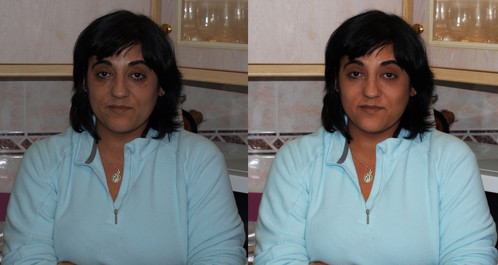
										<content:encoded><![CDATA[<p><a href="https://ildefonsosegura.es/fotomanipulacion-retoque-facial-manteniendo-textura-de-piel-con-photoshop/dolores/" rel="attachment wp-att-1154"><img loading="lazy" decoding="async" class="size-full wp-image-1154 aligncenter" alt="dolores" src="https://ildefonsosegura.es/wp-content/uploads/dolores.jpg" width="498" height="265" srcset="https://ildefonsosegura.es/wp-content/uploads/dolores.jpg 498w, https://ildefonsosegura.es/wp-content/uploads/dolores-300x159.jpg 300w" sizes="(max-width: 498px) 100vw, 498px" /></a></p>
<p>Otro tutorial de <strong>Photoshop</strong> en el que mostraré como realizar un retoque facial de una persona pero manteniendo la textura original. Para ello, quitaremos la textura, homogeneizaremos, buscaremos tonos uniformes sin impurezas y devolveremos la textura ¿como? Miralo</p>
<p><span style="color: #800000;"><strong>VIDEOTUTORIAL </strong></span></p>
<p><center><iframe src="https://www.youtube.com/embed/RBNaZiRIo4s" height="360" width="640" allowfullscreen="" frameborder="0"></iframe></center></p>
<p>&nbsp;</p>
<div align="right">
<p><script src="https://apis.google.com/js/platform.js"></script><script>// <![CDATA[
function onYtEvent(payload) { if (payload.eventType == 'subscribe') { // Add code to handle subscribe event. } else if (payload.eventType == 'unsubscribe') { // Add code to handle unsubscribe event. } if (window.console) { // for debugging only window.console.log('YT event: ', payload); } }
// ]]&gt;</script></p>
<div class="g-ytsubscribe" data-channel="ildefonsosegura" data-layout="default" data-count="default" data-onytevent="onYtEvent"></div>
</div>
</div>
<p style="text-align: left;">No dejes de compartir este post.</p>
<p style="text-align: left;">Así es como me puedes ayudar 🙂 Gracias</p>
<p>&nbsp;</p>La entrada <a href="https://ildefonsosegura.es/fotomanipulacion-retoque-facial-manteniendo-textura-de-piel-con-photoshop/">Fotomanipulación retoque facial manteniendo textura de piel // tutorial Photoshop</a> apareció primero en <a href="https://ildefonsosegura.es">Ildefonso Segura</a>.]]></content:encoded>
					
					<wfw:commentRss>https://ildefonsosegura.es/fotomanipulacion-retoque-facial-manteniendo-textura-de-piel-con-photoshop/feed/</wfw:commentRss>
			<slash:comments>0</slash:comments>
		
		
			</item>
		<item>
		<title>Tutorial Photoshop // Fotomanipulación cambiar la cabeza</title>
		<link>https://ildefonsosegura.es/fotomanipulacion-cambiar-la-cabeza-con-photoshop/</link>
					<comments>https://ildefonsosegura.es/fotomanipulacion-cambiar-la-cabeza-con-photoshop/#respond</comments>
		
		<dc:creator><![CDATA[Ildefonso Segura]]></dc:creator>
		<pubDate>Sun, 23 Dec 2012 17:57:48 +0000</pubDate>
				<category><![CDATA[Efectos]]></category>
		<category><![CDATA[Fotocomposición]]></category>
		<category><![CDATA[Photoshop]]></category>
		<category><![CDATA[Tecnicas]]></category>
		<category><![CDATA[Tutoriales]]></category>
		<category><![CDATA[Video]]></category>
		<category><![CDATA[cambio]]></category>
		<category><![CDATA[cara]]></category>
		<category><![CDATA[clonar]]></category>
		<category><![CDATA[consejos]]></category>
		<category><![CDATA[foto]]></category>
		<category><![CDATA[fotografia]]></category>
		<category><![CDATA[gloriasanis]]></category>
		<category><![CDATA[ildefonsosegura]]></category>
		<category><![CDATA[image]]></category>
		<category><![CDATA[manipulación]]></category>
		<category><![CDATA[tampon]]></category>
		<category><![CDATA[tuto]]></category>
		<category><![CDATA[video]]></category>
		<category><![CDATA[youtube]]></category>
		<guid isPermaLink="false">http://ildefonsosegura.es/?p=1136</guid>

					<description><![CDATA[<p>Con este tutorial podrás, de una forma fácil, realizar una fotomanipulación con la que cambiarás la cabeza de un cuerpo a otro. Utilizamos técnicas de clonado con reglas y consejos de manipulación para conseguir un resultado alucinante. &#160; VIDEOTUTORIAL &#160; No dejes de compartir este post. Así es como me puedes ayudar 🙂 Gracias &#160;</p>
La entrada <a href="https://ildefonsosegura.es/fotomanipulacion-cambiar-la-cabeza-con-photoshop/">Tutorial Photoshop // Fotomanipulación cambiar la cabeza</a> apareció primero en <a href="https://ildefonsosegura.es">Ildefonso Segura</a>.]]></description>
										<content:encoded><![CDATA[<p><a href="https://ildefonsosegura.es/fotomanipulacion-cambiar-la-cabeza-con-photoshop/cambio-de-cara-compara/" rel="attachment wp-att-1137"><img loading="lazy" decoding="async" class="size-full wp-image-1137 aligncenter" alt="CAmbio-de-cara-compara" src="https://ildefonsosegura.es/wp-content/uploads/CAmbio-de-cara-compara.jpg" width="500" height="300" srcset="https://ildefonsosegura.es/wp-content/uploads/CAmbio-de-cara-compara.jpg 500w, https://ildefonsosegura.es/wp-content/uploads/CAmbio-de-cara-compara-300x180.jpg 300w" sizes="(max-width: 500px) 100vw, 500px" /></a></p>
<p>Con este tutorial podrás, de una forma fácil, realizar una fotomanipulación con la que cambiarás la cabeza de un cuerpo a otro. Utilizamos técnicas de clonado con reglas y consejos de manipulación para conseguir un resultado alucinante.</p>
<p>&nbsp;</p>
<p><span style="color: #800000;"><strong>VIDEOTUTORIAL </strong></span></p>
<p><center><iframe src="https://www.youtube.com/embed/Ejb46O99Zsw" height="360" width="640" allowfullscreen="" frameborder="0"></iframe></center></p>
<p>&nbsp;</p>
<div align="right">
<p><script src="https://apis.google.com/js/platform.js"></script><script>// <![CDATA[
function onYtEvent(payload) { if (payload.eventType == 'subscribe') { // Add code to handle subscribe event. } else if (payload.eventType == 'unsubscribe') { // Add code to handle unsubscribe event. } if (window.console) { // for debugging only window.console.log('YT event: ', payload); } }
// ]]&gt;</script></p>
<div class="g-ytsubscribe" data-channel="ildefonsosegura" data-layout="default" data-count="default" data-onytevent="onYtEvent"></div>
</div>
</div>
<p style="text-align: left;">No dejes de compartir este post.</p>
<p style="text-align: left;">Así es como me puedes ayudar 🙂 Gracias</p>
<p>&nbsp;</p>La entrada <a href="https://ildefonsosegura.es/fotomanipulacion-cambiar-la-cabeza-con-photoshop/">Tutorial Photoshop // Fotomanipulación cambiar la cabeza</a> apareció primero en <a href="https://ildefonsosegura.es">Ildefonso Segura</a>.]]></content:encoded>
					
					<wfw:commentRss>https://ildefonsosegura.es/fotomanipulacion-cambiar-la-cabeza-con-photoshop/feed/</wfw:commentRss>
			<slash:comments>0</slash:comments>
		
		
			</item>
		<item>
		<title>Tutorial Photoshop // Rostro dibujado en arena de playa (filtro iluminación)</title>
		<link>https://ildefonsosegura.es/rostro-dibujado-en-arena-de-playa/</link>
					<comments>https://ildefonsosegura.es/rostro-dibujado-en-arena-de-playa/#respond</comments>
		
		<dc:creator><![CDATA[Ildefonso Segura]]></dc:creator>
		<pubDate>Sat, 22 Dec 2012 10:14:34 +0000</pubDate>
				<category><![CDATA[Efectos]]></category>
		<category><![CDATA[Fotocomposición]]></category>
		<category><![CDATA[Photoshop]]></category>
		<category><![CDATA[Tecnicas]]></category>
		<category><![CDATA[Tutoriales]]></category>
		<category><![CDATA[Wallpaper]]></category>
		<category><![CDATA[arena]]></category>
		<category><![CDATA[cara]]></category>
		<category><![CDATA[dibujar]]></category>
		<category><![CDATA[efect]]></category>
		<category><![CDATA[glorias]]></category>
		<category><![CDATA[ildefonsosegura]]></category>
		<category><![CDATA[mar]]></category>
		<category><![CDATA[oceano]]></category>
		<category><![CDATA[playa]]></category>
		<category><![CDATA[rostro]]></category>
		<category><![CDATA[rotular]]></category>
		<category><![CDATA[sand]]></category>
		<category><![CDATA[tatuaje]]></category>
		<guid isPermaLink="false">http://ildefonsosegura.es/?p=757</guid>

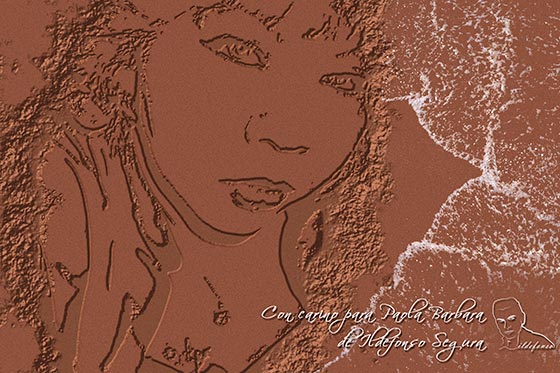
					<description><![CDATA[<p>Aprende a crear un efecto de dibujo en la arena mojada de playa ¿nunca has escrito o dibujado con algo en la arena? ahora puedes desde casa. En algún punto del tutorial verás que también se consigue el formato tatuaje del rostro con lo que tienes dos tutoriales en uno.   VIDEOTUTORIAL ROSTRO EN ARENA [&#8230;]</p>
La entrada <a href="https://ildefonsosegura.es/rostro-dibujado-en-arena-de-playa/">Tutorial Photoshop // Rostro dibujado en arena de playa (filtro iluminación)</a> apareció primero en <a href="https://ildefonsosegura.es">Ildefonso Segura</a>.]]></description>
										<content:encoded><![CDATA[<div data-elementor-type="wp-post" data-elementor-id="757" class="elementor elementor-757">
						<section class="elementor-section elementor-top-section elementor-element elementor-element-659c0aaa elementor-section-boxed elementor-section-height-default elementor-section-height-default" data-id="659c0aaa" data-element_type="section" data-e-type="section">
						<div class="elementor-container elementor-column-gap-default">
					<div class="elementor-column elementor-col-100 elementor-top-column elementor-element elementor-element-797e0a03" data-id="797e0a03" data-element_type="column" data-e-type="column">
			<div class="elementor-widget-wrap elementor-element-populated">
						<div class="elementor-element elementor-element-77125e90 elementor-widget elementor-widget-text-editor" data-id="77125e90" data-element_type="widget" data-e-type="widget" data-widget_type="text-editor.default">
				<div class="elementor-widget-container">
									<p><img loading="lazy" decoding="async" class="size-full wp-image-758 aligncenter" src="https://ildefonsosegura.es/wp-content/uploads/Rostro-en-arena-de-playa.jpg" alt="Rostro-en-arena-de-playa" width="560" height="373" srcset="https://ildefonsosegura.es/wp-content/uploads/Rostro-en-arena-de-playa.jpg 560w, https://ildefonsosegura.es/wp-content/uploads/Rostro-en-arena-de-playa-300x199.jpg 300w" sizes="(max-width: 560px) 100vw, 560px" /></p><p>Aprende a crear un efecto de dibujo en la arena mojada de playa ¿nunca has escrito o dibujado con algo en la arena? ahora puedes desde casa. <strong>En algún punto del tutorial verás que también se consigue el </strong><strong>formato tatuaje</strong> del rostro con lo que tienes dos tutoriales en uno.</p><p> </p><p><strong style="color: #800000; font-size: 14px;">VIDEOTUTORIAL ROSTRO EN ARENA</strong></p><p> </p><p> </p><center><iframe src="https://www.youtube.com/embed/d8x9QH-QtYE" width="640" height="360" frameborder="0" allowfullscreen="allowfullscreen"></iframe></center><p> </p><p> </p><p> </p><center></center><p> </p><p> </p>								</div>
				</div>
					</div>
		</div>
					</div>
		</section>
				<section class="elementor-section elementor-top-section elementor-element elementor-element-f741438 elementor-section-full_width elementor-section-height-default elementor-section-height-default" data-id="f741438" data-element_type="section" data-e-type="section">
						<div class="elementor-container elementor-column-gap-default">
					<div class="elementor-column elementor-col-50 elementor-top-column elementor-element elementor-element-98c42cf" data-id="98c42cf" data-element_type="column" data-e-type="column">
			<div class="elementor-widget-wrap elementor-element-populated">
						<div class="elementor-element elementor-element-a695b79 elementor-align-right elementor-invisible elementor-widget elementor-widget-button" data-id="a695b79" data-element_type="widget" data-e-type="widget" data-settings="{&quot;_animation&quot;:&quot;shake&quot;}" data-widget_type="button.default">
				<div class="elementor-widget-container">
									<div class="elementor-button-wrapper">
					<a class="elementor-button elementor-button-link elementor-size-sm elementor-animation-grow" href="https://drive.google.com/open?id=0B_nJkCGJubuceFlvSUJkTTZLNTQ" target="_blank">
						<span class="elementor-button-content-wrapper">
									<span class="elementor-button-text">DESCARGA EL MATERIAL</span>
					</span>
					</a>
				</div>
								</div>
				</div>
					</div>
		</div>
				<div class="elementor-column elementor-col-50 elementor-top-column elementor-element elementor-element-b23f1f1" data-id="b23f1f1" data-element_type="column" data-e-type="column">
			<div class="elementor-widget-wrap elementor-element-populated">
						<div class="elementor-element elementor-element-c4e349a elementor-widget elementor-widget-html" data-id="c4e349a" data-element_type="widget" data-e-type="widget" data-settings="{&quot;_animation&quot;:&quot;none&quot;}" data-widget_type="html.default">
				<div class="elementor-widget-container">
					<form action="https://www.paypal.com/cgi-bin/webscr" method="post" target="_blank">
<input type="hidden" name="cmd" value="_donations">
<input type="hidden" name="business" value="ildefonsosegura@gmail.com">
<input type="hidden" name="lc" value="ES">
<input type="hidden" name="item_name" value="MANTENIMIENTO DE LA PAGINA DE ILDEFONSOSEGURA">
<input type="hidden" name="no_note" value="0">
<input type="hidden" name="currency_code" value="EUR">
<input type="hidden" name="bn" value="PP-DonationsBF:paypal1.jpg:NonHostedGuest">
<input type="image" src="http://ildefonsosegura.es/wp-content/uploads/paypal-updated-1.png" border="0" name="submit" alt="PayPal. La forma rápida y segura de pagar en Internet.">
<img loading="lazy" decoding="async" alt="" border="0" src="https://www.paypalobjects.com/es_ES/i/scr/pixel.gif" width="1" height="1">
</form>				</div>
				</div>
					</div>
		</div>
					</div>
		</section>
				<section class="elementor-section elementor-top-section elementor-element elementor-element-6e080e0f elementor-section-boxed elementor-section-height-default elementor-section-height-default" data-id="6e080e0f" data-element_type="section" data-e-type="section">
						<div class="elementor-container elementor-column-gap-default">
					<div class="elementor-column elementor-col-100 elementor-top-column elementor-element elementor-element-5cd53b6c" data-id="5cd53b6c" data-element_type="column" data-e-type="column">
			<div class="elementor-widget-wrap elementor-element-populated">
						<div class="elementor-element elementor-element-7fcef462 elementor-widget-divider--view-line elementor-widget elementor-widget-divider" data-id="7fcef462" data-element_type="widget" data-e-type="widget" data-widget_type="divider.default">
				<div class="elementor-widget-container">
							<div class="elementor-divider">
			<span class="elementor-divider-separator">
						</span>
		</div>
						</div>
				</div>
					</div>
		</div>
					</div>
		</section>
				<section class="elementor-section elementor-top-section elementor-element elementor-element-c8b8baf elementor-section-boxed elementor-section-height-default elementor-section-height-default" data-id="c8b8baf" data-element_type="section" data-e-type="section">
						<div class="elementor-container elementor-column-gap-default">
					<div class="elementor-column elementor-col-100 elementor-top-column elementor-element elementor-element-8ff1e1d" data-id="8ff1e1d" data-element_type="column" data-e-type="column">
			<div class="elementor-widget-wrap elementor-element-populated">
						<div class="elementor-element elementor-element-316074e elementor-widget elementor-widget-text-editor" data-id="316074e" data-element_type="widget" data-e-type="widget" data-widget_type="text-editor.default">
				<div class="elementor-widget-container">
									<p><span style="font-size: 14px;">Aplica técnicas similares para </span><strong style="font-size: 14px;">conseguir el mismo efecto </strong><span style="font-size: 14px;">pero en esta ocasión</span><strong style="font-size: 14px;"> con texto</strong><span style="font-size: 14px;">.</span></p><p style="text-align: left;"><span style="color: #800000;"><strong>VIDEOTUTORIAL ESCRITURA EN LA ARENA </strong></span></p><p> </p><p> </p><center><iframe src="https://www.youtube.com/embed/quk0LVdXi2Y" width="640" height="360" frameborder="0" allowfullscreen="allowfullscreen"></iframe></center><p> </p><p> </p><p> </p><center></center><p> </p><p> </p>								</div>
				</div>
					</div>
		</div>
					</div>
		</section>
				<section class="elementor-section elementor-top-section elementor-element elementor-element-4444576c elementor-section-full_width elementor-section-height-default elementor-section-height-default" data-id="4444576c" data-element_type="section" data-e-type="section">
						<div class="elementor-container elementor-column-gap-default">
					<div class="elementor-column elementor-col-50 elementor-top-column elementor-element elementor-element-b53ea04" data-id="b53ea04" data-element_type="column" data-e-type="column">
			<div class="elementor-widget-wrap elementor-element-populated">
						<div class="elementor-element elementor-element-5765b281 elementor-align-right elementor-invisible elementor-widget elementor-widget-button" data-id="5765b281" data-element_type="widget" data-e-type="widget" data-settings="{&quot;_animation&quot;:&quot;shake&quot;}" data-widget_type="button.default">
				<div class="elementor-widget-container">
									<div class="elementor-button-wrapper">
					<a class="elementor-button elementor-button-link elementor-size-sm elementor-animation-grow" href="https://drive.google.com/open?id=0B_nJkCGJubucNXRzUXVWMlVzbEk" target="_blank">
						<span class="elementor-button-content-wrapper">
									<span class="elementor-button-text">DESCARGA EL MATERIAL</span>
					</span>
					</a>
				</div>
								</div>
				</div>
					</div>
		</div>
				<div class="elementor-column elementor-col-50 elementor-top-column elementor-element elementor-element-6dd55a30" data-id="6dd55a30" data-element_type="column" data-e-type="column">
			<div class="elementor-widget-wrap elementor-element-populated">
						<div class="elementor-element elementor-element-718fd0c2 elementor-widget elementor-widget-html" data-id="718fd0c2" data-element_type="widget" data-e-type="widget" data-settings="{&quot;_animation&quot;:&quot;none&quot;}" data-widget_type="html.default">
				<div class="elementor-widget-container">
					<form action="https://www.paypal.com/cgi-bin/webscr" method="post" target="_blank">
<input type="hidden" name="cmd" value="_donations">
<input type="hidden" name="business" value="ildefonsosegura@gmail.com">
<input type="hidden" name="lc" value="ES">
<input type="hidden" name="item_name" value="MANTENIMIENTO DE LA PAGINA DE ILDEFONSOSEGURA">
<input type="hidden" name="no_note" value="0">
<input type="hidden" name="currency_code" value="EUR">
<input type="hidden" name="bn" value="PP-DonationsBF:paypal1.jpg:NonHostedGuest">
<input type="image" src="http://ildefonsosegura.es/wp-content/uploads/paypal-updated-1.png" border="0" name="submit" alt="PayPal. La forma rápida y segura de pagar en Internet.">
<img loading="lazy" decoding="async" alt="" border="0" src="https://www.paypalobjects.com/es_ES/i/scr/pixel.gif" width="1" height="1">
</form>				</div>
				</div>
					</div>
		</div>
					</div>
		</section>
				<section class="elementor-section elementor-top-section elementor-element elementor-element-1d2176a0 elementor-section-full_width elementor-section-height-default elementor-section-height-default" data-id="1d2176a0" data-element_type="section" data-e-type="section">
						<div class="elementor-container elementor-column-gap-default">
					<div class="elementor-column elementor-col-100 elementor-top-column elementor-element elementor-element-5e9af1d7" data-id="5e9af1d7" data-element_type="column" data-e-type="column">
			<div class="elementor-widget-wrap elementor-element-populated">
						<div class="elementor-element elementor-element-1f0c7056 elementor-widget elementor-widget-text-editor" data-id="1f0c7056" data-element_type="widget" data-e-type="widget" data-widget_type="text-editor.default">
				<div class="elementor-widget-container">
									<div><div align="center"><center><strong style="color: #ff0000;">Suscríbete a mi canal de Youtube:</strong></center><div><div><div align="center"><p><script src="https://apis.google.com/js/platform.js"></script></p><div class="g-ytsubscribe" data-channel="ildefonsosegura" data-layout="full" data-count="default"> </div></div></div><p> </p><p style="text-align: center;">No te lo pierdas y comparte tus trabajos en mi página de facebook (<span style="color: #0000ff;"><strong><a style="color: #0000ff;" href="http://www.facebook.com/IldefonsoSeguraPage" target="_blank" rel="noopener noreferrer">IldefonsoSeguraPage</a></strong></span>)<br />Espero que te guste y compartas el vídeo. No dejes de compartir este post.</p><p style="text-align: center;">Así es como me puedes ayudar 🙂 Gracias</p></div></div></div>								</div>
				</div>
					</div>
		</div>
					</div>
		</section>
				</div>La entrada <a href="https://ildefonsosegura.es/rostro-dibujado-en-arena-de-playa/">Tutorial Photoshop // Rostro dibujado en arena de playa (filtro iluminación)</a> apareció primero en <a href="https://ildefonsosegura.es">Ildefonso Segura</a>.]]></content:encoded>
					
					<wfw:commentRss>https://ildefonsosegura.es/rostro-dibujado-en-arena-de-playa/feed/</wfw:commentRss>
			<slash:comments>0</slash:comments>
		
		
			</item>
	</channel>
</rss>

<!--
Performance optimized by W3 Total Cache. Learn more: https://www.boldgrid.com/w3-total-cache/?utm_source=w3tc&utm_medium=footer_comment&utm_campaign=free_plugin

Caché de objetos 0/53 objetos usando Redis
Caché de base de datos usando Redis

Served from: ildefonsosegura.es @ 2026-07-11 19:35:40 by W3 Total Cache
--><br />
<b>Fatal error</b>:  Uncaught TypeError: mysqli_num_fields(): Argument #1 ($result) must be of type mysqli_result, bool given in /var/www/vhosts/ildefonsosegura.es/httpdocs/wp-includes/class-wpdb.php:3870
Stack trace:
#0 /var/www/vhosts/ildefonsosegura.es/httpdocs/wp-includes/class-wpdb.php(3870): mysqli_num_fields()
#1 /var/www/vhosts/ildefonsosegura.es/httpdocs/wp-includes/class-wpdb.php(785): wpdb-&gt;load_col_info()
#2 /var/www/vhosts/ildefonsosegura.es/httpdocs/wp-content/plugins/w3-total-cache/DbCache_WpdbInjection_QueryCaching.php(230): wpdb-&gt;__get()
#3 /var/www/vhosts/ildefonsosegura.es/httpdocs/wp-content/plugins/w3-total-cache/DbCache_WpdbNew.php(216): W3TC\DbCache_WpdbInjection_QueryCaching-&gt;query()
#4 /var/www/vhosts/ildefonsosegura.es/httpdocs/wp-content/plugins/aaa-option-optimizer/src/class-database.php(199): W3TC\DbCache_WpdbNew-&gt;query()
#5 /var/www/vhosts/ildefonsosegura.es/httpdocs/wp-content/plugins/aaa-option-optimizer/src/class-plugin.php(182): Progress_Planner\OptionOptimizer\Database::batch_insert()
#6 /var/www/vhosts/ildefonsosegura.es/httpdocs/wp-includes/class-wp-hook.php(341): Progress_Planner\OptionOptimizer\Plugin-&gt;update_tracked_options()
#7 /var/www/vhosts/ildefonsosegura.es/httpdocs/wp-includes/class-wp-hook.php(365): WP_Hook-&gt;apply_filters()
#8 /var/www/vhosts/ildefonsosegura.es/httpdocs/wp-includes/plugin.php(522): WP_Hook-&gt;do_action()
#9 /var/www/vhosts/ildefonsosegura.es/httpdocs/wp-includes/load.php(1308): do_action()
#10 [internal function]: shutdown_action_hook()
#11 {main}
  thrown in <b>/var/www/vhosts/ildefonsosegura.es/httpdocs/wp-includes/class-wpdb.php</b> on line <b>3870</b><br />