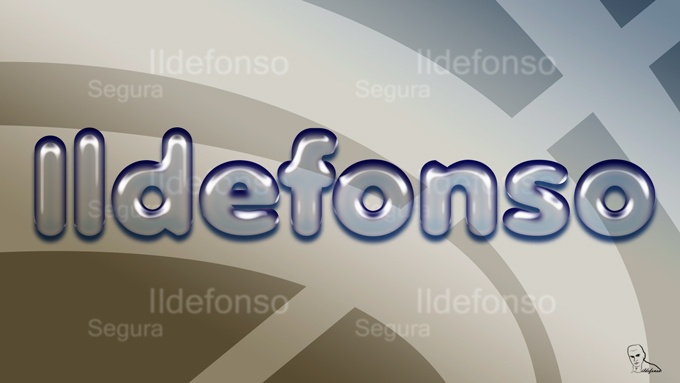
Con este tutorial aprenderemos a usar los estilos de capa para emular un efecto de material de globo, plástico o latex. Si usas variaciones sencillas del ejemplo, puedes conseguir otros efectos que harán que el texto parezca otro material. En cualquier caso, abajo te dejo el editable, estilo y la fuente para que puedas tener el efecto sin necesidad de crearlo.
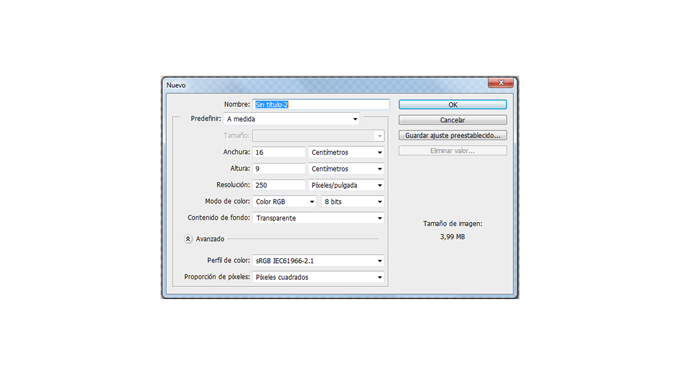
1.- Abre un nuevo canvas de trabajo con una resolución de 250 ppp. Yo usé un tamaño en cm de 16:9 (wide screen)
2.- Pon un fondo que tu elijas. Yo usé uno creado por mi sencillo

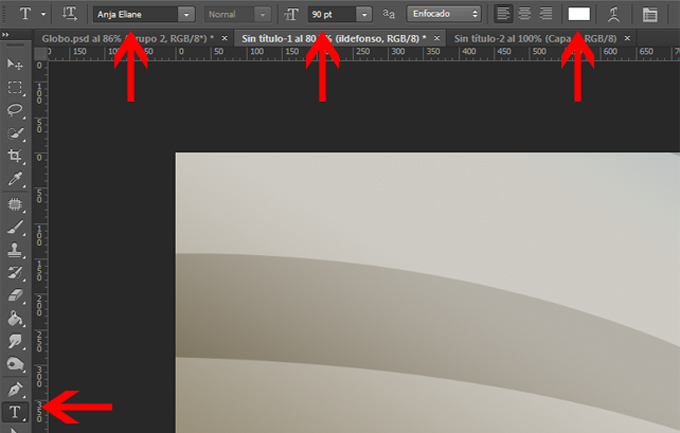
3.- Selecciona la herramienta texto de la barra de herramientas. Usa la fuente Anja con color blanco ffffff y tamaño aproximadamente 90 px
4.- Escribe tu texto

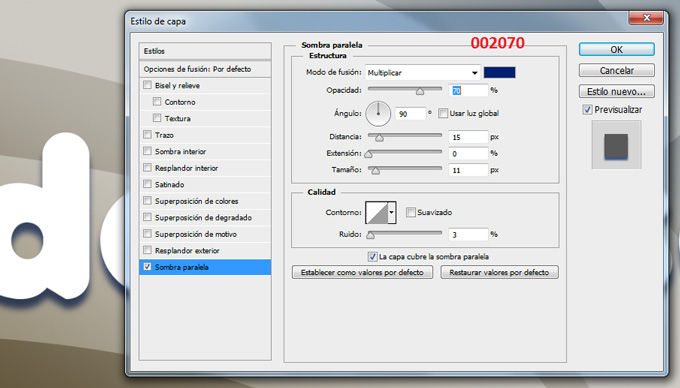
5.- Haz clic derecho en la capa de texto y selecciona OPCIONES DE FUSION. Comienza seleccionando SOMBRA PARALELA
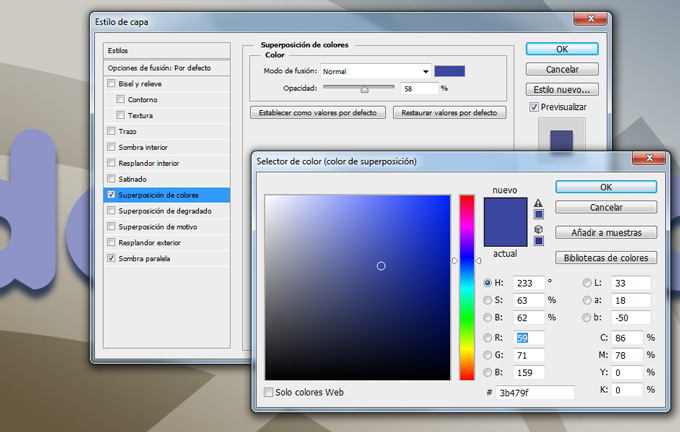
6.- Continuamos con SUPERPOSICION DE COLORES buscando un tono azul
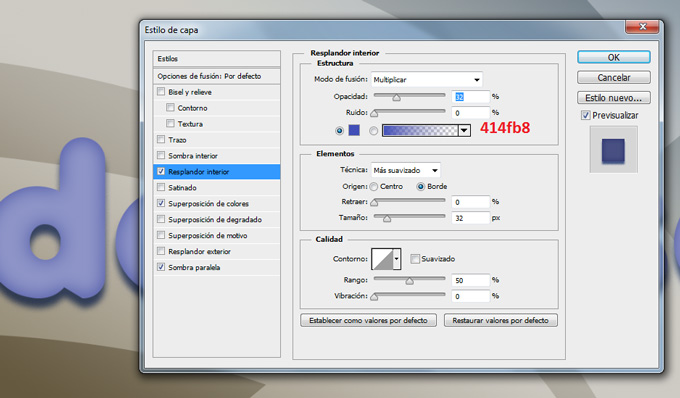
7.- Aplicamos ahora la variable RESPLANDOR INTERIOR
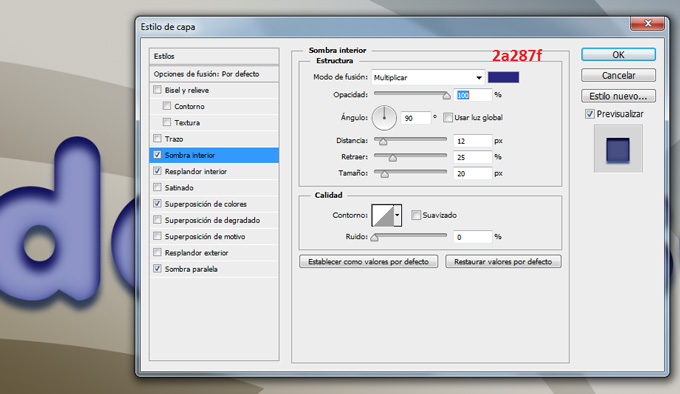
8.- A continuación le damos SOMBRA INTERIOR
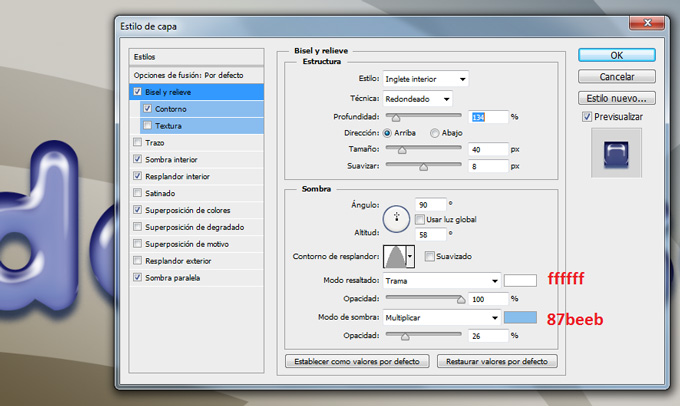
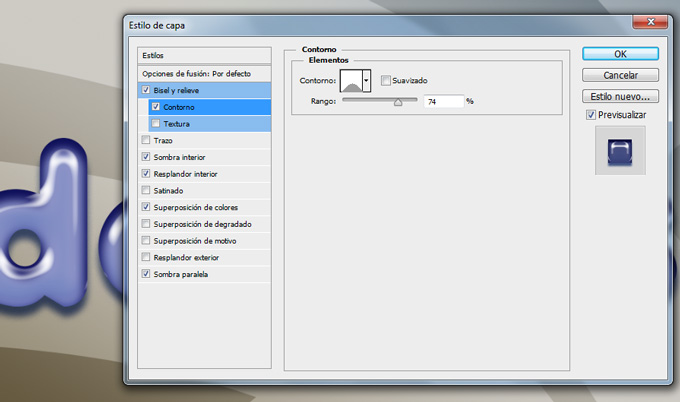
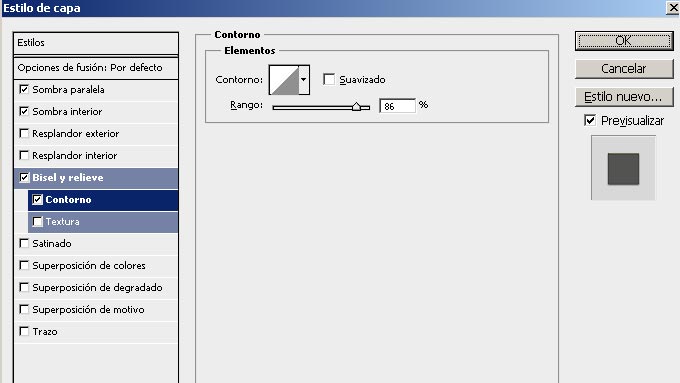
9.- Nos situamos en BISEL Y RELIEVE dándole unos valores como sigue:
10.- Dentro de bisel y relieve seleccionamos CONTORNO
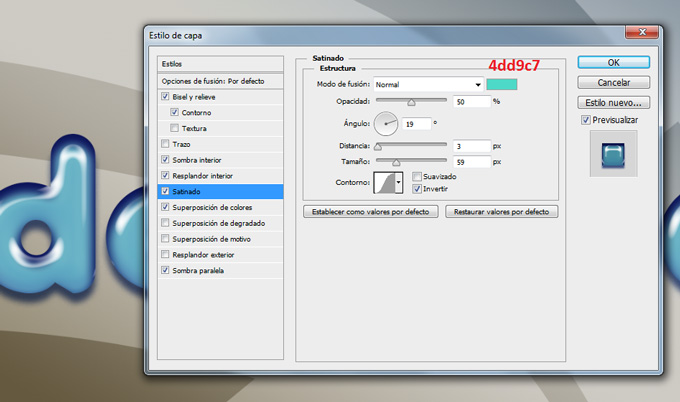
11.- Casi finalizando aplicamos SATINADO
12.- Hasta aquí ya tendríamos un efecto de texto de globo bastante aceptable.

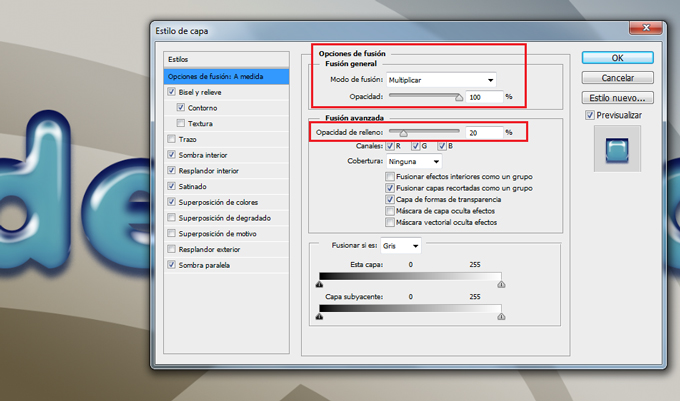
13.- En las opciones de fusión vamos a cambiar variables tanto de la sección de FUSION GENERAL como de FUSION AVANZADA
En la fusión general cambiaremos el tipo de fusión de capa a MULIPLICAR. En la fusión avanzada cambiaremos el porcentaje de relleno al 20%
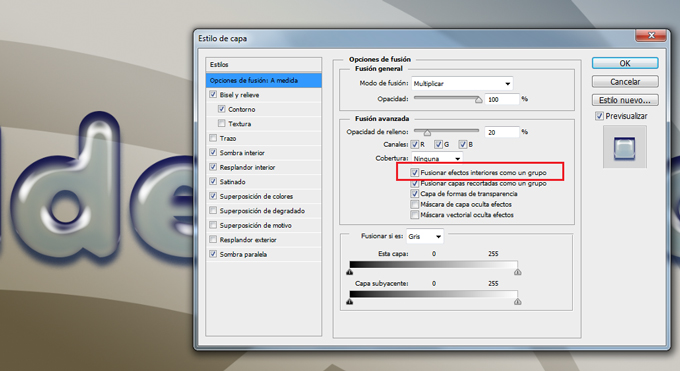
14.- Para conseguir mayor transparencia en el texto seleccionaremos una variable dentro de la FUSIÓN AVANZADA que no he visto en ningún tutorial. Esa opción es FUSIONAR EFECTOS INTERIORES COMO UN GRUPO. Con esta opción seleccionada lo que se hace es fusionar los efectos de «resplandor interior», «satinado» y «superposición» con la capa antes de fusionarlos con el documento. Todas las opciones de fusión se fusionan con el documento y en función del contenido de las otras capas el resultado de las variables es diferente. Si tienes esta opción de FUSIONAR EFECTOS INTERIORES COMO UN GRUPO, los efectos interactuan con el contenido de la capa y no con el resto de capas.
15.- Así el resultado es el siguiente que íbamos buscando:
Con fecha 21 de octubre de 2013 se publica un videotutorial donde explico como conseguir un efecto de tallado de una calavera en una textura de madera. Con la misma técnica podrías conseguir la integración de un volumen sencillo en una textura determinada.
Aprovechando estas fechas cercanas a Halloween, tienes a tu disposición un videotutorial junto con otros que ya publiqué y que te pueden servir también, donde te muestro unas técnicas sencillas con máscaras, filtros y capas de ajuste. El resultado es fantástico y te invito a ver el videotutorial haciendo clic en la imagen siguiente.
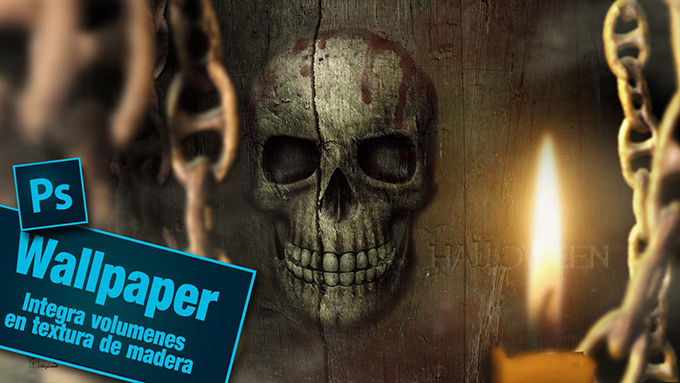
HAZ CLIC EN LA IMAGEN PARA VER EL VIDEOTUTORIAL
[widget id="custom_html-8"]
Tutoriales relacionados con la temática Halloween
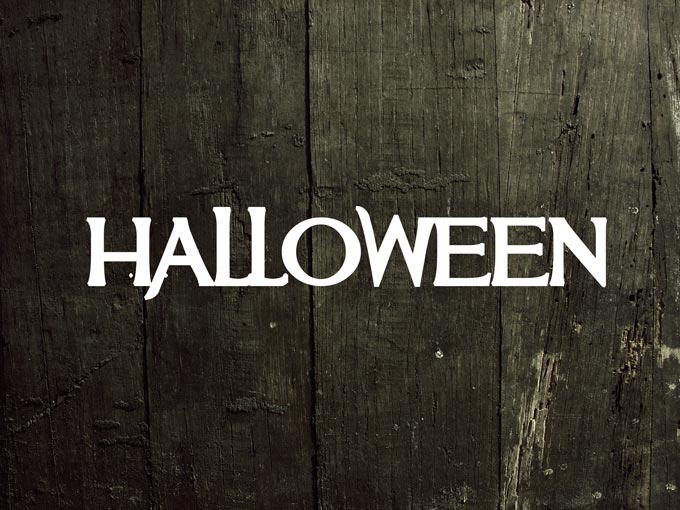
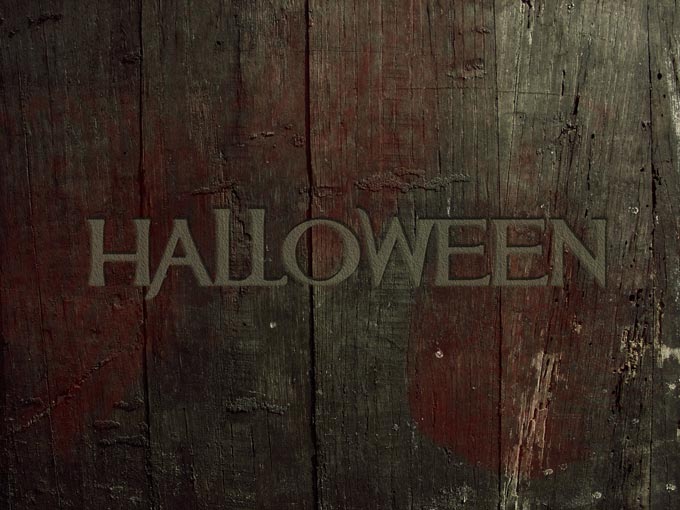
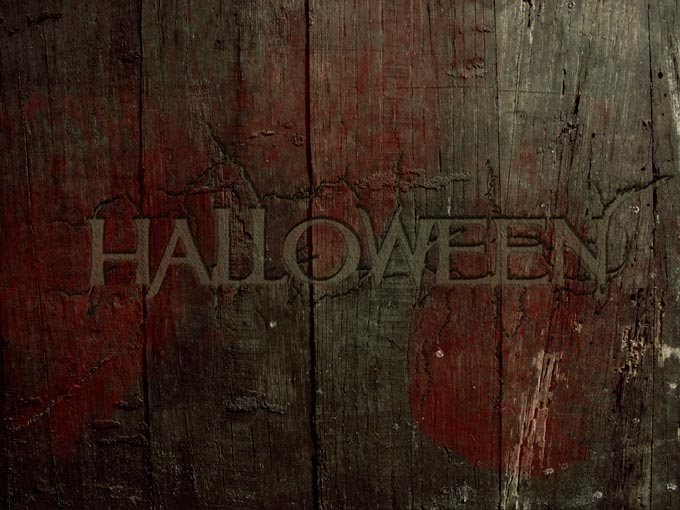
En este post te muestro un tutorial que completa al videotutorial citado dado que nos enseña a realizar el texto que aparece en el wallpaper de Halloween. El resultado es este y lo vemos paso a paso:

TUTORIAL PHOTOSHOP
PASO 1.- Abrimos textura de madera donde pondremos el texto

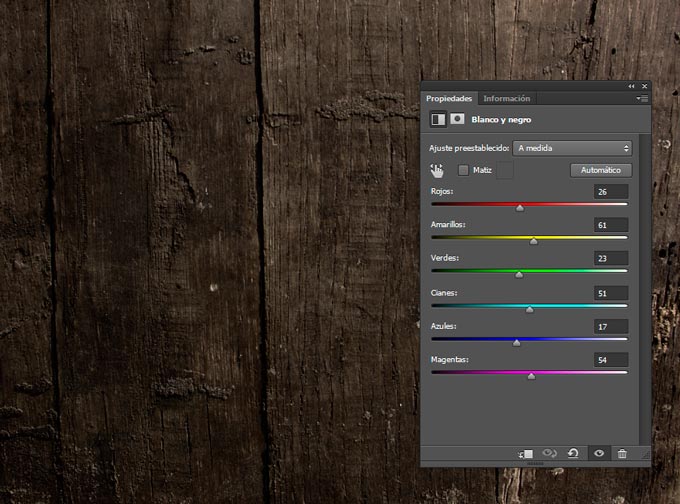
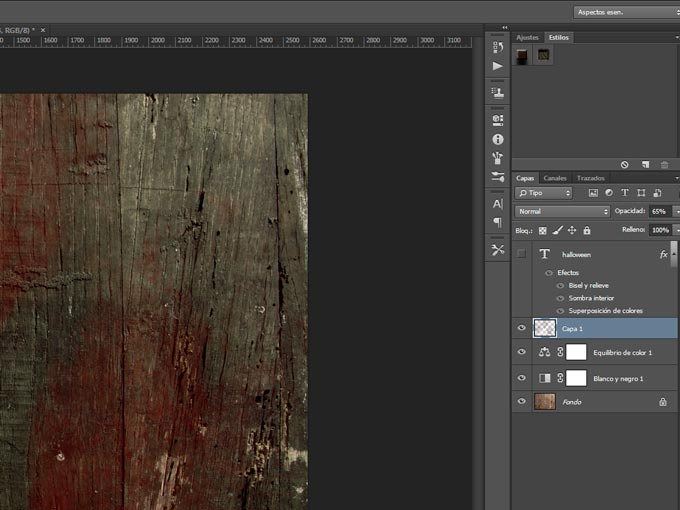
PASO 2.- Añadimos capa de ajuste de Blanco y negro con los valores por defecto que son los que se ven en la imagen. Ponemos el modo de fusión de la capa en MULTIPLICAR
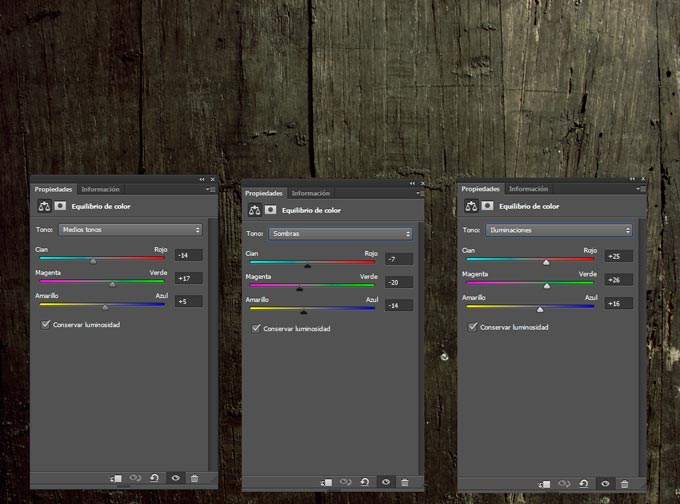
PASO 3.- Añadimos caja de ajuste de equilibrio de color con los valores de la imagen tanto en medios tonos como en sombras como en iluminaciones. Ponemos el modo de fusión de la capa en COLOR
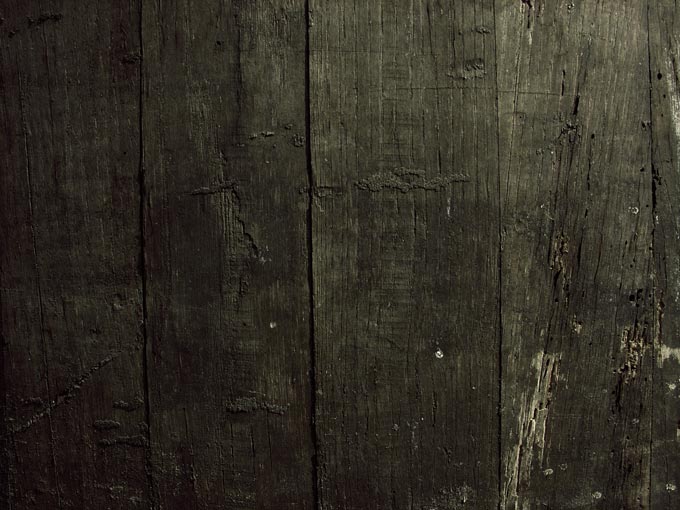
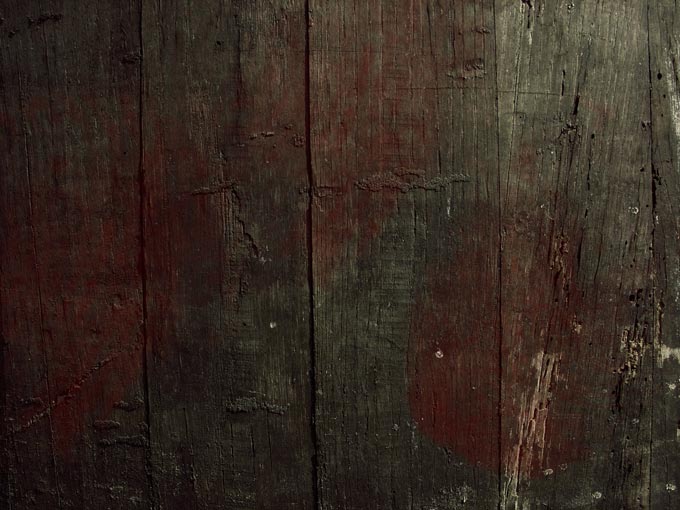
PASO 4.- tendríamos este resultado en la textura a partir del cual podemos trabajar el texto
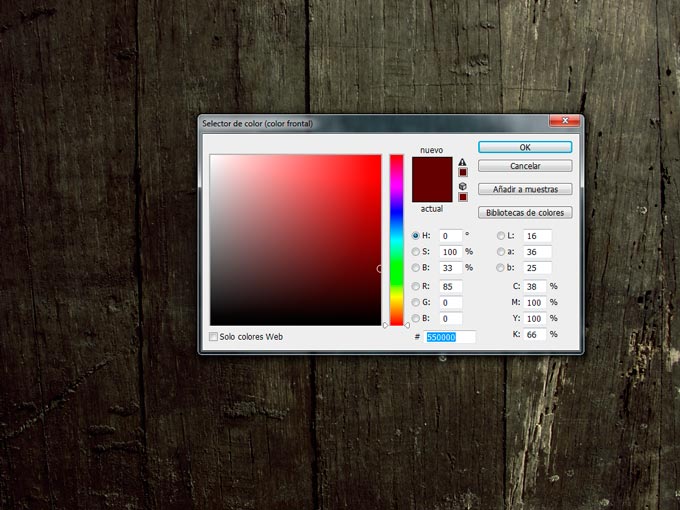
PASO 5.- Seleccionamos un color rojo oscuro para emular el color de la sangre. Código 550000
PASO 6.- Seleccionamos un pincel de sangre que puedes encontrar en la red. Acuérdate de chequear que no tiene derecho de copyright
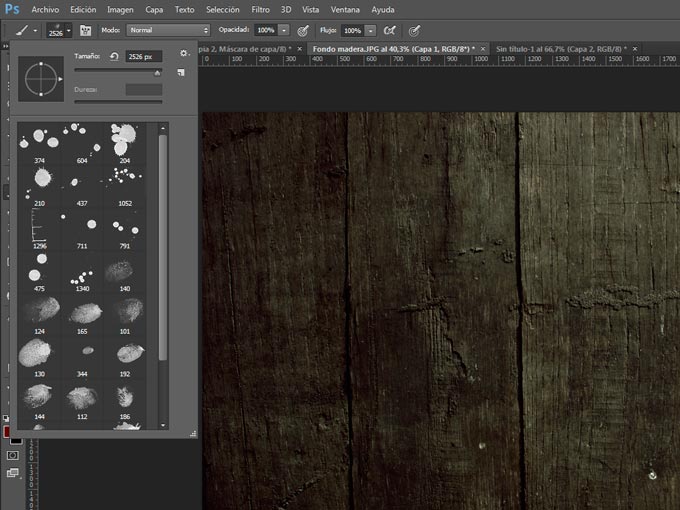
PASO 7.- Vamos pintando con diferentes tamaños, pinceles, rotacion,… y bajamos la opacidad de la capa en torno al 65%
PASO 8.- Tendríamo un resultado como este
PASO 9.- Ponemos nuestro texto. El tipo de fuente que usé fue MULAN
PASO 10.- Aplicamos un estilo de capa. Clic derecho del ratón sobre la capa de texto y selecciona OPCIONES DE FUSION. Sigue los cuadros siguientes para copiar los valores de los atributos del estilo. Ojo… el relleno de la capa se reduce al 25%
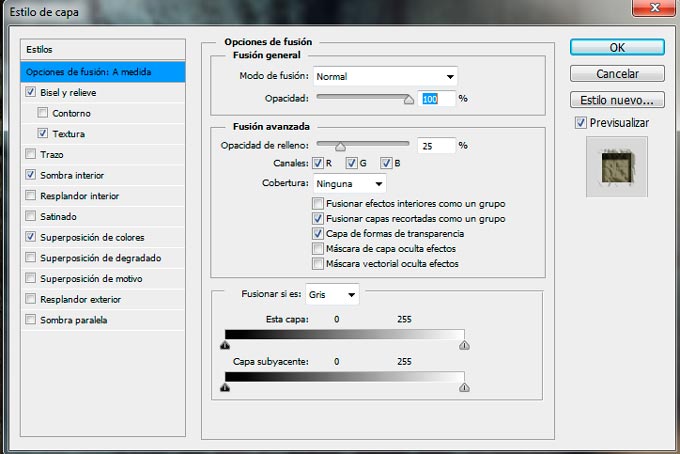
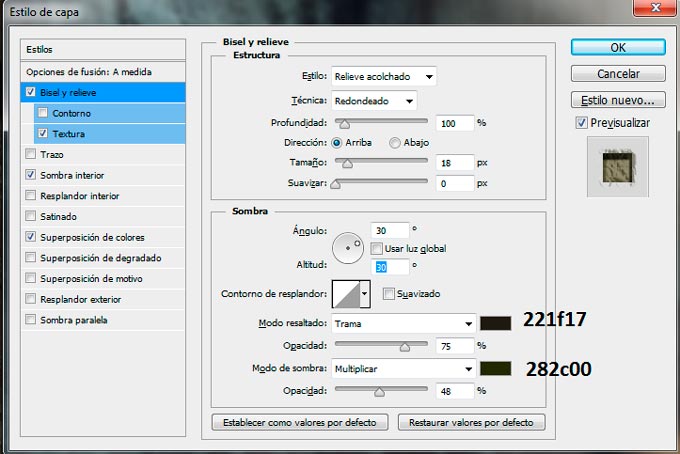
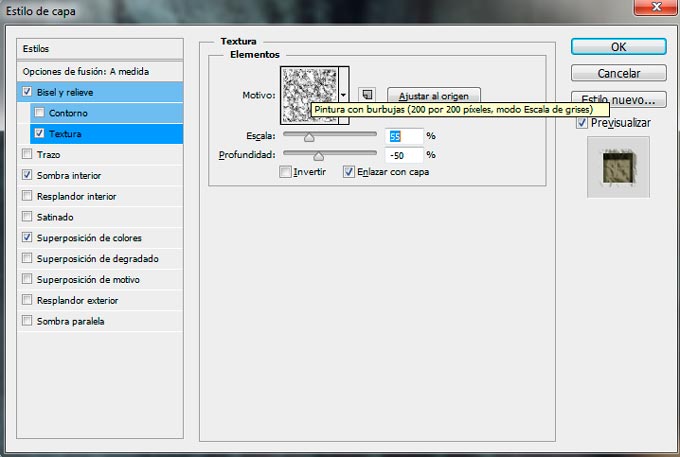
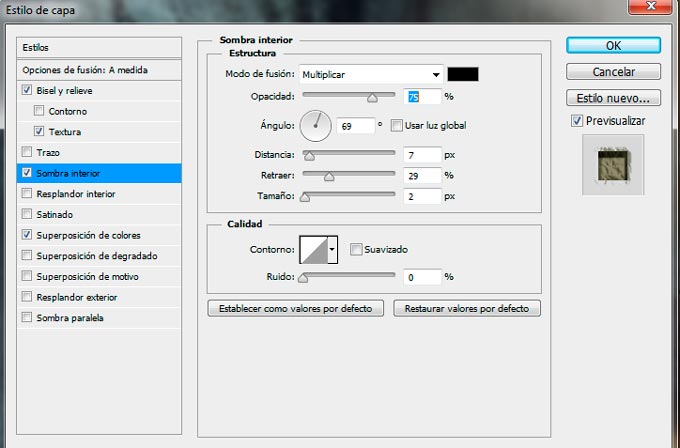
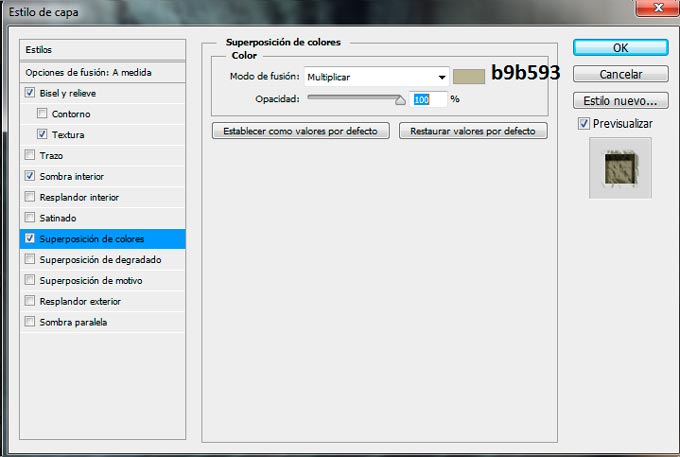
PASO 11.- El estilo nos queda como sigue
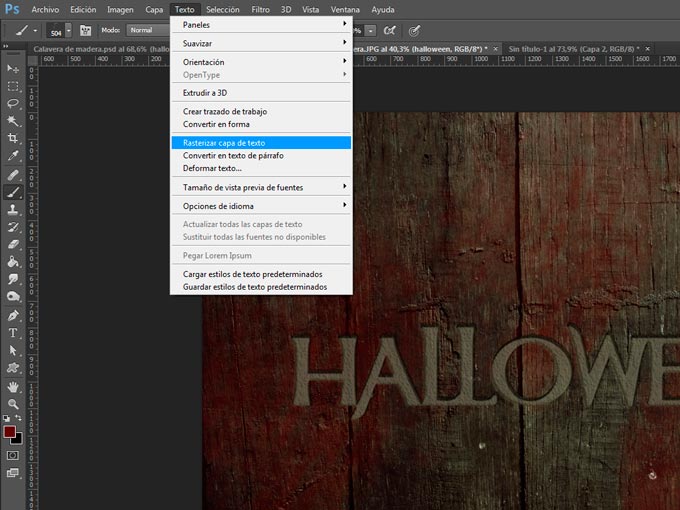
PASO 12.- En el menú TEXTO rasterizamos el texto
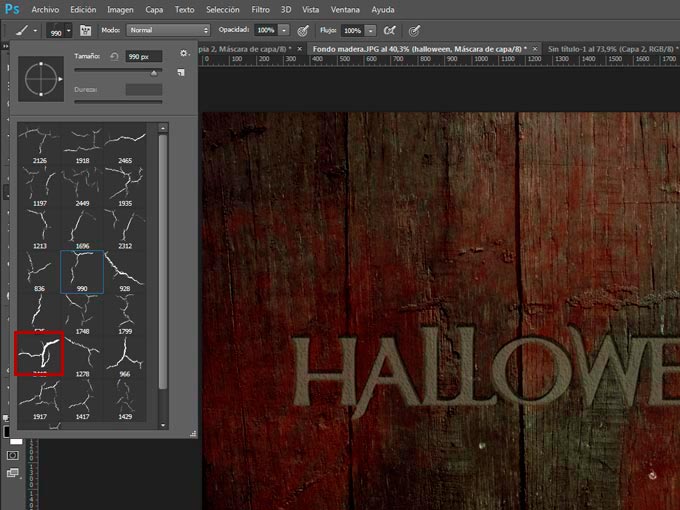
PASO 13.- Seleccionamos un pack de pinceles de grietas. Os hago la misma recomendación que hice con los de sangre.
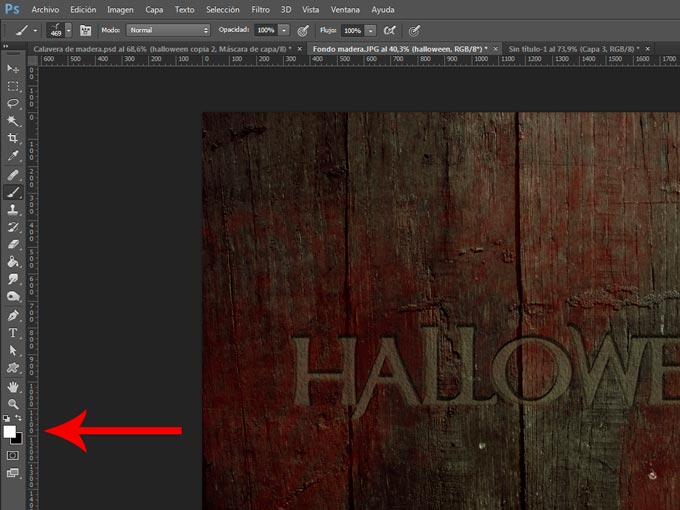
PASO 14.- Seleccionamos el color frontal blanco (como el texto). Un atajo rápido para hacerlo es pulsar D y luego X. Así el color frontal es blanco con total seguridad
PASO 15.- Si por un momento ponemos el relleno de la capa en el 100% y ocultamos los estilos de capa, podemos ver un ejemplo de como hemos pintado con las grietas el texto

Si volvemos a poner el relleno en 25% y hacemos visibles los efectos tendemos este resultado
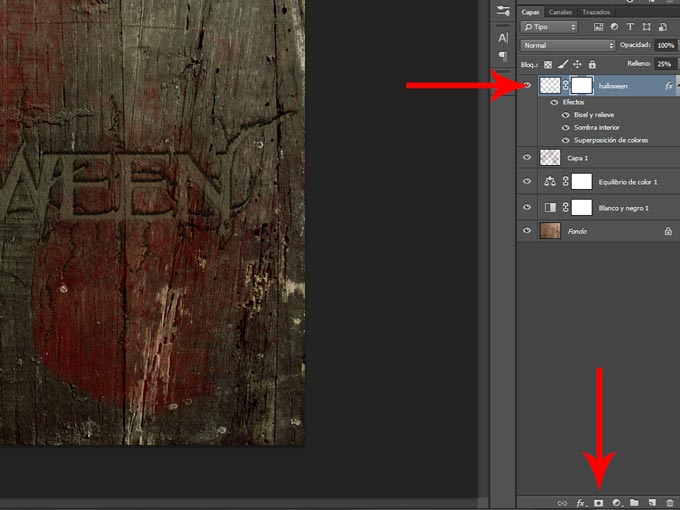
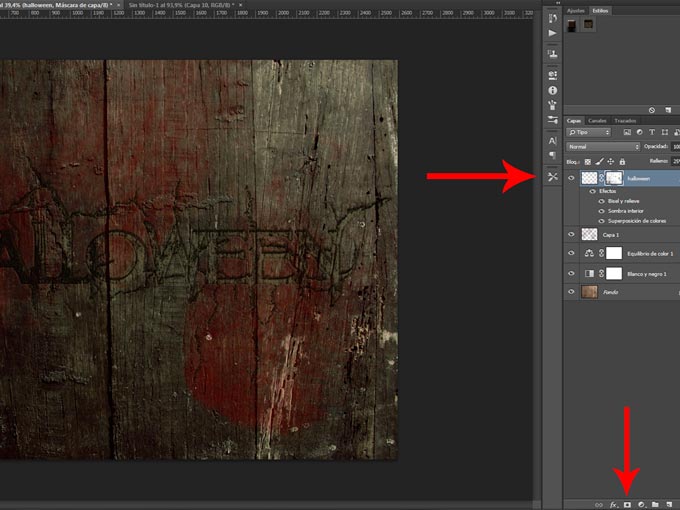
PASO 16.- Añadimos a la capa una máscara de capa con el icono que está abajo del panel de capas
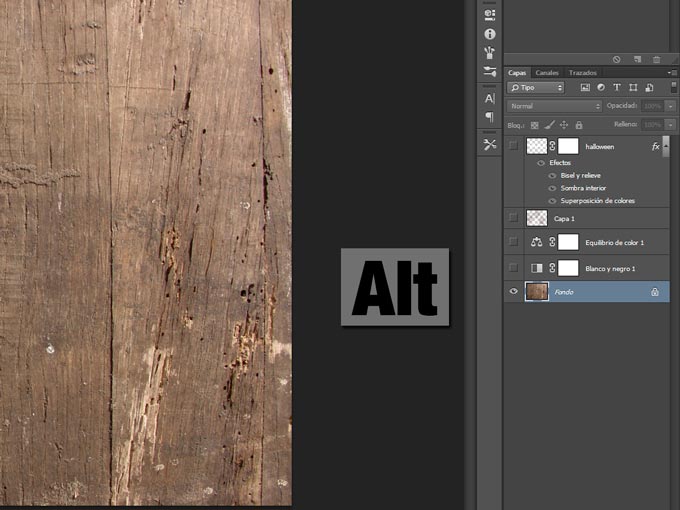
PASO 17.- Mantenemos tecleada la techa ALT y hacemos clic en el ojo de la capa textura de madera. Con eso conseguimos que solo se vea esa capa
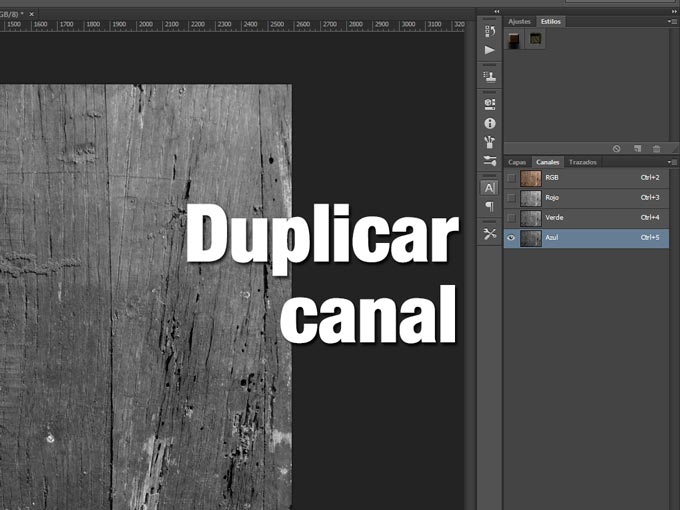
PASO 18.- Nos vamos a la paleta de canales. Con el botón derecho del ratón hacemos clic en el canal azul y le indicamos que duplique el canal
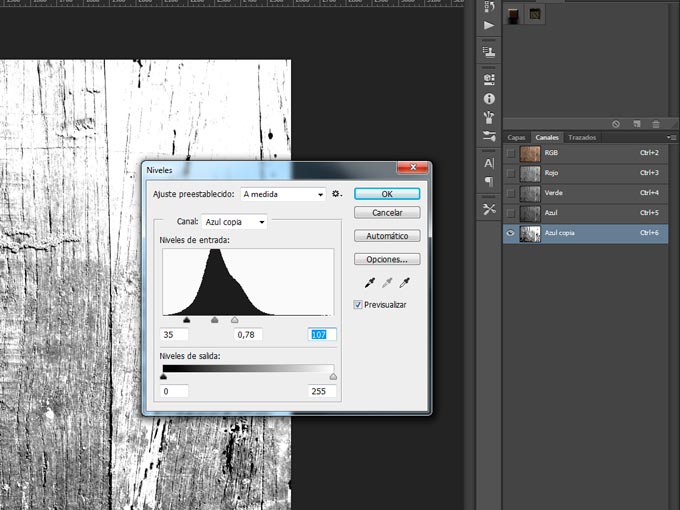
PASO 19.- Con CTRL+L vemos la paleta de niveles y buscamos acercarnos con los tonos hacia la izquierda dando luz a la mayoría del canal
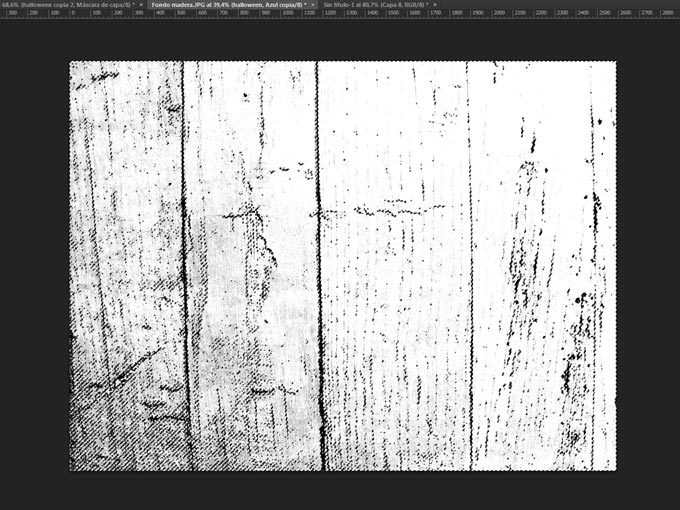
PASO 20.- Con CTRL+clic en el canal se seleccionan las áreas blancas del mismo.
PASO 21.- Con esa selección realizada volvemos a la paleta de capas RGB
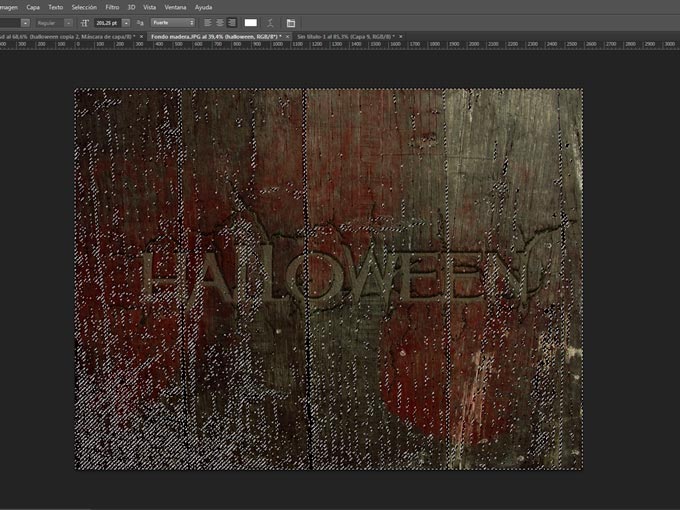
PASO 22.- Añadimos una máscara de capa y automáticamente las zonas no seleccionadas se pintan de negro en la máscara y por lo tanto se ocultan esas zonas en la capa del texto
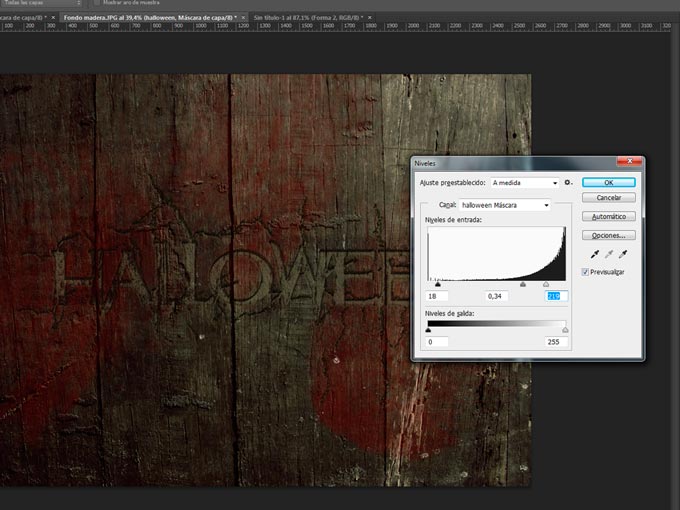
PASO 23.- Situados en la máscara podemos cambiar sus niveles (CTRL+L) para ajustar la apariencia de las zonas a ocultar o visualizar. En mi composición le di estos valores a los niveles
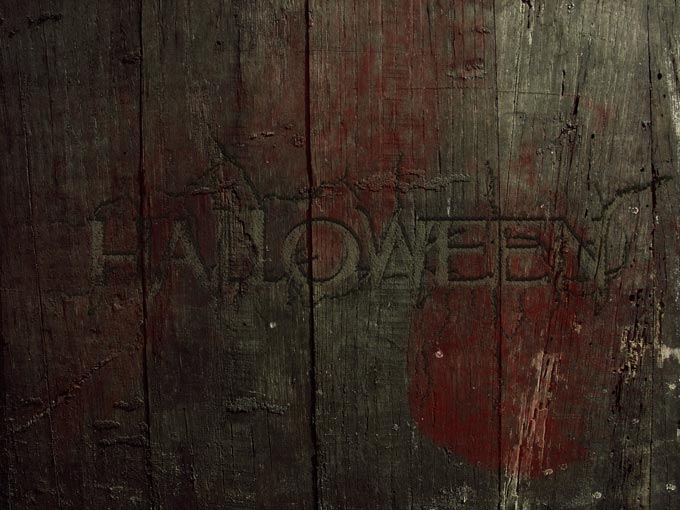
PASO 24.- El resultado hasta el momento es este
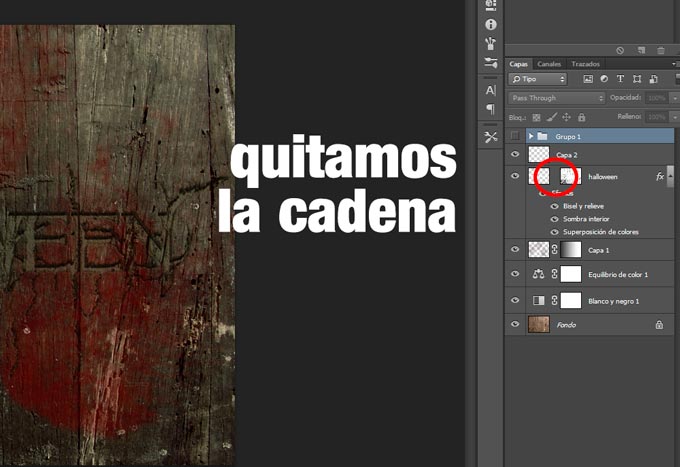
PASO 25.- Quitamos la unión entre la capa y su máscara de capa haciendo simplemente clic con el ratón en la cadena que las une. Esta debe desaparecer como en la imagen
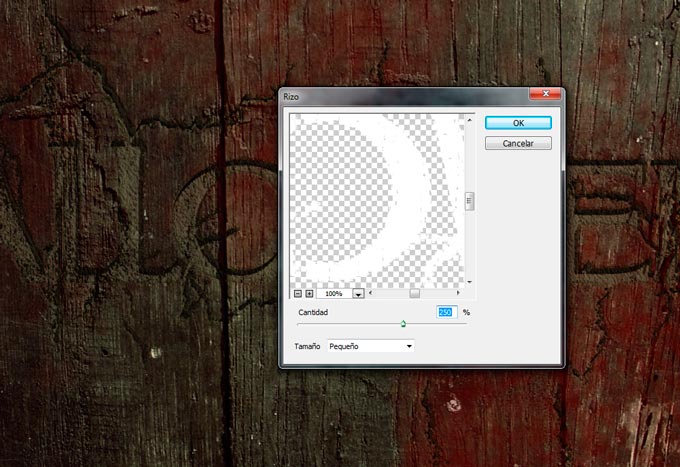
PASO 26.- Aplicamos un filtro en la capa. Filtro, distorsionar, RIZO con el valor que se muestra en la imagen
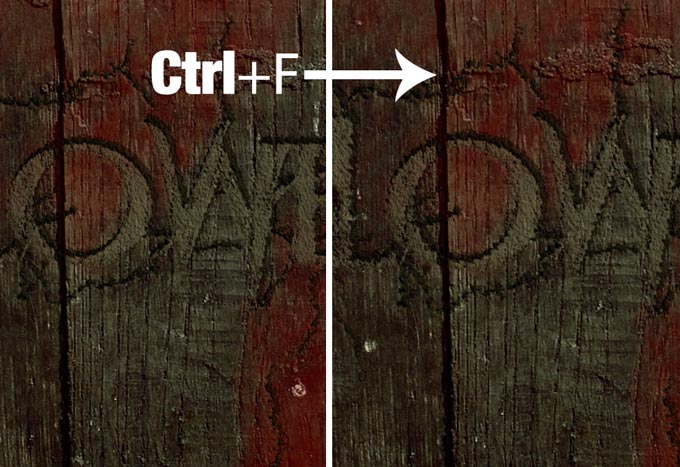
PASO 27.- Con CTRL+F se repite el filtro y conseguimos un efecto de irregularidad en los bordes bastante real al objeto que buscamos
CONCLUSION
Si te ha gustado el tutorial, espero que dejes un comentario y que lo compartas con tus amigos. Asi me ayudas a continuar. Gracias
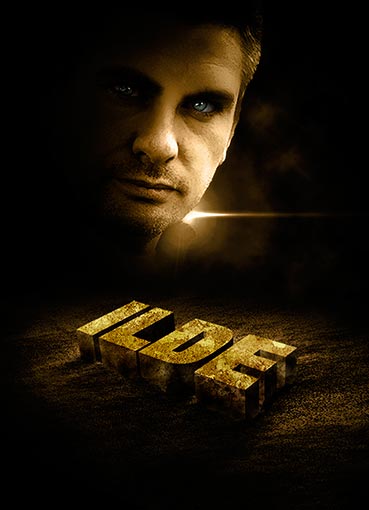
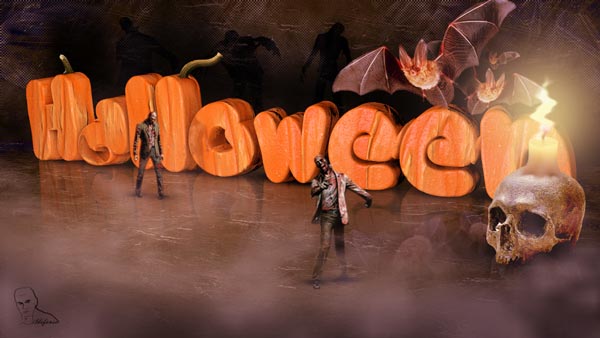
En esta bonita composición realizamos tres videotutoriales que explican
- Tutorial Photoshop: Cómo realizar el wallpaper con el texto e iluminarlo
- Tutorial Cinema4D: Cómo exportar el texto 3D desde cinema4D a photoshop a través del canal alfa
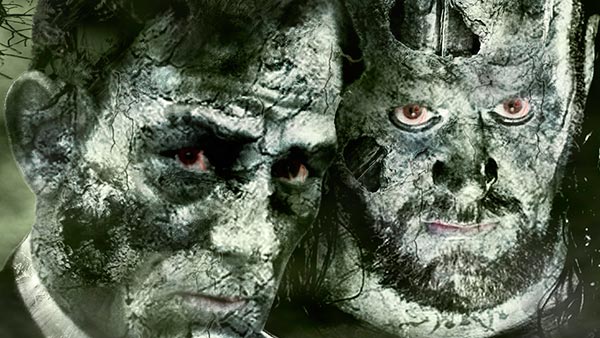
- Tutorial Photoshop: Cómo realizar el efecto de iluminación de la cara (Firma o Photobook)
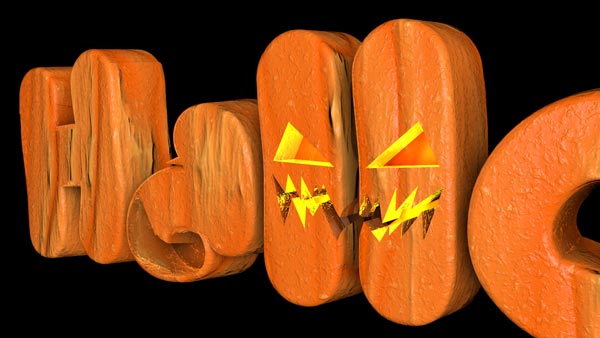
VIDEOTUTORIAL TEXTO ARENOSO 3D
VIDEOTUTORIAL EXPORTAR EL TEXTO EN CANAL ALFA
VIDEOTUTORIAL FIRMA PARA WEB O PHOTOBOOK
TUTORIAL ESCRITO
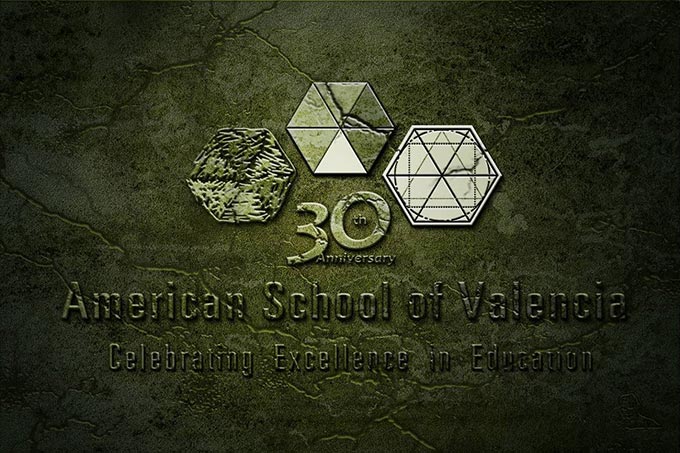
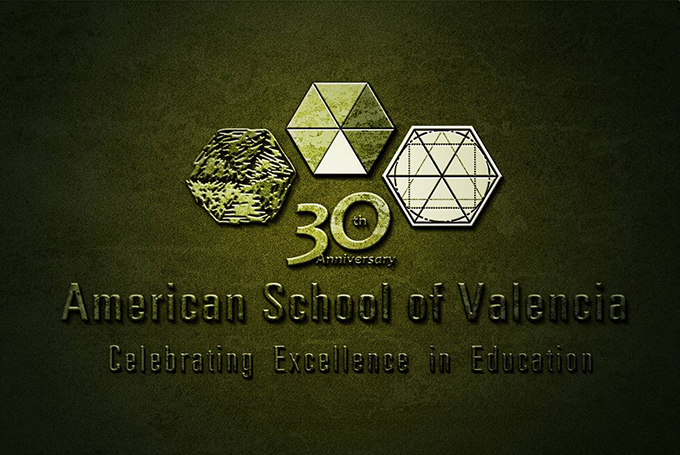
Conseguiremos primero un wallpaper como este:

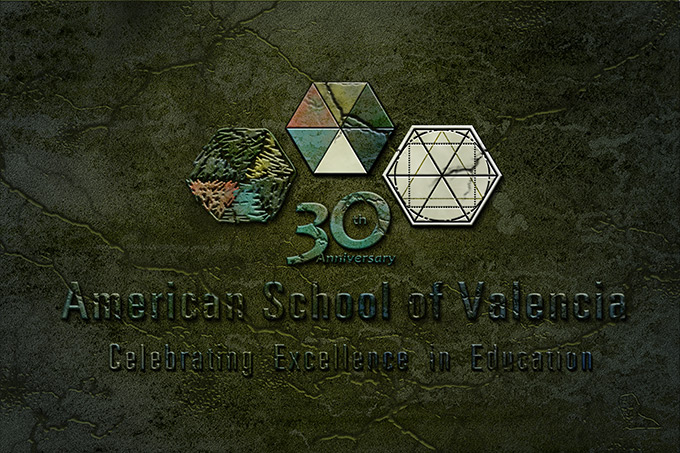
Y posteriormente lo envejeceremos para conseguir este:
Igualmente le podemos dar un color para hacerlo mucho más real comparándolo con el logo original
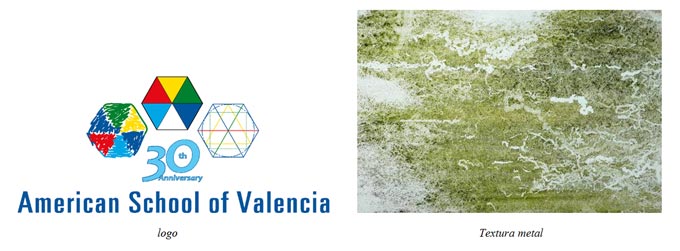
1.- STOCKTS UTILIZADOS
Partimos de dos stocks
- Logotipo seleccionado
- Textura de piedra
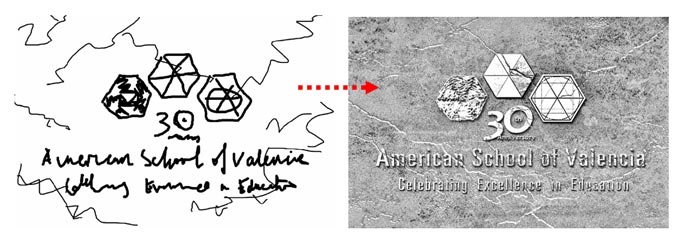
2.-PLANTEAMIENTO DEL TRABAJO
En cualquier proyecto os recomiendo que planteeis en primer lugar un borrador de lo que quereis hacer para seguir una guía que, incluso durante el desarrollo del trabajo, podréis modificar. En cualquier caso es un punto de partida.
3.-DESARROLLO DEL TRABAJO
3.1.-FONDO
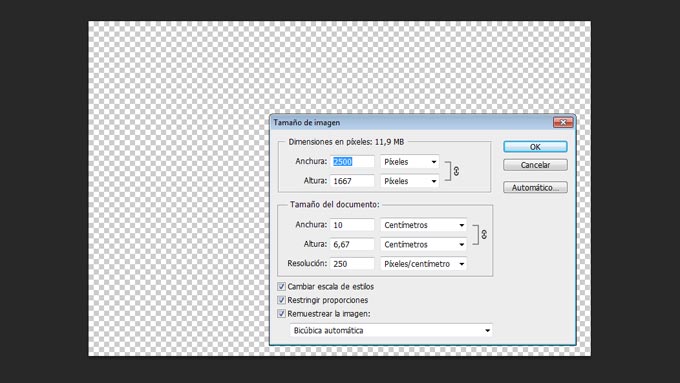
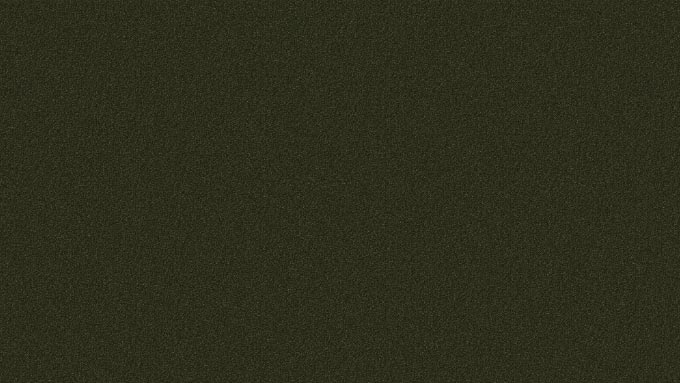
1) Abriremos un documento (CTRL+N) de dimensiones 2500×1667 con una resolución de 250ppp y fondo transparente. Cualquier otra resolución implicará ajustes en los estilos que posteriormente mostraré. El resultado que yo obtengo es en función de estos parámetros. Con otros distintos, el resultado no será igual sin perjuicio de que vosotros lo ajusteis para conseguirlo.
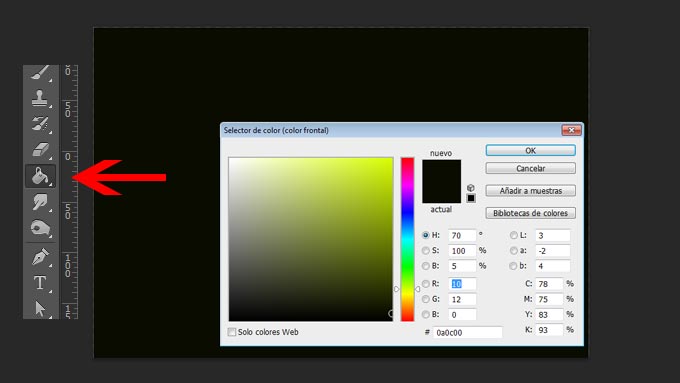
2) Seleccionamos la herramienta de bote de pintura (tecla «G») y rellenamos de un color 0a0c00
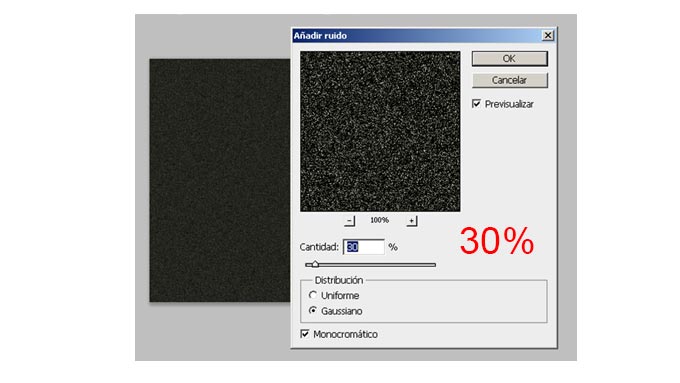
3) Vamos a FILTRO, AÑADIR RUIDO y añadimos un 30%, gausiano y monocromático
4) Vamos de nuevo a FILTRO, GALERIA DE FILTROS y seleccionamos TEXTURA dándole los valores de Arenisca, Escala al 121%, Relieve 17 y luz superior izquierda
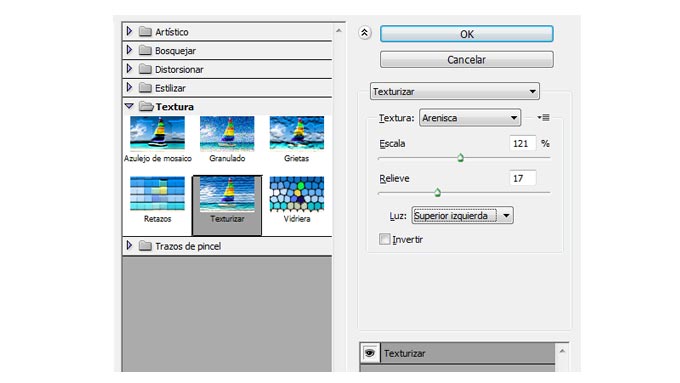
Así conseguimos tener esto
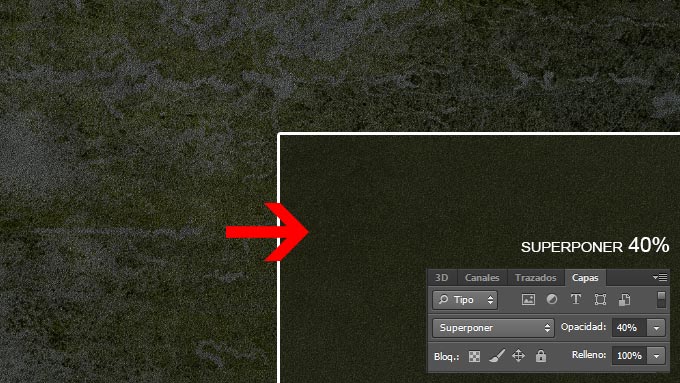
5) Colocamos la textura de piedra (ve al menú ARCHIVO, COLOCAR y busca el archivo de la textura) )y cambiamos el modo de fusión a SUPERPONER . Bajamos opacidad al 40%.
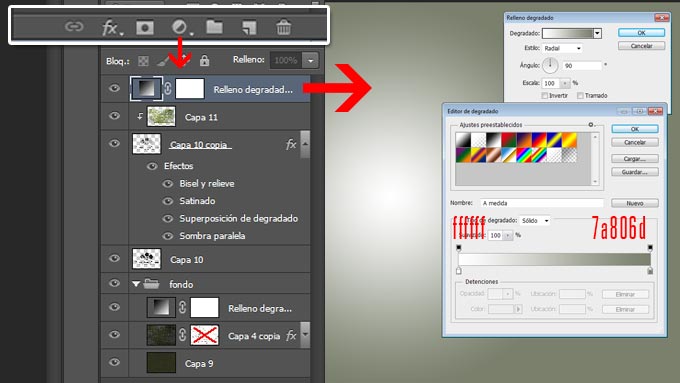
6) Vamos al menú CAPA, AÑADIR NUEVA CAPA DE RELLENO de DEGRADADO quedando como sigue
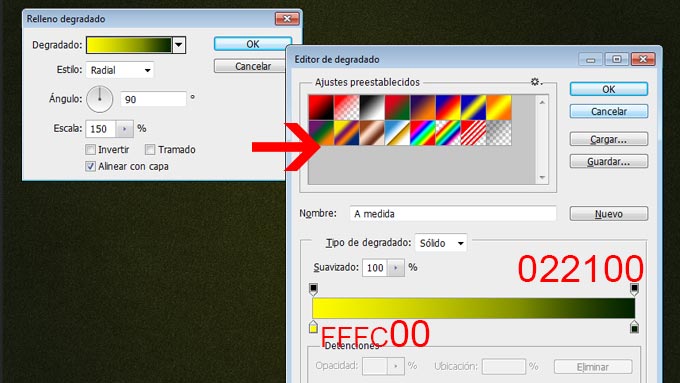
Cambiamos el modo de fusión a SUPERPONER y bajamos opacidad al 29%
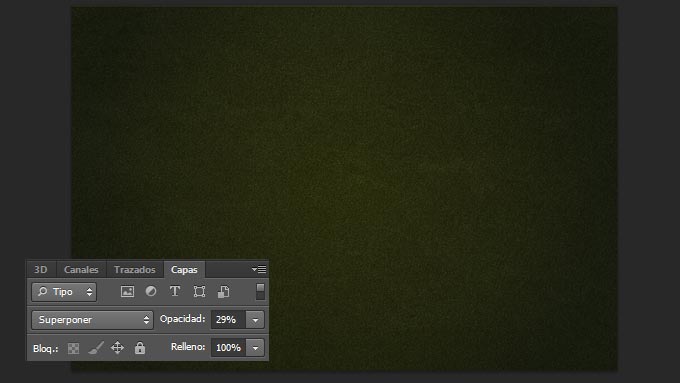
Así ya tenemos nuestro fondo hecho
3.2.-LOGOTIPO DE PIEDRA
1) Introducimos el logotipo (a través del ARCHIVO, COLOCAR el logotipo)

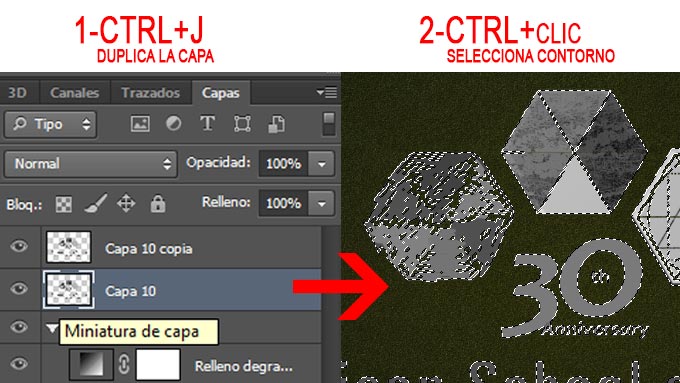
2) Con la combinación de teclas CTRL+SHIFT+U desaturamos la capa del logotipo (con el menú IMAGEN, AJUSTES, DESATURAR consigues lo mismo)

3) Duplicamos esta capa con la combinación de teclas CTRL+J. A continuación nos situamos en la capa inferior de logo desaturado y con la tecla CTRL presionada hacemos clic con el mouse para seleccionar el contorno del logo.
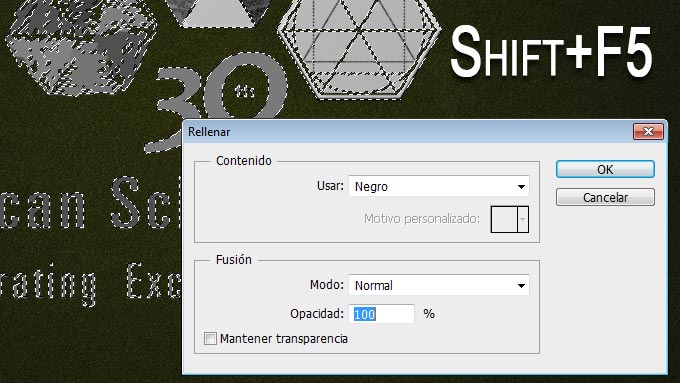
4) Con la combinación SHIFT+F5 (o desde el menú EDICION, RELLENAR) rellenamos de color negro
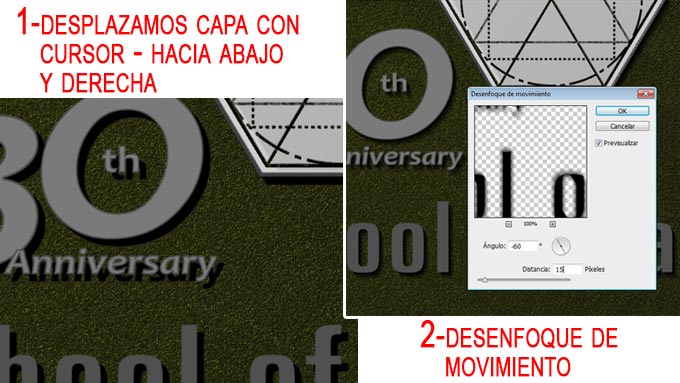
5) Con el cursor desplazamos la capa rellena de negro hacia abajo y hacia la izquierda para darle una extrusión en la sombra del logo. Después iremos a FILTRO, DESENFOQUE DE MOVIMIENTO de -60º y 15 px
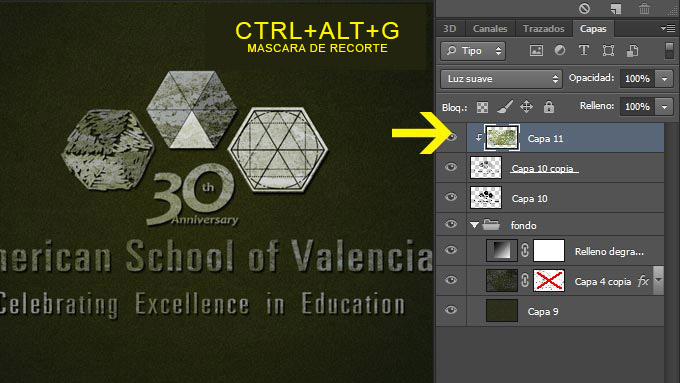
6) Colocamos de nuevo la textura de piedra arriba del todo y ponemos en modo de fusión de la capa en LUZ SUAVE
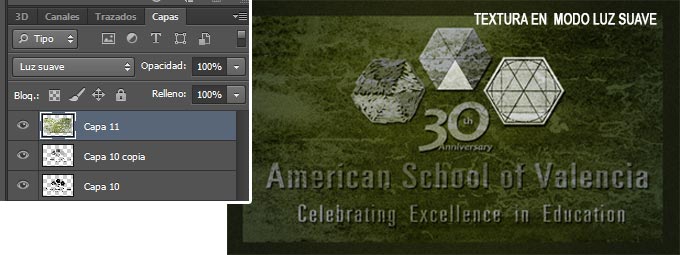
7) Hacemos que la textura sea una máscara de recorte de la capa que tiene debajo (la del logo). Combinación para hacer la máscara de recorte = CTRL+ALT+G
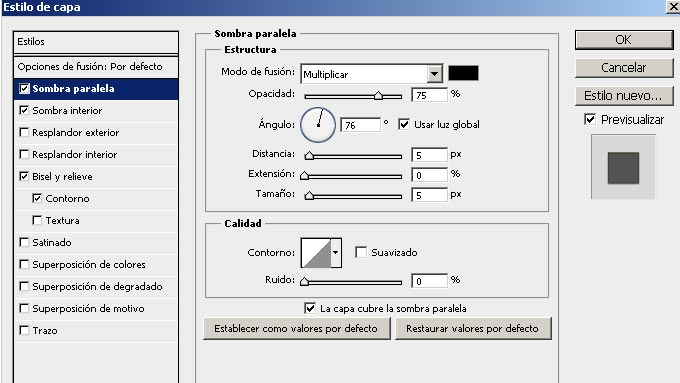
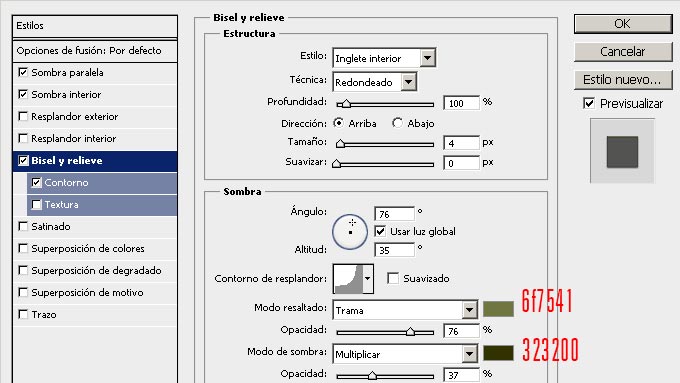
8) A continuación nos situamos en la capa del logo desaturado y con el botón derecho hacemos clic en la capa para elegir OPCIONES DE FUSIÓN de la lista desplegable obtenida. Aplicamos unos estilos como aparece a continuación
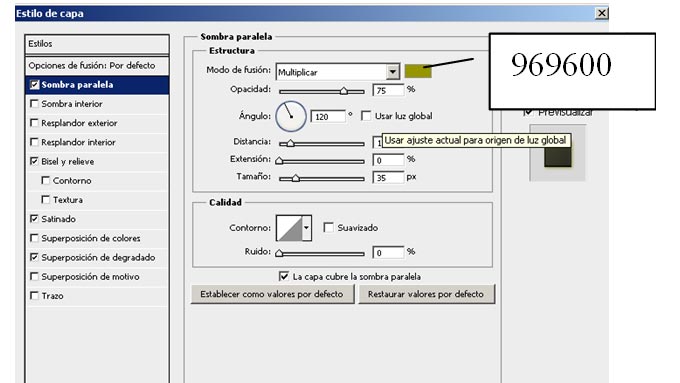
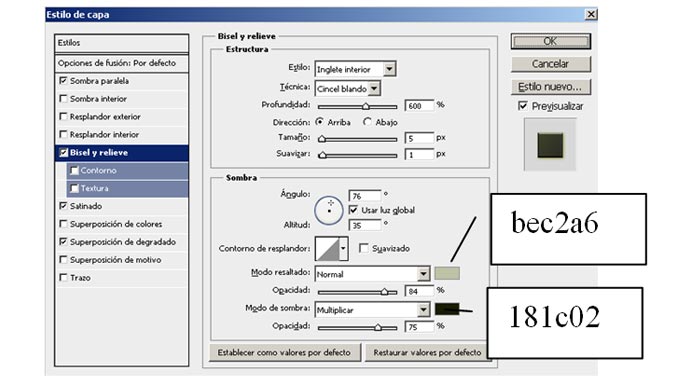

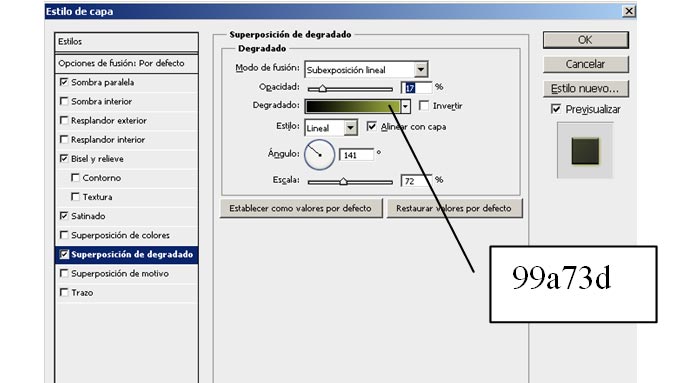
El resultado que tenemos es este
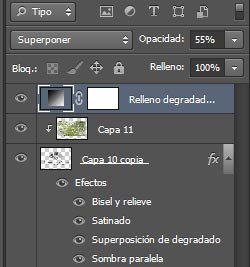
9) Desde los iconos de la parte de abajo de la paleta de capas añadimos una capa de ajuste de DEGRADADO según las siguientes variables
10) Ponemos el modo de fusión de la capa en SUPERPONER y le bajamos la opacidad al 55%
11) Desde los iconos de abajo de la paleta de capas añadimos otra capa de ajuste de EQUILIBRIO DE COLOR con los valores que ves en la imágen y cambiamos el modo de fusión a LUZ FUERTE bajando la opacidad al 55%
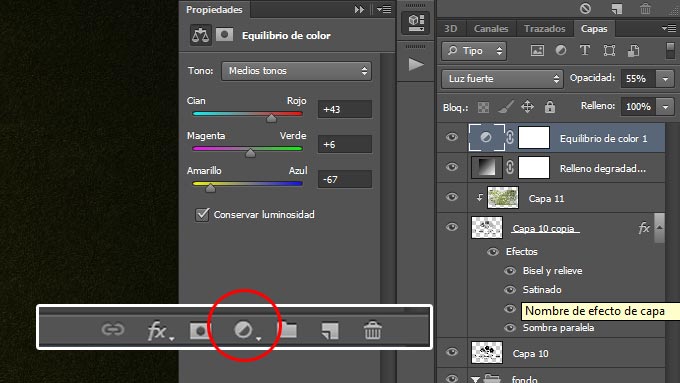
12) Así es como tenemos el logotipo en apariencia de piedra iluminada
CONCLUSION 1
3.3.-LOGOTIPO DE PIEDRA ENVEJECIDO Y AGRIETADO
1) Vamos a cambiar algunas variables de una capa que ya editamos al principio. Nos vamos a la capa inferior de la textura de pierdra y le cambiamos la opacidad a 80% (antes estaba al 40%) y el modo de fusión a NORMAL (estaba en superponer)
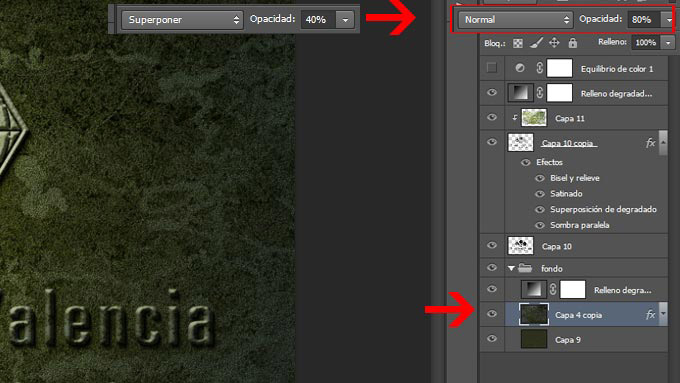
2) Tendríamos ahora algo asi

3) A esa capa de la textura de piedra aplicaremos unos estilos (botón derecho sobre la capa y seleccionamos «opciones de fusión»). Aunque no veas que pasa nada, le estás dando estilo y será útil en los siguientes pasos.

4) Creamos una máscara de capa en la capa de la textura (en el menú CAPA, MASCARA DE CAPA, DESCUBRIT TODAS). Seleccionamos un pincel de rayos (si no sabes como instalarlos te aconsejo mi manual HAZ CLIC y te muestro cómo)
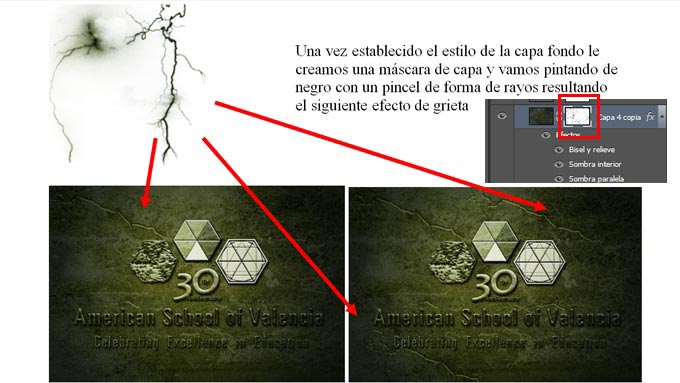
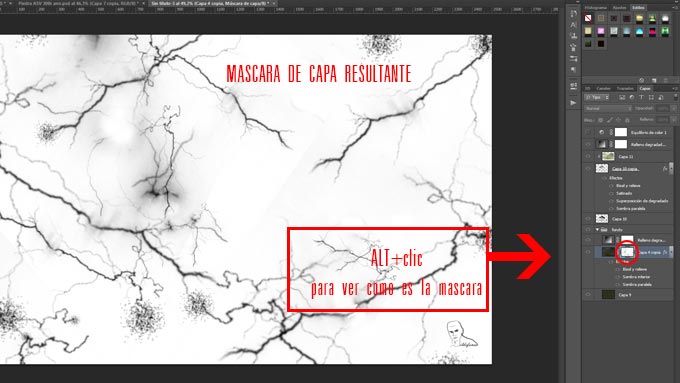
5) Pintamos y tendríamos un resultado en la máscara como el que sigue (lo que ves es lo que hemos pintado en la máscara de capa de color negro – haz ALT+clic en la máscara para verlo y lo mismo para volver a la vista inicial)
6) Hemos conseguido hasta el momento esto:

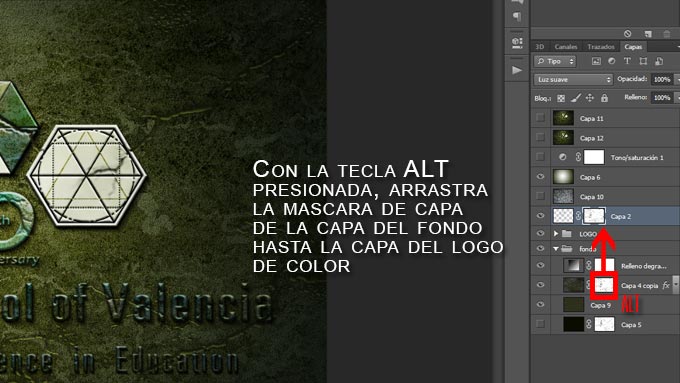
7) Para conservar las mismas grietas que hemos dibujado en el fondo (a través de la máscara de capa) sobre el logo, debemos copiar la máscara de la textura a la capa del logo. Para ello, mantenemos la tecla ALT presionada mientras arrastramos la máscara que queremos copiar hacia la capa donde queremos copiarla.
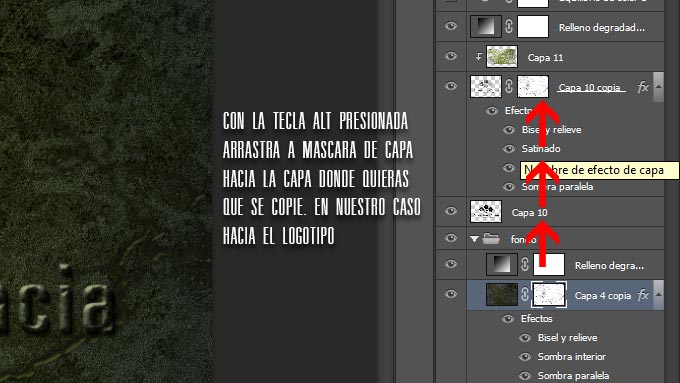
y conseguimos que las mismas grietas de la parte de atrás estén sobre el logotipo
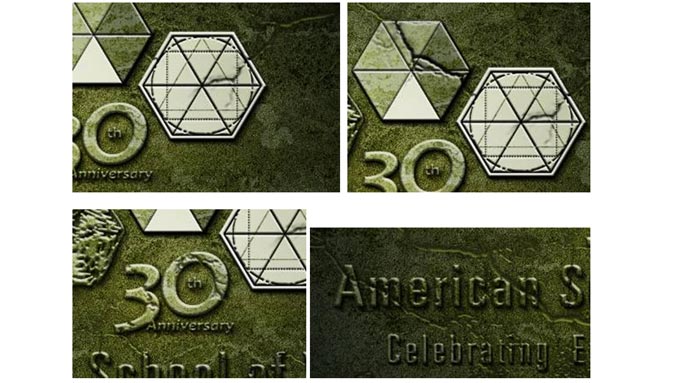
Vemos que nos queda lo que buscábamos
CONCLUSION 2

3.4.-COLOR EN EL LOGOTIPO DE PIEDRA ENVEJECIDO Y AGRIETADO
1) Colocamos arriba del todo de nuevo el logo original a color y cambiamos el modo de fusión a LUZ SUAVE
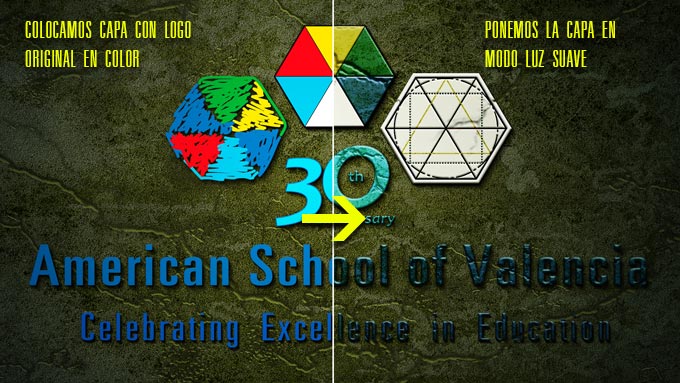
2) Añadimos una máscara de capa (menú CAPA, MASCARA DE CAPA, MOSTRAR TODAS o desde los iconos de abajo de la paleta de capas). Nos situamos en la máscara de capa y aplicamos desde el menú FILTRO, INTERPRETAR, NUBES. Lo hacemos por segunda vez presionando CTRL+F. Vamos de nuevo a FILTRO, INTERPRETAR pero en esta ocasión NUBES DE DIFERENCIA y posteriormente repetimos el filtro con CTRL+F. En definitiva hemos aplicado dos veces NUBES y dos veces NUBES DE DIFERENCIA. Quedaría así:

3) Aplicamos la máscara de capa ¿cómo? te situas en la máscara de capa, botón derecho del mouse y selecciona APLICAR MASCARA DE CAPA. Ahora solo tendrás una capa sin máscara pero como esta:

4) Igual que hicimos en el punto 7 del apartado anterior, copiaremos la máscara de capa donde dibujamos las grietas en la capa que acabamos de obtener en el punto 3 anterior
Y nuestro trabajo está finalizado
CONCLUSION 3
Espero que te haya gustado el tutorial, lo compartas y me dejes tu comentario
La entrada Tutorial Photoshop // Convierte tu logo en piedra, envejecelo y agrietalo apareció primero en Ildefonso Segura.]]>
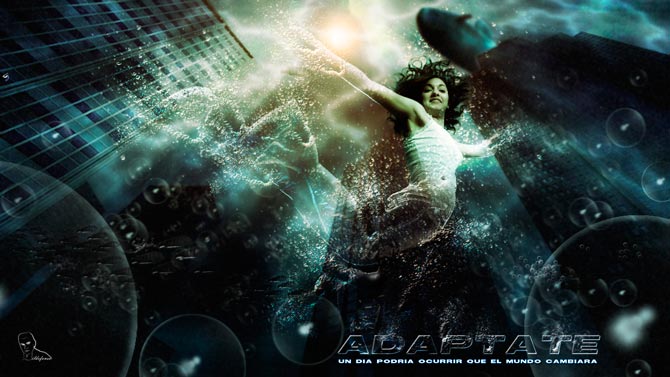
La composición creada en enero de 2011 (ADAPTATE) es una reflexión sobre la dura situación actual por la que estamos pasando. Los tiempos cambian y el entorno turbulento hace más difícil un seguimiento de los estándares habituales. Hemos de adaptarnos a las situaciones anticipándonos y formando parte de la realidad como responsables de los cambios, actores y no como víctimas de las circunstancias, Adáptate.
Esta composición está explicada en tres tutoriales:
1.- Convertir una persona en agua
2.- Crear burbujas (pinceles).
3.- Sumergir una ciudad.
Abajo puedes ver y descargar el tutorial escrito. Disfrútalo
VIDEOTUTORIAL CONVERTIR LA PERSONA EN AGUA
VIDEOTUTORIAL CREAR BURBUJAS VIDEOTUTORIAL SUMERGIR UNA CIUDAD
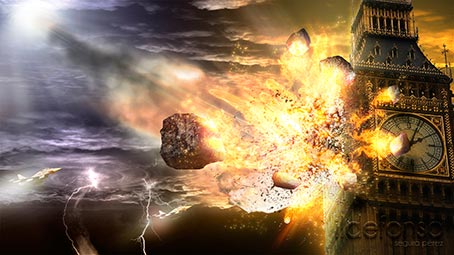
La magia del photoshop nos ayuda a crear situaciones fantásticas como la de la fotocomposición de ADIOS BIG BEN creada en Agosto de 2010. En febrero de 2011 y a petición de un amigo (canal Tiogollum) realicé el tutorial en youtube. Realmente responde a mi afición por la ciencia ficción que en esta ocasion he creado yo mismo intentando emular los trabajos de los grandes maestros.
VIDEOTUTORIAL
Meses después de realizar el wallpaper me interesé en animar la escena e hice un speed art en el que mostraba cómo se hacía la animación de la caida de un meteorito sobre Londres. Mira como quedó:
TUTORIAL ESCRITO
Tutorial de Photoshop: ADIOS BIG BEN
La entrada Tutorial Photoshop // Wallpaper adios Big Ben (Meteorito en Londres) apareció primero en Ildefonso Segura.]]>
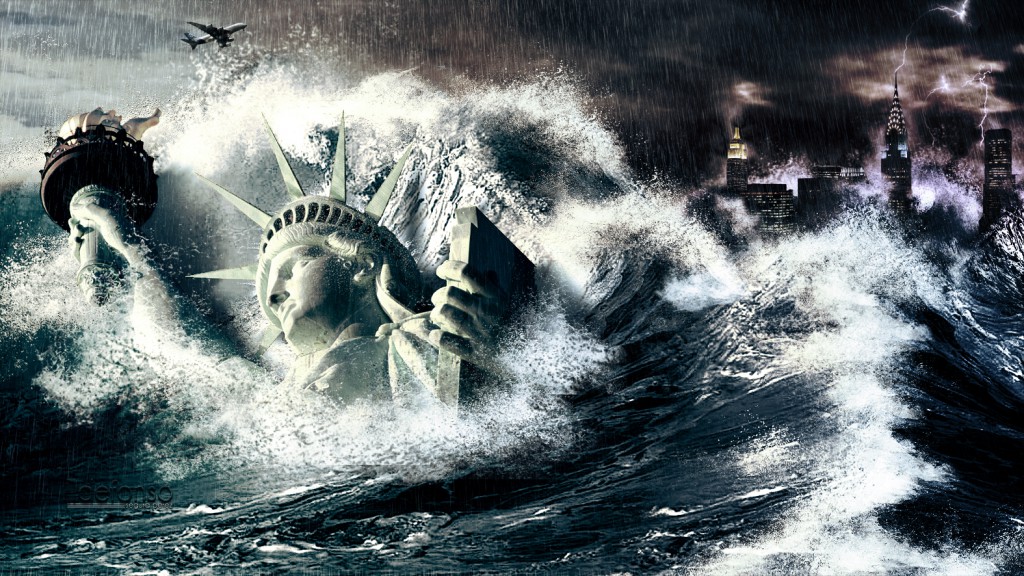
Fotomontaje realizado en el verano del 2010 que intenta representar un Tsunami que arrasa la emblematica Estatua de la Libertad. Se utilizaron 5 stocks y multitud de técnicas y herramientas de Photoshop. Este fotomontaje se explica tanto en video tutorial como en tutorial escrito. El link está debajo del segundo video tutorial
VIDEOTUTORIAL 1ª PARTE
VIDEOTUTORIAL 2ª PARTE
TUTORIAL ESCRITO
Tutorial Liberty Statue Tsunami
No dejes de compartir este post.
Así es como me puedes ayudar 🙂 Gracias
La entrada Tutorial Photoshop // Wallpaper Tsunami en New York apareció primero en Ildefonso Segura.]]>
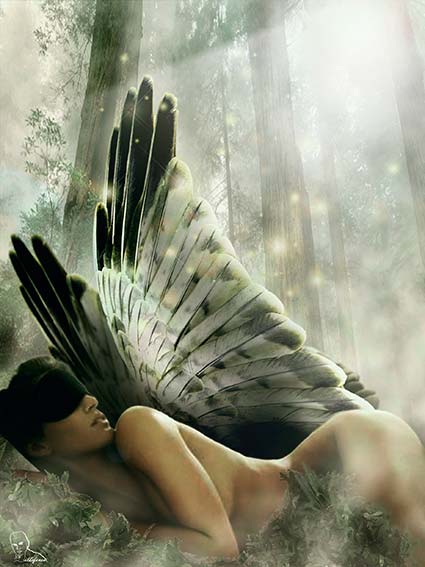 Con estafotocomposición creada en febrero de 2011 he querido realizar una reflexión sobre cupido.
Tradicionalmente se ha considerado como un hombre pero en mi opinión podría ser una mujer porque reúne todas las características necesarias para realizar su fución. He querido manifestar mi opinión sobre la igualdad que las mujeres deben tener en todos los ámbitos.
Con estafotocomposición creada en febrero de 2011 he querido realizar una reflexión sobre cupido.
Tradicionalmente se ha considerado como un hombre pero en mi opinión podría ser una mujer porque reúne todas las características necesarias para realizar su fución. He querido manifestar mi opinión sobre la igualdad que las mujeres deben tener en todos los ámbitos.
VIDEOTUTORIAL
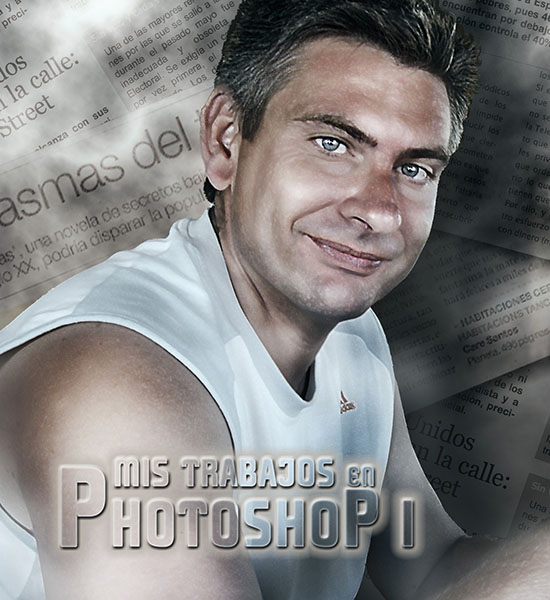
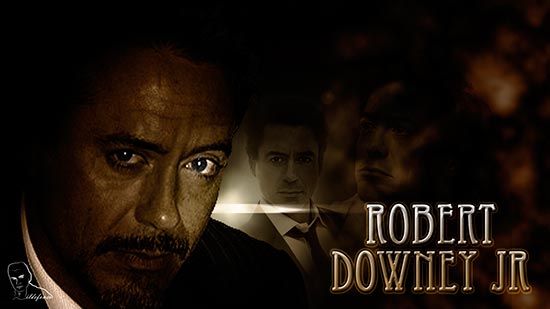
Ya expliqué hace meses una técnica de iluminación utilizando un cartel de cine (Cartel de cine de Batman). Ahora, analizando varios tutoriales en la red y aplicando mis propias opciones de fusión, he conseguido realizar un efecto de iluminaciones y sombras fantástico. Aquí tienes pasos escritos y el video los completa.
El efecto que he planteado es resultado del compendio de técnicas sobre iluminación y sombras sobre las que muchos tutoriales han versado. Ahora intento aplicar mi estilo consiguiendo un resultado que se puede aplicar sobre todo al área del diseño de cartelería y sobre todo para carteles de películas.
VIDEOTUTORIAL

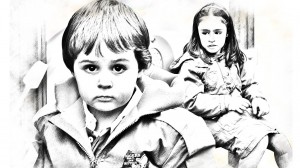
Con este tutorial de Photoshop podrás aprender técnicas para convertir una fotografía en un dibujo. En la miniatura ves un ejemplo del resultado muy profesional. Sólo emplearás unos minutos para conseguir este efecto. Anímate y prueba con este sencillo tutorial. Disfrútalo.
VIDEOTUTORIAL
VIDEOTUTORIAL HABLADO